Use GNU Emacs
The Plain Text Computing Environment
This work by Keith Waclena is copyright 2026 and is licensed under a Creative Commons Attribution-NonCommercial-NoDerivs 3.0 (CC BY-NC-ND 3.0) license.
Using Emacs is kind of like making a piece of art. You start with a big block and you slowly chip away, bringing it closer and closer to what you want. — Mary Rose Cook
[Emacs is] a Lisp Machine with several compatible user interface modalities. Which is just amazingly helpful to [blind] people like me […] who are typically forgotten about these days. […] Emacs is a shining beacon in a dark age of canvases and decorative user interface design. — Mario Lang
It wouldn’t make sense to start out with anything other than Emacs. I don’t think there has been a piece of software which has had a larger impact on my life. I began using this about fifteen years ago, and it has followed me across operating systems, jobs, roles (I used it to manage my teams), languages, and needs. Every time I start something new, Emacs has been there to make it just a little easier, and the more I do in it, the easier everything gets. I believe this power comes from Emacs being the closest thing we have to a working Lisp Machine. — Katherine Cox-Buday
Emacs outshines all other editing software in approximately the same way that the noonday sun does the stars. It is not just bigger and brighter; it simply makes everything else vanish. — Neal Stephenson
Emacs is the King of Editors because it’s a Lisp interpreter. Each and every key you tap runs some Emacs Lisp code snippet, and since Emacs Lisp is an interpreted language, that means that you can configure any key to run any arbitrary code. You just, like, do it. — Lars Magne Ingebrigtsen
I’m using Linux. A library that Emacs uses to communicate with Intel hardware. — Erwin, #emacs, Freenode
OSs and GUIs come and go, only Emacs has lasting power. — Per Abrahamsen
I am large, I contain multitudes. — Walt Whitman
Table of Contents
- Copying
- FRONT MATTER
- FUNDAMENTALS
- Introduction
- Emacs as Operating System
- Quickstart
- The Fundamental Emacs Concepts
- The Keyboard and Key Bindings
- Files, Buffers and Windows in Brief
- Selecting Text: the Point, the Mark, and the Region
- Cutting, Copying, and Pasting
- Editing with Textual Objects
- Other Ways to Move Around
- Variables and Symbols
- Help, Discovery, and Documentation
- Info: The Emacs Documentation Reader
- Messages, Errors, and Lossage
- The Minibuffer
- Completion
- What is Text?
- Buffers
- Modes, Major and Minor
- Application Buffers
- Windows
- The Mode Line in Detail
- Frames
- Files
- Visiting Files
- Find File at Point
- Persisting Files Across Sessions
- Large Files
- Saving Files
- Read-Only Buffers, or, Emacs is More
- Reverting Buffers
- Auto-Reverting (Watching Files)
- Backup Files
- Auto-Save Files
- Lock Files
- Files Modified Behind Emacs’s Back
- Compressed Files
- Encrypted Files
- Archive Files
- Document Files (PDFs and the Like)
- Image Files
- Binary Data Files
- UNFINISHED Quoting File Names
- UNFINISHED Filesets
- References
- Directory Editing with Dired
- Basic File Operations
- Subdirectories
- Compressing and Archiving Files
- Deleting Files by Flagging
- Marking Files
- The Mark Keymap
- Mass Name Changes by Regular Expression
- What Went Wrong?
- Writable Dired
- Two-Panel Dired
- Searching and Replacing
- Diffing and Comparing
- Reverting and Sorting the Dired Buffer
- Omitting Uninteresting Files
- Running External Commands
- Image-Dired
- Tagging and Commenting Images
- Remote Directories
- More Dired Entry Points
- Third-Party Directory Tools
- References
- Searching …
- Incremental Search
- Failing Searches and Making Corrections
- Editing Your Search
- Aborting Your Search
- Quick Search Exit
- Scrolling
- The Region is Set for Free
- Changing Directions
- Restarting Your Last Search
- Searching for Funny Characters
- Case Sensitivity and Whitespace
- Varieties of Isearch
- Nonincremental Search
- Yanking Into the Search
- Transitioning to Other Search Types
- Help
- Occurrences
- Multi-Buffer Searching
- Incremental Search
- … and Replacing
- Meet the Greps
- Regular Expressions
- Unlimited Undo with Redo
- Approaching Programming: Keyboard Macros
- The Customize Facility
- The Package Manager
- Updates and Bugs
- Exiting Emacs
- Starting Emacs!
- ADDITIONAL TOPICS
- Completion at Point
- Registers
- Rectangles
- Bookmarks
- Abbreviations
- Recursive Edit
- Visual Display and Color
- Manipulating Plain Text
- Folding Text
- UNFINISHED Templates
- International Character Set Support
- Remote File Editing with Tramp
- Client / Server
- Ubiquitous Capture & Note Taking
- Org Mode
- Printing
- UNFINISHED Modal Editing
- Third-Party Packages
- Security Concerns
- Authentication
- Programming the Lisp Machine
- The Emacs Community
- NEVER LEAVE EMACS: APPLICATIONS
- External Commands, Shells and Terminals
- Running One Command
- Which shell is being used?
- Where’s the output?
- What happens to the output Buffer if I do
M-!twice? - What do you mean, synchronously?
- Isn’t there an easier way to insert command output?
- What about standard input?
- Can I run any program this way?
- What if I don’t want to wait?
- Managing Asynchronous Processes
- Run Commands from Dired
- Interactive Shells
- Terminal Emulation
- Remote Shells
- Eshell
- Running One Command
- Browsing the Web
- The Calendar, Diary, and Clocks
- Version Control
- Supported Version Control Systems
- VC “Modes”
- VC File Mode in One Command
- More VC File Mode Commands
- Initializing a Repository
- Diffing and Comparing
- Examining the Logs
- Viewing Older Revisions
- Discarding Changes
- Other File Operations
- Tagging
- Branching and Merging
- Working With Remote Repositories
- VC Project Mode
- VC Grepping
- Diffing and Merging
- Playing Music
- Mail and News
- Web and News Feeds (Syndication)
- UNFINISHED Slideshow Presentations
- UNFINISHED Address Book: The Insidious Big Brother Database (BBDB)
- UNFINISHED Drawing Pictures
- UNFINISHED DNS Lookups
- UNFINISHED EUDC: Emacs Unified Directory Client (LDAP)
- UNFINISHED FTP (File Transfer Protocol)
- UNFINISHED Accessing SQL Databases
- Editing Processes with
proced - UNFINISHED Unix Manual Pages
- UNFINISHED Calc
- Passwords and Password Managers
- EasyPG Assistant
- UNFINISHED Emacs Speaks Statistics: Data Analysis
- UNFINISHED Maps
- UNFINISHED Chat
- UNFINISHED Emacs as Window Manager
- Games and Amusements
- External Commands, Shells and Terminals
- EMACS FOR…
- UNFINISHED Emacs for Writers
- Text Mode
- Outline Mode
- Wrapping Lines and Filling Paragraphs
- Spell Check
- Dictionaries and Thesauri
- UNFINISHED Presentation Slide Shows
- UNFINISHED Generating Web Pages and Web Sites
- UNFINISHED Typesetting and Publishing
- UNFINISHED Footnote Minor Mode
- UNFINISHED Managing Bibliographic Citations
- UNFINISHED Typing Tutors
- UNFINISHED Emacs for Programmers
- UNFINISHED Emacs for Emacs Lisp Programmers
- UNFINISHED Emacs for Writers
- THE BACK OF THE BOOK
- Appendices
- Varieties of Emacs: A History
- Historical Firsts & Innovations
- Emacs vs. The Unix Philosophy
- UNFINISHED Compilation Mode and its Many Descendants
- The Great Sentence-Ending Controversy
- Install Emacs on ChromeOS
- UNFINISHED Install Emacs in the Windows System for Linux (WSL)
- The Famous Canards
- The Troublesome Meta Key
- The
ESCPrefix - The Least to Know About Public Key Cryptography
- UNFINISHED Emacs on Your Phone
- An Initial Init File
- Bibliography
- Colophon
- Photo and Illustration Credits
- Acknowledgments
- About the Author
- Appendices
List of Tables
- Table 1: Some More Prefix Keys
- Table 2: Examples of variables
- Table 3: Elisp Data Type Syntax
- Table 4: The Main Vertico Commands
- Table 5: ASCII Control Characters, Excepting Delete
- Table 6:
buffer-menu-modeCommands - Table 7:
special-modeKey Bindings - Table 8: The
C-x 4Family of Other-Window Commands - Table 9: The
C-x tFamily of Tab Bar Commands - Table 10: Window Resizing Commands
- Table 11: The
C-x wWindows Keymap - Table 12: Frame Manipulation Commands
- Table 13: Resolving Modified Buffer vs File Conflicts
- Table 14: Prerequisite Software for Document Viewing
- Table 15:
doc-view-modeScrolling and Paging Commands - Table 16:
image-modeScaling Commands - Table 17:
image-modeScrolling Commands - Table 18: Basic
diredFile Operations - Table 19: The Dired Mark Keymap
- Table 20: Dired by Regular Expression
- Table 21:
dired-modeImage Tagging and Commenting Commands - Table 22: Isearch Yank Commands
- Table 23: Multi-Isearch Entry Points
- Table 24: Query Replace Actions
- Table 25: Case-smart
M-%examples - Table 26:
query-replace-regexpExamples - Table 27:
grep-modeBindings - Table 28: Regular Expression Syntax Classes
- Table 29: Keyboard Macro Commands
- Table 30: Customization Commands
- Table 31: Package Menu Maintenance Commands
- Table 32:
C-x C-cModified File Prompt - Table 33: Occasional Command-Line Options
- Table 34: Command-Line Options for Scripting
- Table 35: Register Commands and Types
- Table 36: Explicit Rectangle Commands
- Table 37: Old- and New-School Rectangle Commands
- Table 38: Bookmark Commands
- Table 39: Bookmark Menu Commands
- Table 40: Hi-Lock Mode Commands
- Table 41:
M-x delete-duplicate-lines - Table 42: Emoji Commands
- Table 43: Typing déçût with
latin-1-postfix - Table 44:
latin-1-postixInput Method Summary - Table 45: Tramp Filename Syntax
- Table 46:
emacsclientOptions - Table 47: Plain Printing Commands
- Table 48: PostScript Printing Commands
- Table 49: PostScript Spooling Commands
- Table 50: Htmlize Commands
- Table 51: Shell Commands
- Table 52: EWW Key Bindings
- Table 53: Browse URL Browsers
- Table 54: Calendar Motion Commands
- Table 55: Specific Calendar Dates and Scrolling
- Table 56: Calendar Holiday Commands
- Table 57: Calendar Astronomical Commands
- Table 58: To and From Other Calendar Systems
- Table 59: Calendar Diary Commands
- Table 60: Supported Version Control Systems
- Table 61: VC File Mode Commands
- Table 62: VC Dir Commands
- Table 63: Ediff Entry Points
- Table 64: Ediff Merge Entry Points
- Table 65: Ediff Session Group Commands
- Table 66: Ediff Directories Entry Points
- Table 67:
*Proced*Buffer - Table 68:
procedCommands - Table 69:
*Proced*Buffer Filter Schemes - Table 70: Commands in the EPA
*Keys*Buffer - Table 71: Encryption Commands in Dired
- Table 72: Flyspell Commands
- Table 73: Ispell Misspelling Correction Options
- Table 74:
*Dictionary*Buffer Bindings - Table 75: Available English Dictionaries
- Table 76: Photo and Illustration Credits
- Table 77: Licenses
Preface
This document was originally written around 1997 for GNU Emacs version 19.29 and published under the title A Tutorial Introduction to GNU Emacs. It has subsequently been updated for version 30.2, thoroughly revised, and expanded ridiculously. The book’s version is 30.2.29 as of 12 July 2026 and is an unfinished work-in-progress.
In addition to this HTML version, the book is also available in PDF, EPUB, and Kobo EPUB formats.There is an RSS feed to help you keep track of any updates to the many unfinished chapters.
Keith Waclena <waclena at fastmail.com>
Chicago
How to Use This Book
A book that tries to cover most of the enormous computing system that is GNU Emacs seems to inevitably end up about as big as Emacs itself. While I’ve tried to arrange the book to be readable straight through from beginning to end, I doubt many will be inclined to do so. So I’ve also tried to make it possible to skip directly to any topic of interest by heavily hyperlinking back to any prerequisite topics1. For example, if you skip to the chapter on running your shell in Emacs, you’ll find the necessary links to fundamental topics you’ve skipped over (say, renaming Buffers, directory editing, or Incremental Search).
GNU Emacs has been around for 41 years (as of 12 July 2026), and because it debuted many concepts now taken for granted, it also has its own way of doing them, and even its own language for talking about them. So I would for sure read The Fundamental Emacs Concepts; Files, Buffers and Windows in Brief; Selecting Text; and Cutting, Copying, and Pasting; and at least glance at The Keyboard and Key Bindings.
The single most important thing is, while you’re reading, have Emacs up and running so you can try things out as you read about them. And be sure to try the built-in interactive learn-by-doing Emacs tutorial; right now is not too soon to start it.
The Book Has an Init File
My recommendation is to learn the basics of Emacs with as few customizations as possible. However, I do provide a minimal recommended initial Init File (configuration file) that you can download and install to improve your experience. It wouldn’t hurt to put this off for the first few chapters, but if you feel like bailing on Emacs before then, see if adding the book’s Init File changes your mind.
Terminology and Notation
A number of Emacs technical terms are also common words. To minimize confusion, when I use the technical terms, I capitalize them. So if I say, “Killing the Frame or Window in no way kills the associated Buffer”, I’m talking about three Emacs data structures. But if I say, “In this frame of reference, a window of opportunity exists to buffer your data”, well, I don’t know what I’d be talking about, but it has nothing to do with the Emacs data structures.
Note that in the many tables where I summarize the Emacs keystrokes for a set of commands, I don’t follow this rule; instead, I try to capitalize words that might suggest a helpful mnemonic, as in this excerpt:
| Keys | Action |
|---|---|
s h |
Show full Height in window |
s w |
Show full Width in window |
s b |
Show Both full height and width in window |
One of the most basic facts about Emacs is that every key you type potentially
executes some Command. When I introduce a new keystroke I use this format:
C-e (move-end-of-line), which means that the keystroke C-e
invokes the Command named move-end-of-line. See The
Keyboard and Key Bindings for complete details.
I frequently mention various Unix commands and programs (often because Emacs
provides an interface to them). I use the Unix Manual’s traditional notation
for these in a fixed-pitch font, appending a parenthesized section number to the
command name. Examples are ls(1), grep(1), sudo(8), etc.
The Scope of the Book
This book describes GNU Emacs version 30.2, which is the latest official release as of 12 July 2026; many operating systems or their package managers will come with an older (possibly much older) version by default. While Emacs has excellent backward compatibility, meaning everything you learn about it will probably still work for literally decades, it also introduces new features and new ways of doing old things all the time. If you’re running an older Emacs than I am, you may occasionally find that a command or key binding that I mention doesn’t exist, or acts somewhat differently; but mostly, everything will work.
There also have been and still are other versions of “Emacs” besides GNU Emacs, which can lead to differences as well. The most notable these days is probably Aquamacs, a version specially for Mac OS X, which besides its Mac-specific changes is (at this writing) based on GNU Emacs version 25.3 from 2017—that’s four major revisions behind. You might ultimately prefer Aquamacs or another Emacs, but this book will be most useful to you if you start out with GNU Emacs; see Installing Emacs.
Additionally, some of my discussion will have a Unix focus, since that’s what I use every day. Emacs works beautifully on mostly-Unix operating systems (like Mac OS X and ChromeOS) and on completely non-Unix OS’s, like Microsoft Windows, but some of my examples will assume you’re running a true Unix, like GNU/Linux or one of the BSDs. But really, Emacs makes all operating systems virtually indistinguishable.
My emphasis in the book is on built-in features that ship with Emacs. I occasionally mention or recommend various third-party Packages (add-ons written and provided by people like you!) but I don’t go into much detail and there’s no way I can keep up with the huge third-party ecosystem.
In fact, some of the most important built-in Emacs subsystems are so big that I can only give at best a glancing overview: most notable are the calculator; Gnus (for email); Org Mode (for… well… practically everything); and Emacs Lisp programming. The good news is that each of these has its own built-in book-length document (Emacs Lisp has two!).
The Fine Manual
Don’t fear or neglect the extensive built-in Emacs Manual; you can start out reading it on the web but as you become familiar with Emacs I think you’ll prefer reading it natively.
The more time I spent writing this book, the more I had to double-check things that I felt certain I fully understood decades ago: things that, after all, I use every day! The result was two-fold:
- I discovered that there’s a ton of new stuff I had no idea about—being an Emacs user means a lifetime of learning ahead of you (and what’s better than that?).
- I also discovered that the manual is really one of the best software user manuals ever written.
So, RTFM: Read The Fine Manual.
Audience
I’m afraid this book is of two (or more) minds about its intended audience. When I wrote the first version in 1997, the audience was librarians who were using Unix systems for the first time. When I decided to expand the book during the pandemic, I didn’t want to change the audience to solely tech-savvy programmers, but I did want to include a lot of advanced stuff for tech types. The result is that those programmers will find lots of basics to skim over, and the non-programmers will find a certain amount of tech nerd stuff to skip.2
There are many fun and inspiring blog posts and videos by non-programming Emacs users—writers of fiction, managers, people who found a new way to organize their note-taking—and my fantasy is to find (or create!) some more, while perhaps convincing the programmers that Emacs is much more than just another IDE.
Glossary
Emacs has it’s own extensive jargon of technical terms; here are some of the ones that might otherwise be puzzling.
I’ve also made up a few coinages of my own for the purposes of this book (labeled “KW” so you don’t embarrass yourself by using them).
- alias
- an additional, equivalent name of a function or Command
- binding
- the pairing of an event with a Command
- Buffer
- the places where text is entered, edited, or displayed
- Button
- a clickable region of text in a Buffer that invokes a Command
- click
- to activate a Button or a link in a menu or in a Buffer, with the mouse or by hitting Return when positioned there
- Command
- a function intended to be used interactively by the user, rather than used only by an Emacs Lisp programmer
- current line
- the line in a Buffer where Point (the cursor) is
- cut
- the modern term for what Emacs calls Kill
- delete
- to remove text from a Buffer with no way to get it back (compare Kill)
- directory
- a structure on disk that holds files and other (sub-) directories; what non-Unix users call a folder
- DWIM
- Do What I Mean: applied to commands that guess which of several actions are most appropriate
- EIPNIF
- Everything Is Possible, Nothing Is Forbidden (KW); you can change any aspect of Emacs’s behavior, even if it’s a really bad idea
- elisp
- Emacs Lisp, the dialect of the Lisp programming language that implements Emacs
- event
- an action that represents input to Emacs, mainly keystrokes, or mouse-clicks or -drags
- Face
- a font with associated styles, such as color and slant
- fontification
- to assign Faces to certain parts of the buffer based on their structure or syntactic role
- Frame
- an OS-managed Emacs window; modern term: window
- glob
- to expand wildcard characters, typically in a wildcarded filename, or
the special wildcard characters themselves (commonly
*and?) - grep
- to search (after the Unix searching utility
grep(1)) - init file
- your Emacs initialization file: what non-Emacs users call a config file
- key binding
- the binding of a keystroke to a Command
- Kill
- to remove text from a Buffer, saving it on the Kill Ring where it can be easily retrieved later; modern equivalent: cut
- machine
- any computer, whether your laptop, desktop, or a remote server; so called by greybeards
- open
- to Visit a file for editing
- operating system
- the software that runs all the other software on your computer (including your phones and tablets) and interfaces with your hardware, probably one of Android, Linux, Mac OS X, or Microsoft Windows (Emacs runs on all of these)
- OS
- operating system
- paste
- the modern term for what Emacs calls Yank
- Point
- the location in a Buffer where text would be inserted when you type
- regexp
- a regular expression
- Region
- contiguous text you’re about to Kill, copy, or operate upon; modern term: selection
- regular expression
- a powerful kind of wildcard, pervasively used in Unix and in Emacs for searching
RET- means to hit the Return or Enter key
- selection
- the modern term for what Emacs calls the Region
- session
- the period of time from when you start Emacs to when you exit it; may literally span months
- subsystem
- a collection of Commands and Modes that together facilitate a coherent activity (KW)
- Unix
- the operating system on which GNU Emacs was developed; comes in many flavors, of which Linux is perhaps the best known
- Visit
- to load a file into Emacs for editing; modern term: open
- Window
- a division of a Frame; modern term: pane
- Yank
- to insert previously Killed or copied text; modern term: paste
The Emacs manual also has a glossary, and the Emacs Wiki has both a glossary page and a jargon page.
FUNDAMENTALS
Introduction

Figure 1: Emacs Splash Screen
What GNU Emacs Is
GNU Emacs is a free, portable, extensible, internationalized, self-documenting text editor. That it is free means specifically that the source code is freely copyable and redistributable, so Emacs can never be discontinued and disappear. That it is portable means that it runs on many computers under many different operating systems, so that you can probably count on being able to use the same program no matter what computer you’re using. That it is extensible means that you can not only customize all aspects of its usage (from keystrokes through fonts, colors, mousage and menus), but that you, and the community, can modify and program Emacs, even while Emacs is running, to do entirely new things that its designers never thought of. That it is internationalized means that it has full Unicode3 support, including bidirectional text and many input methods for non-Latin scripts. That it is self-documenting means that every keystroke, menu item, and function can thoroughly explain itself and its usage, and that Emacs contains 427,921 lines of hypertext reference manuals and tutorial documentation about itself and its subsystems.
Because of all this, GNU Emacs is an extremely successful program (having been in continuous development for 41 years4), and does more for you than any other editor. It’s particularly good for programmers. No matter what programming language you use, Emacs probably provides a mode that makes it especially easy to edit code in that language, providing syntax highlighting, context sensitive indentation, and layout. It also allows you to compile your programs inside Emacs, with links from error messages to source code; debug your programs inside Emacs, with links to the source; interact directly with the language interpreter (REPL); jump across multiple files to the definition of a symbol in your source code; and interact with your version control system5.
Emacs also provides many built-in applications such as:
- mail readers (at least half a dozen)
- web browsers (at least two)
- a powerful file manager like Windows Explorer (File Explorer) or Apple’s macOS Finder
- interactive shells, logins (ssh, ftp, sudo), and terminal emulators
- a powerful and easy to use macro system to automate your tasks
- diffing and merging of files
- calendars, project planning, TODO lists, scheduling, and agendas
- a powerful infinite precision programmable calculator with symbolic algebra and data graphics
- image, PDF, DVI, ebook (EPUB), OpenDocument, Microsoft Office, and PostScript viewers, and inline images in plain text
- typesetting and publication of text or source code to HTML, PDF, and presentation slideshows (this document is an example)
- literate programming
- interactive notebooks: that is, documents that contain live code, data, equations, visualizations, and text
- client / server mode (connect to a running local Emacs from any terminal, or to a remote Emacs running on a different computer)
- multilingual spell checking, dictionaries, and thesauri (available in all of the above applications and subsystems, too)
- transparent editing of encrypted and compressed files, and of files inside containers (like tar and zip archives)
- remote file editing (any file or directory you want to edit can be transparently accessed via ssh, ftp and the like)
- spreadsheets (three)
- music players (at least half a dozen)
- chat / messaging systems (like IRC, Jabber, Slack)
- a window manager for X windows
- native Emacs games and interfaces to external games
- a Rogerian therapist (in case this is all a little overwhelming)
In addition, Emacs’s extensibility has resulted in a vibrant ecosystem; users share packages that provide new functionality, and it’s easy to browse several thousand of these via the built-in package manager, and install the ones of interest. Many more Emacs packages are available on GitHub and in the Emacs Wiki.

Figure 2: Emacs as Operating System
The image above shows Emacs “in use”. It’s a little unrealistic in that I, at least, never want that many windows open simultaneously, but it’s a real screen shot. Going across the columns from left to right, we have email (a folder and a message) and an agenda from my project planner; OCaml source code with a compilation error message and a type-throwback window; a Google search in one of Emacs’s web browsers above a PDF; and finally, a directory in the file manager, a shell, and a paused game of Tetris.
At the very bottom of the screen, I’m in the middle of typing an Emacs command
by its name (M-x list), and have hit TAB to get completion — the completions
window has temporarily popped up and spans the width of the screen.
In the grey mode line along the bottom of the completions window (and replicated, albeit truncated, in slightly different form at the bottom of every other window) you can see that I have incoming email that I haven’t yet seen (red envelope icon) and an unseen chat message from someone named “Tex”.
What GNU Emacs Is Not
First and foremost, Emacs is not a WYSIWYG word processor. This is because Emacs leverages plain text to get maximum flexibility and avoid lock-in to opaque file formats. But Emacs is also used to edit and typeset documents by people who use document preparation systems and markup languages like LaTeX, Markdown, and Emacs’s own Org markup language6.
Actually, this is about the only thing I can think of that GNU Emacs is not.
Emacs as Operating System
Emacs is one of those rare pieces of software that can change your computing life. It’s not really a text editor, nor an IDE. It’s really the last remaining Lisp Machine, a synergistic system that you live in, which replaces most of the dozens of single-purpose applications you’d otherwise be using, some of which lock you into black-box file formats or corporate licensing.
The more things you do in Emacs, the more those things multiplicatively enhance each other.
Imagine you use Emacs (as I do) for your document creation, web site publishing, interactive development environment (IDE), email, TODO lists, file manager, web browser (sometimes), shells and terminals, calendar and agenda, and chat system. As a result, in all of these:
- you use the same exact completion system (with history), whether entering command names, file names, email addresses, or web urls
- you search with the exact same regular expression syntax and the same keystrokes
- you can copy any text from anyplace7
- you can search across all or a subset of the windows running these applications (“which window did I see that error message in?”; “which browser tab is that text in?”)
- you can dynamically highlight lines and words in various colors to make them stand out or distinguish between them
- you automate tasks within and across all these systems with the same macro facility
- you have the same spellcheck interface and dictionaries
- after a restart (we all have to reboot occasionally), you can have most of these windows and files come back with everything (down to your cursor location) exactly where you left it
- you configure and customize all these applications in the same configuration language (and in a single file, unless you choose to split it up), and the language is a complete programming language
- you can modify, extend, fix bugs, and generally hack all of these applications, live, while they’re running
- you can program entirely new applications by combining functions and elements from any of the others
- Emacs is a user-interface machine: it’s full of consistent front-ends that
improve external applications, like
grep(1),ls(1), compilers and debuggers for programming languages, calendars, email, music, version-control systems likegit(1)…
Emacs insulates you from the operating system. If you full-screen your Emacs, you will barely be able to tell whether it’s Linux, BSD, Mac OS, Windows, or ChromeOS underneath. You can use the same configuration everywhere, and since the config language is Lisp, you have conditionals to make any OS- or computer-specific tweaks that might be necessary. You can even load your config over the network — from a web page if you like.
Quickstart
Installing Emacs
If you are running Unix, Emacs may already be installed. If not, it will certainly be easily installed via your package manager.
| Arch Linux | sudo pacman -S emacs-nativecomp |
| Debian | sudo apt-get install emacs |
| Fedora | sudo yum install emacs |
| Ubuntu | sudo apt-get install emacs |
When I last used Mac OS X, Emacs came preinstalled, but was very out of date. If you have the Homebrew package manager, you can install Emacs with this command:
brew install --cask emacs
I can also recommend David Caldwell’s Emacs For Mac OS X8; it’s always up-to-date, and, as Caldwell says, is “Pure Emacs! No Extras! No nonsense!”. Both Caldwell’s and the Homebrew Emacs support the new Apple Silicon hardware. I would discourage you from using Aquamacs, which attempts to make a more Mac-like Emacs but ends up rendering it painful to use (IMHO).
If you are running Microsoft Windows, I recommend the Free Software Foundation (FSF)’s
Windows build, available from the download page9; note that on Windows,
instead of running the emacs executable, you want to run the runemacs script
instead; a Windows user will probably be most comfortable dragging it to the task
bar. You can also install Emacs in the Windows Subsystem for Linux (WSL); just
follow the instructions above for whatever version of Linux you chose. See the
Appendix for how to install Emacs on a Chromebook; you can even install
Emacs on your Android phone or tablet.
For the cheapest possible complete Emacs computing environment, you can run Emacs on a $130 Raspberry Pi 400 that comes with a keyboard, mouse, and cable to connect to your TV.
And, since Emacs is free software, you can of course download and compile your own copy from source.
Starting Up and Running Emacs
Emacs can run in two different modes: a graphical version, which requires a
window system like X11 or Wayland (or the Mac or Windows native interface), and a
“text-only” terminal version, like old-school Unix programs such as vi or vim.
I say you should run the graphical version; in the terminal version (forced
via the -nw (“no windows”) option if a window system is running), you won’t be able to
display images or combine multiple fonts, and many useful key combinations will be
impossible to type, requiring clunkier alternatives10. Mouse-button and
-motion combinations will be severely limited.
Note that using the graphical version doesn’t imply working in a GUI style with
heavy mouse action; I never use the mouse, and configure my Emacs so that the
graphical version looks like Emacs in a terminal (right down to my beloved
fixed-pitch font). However, because I’m running the graphical version, I get
better font and character set support, can view images and PDFs, and make use of
all the exotic keys on my keyboard. If what you like about an editor such as vim
is the way its invocation is tightly bound to your shell and working directory,
or its fast startup speed, running the graphical Emacs in client / server mode
achieves exactly the same thing.
Unless you go out of your way to change this (e.g. with -nw), the graphical
version is what you’ll get if you invoke Emacs from an X11, Mac, or Windows
desktop launcher, or from a shell in a terminal under one of those desktops. This
book everywhere assumes you’re running the graphical version.
Entering Emacs
To enter Emacs, you just say:
emacs
on the command line, or invoke it from your desktop via a launcher, menu, or icon11. When it comes up, you won’t be editing any file. You can then use the file commands to load12 files for editing. Alternatively, you can fire up Emacs with an initial file (or files) by saying:
emacs foo.py
Note that for many Emacs users, starting Emacs is something that’s done very
rarely: I only do it when I’ve needed to reboot my computer. You don’t use
Emacs the way you use vim, starting it in a shell to edit one file, then exiting
to compile, then lather rinse repeat. Loading and unloading files, compiling,
debugging, file management, version control, and everything else is done inside
Emacs with special commands that provide very tight and seamless integration.
If you really prefer to work
in a many-sessions, multi-terminal style after trying the native Emacs approach,
the way to do it is via client / server mode: start up an Emacs server, and then
repeatedly run emacsclient in your terminals as you navigate around, just the
way you’d run vim.
Exiting Emacs
You can exit Emacs from the menu via File / Quit, or type the two keys Control+x
followed by Control+c (which we write as C-x C-c). If you’ve made any changes to a
file, you’ll be asked if you want to save them.
What Emacs Looks Like
The Screen
If you started up Emacs without loading a file, you’ll be looking at the splash screen 13; this is not something you’ll see in everyday use. Otherwise, you’ll be looking at your file.
The default Emacs screen looks pretty conventional, if old-fashioned: it has a
menu bar at the top, a toolbar beneath that, and a scrollbar on the left (you
can ultimately disable any of these; I have, and my Emacs has the clean retro
look of vi); the rest of the screen is completely devoted to the text of your
file, except for the bottom line of the screen — the echo area — and the
line above that — the mode line.
The Mode Line
The Mode Line displays some essential information, in particular the name of the file you’re editing and whether or not you’ve modified it, what line you’re on, and what Mode you’re in. It’s completely customizable and can show lots of other information too, such as the time, load average, mail availability (biff), and version control status. See The Mode Line in Detail below.
The Echo Area
The blank line below the mode line is the Echo Area. The Echo Area is used by Emacs to display short messages, and also for input when Emacs is prompting you to type something (it may want you to type yes or no in answer to a question, the name of a file to be edited, the long name of a command, etc). Unless you are actively using the mouse, Emacs will typically not use a modal dialog box for this sort of thing.
Using Emacs Like It’s Notepad?
Emacs has a reputation of being difficult to use, but in fact anybody can
readily use Emacs out of the box with no instruction14 by using the menu
bar and toolbar. Simply choose File / Open File from the menu; for common
programming languages, you’ll see syntax highlighting automatically. Navigate
conventionally with the scrollbar, mouse, and the Page Up, Page Down, and arrow
keys. To insert text, just start typing (Emacs isn’t modal like vim (not by
default, anyway15)); delete text with Delete or Backspace. Finally, choose
File / Save and then File / Quit from the menu.
This ought to sound extremely familiar.
And pretty boring. You may not be impressed, but you’ll be able to get a lot of work done right away.
But if you want to use Emacs efficiently and give it a chance to change your computing life, you need to learn to control it the way it was originally designed: via the keyboard.
The enormous Emacs keyboard command set is indeed daunting. Fortunately, you can learn the keystrokes incrementally, using the menus for things you don’t yet know how to do. Eventually, you may stop using the menus entirely; I turned off the menu bar, tool bar and even the scroll bars years ago to save screen real estate and haven’t missed them.
Configuring Emacs
Don’t. Yet. Emacs is all about customizing and making it act the way you want, but in my opinion, you should learn the basics in a stock, mostly uncustomized Emacs, so that if you have questions or problems and look up an answer, that answer will apply to you.
In recent years, there’s been something of a cottage industry in Emacs “starter kits” (such as Prelude, Doom Emacs, Emacs Starter Kit, Spacemacs, etc16): distributions that give you a heavily pre-customized, sexy-looking Emacs to fix what are perceived to be “old-fashioned defaults” and load and start up everything you could conceivably want. I would avoid these at first for the same reason17. In fact, some of these starter kits change so much about the experience that large parts of this book will appear to be completely inapplicable to you, so bear that in mind.
I hope browsing this book will convince you that there’s great stuff to come, and that therefore you’ll be able to resist immediately adding a million bits of other people’s configuration tweaks and third-party packages for just a little while, until you get up to speed with the basics.
However, there are a few places where I do recommend some customizations that I think make a significant improvement to the Emacs experience, even while you’re learning. These will pop up from time to time, and are all collected together in an appendix.
Like the average Emacs veteran, my own Emacs is so heavily customized from decades of use that I can barely function in a stock Emacs! I’m all in favor of customizing18, but don’t jump in too early.

Init File LOC of Some Experienced Users
In a recent thread on the help-gnu-emacs mailing list19, the question came up as to what was the size, in lines of code (LOC), of the typical long-time Emacs user’s Init File. There were about a dozen answers. The figure shows the result of this impromptu and unscientific poll20; there’s quite a range from the smallest (this book’s Init File) to the largest; the median size is 2,500 lines.
The Built-In Emacs Tutorial
If you want to dive in immediately and start using Emacs as it ought to be used, now is a good time to run the built-in learn-by-doing Emacs tutorial. This is a simply a special text file that explains some basic Emacs commands and has you try them out, explaining how to get back to where you were and continue. It’s very effective and you don’t have to finish it all at once — it’ll remember where you left off for next time.
If you fire up Emacs without a filename and are looking at the splash screen, you’ll notice that your cursor is sitting right on a “clickable” button labeled “Emacs Tutorial” — just hit return or click the label with the mouse and the tutorial will start up.
If you aren’t looking at the splash screen, you can start (or continue) the
tutorial at any time by typing C-h t (that’s Control+h followed
by the letter t). If you type instead C-u C-h t Emacs will ask what national
language to use for the tutorial; it’s available in
25 languages including
Bulgarian, Chinese, Czech, Dutch, English, Esperanto, French, German, Greek, Hebrew, Italian, Japanese, Korean, Persian, Polish, Portuguese, Romanian, Russian, Slovak, Slovenian, Spanish, Swedish, Thai, and Ukrainian. The default is to use the language of your
computing environment, if available.
The Fundamental Emacs Concepts
To really make Emacs work for you requires an appreciation of its fundamental concepts and how they work together to form a synergistic system.
Functions
Everything you do in Emacs involves the invocation of functions21 and these functions take arguments and have help and documentation.
The Keyboard and Key Bindings
Most of the time you invoke these functions with simple keystrokes — even just typing a single letter into a file invokes a specific function, as do all the editing operations (like deleting a word), and all things like opening files or setting a reminder or sending an email. Most of these functions are associated with keystrokes in a malleable, context-sensitive hierarchical organization with an (at least aspirational) mnemonic scheme.
Variables
Emacs also contains variables exactly like those of any programming language, which store a huge variety of data. Most of them are used only by programmers, but a subset of them are Customizable Variables (a.k.a. User Options), which you’ll use to configure Emacs to your liking. These variables aren’t something that you just set up once in a configuration file: you’ll soon be comfortable setting and inspecting them on the fly as you’re using Emacs.
Discovery, Help and Completion
No one wants to memorize all the thousands of Emacs key bindings22, including those they might use only weekly or monthly. Less frequently used functions are invoked by name with a powerful and extensible completion system, unknown functions are discovered with the Apropos facility, the Help system tells you how to use them, and the Info hypertext documentation system provides even more complete discursive documentation (and there’s a clickable link from the help for any function to its source code, if you really want to know what’s going on).
Buffers
The text of any file you’re editing is stored in a Buffer. But so is almost everything else: documentation, error messages, and the user interfaces (UIs) to the many Emacs subsystems (file managers, email, REPLs, etc). This means that to a great extent you can manipulate a UI using the same commands you use to manipulate the text you’re editing, which is very powerful and means you have less to learn. You can have an arbitrary number of Buffers in your Emacs at any time.
Plain Text
The power of the Buffer is due to the fact that Emacs prioritizes plain text. Almost everything you see in Emacs is plain text. This doesn’t mean everything looks plain; the typical Emacs Buffer is colorized, uses a variety of fonts and possibly character sets, and may include “clickable”23 buttons, read-only sections, dynamically updating data, icons and full-size images, and more: but the Buffer still consists of plain text and the enhancements are applied on top of it.
Windows
Windows are the viewports into your Buffers. You can have an arbitrary number of open windows at any time, divided up horizontally and vertically, and Emacs acts like a tiling window manager to manage them for you.
Search
Emacs has a very wide variety of search commands which do more than simply find the next occurrence of “foo” in your file. You can search within a Buffer, across multiple Buffers, across files that aren’t loaded into Emacs yet, and across the web. You can search back in time by searching version control history. You can search more than just files: since Emacs subsystems (like calendars, shells, and email) run in Buffers, you can search their user interfaces and outputs. You can search all the Emacs documentation, and you can search for things by their names as well as by what they contain. Searches can take you directly to a match or pop up a Buffer of all the matches (rather like a page of Google search results), from which you can jump to the actual locations. All these searches come in a flexible variety of modes (fixed text, lax spacing, case- and diacritic-folding, word search, regular expression, and more), and since you’re doing all this searching in Emacs rather than in a dozen distinct programs, they share the same options and syntax.
Undo and Redo
While common now, unlimited Undo with redo probably debuted in Emacs in the early 1980s. You can undo all changes (even back through file saves) and redo them (undo the undo) all the way forward again, in any combination (you can undo the redo of the undo of the undo). Undo is smart in that it groups togther tiny changes (e.g. consecutive single-character insertions) to make undoing less tedious, and commands that make big structured changes (like search-and-replace) arrange for undo to happen in sensible units. There’s an alternative Undo that works in a tree-structured manner. Most powerful is that you can mark off a specific subregion of the Buffer, and then undo only the changes made within that region (even if you’ve since made other changes elsewhere).
Major and Minor Modes
Every Buffer has a Major Mode that’s specialized for some particular sort of
text. The specializations typically affect the visual display of the text,
tweak general-purpose commands to better suit the text, and provide key bindings
for new commands written specifically to work with that kind of text. The
classic case is a Major Mode for editing the source code of a given programming
language — for example, the mode specializations of python-mode turn Emacs
into a Python IDE.
In addition to Major Modes, we also have Minor Modes. A Major Mode implements
sweeping specializations — you wouldn’t want to edit HTML in python-mode —
but Minor Modes are like mix-ins: each Minor Mode implements some sort of tweak
to behavior or appearance that’s usually suitable to add to any number of Major
Modes. While any Buffer has exactly one Major Mode, you might turn on a few
dozen Minor Modes as well. Minor Modes can implement additional varieties of
navigation, formatting, indentation, highlighting, templating, diagramming,
spellcheck, footnotes, tables, outlining, text folding, hypertext linking, and
much more.
My Emacs at the moment has 705 major and minor modes ready to be enabled.
Customization
One of the hallmarks of Emacs is that virtually every aspect of it can be customized. Not only can you customize fonts, colors, and keystrokes but you can customize them all differently in different parts of Emacs (one font set for Python, another for Haskell). Conversely, if you use Emacs for your email and someone mails you a snippet of Python, you see it, in the email, colorized according to your preferences. Emacs customization is sometimes thought of as unfathomable unless you’re a Lisp programmer, but for decades Emacs has had an interactive forms-based customization system (called Customize) that lets anybody easily tweak anything.
Programmabililty
But if you are willing to learn a little Lisp (or a lot), you can also customize Emacs in the programming language that it’s implemented in, Emacs Lisp (a.k.a. Elisp); having used Emacs since before the Customize system existed, I still do all my customizations this way.24 But with Elisp you can go well beyond mere customization: you can add completely new features to Emacs that never existed. This could range from three lines of code to add an idiosyncratic way of scrolling text (I’ve defined a keystroke to scroll by paragraphs) to building large software systems that would, in a non-Emacs universe, be standalone applications. The popular Magit front-end to the Git version control system comprises 30,000 lines of Elisp code. Gnus, one of several Emacs mail readers, comprises 117,485 lines! Emacs itself is about 79% Elisp (the rest being a C core that implements the Lisp interpreter).
Note that Emacs Lisp isn’t an ad hoc scripting language invented for use in just one editor. It’s a dialect of the famous programming language Lisp, which means it has a decades-old well-designed syntax and semantics. It’s a real programming language: in addition to the multiple books and articles written about Elisp, you can also learn from the hundreds of books and articles written about Lisp itself. And, what you learn about Elisp sets you on the way to becoming a real Lisp programmer.
But if you’re not interested in learning Lisp, you can still program your Emacs via the incredibly powerful macro system called Keyboard Macros. You simply start defining a macro, perform a sequence of editing actions (e.g., search for a keyword, capitalize it, delete the next two words, and add another word at the end of the line), then indicate you’re done. Now a keystroke runs the macro to repeat those actions. Once you’re convinced it’s working, you can tell Emacs to repeat the macro until it’s processed everything. Macros aren’t limited to operating on just one Buffer: you can use any Emacs commands in defining one, and so can switch Buffers mid-macro at will.
But Emacs goes well beyond the capabilities of most macro systems. Since invoking an external shell command is a basic capability of Emacs, you can do that in your macro and use the result. You can have many macros defined at once. You can edit your macro (rather than having to redefine it) if you discover it’s not quite right. You can save your macro with a name for use in future Emacs sessions. A macro can count (to do things like numbering). It can ask for confirmation of a step, or allow you to do a localized tweak at each invocation. All this without being a programmer.
Free Software
Finally, GNU Emacs is free software. This doesn’t mean that you don’t have to pay for Emacs (though you don’t). It means that the project is built upon what the Free Software Foundation (FSF) calls the “four freedoms” — the freedom to (0) run the program, (1) study and change the program in source code form, (2) redistribute exact copies, and (3) distribute modified versions. The FSF achieves this via the frankly amazing invention of the Copyleft license. Without it, Emacs probably wouldn’t exist as the long-lived, continuously improving project that it is. And it assures that Emacs can never be taken away from you by any corporate entity.
The Keyboard and Key Bindings
It makes sense for someone who spends most of their time manipulating text to learn a group of obscure key combinations. It saves time and increases productivity. Learning to use Emacs properly reminds me of playing Jazz on the piano. I’ve learnt all those chords and runs and fills so that I can use them without thinking when I’m improvising. Likewise, I’ve practised using Emacs key strokes such as
M-f, [M-c] andC-M-<Space>so often I use them without thinking when editing. I rely onM-/to complete words, and I can’t do withoutM-handC-eto select and move around text. — Tony Ballantyne (SF and Fantasy Writer)
For Emacs, every keystroke is actually a command (i.e., a function that does something), even simple keystrokes like the letter A: printing characters like this are commands to insert themselves into your text. Non-printing characters (like control characters) are editing commands, which might move the cursor, scroll some text, delete or copy text, rename a file, initiate sending an email, etc.
Every command has a long name, which you can look up in the documentation, like
kill-line, delete-backward-char, or
self-insert-command. Many commands are bound to keystrokes
for convenient editing. We call such a pairing of keystroke and command a key
binding, or binding for short.
The set of all bindings make up the Emacs command set. However, Emacs is an extensible, customizable editor. This means that:
- bindings can be different when editing different types of text, by virtue of extensibility
- bindings can be different for different users, by virtue of customizability
In this document I describe the standard, uncustomized, Emacs key bindings.
Notation
I use the standard Emacs notation to describe keystrokes:
C-x- For any x, the keystroke Control+x.
M-x- For any x, the keystroke Meta+x (see below for more details on Meta keystrokes).
C-M-x- For any x, the keystroke Control+Meta+x (which is exactly the same as Meta+Control+x.).
S-x- For any x, the keystroke Shift+x
s-x- For any x, the keystroke Super+x25
RET- The return key.
SPC- The space bar.
ESC- The escape key.
Control, Meta, and Super are modifier keys, i.e. they only take effect when held down simultaneously with another key, exactly like Shift. If you hold down Shift, Control, or Meta alone, and then simply release it, Emacs doesn’t even know you’ve done so: you must add a non-modifier key for the combination to register as a keystroke. You can combine as many modifier keys together as you have fingers for.
Your keyboard may have even more modifier keys. Emacs is aware of these other modifiers but doesn’t have any standard bindings that use them (you can use them for your own purposes though). In fact, because of arbitrary differences between the keyboards of different computer manufacturers26, Emacs’s Meta modifier really stands for “your preferred non-Control modifier key”.
We don’t typically mention Shift as a modifier key, usually just writing X
instead of S-x, and only use the S- notation occasionally for disambiguation or
emphasis. The S- modifier can of course be combined with other modifiers
(e.g. S-M-x, which is equivalent to M-X, or S-C-M-5, which is equivalent to
C-M-%). Unless you choose to make a distinction with a custom binding, Emacs
almost always equates a shifted letter in a keystroke with the lowercase version
of the same keystroke: so for example both M-f and M-F (a.k.a. S-M-f) are
equivalent: both invoke forward-word. See
Shift Selection for the only major exception.
Simple Keys
There are 94 different basic printable characters27, and they are all bound to
self-insert-command so that they insert themselves as text
when typed. For editing commands, Emacs uses all the control characters: C-a,
C-b, etc. But this is only 32 characters, and Emacs has more than 32 editing
commands.28
To provide access to more key bindings, Emacs uses a Meta key29. This gives
us access to keystrokes such as M-a, M-b, etc.
Since Control and Meta are both shift-like modifier keys, what happens if you
hold down both and then type a key? These combinations are valid keystrokes as
well; they are notated C-M-a, etc. Because both Control and Meta are modifier
keys, C-M-a must necessarily be the same keystroke as M-C-a. For consistency we
always write the former.
Modern keyboards also offer a wealth of non-printing keys such as the home key,
the four arrow keys, and the function keys (F1 and so on). Emacs also binds
commands to many of these. The notation we use for these keys looks like <home>
for the home key, <down> for the down arrow, <f1> for the first function key,
and the like. Emacs can also distinguish the keys of a numeric keypad (whether
NumLock is on or off.) These keys can all be combined with modifier keys to
form keystrokes like C-M-<down>.
Here are the Emacs spellings of some of the most commonly used non-printing keys on your keyboard.
<prior> |
PgUp (Page Up) |
<next> |
Pgdn (Page Down) |
<home> |
Home |
<end> |
End |
<left> <right> <up> <down> |
← → ↑ ↓ (arrow keys) |
<return> |
Enter or Return (also spelled RET) |
<tab> |
Tab (also spelled TAB) |
<backspace> |
Backspace (translated to DEL) |
<delete> |
Del or Delete |
<insert> |
Insert |
<f1> etc |
F1 function key |
Prefix or Compound Keys
The Control and Meta keys plus the printing characters give us 256 possible keystrokes30, or 160 editing commands after eliminating the self-inserting characters. But Emacs has many more than 160 commands! To handle this we also use prefix commands. A prefix command is a keystroke that, when typed, waits for another keystroke to be typed, making a pair (sequence) of keystrokes bound to one command. Each prefix command adds another 256 keystrokes that we can bind commands to. Prefix commands often group together commands that are somehow related.
The most important prefix commands are:
C-h- The help prefix, used for Help commands; the function key
F1is equivalent. C-x- The extra prefix; this prefix is used mostly for commands that manipulate files, buffers and windows.
C-c- The context-specific prefix. Used for commands that are specific to particular Modes, so they are free to be used for different commands depending on context. This prefix also reserves a set of keystrokes specifically for the user to use for their own purposes. These are the most variable of Emacs commands.
These three prefixes give us another 768 keystrokes, for a total of 928. But
Emacs has far more than 928 commands! To handle this, you can bind one of the
subcommands of a prefix command to another prefix command, like C-x 4 for
example, or C-x v, each such binding yielding potentially another 256
keystrokes. A number of these two-character prefixes exist, but they’re rather
specialized, and don’t contain a full set of 256 commands (usually there are
only a few, and the prefix is just used for a mnemonic grouping). There are
even three character prefixes, but most people won’t admit to using them.
| Prefix | Bindings | Commands |
|---|---|---|
C-h |
40 | Help commands |
<f1> |
An alias for C-h |
|
C-x 4 |
15 | Other-Window commands |
C-x 5 |
15 | Other-Frame commands |
C-x 8 |
185 | Unicode character insertion |
C-x 8 e |
9 | Emoji insertion |
C-x @ |
6 | Keyboard Event commands |
C-x RET |
11 | Coding System commands |
C-x a |
12 | Abbrev commands |
C-x n |
5 | Narrowing commands |
C-x r |
27 | Rectangle, Register, and Bookmark commands |
C-x t |
20 | Tab Bar commands |
C-x v |
25 | Version Control commands |
C-x w |
6 | Window commands |
C-x x |
7 | Buffer commands |
M-g |
9 | Goto commands |
M-s |
8 | Search commands |
M-s h |
7 | Highlight commands |
<f2> |
4 | Two-Column commands |
C-x 6 |
An alias for <f2> |
|
| 411 |
Aborting a Command
What if you start typing a prefix, like C-x, and then decide you didn’t mean it?
Emacs will be sitting there, showing this in the Echo Area:
C-x-
waiting for you to finish. You can abort this partially completed prefix by
typing C-g (keyboard-quit).31
You can also interrupt a command that’s asking you a question, or for
information (like a file name): if you type the command to open a file and it’s
asking you for the filename, but you’ve changed your mind, C-g will abort it.
It will also interrupt a running command that you want to now stop. Perhaps
you’re editing a file and have initiated a search-and-replace operation, and
after several replacements, you see it was not what you wanted: C-g will
interrupt it in the middle (and, of course, you can then Undo what you’d already
done).
Using Extended Commands
By now we’ve entered a sort of rarefied atmosphere: even the most hardcore Emacs nerd doesn’t really use all these key bindings. Some Emacs commands are used very rarely, and, when you need one, it’s easier to invoke the command by typing its long name directly, using the Completion system to remind you of the precise name.
There’s one Emacs command that can be used to execute any other command by
typing its long name: M-x (mnemonic: “eXecute” or “eXtended”). When you type
M-x, Emacs prompts you, in the Echo Area32, for the name of any command (with
Completion), even if that command is bound to one or more keys already, and then
executes it.
The prompt looks like:
M-x
and the completion works rather like that of any Unix shell, by typing an
initial part of the command and hitting TAB33. So you might type:
M-x backw
and hit TAB at that point; Emacs will partially complete this to:
M-x backward-
and if you then type:
M-x backward-sen
and hit another TAB, it will complete the entire command (because the prefix is
now unambiguous):
M-x backward-sentence
Now you can hit return (RET) to execute the command or if that’s not what you
meant, you can edit what you’ve typed (using any Emacs editing commands)
and keep completing as you go; of course a C-g will abort the M-x.
If you hit TAB again at the point at which you’ve achieved a partial completion
(at the point of backw or backward- or backward-sen above), Emacs will pop up a
transient buffer showing all the possible completions (you may discover some
surprising and interesting-sounding commands this way).
This can be a lot of commands! If you type M-x and immediately hit TAB, Emacs
will pop up a buffer showing all the interactive commands that exist at the
moment. In a stock Emacs, freshly started, this will be over 4,000 commands; in
my current Emacs session, with many third-party packages loaded, I get about
8,000.
When you see something like “ M-a (backward-sentence)”
in this book, it means that the keystroke M-a is bound (by default) to the
command backward-sentence (in most Modes, or in the Mode I’m currently talking
about), and so at any moment you can use M-x backward-sentence or M-a, as you
prefer.
Too Many Commands?
How does anyone remember these 4,000 commands? Simple: you don’t. Every Emacs user knows a different subset of commands. I’ve used Emacs for 47 years (starting with the original TECO Emacs), and I learn useful Emacs commands that are new to me all the time. Often I notice another Emacs user doing something and I have no idea how they’ve done it, so I ask and learn some Emacs command that I just never came across, or never developed as a habit, or once knew and forgot!
Some Emacs users just learn the most basic commands and are completely happy. Most users learn the basics and then some advanced commands that suit their needs. Some users are constantly learning new commands to speed their editing. A nerdy few progress to writing their own totally new Emacs commands.
Giving Commands Arguments
Many Emacs commands take arguments, the way a procedure or function takes arguments in a programming language. Most commands prompt you for their arguments: e.g., a command to read in a file will prompt you for the filename.
There’s one kind of argument that’s so commonly accepted that there’s a special
way to provide it: a numeric argument. Many commands will interpret a numeric
argument as a request to repeat themselves that many times. For example, the
C-d (delete-char) command, which normally deletes one
character to the right of the cursor, will delete N characters if given a
numeric argument of N. It works with M-x commands and self-inserting commands
too: try giving a numeric argument to a printing character, like a hyphen.
To give a command a numeric argument of, say, 12, type C-u 12 before typing the
command. If you type very slowly, you’ll see:
C-u 1 2-
in the Echo Area. Then type C-d and you’ll have given delete-char an argument
of 12. You can type any number of digits after C-u. A leading hyphen (C-u - 1
2) makes a negative argument; a lone hyphen (C-u -) is the same as an argument
of -1 (which makes many commands “go backwards” in some sense). If you begin
typing a numeric argument and change your mind, you can of course type C-g to
abort it.
Because a numeric argument is given before you type the command, it’s also called a prefix argument; see “Arguments” in the Emacs manual.
Since one often isn’t interested in precisely how many times a command is
repeated, there’s a shorthand way to get numeric arguments of varying
magnitudes. C-u by itself, without any subsequent digits, is equal to a numeric
argument of 4. Another C-u multiplies that by 4 more, giving a numeric argument
of 16. Another C-u multiplies that by 4 more, giving a numeric argument of 64,
etc. So C-u C-u C-u C-d would delete the next 64 characters.
C-u can be used before any other command, and for this reason C-u is called the
universal argument. But note that commands aren’t required to interpret numeric
arguments as specifying repetitions. It depends on what’s appropriate: some
commands ignore numeric arguments, some interpret them as Boolean (the presence
of a numeric argument — any numeric argument — as opposed to its absence),
etc. Read the documentation for a command before trying it.
Disabled Commands
Some commands that are especially confusing for novices are disabled by default. When a command is disabled, invoking it subjects you to a brief dialog, popping up a window displaying the documentation for the command, and giving you four choices; for example:
You have typed C-x n n, invoking disabled command narrow-to-region.
It is disabled because new users often find it confusing.
Here’s the first part of its description:

   Restrict editing in this buffer to the current region.
   The rest of the text becomes temporarily invisible and untouchable
   but is not deleted; if you save the buffer in a file, the invisible
   text is included in the file.  C-x n w makes all visible again.
   See also ‘save-restriction’.

Do you want to use this command anyway?

You can now type
y   to try it and enable it (no questions if you use it again).
n   to cancel--don’t try the command, and it remains disabled.
SPC to try the command just this once, but leave it disabled.
!   to try it, and enable all disabled commands for this session only.
If you invoked the command by accident, just hit n. If you’re sure you know
what you’re doing, hit y. Otherwise, SPC is the way to go, until for any given
command you’re comfortable enough with it to say y.
In this book, I make occasional recommendations to un-disable certain commands I consider very useful; you can see them all in my recommended Initial Init File.
Felicity in Key Bindings
I define a felicitous key binding to be one that can be easily repeated, possibly
even auto-repeated by your keyboard. The most felicitous binding is a single
keystroke, like C-f; you can repeat it easily by just holding down Control and
tapping away af f. Even chorded single keystrokes like C-M-f are maximally
felicitous.
Any prefix binding is less so. A two-character prefix binding that uses the
same modifier key in each case, such as C-x C-t, is not too bad, as you can just
keep the modifier held down and quickly tap x and t. But when the modifiers
differ, we have maximum infelicity.
Consider the horrible horizontal scrolling key-binding
C-x < (scroll-left),34 which is effectively C-x S-,.
Repeatedly invoking this command while observing the change in the visible part
of the text in the Window is like playing a particularly complex arpeggiated
piano part: hold down Control, hit x, lift finger from x and lift finger from
Control, hold down Shift, hit <, lift finger from Shift and from <, and finally
repeat.
Since any Emacs command can be bound to more than one keystroke, in some cases
like this, I provide Init File snippets with additional more felicitous
bindings, like my S-C-< for scroll-left, which can be easily tapped out or
auto-repeated.
In most cases, the felicity of key bindings is a minor issue, but for commands that you tend to repeat, like scrolling commands, Window-switching commands, and dragging commands, more felicitous bindings can make a big difference.
About Mouse Bindings
As mentioned, I don’t use the mouse in Emacs at all (and barely at all in an external web browser, my only other GUI application), so I won’t be devoting much space to it, except to say that Emacs fully supports it.
The mouse is a much more complex user interface device than the keyboard. Consider the traditional hand-held mouse (ignoring laptop touchpads for the moment). The minimal mouse has one button, which, like a key on a keyboard, can be pressed (or clicked) to generate an event that can be bound to an Emacs command. Also like a key-press, this button-click can be modified by any of the keyboard modifier keys, such as Shift, Control, Meta, and the like.
But the complexity of a single mouse click goes way beyond this. We need to potentially distinguish between a button-press and a button-release, a simple in-place click versus a drag, motion without clicking, and double- and triple-clicks (or even more).
But that’s not all: many mice have more than one button: mice on Unix systems traditionally have three buttons, and two- and five-button mice are common. Unlike non-modifier keyboard keys, multiple mouse buttons can be chorded: that is, pressing or clicking two or more buttons simultaneously counts as a completely different button!35 Many mice have a scroll wheel, which acts as another, more complex button, which may also tilt. Laptop touchpads add more complexity. And the keyboard modifier keys can be mixed into all of this.
Emacs defines an abstraction of all this complexity, defines a set of default global mouse bindings, and of course allows you to modify or add mouse bindings yourself.36
All that said, I’ll just summarize the most basic default global mouse bindings; you can get complete details in the manual.
- clicking button 1 moves Point to the location of the click
- dragging with button 1 selects text
- clicking button 2 moves Point and then pastes the contents of the system clipboard37
- clicking button 3 copies the text between Point and the clicked location to the kill ring
Files, Buffers and Windows in Brief
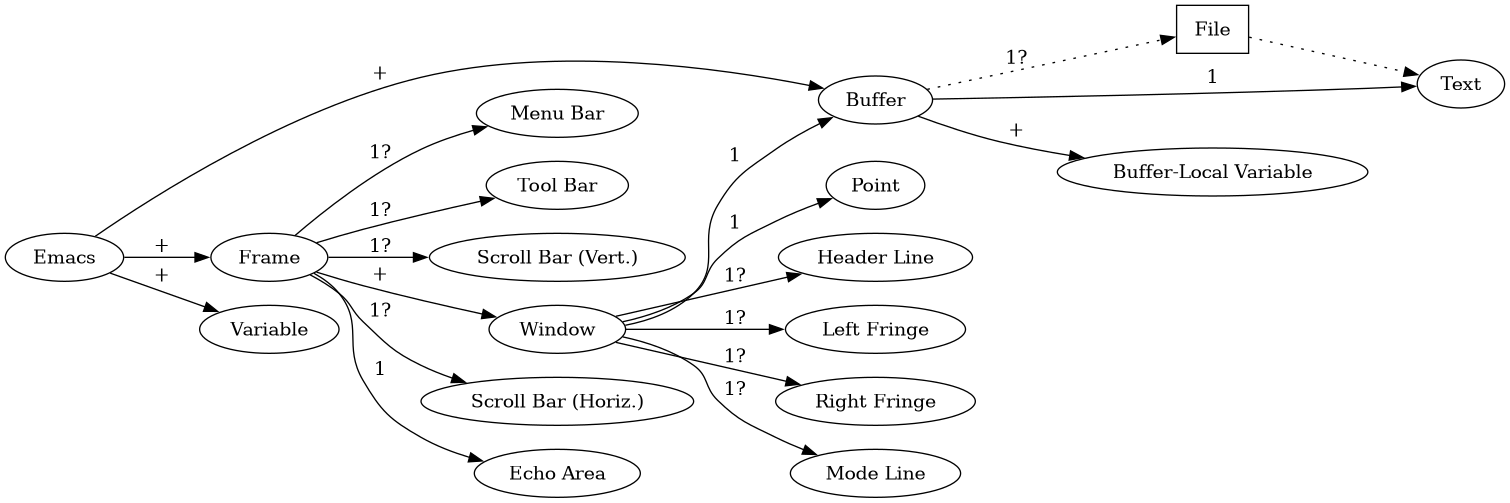
Figure 3: Emacs Data Structures
Legend:
| + | One or more |
| 1 | Exactly one |
| 1? | One or none |
Emacs has three data structures (actually four) that are intimately related; you can’t really grok Emacs without understanding them.
- File
- A file is the actual file on disk. You are never directly editing the data in this file. Rather, you read a copy into Emacs to initialize a Buffer, edit the Buffer’s copy, and write the contents of the Buffer back out to the file to save it. A file of course contains text: characters in some character set, say, Unicode38.
- Buffer
- A Buffer is the internal data structure that holds the text you actually edit. Emacs can have any number of Buffers at any moment. Many Buffers, but by no means all, are associated with a file. Buffers have names; a Buffer that has been initialized from a file is almost always named for that file, and we say that the Buffer is Visiting the file. This means, in particular, that when you save the Buffer, it’s saved to the proper file. At any given instant exactly one Buffer is selected or current (even if several are visible): this is the Buffer that your focused cursor is in, and this is where most of the commands you type take effect (including self-insert commands). Buffers can be deleted at will; deleting a Buffer in no way deletes any file on disk, and if you have any unsaved editing changes, Emacs won’t let you delete the Buffer (unless you insist). See Buffers for details.
- Window
A Window is a view into a Buffer. You can split any Window, horizontally or vertically, into as many Windows as you like (or at least have room for), each viewing a different Buffer. It’s also possible to have several Windows viewing different portions of the same Buffer. The relationship between Buffers and Windows is transient: typically, many Buffers have no Window viewing them at any moment and in general, Buffers outnumber Windows by a large margin.
Windows can be created and deleted at will; deleting a Window in no way deletes the Buffer associated with the Window. Each Window has its own Mode Line, but there’s still only the one Echo Area. See Windows for details.
Don’t confuse Emacs Windows with windows on your desktop! Emacs had multiple Windows two years before Graphical User Interfaces were commercially available. Once GUI desktops became common and used the term “window” for their own purposes, Emacs added support for these “desktop windows”, but needed to use a new name for them: Frame.
- Frame
- A Frame is a “desktop window” that is treated as a separate entity under a windowing system like X. When Emacs starts up, it creates one Frame for you, but you can have as many as you like. Each Frame can hold several Emacs Windows, and, in fact, has it’s own Echo Area (I lied above), but all Buffers are shared in common across all Frames. I won’t be discussing Frames much, as I rarely want more than one. But see Frames for details.
Basic File Concepts and Commands
The most common things you do with files are load them and save them.
C-x C-f(find-file)- This is the main command used to read a file into a Buffer for editing and is what the menu item File / Open File does. It’s actually rather subtle. When you execute this command, it prompts you for the name of the file (with Completion). Then it checks to see if you’re already editing that file in some Buffer; if you are, it simply switches to that Buffer and doesn’t actually read in the file from disk again. If you’re not, a new Buffer is created, named for the file, and initialized with the contents of the file. To create a brand new file, just type a nonexistent file name; you’ll get an empty Buffer that will create a new file when saved39. In any case, the current Window is switched to view this Buffer.
C-x C-s(save-buffer)- This is the main command used to save a file, or, more accurately, to write a copy of the current Buffer out to the disk, overwriting the Buffer’s file, and handling backup versions.
C-x s(save-some-buffers)- This command allows you to save all your Buffers that are visiting files and have modifications, querying you for each one and offering several options for each (save it, don’t save it, peek at it first then maybe save it, just save all of them without asking further questions, etc).40
See Files for more information.
Basic Commands to Manipulate Buffers
The most common things you do with Buffers, which you can for now think of as opened files, are switch between them, list them (in case you’ve forgotten which ones you’ve opened), and occasionally clean them up. But to paraphrase Philidor, “The Buffers are the soul of Emacs” and in short order you’ll be doing a lot more with them.
C-x b(switch-to-buffer)- Prompts for a Buffer name (with completion) and switches the Buffer of the current Window to that Buffer. Doesn’t change your Window configuration (if you had three Windows before, you still have three afterwards). This command will also create a new empty Buffer if you type a new name; this new Buffer will not be visiting any file, no matter what you name it (until you save it, at which point it will be visiting the just-created file).
C-x C-b(list-buffers)- Pops up a new Window which lists all your Buffers, showing for each the name, state (modified or not), size in bytes, the Buffer’s major mode, and the file the Buffer is visiting (if any). This is an interactive Buffer, meaning that, within it, you’re in a special mode that allows you to manipulate Buffers: select them, delete them, save them, search a subset of them, etc.
C-x k(kill-buffer)- Prompts for a Buffer name (with
completion) and removes the entire data structure for that Buffer from Emacs.
If the Buffer is modified and is visiting a file, you’ll be given an
opportunity to save it. Note that killing a Buffer in no way removes or deletes the
associated file (nor does it delete the Window; that Window will simply start
displaying some other Buffer).
kill-bufferis happy to delete a modified non-file Buffer without any warning however, so don’t keep important notes in Buffers like this (such as the*scratch*Buffer). (Emacs has better ways of note-taking anyway.)
C-x C-q(read-only-mode)- Make a Buffer read-only (so that attempts to modify it are treated as errors), or make it read-write if it was read-only. If you open a file that you don’t have permission to modify, Emacs sets the Buffer to read-only, to prevent you from wasting your time editing it when you won’t be able to (directly) save it. This command lets you have your way with it.
See Buffers for more information.
Basic Commands to Manipulate Windows
Just like the windows on your desktop, the most common things you do with Emacs Windows are create them, delete them, resize them, switch between them (i.e., change the focus), and scroll around in them. Emacs manages its Windows in a tiling manner, like one of those tiling window managers that are all the rage these days.
See Windows for more information.
Create a New Window
To create a new Window, you have to pick an existing Window (there’s always at least one!) and split it in two. You can split it vertically (which means you now have less vertical space in the original Window) or horizontally.
C-x 2(split-window-below)- Splits the current Window
in two, vertically (into two Windows, one below the other). This creates a
new Window, but not a new Buffer: the same Buffer will now be viewed in the
two Windows. This allows you to view two distant parts of the same
Buffer simultaneously, by moving around independently in the two Windows.
Of course you can switch to a different Buffer in one of these two Windows
with, say,
C-x b(switch-to-buffer) orC-x C-f(find-file). Mnemonic: “2 Windows where there was 1”.
C-x 3(split-window-right)- Splits the current
Window in two, horizontally (into two Windows, side by side). This also
creates only a new Window, and not a new Buffer: the same Buffer will now be
viewed in the two Windows. Mnemonic: “slightly different from
C-x 2”.
Delete a Window
C-x 0(delete-window)- Deletes just the current Window, resizing the other Windows in the current Frame appropriately. This does not delete the Buffer (nor file) associated with the Window. Mnemonic: “zero this Window”.
C-x 1(delete-other-windows)- Deletes all other Windows in the Frame except the current one, making one Window in the Frame. Does not delete the Buffers (or files) associated with the other Windows. Mnemonic: “show me just this 1 Window”.
Resize Windows
Since Emacs tiles Windows, you can’t resize just one Window41. If you want to make it bigger, you have to steal real estate from some other Window, and if you want to make it smaller, you have to donate real estate.
I think the default Emacs key bindings for resizing Windows are very awkward; see “Change Window” in the Emacs manual. This is easily fixed with some custom bindings; I’ll give the ones I’ve used for years later.
In graphical mode, you can use the mouse: just point the mouse at the Mode Line that’s between the two Windows whose mutual sizes you want to adjust. Point anywhere in the mode line as long it’s not on top of any text or icon, and then click and drag with the left mouse button.
Side-by-side Windows (as created by C-x 3 (split-window-right)) don’t have a Mode Line between them, of course, but
there is a vertical dividing line that you can likewise use, with the mouse, for resizing.
Switch Windows
The simplest way to switch Windows is to cycle through all of them with C-x o,
stopping at the one you wanted to get to. I rarely do it this way and will
discuss better, less tedious methods later. In graphical mode, you can use the
mouse to switch Windows: just click anywhere in the desired Window with the left
mouse button.
C-x o(other-window)- Switch to the other Window, making it the active Window. Repeated invocation of this command moves through all the Windows in the Frame, left to right and top to bottom, and then circles around again. Which Window is the “other window”? See Switching Windows.
Scroll Within a Window
Scrolling horizontally is only necessary if you have a combination of tall skinny Windows and long lines; we’ll ignore that for now. But it’s very common for a file to have many more lines than will fit vertically in a Window.
You can of course scroll with the mouse and the scrollbar (or the scroll wheel) if you don’t mind taking your hands off the keyboard.
C-v(scroll-up)- The basic command to scroll forward
(towards the end of the file) by one screenful. (Is this up or down? Depends
on your point of view.) By default Emacs leaves you two lines of context
from the previous screen. Mnemonic: “View more of the Buffer” or “The V
points toward the text you want to see”.
scroll-upis also bound to the<PageDown>key42. M-v(scroll-down)- Just like
C-v, but scrolls backwards. Mnemonic: “C-vgoes forward soM-vgoes the other way”.scroll-downis also bound to the<PageUp>key.
You can also directly scroll a Window other than the one you’re in. This is just a shorthand for switching to the Window you want to scroll, scrolling it, and switching back to the Window you came from. If you have a lot of Windows in your Frame, that’s exactly what you’ll have to do, but for the common case of two Windows, we have a simple command:
C-M-v(scroll-other-window)- Just like
C-v, but scrolls the other Window. This works with more than two Windows, in which case the other Window is the Window thatC-x owould switch to. You can give it a negative argument to make it scroll backwards.
There’s more about scrolling to come.
Selecting Text: the Point, the Mark, and the Region
Selecting a range of text is fundamental to editing. It enables you to act upon the text: delete it, copy it, modify it, change how it’s displayed (highlight or colorize it, change its font or size), investigate it (count its words or lines), search for other occurrences of it, focus on it (search or undo within it, narrow to it so that’s all you can see), feed it to something outside of Emacs.
The Emacs term for a range of selected text is the Region (“Using Region” in the Emacs manual): it’s simply the text in your Buffer between the Point and the Mark.
The Point
Point (“Point” in the Emacs manual) is the Emacs term for what we’ve been loosely calling your cursor up to now; the cursor always shows the position of Point in your Buffer. Point is where text is inserted when you type, and where most editing operations happen. When you “move” in a Buffer, you’re simply adjusting the location of Point.
Point is really just a number: the offset, in characters, from the beginning of
the Buffer, of the character after Point. You typically don’t care about this
number as such unless you’re writing Elisp, but if you want to know the value of
Point, C-x = (what-cursor-position) will report it in the echo
area (along with some other interesting information43).
Point always identifies a location between two characters. By default, Emacs displays, in the current Window, a cursor at Point in the form of a solid box. The box seems to be on top of a character, but Point is before that character. (You could ask Emacs to instead display the cursor as a thin vertical line, which would make the position of point as between two characters easier to understand, but at the cost of being harder to spot.)
Every Window has a distinct Point which is always visible in that Window. This means that if you visit a file and split the Window into two, you can have Point in a different position in each Window, so you can look at distant parts of the file at the same time.
The Mark
The Mark (“Setting Mark” in the Emacs manual) is a sort of additional, invisible, Point. A Buffer can only have one Mark44, and every Buffer’s is distinct. However, unlike Point, there’s no Mark in a Buffer until you set one (explicitly or implicitly).
The main purpose of the Mark is to determine one end of the Region, Point being the other.
You set the Mark (at the same location as Point) with a special command,
C-SPC (set-mark-command); C-@ is an old synonym. Then, as
you move Point, the Mark stays where you set it and whatever is between the two
forms the Region.
The Region
")
Figure 4: The Active Region (Mark at the beginning)
The Region is the text between Point and Mark. If the Mark exists in a Buffer, so does the Region (because Point always exists). The Region can be of any size: a few words, many paragraphs, the next 253 characters. If you set the Mark and don’t move Point, the Region is of size zero. (Yes, an empty Region is useful.) If you set the Mark at the end of the Buffer, and move Point to the beginning of the Buffer, then the Region encompasses the entire Buffer.
In fact, the Region is the same regardless of whether Point comes first in the Buffer or Mark does; it makes no difference, just do what’s convenient.
This scheme predates the commercial availability of the mouse, and provides a keyboard-driven equivalent of sweeping out text with the mouse. In fact, if you click mouse button 1 (usually the left button) at a position in the Buffer, and drag the mouse pointer in any direction, and then let go of the button, Emacs sets the Mark at the place where you clicked, and the Point at the place where you let go — another way to set the region.
When you explicitly set the Mark with C-SPC (or the mouse), the Mark is activated,
and the Region is suddenly colored differently so you can visualize it (see
Figure 4). If the color becomes distracting, a C-g will deactivate
the Region, as will most commands that operate on the Region after they’re done
with it (so the Active Region is typically transient: set it — color! — act
on it — color gone).
But remember, the Region still exists (because there’s a Mark) even if inactive
and invisible: you can still use it45. If at any time you’re not sure
of its extent, C-x C-x (exchange-point-and-mark) will
reactivate the Region (and hence colorize it); it also swaps Point and Mark,
which is handy if you want to fine-tune the extent of the Region with additional
motion commands, or if you want to get to, or just peek at, the other end (the
Region might be big enough that you can’t see both ends at the same time).
Once you’ve got a Region, you can do stuff to it. What kind of stuff? Delete it; copy it; duplicate it; capitalize or otherwise change the case of it; search-and-replace or undo within it; narrow your view of the Buffer to it; do a web search for it; treat it as a rectangle; write it out to a different file; colorize it; comment it out, count the words, characters, and lines within it; pipe it through a shell command. There are hundreds, nay, thousands, of Emacs commands that operate on the Region, and you can readily make your own.
In a typical GUI editor like Microsoft Word or Google Docs, you spend much of your time sweeping out or selecting text with the mouse and then activating a menu or toolbar item; the Emacs equivalent is to set the Region and then execute a command with a keystroke. In Emacs, you can likewise use the mouse and a menu, but you can also do everything with the keyboard, and in addition to setting the Region by setting the Mark and explicitly moving, you can set it implicitly via textual object commands, search commands, and more.
So now you know how to define the Region: let’s do stuff to it.
C-w(kill-region)- Kills the Region. (You can yank it back elsewhere.) Other editors call this operation cut. Mnemonic: wipe the region.
M-w(kill-ring-save)- Saves the Region without removing it from the Buffer (so you can yank a copy back elsewhere). Other editors call this operation copy. Mnemonic: a “bigger” wipe (which includes an immediate “paste”).
C-x C-i(indent-rigidly)- Rigidly indents (or dedents)
the Region using the arrow keys;
C-u 12 C-x C-iindents the region exactly 12 characters, without using the arrow keys. C-x C-l(downcase-region)- Convert the entire Region to lowercase. This command is disabled by default.
C-x C-u(upcase-region)- Convert the entire Region to uppercase. This command is disabled by default.
M-q(fill-region)- Fills, i.e., justifies with a ragged right margin, all the paragraphs within the Region; with a prefix argument, right justify the paragraphs.
There are hundreds more commands that act on the Region, and the Region is fundamental to the way cutting and pasting is done in Emacs.
Cutting, Copying, and Pasting
Cutting, copying, and pasting to and from the clipboard — the fundamental editing operations — in most applications exist as three keyboard shortcuts, known as Control+x, Control+c and Control+v respectively, called CUA46.
Emacs, of course, uses different terminology and key bindings — how can it not, predating the CUA “standard” by close to ten years?
| CUA Menu Item | Key | Mac OS | Emacs Command | Key |
|---|---|---|---|---|
| Cut | Control+x | Command+x | kill-region |
C-w |
| Copy | Control+c | Command+c | kill-ring-save |
M-w |
| Paste | Control+v | Command+v | yank |
C-y |
| Select All | Control+a | Command+a | mark-whole-buffer |
C-x h |
Emacs calls cutting, “killing”; and it calls pasting, “yanking”. So select your text (by setting the Region), and then use the Emacs keystrokes in the table above, and things will work mostly as you expect.
Aside from the keystrokes, this is directly analogous to the way cutting and pasting is done everywhere else. If you really can’t face the idea of learning these four keystrokes, you can enable CUA Mode, which will let you use the keystrokes you’re used to.
Now we’re done with this chapter, right? Feel free to skip ahead to the next chapter to continue your Emacs exploration, but be sure to come back here later for a little more info.
Welcome back!
It’s time for some tough love. Emacs cut-and-paste goes significantly beyond that of most applications, but, I have to admit, at the cost of a significant learning curve. The advanced features are probably the most complicated part of beginner-level Emacs knowledge. The reason is just that it’s all very abstract and tenuous, and you have to picture invisible things in your head.
What are these advanced features?
- Commands to precisely select (i.e. set the region around) a whole range of textual objects: words, symbols, lines, sentences, paragraphs, and more. We cover these in the next chapter. There are commands to directly select and kill (cut) these objects.
- A history of previously killed and copied text. The Mac OS and Windows clipboards only hold one item—the last piece of text you killed or copied. Emacs remembers your 120 most recent items, and there’s no limit—you can increase it if you like.47
Emacs calls its “clipboard” the Kill Ring, and it’s an invisible (albeit inspectable) data structure that you normally have to picture in your mind’s eye as you use and change it.
With the addition of one more command, new in version 28 of Emacs, your suite of cutting and pasting commands looks like this:
| Action | Key | Emacs Command |
|---|---|---|
| Cut | C-w |
kill-region |
| Copy | M-w |
kill-ring-save |
| Paste | C-y |
yank |
| Paste from History | M-y |
yank-pop |
C-y yanks (“pastes”) your most recent kill (or copy), but you can get back any
of your last 120 kills by instead
using M-y. It presents all your kills using the Completion system: just choose
the text you want to yank, as in Figure 6.

Figure 5: Yanking Back in Time
This function works best with an Incremental Narrowing Framework like Ivy or Selectrum (Ivy is shown in Figure 6).
Until you read Yanking Older Kills, you shouldn’t invoke this command
immediately after C-y: it will have a different effect. If you need to use M-y
right after a C-y, just precede it with C-g (keyboard-quit).
The Kill Ring
When you kill the Region with C-w, Emacs adds the killed text to a data
structure called the Kill Ring, which holds the last several kills. This
allows you to get older kills back. When you yank with C-y, the most recent
kill from the Kill Ring is inserted into the Buffer at Point; it’s not removed
or popped off the Kill Ring, so if you yank again, you get another copy.
The Kill Ring is really a linear list, and killing with C-w feels like pushing
onto a stack; but the commands that deal with it actually treat it as a circular
structure, so we call it a ring.
The Kill Ring is a global data structure, shared by all Buffers: this is so that you can use the Kill Ring to move text from one Buffer to another: kill some text in Buffer A, switch to Buffer B and yank it: you’ve moved the text.
What about copying text? Clearly, you can copy and paste by doing C-w to kill,
immediately yank it back to where it was with C-y, and then move elsewhere and
yank again (your text is still at the front because yanking doesn’t pop the Kill
Ring). That’s C-w C-y (move somewhere) C-y.
M-w is a shortcut for C-w C-y, so we usually use that for copying: M-w (move
somewhere) C-y.
Yanking Older Kills (“Clipboard History”)
Here’s how yanking older kills worked in olden times (before v28’s new
M-y (yank-pop) command). Unless you’re a connoisseur of
Emacs history (this all still works…), I suggest you skip ahead!
Suppose we kill the word “foo” in some Buffer. This pushes it onto the front of the Kill Ring (who knows what else is behind it):
| foo | … |
| ↑ |
The arrow points to what C-y will yank, by default the latest kill. Then we do
some more work, and kill the word “bar” somewhere else. Now the Kill Ring looks
like this:
| bar | foo | … |
| ↑ |
Now we want to paste the “foo” somewhere48. How do we get at it?
We yank with C-y and “bar” (what the arrow points to) is inserted. But now we
immediately type M-y (yank-pop). When invoked immediately
after C-y, it moves the yank-pointer back one step:
| bar | foo | … |
| ↑ |
and simultaneously replaces the just-yanked “bar” at Point with “foo”. If we
immediately type M-y again, it would move the yank-pointer back one more step,
and replace “foo” with whatever is next oldest in the Kill Ring.
You don’t really need to picture the Kill Ring. When you want something from
it, just type C-y and then if you think, “no, older” type M-y, and if you think,
“no, older”, type another M-y and so on.
The only trick here is that you have to type M-y immediately after a C-y, or
after a M-y: if you do anything in between — moving, typing, popping up the
calendar — M-y will do the wonderful new thing of offering up older
kills for Completion; if your Emacs is older then v28, it will complain with
“Previous command was not a yank”.
If you actually type 60 M-y’s, you would then cycle around to the front of the
Kill Ring again!
Suppose the Kill Ring looks like this:
| echo | delta | charlie | bravo | alpha | … |
| ↑ |
Let’s look at the results of some yanks (each of these examples is an alternative to any of the others):
C-ywould yank “echo”- instead,
C-y M-ywould yank “delta” - or,
C-y M-y M-ywould yank “charlie” - or,
C-y M-y M-y C-ywould yank “charliecharlie” (C-yalways yanks from the pointer)
Note that C-y takes a numeric argument (positive or negative), so that C-u 3 C-y
in our example is the same as C-y M-y M-y. M-y works the same way.
What if you type several M-y’s and decide you don’t want what you end up with?
Usually you just undo them, but note that this undoes the changes to your
Buffer, but doesn’t undo the motion of the yank pointer. If you do C-y M-y M-y,
yielding “charlie”, you can undo, yielding “delta”. But your next C-y will yank
“charlie” again, since that’s where you left the yank pointer.
When you’ve got your yanked text (whether acquired by one C-y or a chain of
M-y’s, or the new Completion-based M-y), the Mark is set for you at the
beginning of the restored kill, to make it easy for you to jump there (with
C-x C-x (exchange-point-and-mark); see also the Mark Ring)
— remember that you may have just yanked back a very large chunk of text, so
the beginning could be a long way away.
Undoing a Yank
I stole a function from the EmacsWiki that I call undo-yank (originally
named yank-pop-forwards), that lets you reverse direction in the middle of a
sequence of M-y’s, in case you overshoot; this actually moves the yank pointer,
so you can think of it as an undo for yanks.
;; thanks to an anonymous EmacsWiki coder
(defun undo-yank (arg)
  "Undo the yank you just did.  Really, adjust just-yanked text
like \\[yank-pop] does, but in the opposite direction."
  (interactive "p")
  (yank-pop (- arg)))
(keymap-global-set "C-M-y" 'undo-yank)
I Can’t Picture This!
Ever feel that ’C-y M-y M-y M-y …’ is not a great way of trying to find that piece of text you know you killed a while back? — Colin Walters
Emacs’s abstract approach to the Kill Ring (an invisible data structure with an
invisible yank-pointer), which may seem a mite austere, is very fast and
efficient once you get used to it. But you might occasionally prefer a sort of
WYSIWYG alternative, that lets you browse the Kill Ring interactively: see its
entire contents and search it too. The new functionality of M-y command does
this for you; an alternative is Colin Walters’ third party package
browse-kill-ring.
Other Ways to Set the Region
So far, we’ve been talking about killing (or copying) the Region: as if you were always going to be sweeping out text, mouse-like (even if with the keyboard). But really, it’s much more common to work in terms of textual objects — in other words, kill a word or a line or a paragraph without bothering to sweep out its boundaries. We’ll discuss textual objects in detail in the next chapter.
Appending to a Kill
Since the Kill Ring is a sequence of kills, you might think to use it to accumulate several separate chunks of text that you want to yank back elsewhere. Kill the first piece of text, move to the next and kill it; repeat several times and you’ve now got everything you want, in several chunks at the front of the Kill Ring.
But when it comes time to yank all these chunks back, you’ll have to do a bit of
a dance with a combination of C-y’s and M-y’s in a somewhat surprising order
(because the kills are accumulated on the Kill Ring backwards).
What you want to do instead is append to a single kill at the front of the Kill
Ring, with C-M-w (append-next-kill). So you kill the first
piece of text, move to the second, but now type C-M-w before killing it with
C-w; this causes the second piece to be appended to the text of the front kill,
instead of added as a new kill as usual. Think of C-M-w C-w as a single append
to the kill command.
If the three pieces of text are “alpha”, “beta”, and “gamma”, the process looks like:
move to “alpha”, set the Region, and
C-w:alpha … ↑ move to “beta”, set the Region, and
C-M-w C-w:alphabeta … ↑ move to “gamma”, set the Region, and
C-M-w C-w:alphabetagamma … ↑
Now you can move elsewhere, and with one C-y, you yank back “alphabetagamma”.
Obviously, C-M-w works the same with M-w, if you want to leave the original text
in place.
C-M-w is a pretty low-level tool; Emacs has better ways of approaching the task
of accumulating scattered chunks of text that don’t use
the Kill Ring at all.
Appending to a Buffer
When you want to collect several chunks of text from various locations, the best way to do it is to append the chunks to a Buffer.
Move to the first piece of text you want to collect—let’s say the word
“alpha”—and set the Region, but don’t bother to kill or copy; instead say
M-x append-to-buffer-with-newline. You’ll be prompted for a Buffer
name which will collect all the pieces of text you’re gathering; just make up
any name you like! If you’re collecting Greek letters, you could call the
Buffer “greek” or “g”. Your text will be appended to your Buffer (which will be
created as needed) with a newline added at the end.49
Now find your “beta”. M-x append-to-buffer-with-newline again and
use the same Buffer name. Repeat for “gamma” and as many other things you’re
looking to collect.
When you’re done, go to the place you want to “yank” your collection, and say
M-x insert-buffer: the entire contents of your accumulation Buffer
is inserted at Point.
This scheme has several advantages over the Kill Ring for ambitious text rearrangement.
- You can do your collecting and appending over a span of hours (or even days).
- It allows you to use the Kill Ring as you like in between accumulations.
- You can freely use several different collection Buffers for different sorts of text, and intermix your accumulations.
- The accumulation Buffer is just a Buffer like any other, so you can switch to
it at any point to fix it up, or save it to a file; you also aren’t required
to use
M-xinsert-bufferto get your text; you can kill or copy the text you’ve accumulated to extract what you’ve collected in any order or combination.
See Mass Line Deletion for another solution, and “Accumulating Text” in the Emacs manual for more information.
The Clipboard
The Kill Ring is a data structure to which only Emacs has access. But every
time you kill or copy text to the Kill Ring — with any of the many commands
that do so, not just C-w and M-w — Emacs also copies that text to the system
clipboard. This is the data structure that all your other non-Emacs
applications paste from (with the CUA keystroke Control+v, probably). So this
gives you a simple way passing text to them.
It also works in the other direction: if the contents of the system clipboard
are newer than the Kill Ring — because you did a cut or copy in a non-Emacs
application — then C-y instead inserts the clipboard text — not the first
item in the Kill Ring.
There are several configuration variables to control exactly how Emacs and the clipboard50 interoperate; see “Clipboard” in the Emacs manual.
CUA Mode
If you’re a long-time Windows user and the Control+x, Control+c and Control+v
keystrokes are so thoroughly wired into your fingers that you just can’t get
used to C-w, M-w, and C-y, don’t give up hope. Just say
M-x cua-mode and Emacs will let you use the commands you’re used to.
In order not to completely clobber the hundreds of key bindings on the C-x and
C-c prefixes, the CUA bindings are only operative when the Region is active
(colorized). There are several subtleties and extra features, so see
“CUA Bindings” in the Emacs manual for the complete story.
If you like cua-mode, you can turn it on by default in your init file with this
line of code:
(cua-mode +1)
Editing with Textual Objects
Editing in general consists of inserting text, either by typing it or acquiring it from some existing source; and then, over time, moving from one spot to another in order to make changes (i.e. transform it).
In Emacs, both moving around and making changes are done largely via textual objects — things like characters, words, lines, sentences, and such — and you can:
- move in terms of them, and by moving, optionally:
- select them, and after selecting them,
- copy them,
- kill them, or
- transform them.
For each such object, there is a motion command that moves forward over it and another that moves backward (you can also think of this as moving to the end and to the beginning). All these motion commands interpret numeric arguments as repetitions, so with an argument of N, you can move over N objects with one command.
But of course, if you simply set the mark before moving, then when you’ve moved, you’ve also selected text — that is, you’ve put the Region around whatever you’ve moved over. Having selected, you can now immediately copy or kill the text, or transform it.
Suppose Point is the | in this line — you’re in the middle of the word
“telecommunications” — and you want to kill that word:
the intermediary of some telecommu|nications program, where the
To do so, you can move to the beginning of the word, set the mark, move to the end, and kill: that’s four keystrokes:
| 1 | M-b |
backward-word |
| 2 | C-SPC |
set-mark-command |
| 3 | M-f |
forward-word |
| 4 | C-w |
kill-region |
Besides being completely general (killing a sentence just requires you to substitute sentence-motion commands for the word-motion commands, for example) this technique means that all you need to learn to use textual objects are the motion commands. But most of the textual objects also have a special command that marks, i.e. selects, them, which saves you a keystroke, so we could also kill “telecommunications” with just:
| 1 | M-b |
backward-word |
| 2 | M-@ |
mark-word |
| 3 | C-w |
kill-region |
In addition, most of the objects also define a command to kill them, which can save you another keystroke:
| 1 | M-b |
backward-word |
| 2 | M-d |
kill-word |
Or if you happen to already be at the beginning of the word, it’s just one keystroke:
| 1 | M-d |
kill-word |
You can choose how much mental effort to put into learning these additional commands, knowing that you can always achieve your goal in the 4-step manner. But most expert Emacs users eventually learn all of these special commands: even micro-optimizations pay off for things you do frequently.
Shift Selection
If you execute any of the motion commands while also holding the Shift key, you
can short-cut the selection process via Shift Selection. Consider M-f (forward-word). If
you instead use S-M-f, the Mark is automatically set at Point, and then you move
forward one word: so the word is automatically selected. S-M-f is essentially
C-SPC M-f. In our example:
| 1 | M-b |
backward-word |
| 2 | C-SPC |
set-mark-command |
| 3 | M-f |
forward-word |
| 4 | C-w |
kill-region |
we can instead do:
| 1 | M-b |
backward-word |
| 2 | S-M-f |
forward-word (shifted) |
| 4 | C-w |
kill-region |
The same thing is true for motion backwards, and for any of the other textual object motion commands. Just add the Shift.
And, if you type a shifted motion command, and immediately repeat it (while
holding down the Shift key), the selection is enlarged until you finally issue a
non-shifted-motion command. So if you say S-M-f S-M-f S-M-f you will have set
the Region around three words.
You can mix different objects too: S-M-f S-C-n S-C-f is also legitimate.
Transposing and Dragging Objects
A special case is transposing (or swapping) two objects: that is, put Point between two objects (say, sentences) and swap them — the left hand sentence is now the right hand sentence and vice versa. One single command replaces a more complicated pattern of killing, moving, and yanking.
For example, here in line 0 Point (|) is between “one” and “two”. If we
transpose-words with M-t, we get the result in line 1:
0 one | two three four five
1 two one | three four five
2 two three one | four five
Note that Point has moved forward, or if you prefer, it remains after “one”.
This means that another M-t will result in line 2. So several transpose
commands in a row can be chained together. You might think of this as dragging
“one” to the right.
Most of the transpose commands react to a numeric argument of N by transposing
the object to the left of Point with the one N objects to the right. This means
that an argument of 1 is the same as no argument (on line 0 above, the word
“two” is one word away from the left-hand word “one”).
But if we say C-u 2 M-t, we get this result, because “three” is two words to the
right of “one”:
0 one | two three four five
1 two three | one four five
Personally I think it’s easier to chain several transpose commands to achieve the equivalent effect, but your brain may work differently.
A negative argument transposes in the opposite direction (backwards, rather than
forwards). In addition, a numeric argument of 0 (which would otherwise not do
anything!) is interpreted specially: it swaps the object containing or after
Mark with the object containing or after Point, no matter how far apart they
are! This is a long-distance transposition, with no chaining or counting
required. Here in line 0 ^ indicates Mark (in “one”), and | Point (in
“eleven”); we say C-u 0 M-t:
0 ^one two three four five six seven eight nine ten ele|ven twelve thirteen
1 ele|ven two three four five six seven eight nine ten ^one twelve thirteen
(Frankly I’ve never internalized this and always just Kill, move, and Yank in this use case.)
The exact definition of what makes up a given textual object is often customizable and may vary slightly from mode to mode. This is useful because it means that you can use the same motion commands and yet have them automatically customized for different types of text.
Here’s the complete list of standard Emacs textual objects, with their backward- and forward-motion, marking, killing, and transposing key bindings:
| Object | Backward | Forward | Mark | Kill | Transpose |
|---|---|---|---|---|---|
| Character | C-b, ← |
C-f, → |
C-d |
C-t |
|
| Word | M-b |
M-f |
M-@ |
M-d |
M-t |
| Horizontal Line | C-a |
C-e |
C-k |
||
| Vertical Line | C-p, ↑ |
C-n, ↓ |
C-x C-t |
||
| Sentence | M-a |
M-e |
M-x ... |
M-k |
M-x ... |
| Paragraph | M-{ |
M-} |
M-h |
M-h C-w |
M-x ... |
| Sexp | C-M-b |
C-M-f |
C-M-@ |
C-M-k |
C-M-t |
| Defun | C-M-a |
C-M-e |
C-M-h |
C-M-h C-w |
|
| Page | C-x [ |
C-x ] |
C-x C-p |
C-x C-p C-w |
|
| Buffer | M-< |
M-> |
C-x h |
C-x h C-w |
N.B.: in these charts, M-x ... means that the obvious command exists but isn’t,
by default, bound to a key — that is, M-x mark-end-of-sentence,
M-x transpose-sentences, and M-x transpose-paragraphs.
Characters, Words, and Lines
| Object | Backward | Forward | Mark | Kill | Transpose |
|---|---|---|---|---|---|
| Character | C-b, ← |
C-f, → |
C-d |
C-t |
|
| Word | M-b |
M-f |
M-@ |
M-d |
M-t |
| Horizontal Line | C-a |
C-e |
C-k |
||
| Vertical Line | C-p, ↑ |
C-n, ↓ |
C-x C-t |
Characters
| Object | Backward | Forward | Mark | Delete | Transpose |
|---|---|---|---|---|---|
| (left, right) | |||||
| Character | C-b, ← |
C-f, → |
DEL, C-d |
C-t |
The character is the smallest, the atomic, textual object.
C-b(backward-char)- Moves backward (to the left) over
a character. This is mostly the same thing that the left-arrow
(
<left>(left-char)) does (but there are subtle differences in the context of bi-directional text). C-f(forward-char)- Moves forward (to the right) over a
character. Same deal with right-arrow (
<right>(right-char)).
The f for forward and b for backward mnemonic will recur.
DEL(delete-backward-char)- Deletes the character to the left of Point; note that this is not a Kill and the deleted character doesn’t go on the Kill Ring (because at one keystroke per character, it’s quicker to retype it than to kill and yank it).
C-d(delete-char)- Deletes the character to the right of Point; also not a Kill.
C-t(transpose-chars)- Swap the characters around Point; at the very end of the line, swap the two previous characters.
Words
| Object | Backward | Forward | Mark | Kill | Transpose |
|---|---|---|---|---|---|
| (left, right) | |||||
| Word | M-b |
M-f |
M-@ |
M-DEL, M-d |
M-t |
M-f(forward-word)- Moves forward over a word.
M-b(backward-word)- Moves backward over a word.
Note the f/b mnemonic. Also, as another mnemonic, note that M-f is like a “bigger” version of C-f.
M-@(mark-word)- Sets the Mark at the end of the current word; immediately repeating this command moves the Mark to the end of the next word, enlarging the Region by one word (this is generally the way all marking commands work).
M-d(kill-word)- Kills text forward from Point to the end of the word.
M-DEL(backward-kill-word)- Kills text backward to the beginning of the word.
M-t(transpose-words)- Swap the words around Point.
Lines
| Object | Backward | Forward | Mark | Kill | Transpose |
|---|---|---|---|---|---|
| Horizontal Line | C-a |
C-e |
C-k |
||
| Vertical Line | C-p, ↑ |
C-n, ↓ |
C-x C-t |
Lines can be considered vertically or horizontally. Horizontal first.
C-a(move-beginning-of-line)- Moves to the beginning of the current line.
C-e(move-end-of-line)- Moves to the end of the current line.
A for the beginning of the alphabet, E for “end”.
Strangely, there’s no command to set the region around the entire current line (though it’s very easy to write one!).
C-k(kill-line)- Kills from Point to the end of the current line, not including the newline unless the line is blank. Thus, if you’re at the beginning of a non-blank line it takes two C-k’s to kill the whole line and close up the whitespace.
C-u 0 C-k(kill-line)- Kills to the beginning of the current line, not including the newline.
Now let’s consider lines vertically.
C-p(previous-line)- Moves up to the previous line;
also on
↑(<up>). C-n(next-line)- Moves down to the next line; also on
↓(<down>). C-x C-t(transpose-lines)- Swap the line containing Point and the previous line, leaving Point after both (allowing chaining).
When moving vertically by lines, the cursor tries to stay in the same column, but if the target line is too short, the cursor will be at the end of the line instead: Emacs doesn’t automatically insert spaces at the ends of lines (end of line is unambiguous)51.
It doesn’t seem too intuitive to kill lines vertically by analogy with C-n and
C-p; I know of no such commands.
Prose Objects: Sentences and Paragraphs
| Object | Backward | Forward | Mark | Kill | Transpose |
|---|---|---|---|---|---|
| Sentence | M-a |
M-e |
M-x ... |
M-k |
M-x ... |
| Paragraph | M-{ |
M-} |
M-h |
M-h C-w |
M-x ... |
Sentences
When you’re editing prose, motion by sentences and paragraphs is very
convenient. Note that, by default, for the purposes of motion, sentences need
to end with two spaces after their terminal punctuation (period, exclamation
point, or question mark). This has become something of a cause célèbre
lately, but don’t worry, you can change sentence-ending to only require one
space by Customizing sentence-end-double-space.
M-a(backward-sentence)- Moves to the beginning of the current sentence.
M-e(forward-sentence)- Moves to the end of the current sentence.
Note the mnemonic relationship between C-a / M-a and C-e / M-e. Again the Meta
version is for a “bigger” object.
M-xmark-end-of-sentence- Sets Mark at the end of the current sentence; this command doesn’t have a default key binding (but you could give it one).
M-k(kill-sentence)- Kill the text from Point to the end of the sentence.
C-u -1 M-k(kill-sentence)- Kill the text from Point to the beginning of the sentence.
Paragraphs
You can similarly move by paragraphs — but what is a paragraph exactly? It depends on the Major Mode and you can tweak the definition yourself52, but most commonly, paragraphs are delimited by blank lines.
M-{(backward-paragraph)- Move to the beginning of the current paragraph.
M-}(forward-paragraph)- Move to the end of the current paragraph.
M-h(mark-paragraph)- Sets the Region around the entire current paragraph; unlike the marking commands for smaller objects, in addition to setting the Mark at the end of the object, this one also moves Point to the beginning (this turns out to be much more useful for large objects).
M-xkill-paragraph- Kill the text from Point to the end of the paragraph.
Larger Objects: Pages and Buffers
| Object | Backward | Forward | Mark | Kill | Transpose |
|---|---|---|---|---|---|
| Page | C-x [ |
C-x ] |
C-x C-p |
C-x C-p C-w |
|
| Buffer | M-< |
M-> |
C-x h |
C-x h C-w |
Pages are separated by form feed characters (C-l — that’s L, not the digit 1),
just as lines are separated by newline characters. This used to be a common
concept back when Emacs was young; when printing, you had to manually indicate
where a page break should occur, causing the printer to skip to the top of the next
page (or “form”), and to do this you would insert a form feed character into
your text.
Since form feeds count as whitespace in most programming and markup languages,
pages are still a useful idea, and Emacs has several commands that do things in terms
of them. You can insert a form feed into your file by typing C-q C-l (see
Quoted Insert).
So while it’s rare now to use a form feed to actually force a new page when
printing53, it’s handy to be able to separate a large file into “pages” which are
really just bigger sections than paragraphs. A typical organization in a file
of source code is to precede each section header comment with a form feed, and
then you can navigate by these logical sections via C-x [ and C-x ].
Here’s what it looks like in a file of my Emacs Lisp source code (Elisp comments
start with one or more semicolons, and a form feed character displays as ^L):
^L
;;; parsing and unparsing
That ^L is not two characters, as you can clearly see if you move your cursor
across it one character at a time: it just looks like it.
C-x [(backward-page)- Moves to the beginning of the current page.
C-x ](forward-page)- Moves to the end of the current page.
C-x C-p(mark-page)- Sets the Region around the entire current page; unlike most marking commands, in addition to setting the Mark at the end of the object, this one also moves Point to the beginning.
Finally, it’s useful to be able to jump directly to the beginning or the end of the buffer without having to scroll.
M-<(beginning-of-buffer)- Moves to the beginning of the buffer.
M->(end-of-buffer)- Moves to the end of the buffer.
Mnemonic: the beginning of the buffer is a location that’s less-than any other location, and vice versa.
C-x h(mark-whole-buffer)- Move Point to the beginning of the buffer and set Mark at the end of the buffer.
M-xmark-beginning-of-buffer- Set Mark at the beginning of the buffer, without moving Point,
M-xmark-end-of-buffer- Set Mark at the end of the buffer, without moving Point.
Code Objects: Balanced Parentheses and Function Definitions
| Object | Backward | Forward | Mark | Kill | Transpose |
|---|---|---|---|---|---|
| Sexp | C-M-b |
C-M-f |
C-M-@ |
C-M-k |
C-M-t |
| Defun | C-M-a |
C-M-e |
C-M-h |
C-M-h C-w |
An S-expression54 (“sexp” for short) is the name, in Lisp, for atoms
(symbols, numbers, and quoted strings) and the balanced parentheses that enclose
them, recursively. In Emacs, this useful notion is available everywhere; it’s
especially useful for editing programming languages, but even in prose it’s very
useful to be able to move over, copy, or kill a parenthesized phrase. The
characters that Emacs recognizes as parens are usually regular parentheses (aka
round brackets), square brackets, and braces (aka curly brackets), but it
depends on the Major Mode (for some languages, angle brackets (i.e. < and >) may
act as parens too).
But sexps are more than just balanced parens. A symbol (roughly, a word) that doesn’t contain any parens also counts as a sexp, as does a number. In most programming language modes, quoted strings are sexps (using either single or double quotes, depending on the syntax of the language). A sexp is any of those, or a parenthesized sequence of them, recursively.
These commands may seem confusing at first, but for editing most programming languages they’re fantastic. Not only do they move you around quickly and accurately, but they help spot syntax errors while you’re editing, because they’ll beep at you if your parens or quotes are unbalanced.
C-M-b(backward-sexp)- Moves backward over the next
sexp. If your cursor is just to the right of an opening paren,
C-M-bwill beep, because there’s no sexp to the left to move over: you have to move up. C-M-f(forward-sexp)- Moves forward over the next sexp. Same error if your cursor is just to the left of a closing paren.
Here’s an example of linear movement via sexps. The location of Point is shown
by |, and we move forward with C-M-f each time. After three C-M-f’s Point is
after “Emacs” in line 3, because each of the first three words count as symbols
and thus are sexps. But the next C-M-f leaps over the entire parenthesized
expression in line 4.
0. |In  1976,  Emacs  (in its original TECO form)  was invented.
1.  In| 1976,  Emacs  (in its original TECO form)  was invented.
2.  In  1976|, Emacs  (in its original TECO form)  was invented.
3.  In  1976,  Emacs| (in its original TECO form)  was invented.
4.  In  1976,  Emacs  (in its original TECO form)| was invented.
C-M-u(backward-up-list)- Move backward up one level of parens. In other words, move to the opening paren of the parens containing the cursor, skipping over balanced sexps.
C-M-d(down-list)- Move down one level of parens. In other words, move to the inside of the next opening paren, skipping over intervening sexps.
Let’s move up in nested parentheses with C-M-u. On line 0, Point is in front of
the word “Lisp”. We type C-M-u and on line 1, Point is now in front of the
nested parentheses. One more C-M-u and Point moves in front of the leftmost
paren.
0. (in its original TECO form  (which preceded the |Lisp implementation))
1. (in its original TECO form |(which preceded the  Lisp implementation))
2. |(in its original TECO form (which preceded the  Lisp implementation))
Nested parentheticals may be poor prose style, but they’re extremely common in source code in almost any programming language.
Now let’s move down with C-M-d. On line 0, Point is on the return type of this
C function definition; on line 1, after C-M-d, Point is inside the formal
parameter list:
0. |void synctex_updater_free( synctex_updater_t updater) {
1.  void synctex_updater_free(|synctex_updater_t updater) {
Since function defintions are such an important unit of text in programming languages, whether they’re called defuns, subroutines, procedures, procs, or whatever, they also count as textual objects. Like the sexp commands, these commands work appropriately in most programming language modes. Emacs calls this generic notion of function or procedure defun, again after Lisp.
C-M-a(move-beginning-of-defun)- Move to the beginning of the current function definition.
C-M-e(end-of-defun)- Move to the end of the current function definition.
C-M-h(mark-defun)- Sets the Mark at the end of the current defun.
Note the mnemonic analogy with lines and sentences.
Extending Kills
If you kill several times in a row, with any combination of kill commands, but
without any non-kill commands in between, these kills are appended together in
one entry on the Kill Ring — there’s no need to precede the kills with
C-M-w (append-next-kill). For example you can kill the next
six words as a unit with M-d M-d M-d M-d M-d M-d, move elsewhere and yank back
all six (with their intervening whitespace) with one C-y. C-u 6 M-d would be
equivalent. You can kill a block of lines with a sequence of several C-k’s, or
you could kill the next sentence and the following two words with M-k C-u 2 M-d
(note that the numeric argument C-u 2 doesn’t break up the sequence of kills,
because C-u 2 is part of the following M-d command).
Adjusting the Region
After setting the Region around one or more textual objects, whether by setting
the Mark and moving, or Shift Selection, or by object-specific mark commands,
you can fine-tune the Region by lengthening or shortening it at either end with
any other motion commands — perhaps you selected a paragraph with M-h but you
don’t want the blank line at the front of it, or selected a sentence and
want to add the two words at the beginning of the following sentence. Just move Point in any
manner. If you want to adjust the other end, where Mark is, use C-x C-x (exchange-point-and-mark): now Point is where the Mark was and you can
adjust that end.
Other Ways to Move Around
The textual object motion commands covered in the last chapter are probably the most important means of motion in Emacs. But there are several other ways to move around.
Move by Searching
You can exploit your knowledge of the contents of your text by using Emacs’s many search capabilities to move around. If you want move to where you were discussing Ursula K. Le Guin, just search for her name.
Follow a Breadcrumb Trail (The Mark Ring)
We learned in Selecting Text that there’s only one Mark in any Buffer. This is strictly true, but there’s an additional data structure in each Buffer called the Mark Ring (see Info) that holds a history of previous Mark locations55.
Whenever you set the Region, whether with C-SPC (set-mark-command) or a mouse selection, or implicitly with textual object
mark commands (like M-h (mark-paragraph)), the Mark’s
current location is pushed onto the Mark Ring. The Mark is also set for you
automatically at places where you’ve done “significant” things, like changing
text, moving a long way away in one big jump (there being many ways to do this),
the spot where you issued a search command, and the like56, and these
locations also go onto the Mark Ring.
Thus a breadcrumb trail of Marks is left for you to find your way back,
Theseus-like, to where you’ve been, and provides a quick way to get back to
these previous locations. The way to jump back to the previous Mark location is
to give C-SPC (set-mark-command) an argument, so C-u C-SPC.
It also rotates the Mark Ring, so that a repeated, uninterrupted sequence of C-u
C-SPC commands will take you back in time through your previous Mark locations.
The Mark Ring is a circular structure, so when you hit the end, you’ll circle
round to the most recent Mark location again. You’ll notice the analogies to
the operation of the Kill Ring.
It’s a common idiom to set the Mark explicitly as a breadcrumb to jump back to,
rather than as part of selecting some text. If you set the Mark, which
activates the Region, and immediately set it again in the same spot, the Region
is deactivated; this is nice for using the Mark to record your position —
you’re not really setting the Region, so why be distracted by the color of the
active region? So remember C-SPC C-SPC as the breadcrumb-dropping command.
The Global Mark Ring
In addition to each Buffer’s specific Mark Ring, there’s a also a Global Mark
Ring: this records a history of your locations in previous Buffers. So if you
want to jump to the last place you were in the previous Buffer you were in, just
use C-x C-SPC (pop-global-mark). The setting of these
global marks is automatic: whenever you switch Buffers, Emacs pushes the Buffer
you just left (and your location there) onto the Global Mark Ring. You can
cycle through this ring, too.
Move Via Your History of Changes
Perhaps the most surprising way of moving is by Undoing; if you recently made a change to your text (possibly just by adding some more) and then moved elsewhere, it’s pretty common to want to go back to where you made that change, and the easiest way to get there is to just Undo it, because wherever you may be now, an Undo pops you right back to the last change in that Buffer. You can use this trick even if you don’t want to Undo your change — because you can instantly restore it by a Redo.
Obviously this trick gets much trickier if you want to move back to where you
were, say, three changes ago: three Undos gets you to the right spot, but assuming
you liked your changes, if you Redo them you’re now back where you came from!
The third-party packages goto-last-change and goto-chg solve the problem by
going to the Undo locations without actually Undoing!
Mode-specific Motion
Various Major Modes may implement special ways of moving. Perhaps the most obvious is moving by identifiers (names) in programming language modes: you can move from a use of a function or variable to the definition, for example, or move through all the uses of an identifier. This typically works across all the files in a defined project. Some languages have a bespoke way of handling this via the language server protocol (LSP)57, but Emacs also supports various language-agnostic approaches, such as the Xref subsystem.
Move by Scrolling
Sometimes, rather than moving pointedly to get to a precise location, you just want to scroll through your text to get an overview and stop at the spot that catches your fancy; scrolling is covered in the chapter on Windows.
Goto Commands
Most of the textual-object motion commands can be thought of as moving relatively: when you move forward by one word (sentence, paragraph, …) you’re moving relative to the location of Point.
But occasionally it’s useful to move to an absolute position (though
much less often than one might think). The most common type of
absolute motion is to move to a specific line by its line number. For
example, according to M-x what-line, this line as I’m
writing it is line 1,497. If I move elsewhere, I can come right back
here by jumping to line 1,497!
Of course, since I’m editing, in a few minutes that line probably isn’t line 1,497 anymore, and I probably won’t remember that number for more than a few seconds, and anyway, if I wanted to come back here why don’t I just use the Mark Ring or search?

Figure 6: display-line-numbers-mode in action.
I think most people who use line numbers as motion targets have line numbers
turned on.
Emacs doesn’t display line numbers by default, though it does show
the current line number in the mode line, but you can toggle the traditional
left-margin display of line numbers on and off with M-x display-line-numbers-mode,
or arrange for them to always be on in every Buffer58. To me they just
waste screen real estate.
But what if you’re compiling a program in your terminal and it reports a syntax
error on line 563? Well, you should be compiling that program in Emacs with
M-x compile, and then you can jump to that error with a keystroke,
with no need to type any line number; see Compiling Code.
However, it’s true that you do occasionally get a line number foisted upon you
in an unpredictable manner — say, from a stack trace when a program blows up,
or from some log file. When you do, M-g g (goto-line)
will prompt you for the number and jump there.
Much more rarely, you’ll have a byte (character) offset from the beginning of
some file; M-g c (goto-char) will take you there.
Finally, M-g TAB (move-to-column) is what you need for
absolute positioning on the other axis: it moves to the given character offset
from the left margin. There are lots of subtleties to this command — like,
how do you count tab characters in the line, or multibyte (say, Unicode)
characters? — but hopefully you’ll never need it; I’d never used it before I
had to write this paragraph! See the documentation for details.
Variables and Symbols
Usually the programming language in which a program is implemented is only of incidental interest to the user of the program. But all Emacs users know that it’s implemented in Emacs Lisp, because the Lisp interpreter is always there, running Emacs and interacting with you to a degree that’s unheard of in most programs.
One of the most important parts of the running Lisp interpreter is the
collection of symbols that it contains: 45,260 at
startup. A symbol — which is a name like what-line or compile or
kill-paragraph — can hold a Command, in which case the symbol
serves as the name of the Command59, which you can use to execute the
Command via M-x (execute-extended-command) or by
which it can be attached to a keystroke via a key binding.
A symbol can also be a variable—initially Emacs has 45,260 of them— and have a value. We say the value is bound to the variable. Most of these variables are used only by programmers in the implementation of the functions they write for you to use, but a subset of them—3,113—are Customizable Variables (a.k.a. User Options), which you can use to configure Emacs to your liking.
In this chapter we’ll be talking mostly about User Options. They’re fundamentally the same as plain old variables, but distinguished by being variables that you’re expected to want to customize, and they have additional features to assist in this. But you can customize almost any variable if you want to, and some lazy Elisp programmers60 simply might not bother to mark their variables as customizable. So I’ll generally just use the term “variable” here.
What Are These Variables For?
Emacs is famously malleable and customizable: you can make it work and look
exactly the way you want, and this is mostly achieved through variables. Do you
not like the red color of the squiggles under your spelling errors? That
color61 is specified in the variable
flyspell-incorrect, so you can change it.
Do you wish Emacs wouldn’t beep at you when an error occurs? The
visible-bell variable lets you change that.
Throughout this book, I make some recommendations for tweaks to some variables, and give examples of others that you might want to change.
Types of Variable Values
A variable can hold any kind of Lisp value, and there are several types: truth values (corresponding to true / false or on / off: called Booleans by programmers), numbers, text (called strings by programmers), functions, and, perhaps most importantly, lists, which are sequences or collections of values of any types62. Also, and I don’t want to blow your mind here, but a variable (which is a symbol, you’ll recall) can also hold… a symbol.
Let’s look at some examples of real Emacs variables and the (typical) types of values they hold.
:title Examples of variables| Variable Name | Default Value | Type |
|---|---|---|
visible-bell |
t |
Boolean |
delete-by-moving-to-trash |
nil |
Boolean |
kill-ring-max |
120 |
number |
report-emacs-bug-address |
"bug-gnu-emacs@gnu.org" |
string |
tool-bar-position |
top |
symbol |
split-window-preferred-function |
split-window-sensibly |
function |
image-types |
(svg png gif tiff jpeg xpm xbm pbm) |
list |
In Table 2, we see that visible-bell is on (because t is the
Elisp Boolean true value) while delete-by-moving-to-trash is off (because nil
is the Boolean false value).
kill-ring-max determines the size of the Kill Ring.
report-emacs-bug-address is the email address for Emacs bug reports such as
those generated by report-emacs-bug, and as such must be a
string.
tool-bar-position specifies where the tool bar should be displayed, and must be
one of the four symbols top, bottom, left, or right.63
split-window-preferred-function is a variable that holds a function that is
actually called to split a window; split-window-sensibly is a symbol that names
a function suitable for this purpose. Variables that hold a function are
typically set to the symbol that names the function.
Finally, image-types is a list—of symbols, in this case, but Elisp lists can
hold any types or combination of types (including nested lists).
Inspecting Variables
You can take a look at the current value of any Emacs variable at any time. The
usual way is to use the Help facility via
C-h v (describe-variable) or the more ecumenical
C-h o (describe-symbol); see Help for a Variable for details.
Changing the Value of a Variable
As the name implies, you can also change the value that’s bound to a variable. There are three times at which you might do this:
- when Emacs starts up, via your Init File or the Customize Facility;
- explicitly and interactively, while you are using Emacs;
- whenever you visit a given file.
For cases 1 and 2, it’s best to use Customize, because it provides documentation
about how the variable works, guides you though the possibilities, prevents you
from making common mistakes, and allows you to revert your changes or save them
for future sessions. It’s equally good for making settings for your startup
configuration, for setting a value just for this session, or just to try out a
new value for a while. You’ll know you can use Customize when C-h v says, “You
can customize this variable.”
Note, however, that Customize only works for User Options. If you want to change a variable that hasn’t been defined as such, you’ll have to learn a little about Elisp.
Buffer-Local Variables
Variables can have different values in different buffers. For example, you might want to indent lines differently when you’re writing a Python program than when you’re writing prose. We call these buffer-local variables. They start out with a default value, but if you change the value of such a variable, the change only applies in the current buffer.64
You can’t change the local value of a buffer-local variable with Customize; you
either do it via Elisp in your Init File (if you want the change in every Emacs
session; see Hooks below), or else you use M-x set-variable to do it
just for now, in the current buffer.
To set a variable with set-variable, you need to know the type of value the
variable expects; that means you need to read its documentation with C-h v. You
also need to know enough about Elisp to understand the syntax of the different
types. There’s a difference between the number \(256\) and a string
containing the three digits \(2\), \(5\), and \(6\).
If you say M-x set-variable, Emacs will prompt you for the name of a variable.
You might enter:65
Set variable: report-emacs-bug-address
The next prompt would be:66
Set report-emacs-bug-address globally to value:
According to the documentation, this value needs to be a string; if you were to enter:
Set report-emacs-bug-address globally to value: myself@example.com
you would get a type error:
user-error: Value ‘myself@example.com’ does not match type string of report-emacs-bug-address
Table 3 provides a cheat-sheet for entering values of the
major data types in the correct syntax; see
“Init Syntax” in the Emacs manual for details, and also for how to set
variables in your Init File. But remember, prefer
M-x customize-variable whenever possible.
| Type | Example | Another Example |
|---|---|---|
| Boolean (true or on) | t |
|
| Boolean (false or off) | nil |
|
| number | 256 | 1 |
| string | “256” | “myself@example.com” |
| symbol | flyspell-incorrect |
top |
| function (same as symbol) | find-file |
set-variable |
| list | (1 4 12) |
("/tmp") |
The syntax of Booleans is very simple: the true value is spelled t and the false
value, nil.67 I could give you other examples of the true and of the false
values, but it would require a little
too much explanation.
Numbers are represented as a sequence of base 10 digits, like 256, possibly
including a decimal point, as in 3.141593. There’s a special syntax to enter
numbers in other bases.
Strings are enclosed in double-quotes; there are some tricks here, like how to
include a double-quote in a string---""" is no good, because the enclosed
(second) " terminates the string: you have to escape it with a backslash like
this: "\"". There are also other “escapes” so that you can include control
characters and such; see “String Type” in the Elisp manual.
Symbols look rather like strings without quotes (they don’t need quotes because they won’t contain spaces); you can just type their names. As discussed above, a function is typically represented by the symbol that names it (though for the Elisp programmer, there are other possibilities) and so uses the syntax of symbols.
Lists are simply zero or more space-separated instances of any types enclosed in
parentheses. The empty list is ( ). There’s no problem nesting lists: this list
contains two values, a string followed by a list of three numbers: ("foo" (1 2
3)).
This should be enough syntax for you to enter values at the set-variable prompt.
File- and Directory-Local Variables
Elisp also lets you initialize buffer-local variables inside arbitrary files: these are called file-local variables. When you visit such a file, the variables are automatically given their declared values in the buffer that the file initializes. This is especially useful as a way to set the Major Mode in which the file should be edited—see Mode via File-Local Variable—but you can set additional variables too (subject to Security limitations).
You can also set buffer-local variables on a per-directory basis; this is very convenient when you would otherwise be repeatedly setting (or forgetting to set…) the same file-local variables every time you add a file to a directory; see “Directory Variables” in the Emacs manual.
Hooks
An essential part of Emacs’s customizability is provided by hook variables. They cleverly solve the problem of how you can customize, in your Init File, dynamic things that haven’t happened yet, like all future buffers in some particular Major Mode, or an Emacs application that you haven’t started yet (like Eww (the web browser) or Dired the file manager), or a third-party application like Magit that doesn’t even ship with Emacs.
A hook is nothing more than an ordinary variable that’s used in a conventional
way by Emacs programmers. The value of a hook is a list of functions, such that
at some documented and distinguished time—like when you visit a file in, say,
python-mode, or pull up a web page in Eww, or start playing an audio file in
EMMS—the functions are executed, or run.
Most hooks have a default value of the empty list: when the hook is run, nothing
happens! But the important point is that you can add your choice of functions
to the hook to cause magical things to occur. For example, you might add the
function flyspell-prog-mode to the
python-mode-hook variable to enable spell-checking of
Python comments. Now you’ll get this spell-checking in every Python file that
you visit.
Minor Modes are a very common class of functions to add to hooks, as is a function that changes the value of one or more buffer-local variables, whether one of the 132 predefined buffer-locals, or one defined specifically by a Major Mode for customization purposes. You can also write a function yourself to do any crazy thing that no one else could have thought of in advance, like send an email to somebody mentioning that you’ve started editing that Python file.
Hooks are almost always set in the Init File, rather than via
M-x set-variable; see Programming the Lisp Machine.
Help, Discovery, and Documentation
All kinds of help for Emacs is never more than a keystroke away — no need to
switch to a web browser. The Help system (commands on the prefix key C-h and
also the function key F1) provides quick access, especially for known-item searches
(“what is”, “where is”, “what does it do”). The Apropos facility is more like a
Google search, used when you want to do something but don’t know what commands
or Modes or subsystems are available to do it (a query like “version control
diff”, say). Finally, Emacs has a built-in hypertext documentation reader,
called Info, for long-form, book-length documentation. To enter it, type
C-h i. See the Info chapter for more information.
Help
Emacs’s extensive online help is available via the help key,
C-h 68. C-h is a prefix key. Type C-h twice to get a
window describing all the following commands and more (a SPC will scroll this window).
Some of the most useful help commands are:
C-h C-q(help-quick-toggle)- Toggles a quick help Buffer on and off that summarizes 30-odd keystrokes in six categories.
C-h a(apropos-command)- Prompts for keywords and then
lists all the commands whose names match. If you’ve forgotten the name of the
command that counts words,
C-h a word countwill reveal it. C-h k(describe-key)- Prompts for a keystroke and
describes the function bound to that key, if any. If you remember
M-=but can’t recall what it is, useC-h k(it’s count-words-region). C-h w(where-is)- Prompts (with Completion) for the
name of a function and tells you (in the Echo Area) what keystrokes will
invoke it. If you cheekily type
C-h w where-is, you’ll see:C-h w, <f1> w, <help> w. C-h o(describe-symbol)- Prompts (with Completion) for
the name of a function, a variable, or a Face69 and describes all the
matches. If you remember
count-words-regionbut not what it does,C-h o count-words-regionwill tell you. (C-h fwill do the same but only for functions, andC-h vonly for variables, if you want to narrow it down.) C-h m(describe-mode)- Describes the current Major Mode and its particular key bindings.
C-h r(info-emacs-manual)- Enters the Info hypertext documentation reader at the Emacs manual, which contains many hundreds of pages of documentation.
C-h p(finder-by-keyword)- Runs an interactive subject-oriented browser of installable Emacs packages70. These lists of packages are actually presented by the package manager itself, so you can directly install packages from here.
C-h t(help-with-tutorial)- Run the Emacs tutorial. Have you done this yet?
There are 39 more help commands on C-h, which C-h C-h will reveal.
Of the commands I list above, C-h k, C-h o, C-h f, C-h v, C-h m (and a few of
the other 39) bring up a Help Buffer. This is something of a simplification,
but there are three main varieties of the Help Buffer:
- help for commands and functions, whether acquired via a keystroke or via a command name
- help for variables
- help for Modes
Let’s see what these are like.
The Help Buffer
Let’s get help from C-h k for whatever C-x C-b is! This is the same kind of
buffer you’d get from C-h f (describe-function).

Figure 7: Help for key C-x C-b
First note that the help pops up in its own buffer (named *Help*) in a new
window (stealing some screen real estate from the PKGBUILD buffer I was looking
at); the buffer is in help-mode (which of course usefully
redefines some keystrokes).
Often a quick glance at this buffer is enough to answer your question and you
just get rid of it with a quick C-x 1 (delete-other-windows),
perhaps after giving it a quick scroll with
C-M-v (scroll-other-window).
If you’re in an investigative mood, you might jump into the help buffer with
C-x o (other-window), where you can exploit its clickable
buttons (cyan text) and the the key bindings of help-mode.
Parsing the Help Buffer
The first line identifies the function that C-x C-b runs: list-buffers, and
tells us which keymap (global-map) the keystroke was found in71.
It also tells us what kind of a function list-buffers is — “an interactive
compiled Lisp function”; other possibilities include “built-in function” (which would
mean it’s implemented in C, rather than Elisp) — and it tells us which file of
source code the function is defined in. You don’t need to worry about any of
this as a person just learning to use Emacs, but it isn’t just idle chat: the
cyan color of the file name means that it’s a hypertext link, and if you “click”
it (with mouse button 1 or by hitting return) it will take you directly to the
definition of that function in that file and you can read the source code
yourself.
As an aside: this is an incredibly powerful tool for learning how to extend Emacs. I guarantee that if you are wondering what function the back-arrow button in Firefox runs when you click it, you’ll have to spend a lot of time plowing through the >1 GB of source code (after you download it) and cross your fingers when you search for “back”. And if we were talking about the bold-face toolbar button in Google Docs or Microsoft Word, you wouldn’t even be allowed to download the proprietary source code.
The next paragraph lists all the key bindings which run list-buffers — this is
just what C-h w (where-is) would tell you.
The next line (“(list-buffers &optional ARG)”) shows you how you would call the
list-buffers function if you were writing Elisp, and after that, how old this
function is in terms of the Emacs version number (this is mostly useful for
programmers who might not want to write code using a new bleeding-edge function
that won’t be available in older Emacsen72).
The remainder of the buffer describes precisely what list-buffers does. This
text may include more hyperlinks to other, related, functions or variables (like
buffer-menu here).
The help for a command can be extensive. But this is because the documentation includes everything an Elisp programmer might need to know; usually the first line or two tells you everything you need for interactive use.
Finally, if this isn’t the first help buffer you’ve popped up in this Emacs
session, at the bottom of the buffer will be a button labeled “[back]” which
will take you to the previous help buffer you looked at. Once you’ve gone back,
there will be a “[forward]” button to return you to where you came from. These
are just like the back and forward buttons in your web browser and make it easy
to browse through the hypertext of the Emacs help system. Note that there’s
really only one *Help* buffer, to keep from cluttering your Emacs; the
navigation buttons recreate the previous text in the same *Help* buffer.
I mentioned that the help buffer is in Help Mode. This gives you 25 useful key
bindings for use when you’re in the *Help* buffer. For example, SPC is bound to
scroll-up-command and S-SPC to
scroll-down-command for easy reading. C-c C-b and C-c C-f
are keyboard equivalents of the “[back]” and “[forward]” buttons. TAB and
<backtab> (a.k.a S-TAB) take you to the next and previous clickable button
respectively.
Help for a Variable
Now let’s look at the help for the variable completion-styles, which we could
see by executing C-h o completion-styles (or C-h v).

Figure 8: Help for variable completion-styles.
It’s very similar to the help for a function, but it tells you right up front
the most important thing about a variable: what it’s current value is (here, the
list of symbols
(basic partial-completion substring initials flex)). Interestingly, it also
tells you that its original value was (basic partial-completion emacs22): this
is the default value in a fresh Emacs: I changed it to demonstrate this
feature. There may also be a hyperlink into the Customize facility, as here.
The rest of the buffer is the documentation for the variable, with the same
features as for functions.
For some variables, the help will say “Automatically becomes
buffer-local when set.” This means that the variable can have distinct values
in different buffers, which is very useful for customization. For some
variables, a buffer-local value doesn’t really make a lot of sense, like
confirm-kill-emacs, which lets you specify whether you want
to be asked to confirm your intention when you give the exit command. But you
may well prefer the values of other variables to vary from buffer to buffer or
Mode to Mode, such as indicate-empty-lines,
fill-column, or truncate-lines.
The help for some variables may also address the safety of the variable with a statement like “This variable is safe as a file local variable if its value satisfies the predicate ‘integerp’.”; see Security Concerns.
Help for a Mode
To get help for a Major Mode, just switch to a buffer that’s in that Mode and do
C-h m. The help buffer gives a description of the Mode, and lists all the
Mode-specific key bindings. In addition, each enabled Minor Mode is described
separately.
You can also access Major Mode help from any Buffer using C-h f and the name of
the Mode, e.g. C-h f org-mode.
Discoverability via Apropos
Most of the Help commands described above answer specific questions about known items: what is this key? what does this function do? what kind of values can I set this variable to? The Apropos facility is how you search for unknown functions and variables related to what you want to do.
We’ve been introduced to the Apropos facility via C-h a above. This is
M-x apropos-command which searches for commands by name.
Command is the technical term for an interactive function: that is, a
function you can call via a key binding or with M-x. The reason for making
this distinction is purely practical. Emacs has tens of thousands of functions,
most of which would only ever be called by an Emacs Lisp programmer. Commands
are functions that are likely to be useful to the non-programmer (or to the
programmer when she’s acting like a non-programmer).
If you’re interested in seeing non-command functions as well, you can give C-h a
an argument (e.g. C-u C-h a).
Even more broad-minded is just plain M-x apropos, which includes all
functions, variables, and faces.
If you want to limit your search to variables, you can use
M-x apropos-variable. But there are other Apropos commands to make
finer distinctions among variables:
M-xapropos-user-option- only considers user-customizable variables (sometimes called options)
M-xapropos-local-variable- only considers buffer-local variables defined in the current buffer
If you’re working with a particular Elisp library (like, say,
dired), you can use M-x apropos-library to list
all (and only) the variables and functions defined in that library. The library
has to have been loaded; if you don’t get any results, load the library first
with M-x load-library.
All of the above commands are only searching by function or variable name, to
avoid overwhelming you. But you can include in your search all the text of the
function’s or variable’s documentation with C-h d (apropos-documentation). This is just like C-h a but instead of limiting
its search to the names of commands, it includes all symbols (like variables)
and also searches the full text of the documentation of these symbols. This is
a much broader search, and for reasons of both speed and concision, it limits
the search to the standard built-in Emacs commands. If you give C-h d an
argument, i.e., C-u C-h d, it searches the documentation of literally all
symbols in your running Emacs, including those from third-party packages you may
have loaded.
Finally, you can also search the values of variables with
M-x apropos-value. This is a pretty big search. My Emacs at
the moment has 45,260 defined variables, and some of them have
pretty big values.
The Apropos Query Language
All the Apropos commands use the same query language. Your query can take any of the following three forms:
- a single word
- all the results must contain this word
- two or more words
- all the results must contain at least two of these words
- a regular expression
- all the results must match this regular expression.
Additional Information
The Help key has several additional subcommands that provide access to more information. Some of these are shortcuts into the Emacs or Elisp manuals in Info, but some are standalone files.
C-h C-a- Information about Emacs (recreates the splash screen you saw when you started up Emacs).
C-h C-c- Emacs copying permission (displays the complete text of the GNU General Public License, which gives you your freedom to copy, modify, and redistribute Emacs and its source code).
C-h C-d- Instructions for debugging GNU Emacs. This is for real hard-core programmers hacking on Emacs to fix deep bugs.
C-h C-e- External packages and information about Emacs.
C-h C-f- Emacs FAQ (the Frequently Asked Questions list).
C-h C-m- How to order printed Emacs manuals.
C-h C-n- News of recent Emacs changes; see Updates and Bugs.
C-h C-o- Emacs ordering and distribution information. This used to provide postal addresses you could write to in order to get copies of Emacs mailed to you on giant 9-track magnetic tapes to load on your mainframe! Nowadays, it just contains a few URLs and notes how you can make donations to the Free Software Foundation.
C-h C-p- Info about known Emacs problems. This is a broad summary of the
standout Emacs bugs; the real bug list is available on the Web in the Bug
Tracker, which is also available in Emacs via the
debbugspackage; see Reporting Bugs. C-h C-t- Emacs TODO list. If you’re a Lisp or C programmer and want to contribute to the development of Emacs, you can start here.
C-h C-w- Information on absence of warranty for GNU Emacs.
Info: The Emacs Documentation Reader
Emacs has a built-in documentation reader called Info. It dates from 1985 and actually predates GNU Emacs (it was present in ITS TECO Emacs) and was one of the earliest freely available hypertext systems, predating the World Wide Web by about fourteen years.
The Emacs manual is the most important Info document, but Emacs ships with 68 additional manuals, comprising 427,921 lines of text, describing various subsystems and major modes (e.g. Org, Gnus, Calc).
Info documents are written in their own markup language, called Texinfo, and
Texinfo is used to document many other non-Emacs software projects73. The
non-Emacs packages I’ve installed on my Arch Linux system include an additional
69 Info manuals. (Non-Emacs users read these
manuals with the info command-line documentation reader, which is sort of like a
clone of the Emacs Info system for Vim users and other Emacs-averse types, I suppose.)
The main entry points for Info are:
C-h iorM-x info- Lists all installed manuals, including the Emacs manual (there will be at least sixty, if you’ve done a full install of Emacs).
C-h rorM-x info-emacs-manual- Skip the top-level list and read the Emacs manual directly.
C-h R(info-display-manual)- Open a specific manual by
name, with Completion.
C-h R calcwould go directly to the Calc manual, for example. C-h F(Info-goto-emacs-command-node)- This is like
C-h f(describe-function)—it prompts for the name of an Emacs function—except it tries to find a discussion of the function in the Emacs manual (while every Emacs function has Help documentation, they aren’t all described in detail in the manual). C-h K(Info-goto-emacs-key-command-node)- This command is
to
C-h k(describe-key) asC-h Fis toC-h f.
Info is of course documented in its own Info-manual, which you can read with
C-h R info (or just navigate to it from the main Info menu via C-h i).
Info has its own interactive tutorial74, modeled on the Emacs Tutorial, to teach
you how the hypertext system works. Ideally, you should take it before you
start using Info; you can start the tutorial by typing h
( Info-help) from anywhere in any Info manual. But you can read any
Info document in its entirety by just hitting
SPC (Info-scroll-up), so feel free to just dive in; if you
want more or need help, hit h.

Figure 9: Typical Info node with menu
A typical page in an Info document (called a node) looks like that in Figure 9. The very first line is a header line with next, previous, and up navigation links for mouse navigation. The next line is a breadcrumbs line that shows your position in the document hierarchy with clickable links. The rest of the page consists of text, typically with clickable hyperlinks to other pages. Often there is (as here) a menu of links to subsections of the chapter; these are exactly the same kind of links as appear interspersed in the text.
You can move around in Info within a node, or between nodes. The usual motion
and scrolling commands work fine for the former, along with the convenient
bindings SPC and DEL for scrolling up and down by screenfuls.
Moving between nodes is more interesting. If you’re looking at the bottom of a
node75, SPC will move on to the next node, in the order you’d use to read
the entire document (DEL does the same backwards if you’re at the top of a
node).
Like any hypertext, an Info document has a tree structure76. While SPC
moves node by node through the whole tree in reading order (that’s a depth-first
traversal), you can cut across the branches at any level (breadth-first-wise)
with n (Info-next) and p (Info-prev). So,
if you’re in the node for Chapter 3, n will go directly to Chapter 4, skipping
all subsections of Chapter 3, and if you’re in subsection 4 of section 2 of
Chapter 6, n will go to subsection 5, and so on. p does the same thing
backwards. In other words, n and p are the keyboard shortcuts for the Next: and
Prev: links in the node’s header line. u will go up to the parent of this node.
You can also move through nodes in the order in which you visited them: that is,
move via your node-browsing history. The
l (Info-history-back) command goes left to the last node you
were in; more l’s go further back in time. The
r (Info-history-forward) command goes right, forward in time,
assuming you’ve already gone backward. These commands have no relation to the
order of the nodes in the document, but only to the order in which you’ve read
them. L (Info-history) takes you to a node containing the
history of all the nodes you’ve visited, as a Menu.
Hyperlinks
Info documents wouldn’t be hypertexts if they didn’t have hyperlinks. These are
exactly like the links in a web page and look similar: colorized and underlined.
You can navigate from link to link in a node with TAB (S-TAB goes in reverse)
and then follow a link by “clicking” on it (either with RET or the mouse). Info
links can take you to other places within a node, to other nodes in the
document, and also to nodes in other Info documents.77 Links to places in
the same node are formatted like footnotes.
You can also follow any of the links in the current node (even if you can’t see
some of them) without navigating to them with
f (Info-follow-reference), which prompts you for the text of
the link. You can use Completion to complete any of the links in the node; note
that Menu links and Footnote links are excluded from the Completion, because
they have their own shortcut commands.
Menus
Many Info nodes have menus, especially in the first node of a document and in each chapter. Menus are nothing more than a list of hyperlinks and work the same way; it’s just a convention for organizing an Info document. Menus typically list all the children of a given node: that is, a chapter menu will list all the sections in that chapter, and a section menu all its subsections.
You can use Completion to select a Menu item by typing
m (Info-menu), analogous to the f command for cross
references, and the digit keys will jump directly to the node of the
corresponding menu item: e.g., 3 would jump to the node named in the 3rd menu
item and so on.
Searching
Since an Info node is just a buffer, you can obviously search within it with the
usual search commands like C-s (isearch-forward),
M-x occur, and the like. Incremental search commands like C-s will
beep when you get to the end of the node, but if you force the search with one
more C-s then instead of wrapping to the beginning of the buffer, they will skip
ahead to the next hit in the next node of the document.
Indexes
In addition to full text searching, most Info documents are actually manually indexed by their authors, and everybody knows that a good index, what with synonyms, related terms, and inversion, can offer accessibility that full text searching can’t. In addition, an index allows for the possibility of Completion on index terms!
An Info document can have one or more indexes—Emacs-related documents will often have separate indexes of Key Bindings, User Options, Commands, Variables, and Concepts (the Emacs manual has all of these).
The index pages of a document are always listed at the end of the top-level menu
of the document (its table of contents), but from any node the
i (Info-index) command prompts you for an index term, with
Completion, from any of the document’s indexes. Since a given term can point to
any number of nodes, it will take you to the first occurrence, and if there are
more, you might see a message like this in the Echo Area:
Found ‘INDEXTERM’ in Concept Index. (20 total; use ‘,’ for next)
and indeed, the comma key will step you through all the hits.
Alternatively, you can instead use I (Info-virtual-index),
which presents the same hits as i but lists them all in a dynamically-generated
Menu.
You can also search across all sixty-plus Info documents at once with
M-x info-apropos, the search-engine of Info commands. It works like
other Apropos commands but targets the text of the indexes of all installed Info
files, and generates a dynamic Menu page from the hits.
Higher-Level Navigation
You can jump directly to the top of the current Info document, with its master
Menu table of contents, with t (Info-top-node), and the
d (Info-directory) command goes to the Menu at the root of the entire
Info system, listing all installed Info documents (the same place that C-h i
takes you to).
Write Your Own Manual
If you are writing a book-length document, especially a manual for software, and
very especially a new manual for an Emacs subsystem or Mode, you might consider
using Texinfo format.78 You’ll get many output options—PDF, HTML,
DocBook, EPUB, and of course Info, which can be read in Emacs and even by non-Emacs
users via the info command-line reader that’s standard on most Unix systems.
And Emacs is of course especially suited for authoring with its Texinfo Mode;
see Emacs For Writers for more information.
Messages, Errors, and Lossage
Messages
Various brief messages appear in the Echo Area from time to time. This includes
error messages (like, trying to save a file that you don’t have permission to write),
and also informational messages. Some commands exist only to print informational
messages, such as C-x l (count-lines-page), which tells you
how many lines there are in your buffer79:
Page has 5549 lines (2407 + 3143)
If you miss a message like this, or if you want to make a copy of the message,
you can use C-h e (view-echo-area-messages). This pops up
the *Messages* buffer, which you can switch to for copies of the N most recent80
Echo Area messages. It’s just a buffer like any other, so you can copy and
paste from it.
There’s a separate buffer for warnings. Warnings are obviously
like errors, but less severe. While errors go to the Echo Area, and behind the
scenes are copied to the *Messages* buffer, warnings instead go to a separate
*Warnings* buffer, and when a warning is generated this buffer pops up and is
very noticeable. It seems counterintuitive that warnings should be more
in-your-face than errors; I think the reason is two-fold: 1. the special
handling of warnings is a relatively new feature, dating from about Emacs
version 22; and 2. an error terminates whatever function raised it — it beeps,
and you’ll look at the Echo Area — whereas a function that generates a warning
will continue with what it was doing, but wants you to know something that you
might need to act upon. There’s no special command to pop up the *Warnings*
buffer; if you’ve deleted the window that popped up, and you want to reexamine
it, you can just switch to it by name with C-x b (switch-to-buffer) (which you can also do to get to *Messages*).
What Just Happened?
Occasionally as you’re working, you might suddenly notice that something unexpected has happened — perhaps a chunk of text has disappeared before your eyes, or you’re suddenly in a completely different location! What happened?
Almost certainly this means you accidentally hit some unintended combination of keystrokes, and since so many such combinations are bound to commands, this means you inadvertently told Emacs to do something.
If a change to your text occurred, you can just Undo it and continue on. While you can’t Undo a location change, you can use the Mark Ring or the Global Mark Ring to return to where you were. But you might want to know what keystrokes and command you invoked so that you can avoid hitting it in the future — or perhaps you’ve discovered a new useful command to use intentionally!
The C-h l (view-lossage) command81 pops up a Help Buffer
showing the last 300 keystrokes you’ve typed. The lines look like this:
M->                           ;; end-of-buffer
q                             ;; quit-window
C-x b                         ;; switch-to-buffer
c                             ;; self-insert-command
o                             ;; self-insert-command
showing you the keystroke and the command name. You can ask for help for any of
the command names (with C-h f (describe-function))
which can help you figure out what happened.
The Minibuffer
Sometimes a command needs to ask you a question. C-x C-f asks,
“What file did you want?” C-x b asks, “What Buffer did you
want?” M-x asks, “What long-named command did you want me to
execute?”
To get your answer, Emacs uses its most general and most powerful data
structure, the Buffer, but to avoid constantly popping up a new one and messing
with your Window layout, it uses a special Buffer called the Minibuffer
(see “Minibuffer” in the Emacs manual), which is always displayed in a compact form in
the same location. In fact, the Minibuffer reuses the fixed Window that’s used
for the Echo Area at the bottom of the screen. The question, or prompt, appears
in the Echo Area, which is automatically focused to receive your response, and
when you hit RET, the little excursion is over.
The advantage of using a Buffer, rather than something like a modal GUI dialog widget, would be that you already know how Buffers work, and you can interact with this Minibuffer using the same commands you use all day long.82
The Echo Area, and thus the Minibuffer’s Window, is normally only one line high — just enough space for a typical prompt and your response, though it will dynamically expand to more lines as needed, and you can change the default height if you like.
The Minibuffer has its own Major Mode, with a few specialized key
bindings. Most notable is that hitting RET is how you indicate that
you’re done typing your answer: RET deactivates the Minibuffer and
your cursor is returned to the Window it was in when the interaction
started.
While it has some special behavior and a few restrictions, the Minibuffer is otherwise very much a fully-functional Emacs Buffer. All the usual editing commands work — you can move around within it to correct mistakes, you can even do fancy things like search within it, you can kill and yank text, use spelling correction, or anything else83.
Minibuffer History
In addition to the special treatment of RET, the Minibuffer’s Major Mode
provides convenient history commands. You can instantly recall your previous
input — command name, filename, Buffer name… — with M-p (previous-history-element); subsequent M-p’s will go further back, and you
can switch directions and go forward again with M-n (next-history-element) — the up- and down-arrow keys are synonyms.
(Rather than navigating the history, C-p and C-n navigate multi-line input as in
any Buffer — multiple lines, while atypical, are completely supported in the
Minibuffer).
You can also search backward in the history with
C-r (isearch-backward) or
C-M-r (isearch-backward-regexp). You could, say,
quickly pull up the last Org Mode file you edited with C-x C-f C-r
.org, even if you last typed that filename days ago.
Note that any individual command can have its own distinct history list. This is typically done to tamp down the Completion possibilities for any given command to those that are most likely to be useful. Since the Minibuffer is used for all prompted inputs, if it only had one history list, then you’d have to wade through Buffer names, command names, color names, variable names — you get the idea — no matter what you were about to enter.
Instead, all the file-visiting commands, like C-x C-f, share a
single history list which only contains filenames; likewise for
C-x b and Buffer names, M-x and command names,
etc.
Future History
One of the lesser-known features of the Minibuffer84 is that its
history extends into the future: that is, Emacs can predict inputs
that you haven’t typed yet! More prosaically, you could call these
predictions, defaults. You access these defaults with
M-n (next-history-element) — use it immediately
after you’ve been prompted for input by some command and it’ll offer
up suggestions: if you’re at the end of the history, the next history
element is from the future!
For example, after C-x b (switch-to-buffer), M-n will offer
up names of Buffers that you’ve recently visited (even if you haven’t ever
explicitly input their names). C-x C-f will do something
similar, but in addition, if, before you invoked C-x C-f, Point happened to be
in the name of an existing file, it will offer up that filename. Sometimes the
things M-n comes up with can seem telepathic. (The flip side is that sometimes
it won’t have any guesses for you.)
Recursive Minibuffers
The Minibuffer is the sole, unified way to get prompted input, and
you can use any commands you like when you’re entering text there. So
what happens if you type M-x eww to pull up a web page in
the Emacs web browser. Eww is now using the Minibuffer to read a URL,
prompting you with:
Enter URL or keywords:
Then you realize you don’t remember the precise URL you need, but you know it’s
in a file. So you naturally type C-x C-f (find-file) so you
can observe and copy that URL.
But no! Emacs will beep at you and refuse to execute C-x C-f, saying:
Command attempted to use minibuffer while in minibuffer
That is, you’re in the Minibuffer (entering a URL) but C-x C-f now
needs to use the Minibuffer to read a filename!
This is not really a limitation of Emacs, which actually has no problem allowing you to invoke the Minibuffer recursively to any (reasonable) depth. However, this feature is disabled by default — because it’s been found to confuse Emacs newbies.
But this many pages into this book, you’re no longer a newbie! While my example may be somewhat contrived, recursive Minibuffers are very useful and you’ll probably want them several times in a day. I recommend turning them on with this snippet of code in your init file:
(setq enable-recursive-minibuffers t)
If you recursively invoke a Minibuffer and change your mind about it,
just hit C-g (keyboard-quit) as usual; it will
abort the most recent Minibuffer and you’ll be back in the previous
one and can complete your input there as you like.
Temporary Excursions
When you’re entering information in the Minibuffer, you may occasionally realize that you don’t actually know what you need to type, as in our URL example. You have to check something first.
The normal procedure is just to use C-g (keyboard-quit) to
cancel the command that’s using the Minibuffer, do your investigation, and then
reissue the command. How very modal of you.
But you can instead just temporarily switch out of the Minibuffer with any
command that switches Windows. Normally that would be C-x o (other-window) but any Window-changing command, or clicking in another
Window with the mouse, is fine.
Now you’re in one of your “normal” Windows, and the Echo Area, instead of being blank, as usual, still contains the Minibuffer prompt and whatever else was displayed there when you jumped out: the Minibuffer is frozen the way you left it, waiting for you to return and finish what you were doing. In a graphical mode Emacs, you’ll notice that the Minibuffer cursor has changed from a solid rectangle to a hollow one.
While you’re away, you can do anything you like: continue editing, play a game
with M-x tetris, copy some text you need for the Minibuffer:
you can even, of course, use a command that uses the Minibuffer!85 You can stay
away as long as you like. When you’re ready to get back to where you left off,
just navigate to the Minibuffer (again, C-x o
or a mouse click is the most natural), and complete your action, perhaps yanking
in some text you copied for the purpose. Hit RET to execute the patient,
long-suffering command-in-progress, and you’ll be returned to wherever you were
when you started this excursion — the Window layout and your Buffer position
will be restored as they were, even if, during your excursion, you changed
Windows around radically. This is the essence of non-modal editing!
Repeating Complex Commands
Among people who use Emacs mostly as a text editor, the Minibuffer is probably
most heavily used to input file names, followed by Buffer names. But as you use
Emacs for more things, the use of the Minibuffer to enter command names with
M-x (execute-extended-command) probably dominates. So Emacs
provides special history support for these.
We know that if you type M-x you can retrieve previous commands from the history
with M-p, C-r, and M-r, but some
commands have multi-part inputs. Consider M-x rgrep (see
Meet the Greps). It’s nice that the Minibuffer history helps you avoid typing all
five characters of “rgrep” to run a new Rgrep, but what if you want to rerun a
previous Rgrep exactly?
M-x rgrep prompts you for three things: a search term or regular
expression, a file type wildcard pattern (e.g., *.org), and a base directory
from which to start the search. You can use the history commands at each of
these prompts, but that can be a little tedious if you just want to rerun the
command exactly: M-x rgrep RET M-p RET M-p RET M-p RET M-p RET.
Instead, you can use C-x ESC ESC (repeat-complex-command).
You get a Minibuffer prompt showing your previous M-x command, in its true Elisp
form; it might look like this:
Redo: (rgrep "minibuffer" "*.org" "~/txt/" nil)
Even if you’re not an Elisp programmer (yet), this should be recognizable as
your grep for the string “minibuffer” in Org Mode files contained (recursively)
in ~/txt/; just hit RET to re-run it, with no need to reenter the three
parameters. You can edit the command beforehand (perhaps to tweak the regexp,
or the file type, or the base directory)86.
You can use the Minibuffer history (M-p, C-r, M-r) as usual here to choose a
different prior command. Note that the history includes any command that used
the Minibuffer, even if you invoked it via a key binding, so you’ll find old
friends like C-x C-f (find-file) and
C-x b (switch-to-buffer) here as well.
You can view a Buffer of the N most recent87 M-x commands with
M-x list-command-history. The commands are in their true
Elisp form, as for C-x ESC ESC, one per line. In this Buffer you
can re-run the command at Point by typing x ( command-history-repeat).
Since the default command history list is so short, and since I think RET in
this Buffer should execute the command at Point, I recommend this snippet for
your init file:
(with-eval-after-load 'chistory
  (setq list-command-history-max 120)
  (define-key command-history-map (kbd "<return>") 'command-history-repeat))
An Aside Concerning Completion Frameworks
Note that alternative Completion frameworks, and Incremental Narrowing Frameworks in particular, may radically alter the nature of the Minibuffer, making it seem less like a normal buffer, and some of the things described in this chapter may not work precisely the same way.
Completion
Everyone is familiar with completion, perhaps under the name “autofill”, which usually refers to the automatic completion of fields in forms. Web browsers, spreadsheets, and smartphone applications autofill via drop-downs, and Unix users are of course familiar with the TAB-completion of commands, options, and filenames in any conventional shell88.
Emacs definitely had completion for the Minibuffer by 1985 and as a text-oriented computing interface that prioritizes the keyboard over menus, it’s fundamental to using Emacs. Completion is pervasive: almost anytime Emacs prompts you for information — command names, variable names, filenames, color names, lists of words — completion is available; it’s also available at Point in many buffers (e.g., to complete symbols and keywords in programming languages, as you type).
This is not to be confused with the predictive autocompletion or autocorrect for prose that you’re used to from the text messaging app on your phone, where every word you enter is automatically turned into a typo for you!89 Instead, you can autocomplete natural language words via an explicit keystroke; Emacs calls this expanding dynamic abbreviations.
Neither is it to be confused with template expansion, where an entire
complex piece of text, like say a case statement in a programming
language, is expanded from one word.
As completion examples I’ll use M-x commands, because the basic set of them is
common to all Emacs users — filenames and buffer names are going to be unique
to each person — but don’t forget that it works the same for everything.
A Shortcut to Completion
Emacs has a number of ways of performing completion that I’ll call completion frameworks. The default framework is roughly the way completion has always worked since about 1985, but you definitely want to use a more modern framework of the type known as incremental narrowing. Even here, Emacs has more than one choice.
I’m going to recommend you start right off with Vertico90, which you can install from the GNU ELPA Package Repository; see Figure 10.

Figure 10: M-x switch-to-buffer via Vertico
You’ll need to add this to your Init File and restart your Emacs91:
(setq completion-styles '(partial-completion substring flex))
(unless (package-installed-p 'vertico)
  (with-demoted-errors "%s"
    (unless package-archive-contents
      (package-refresh-contents))
    (package-install 'vertico)))
(with-demoted-errors "%s" (vertico-mode +1))
An incremental narrowing framework (INF) generally lets you complete a string
(whether a M-x command name, file name, buffer name, or anything else) by typing
a pattern consisting of clusters of adjacent letters separated by punctuation.
So to complete the command switch-to-buffer, you can type
sw-to-bu which rapidly narrows the matches down from 22,351
possible commands to a mere 7.
The entire line of one of the matches will be highlighted; this is the match
that will be used if you hit RET. If switch-to-buffer is not highlighted
yet, you’ll need to either narrow it down further, by adding more letters, or,
when the number of matches is small enough, just navigate to it with C-n or the
down-arrow key.
If there are more than the default 10 matches, you can scroll through them until you spot the one you want, or edit your pattern (with the usual Minibuffer editing commands) to narrow it down further. The usual Minibuffer history commands work as well. See Table 4.
| Key | Type | Action |
|---|---|---|
C-n, ↓ |
Move | Move down to highlight next match |
C-p, ↑ |
Move up to highlight previous match | |
RET |
Done | Select the highlighted match |
C-RET |
Use the exact text that you typed | |
C-v |
Scroll | Scroll down to reveal the next 10 matches |
M-v |
Scroll up to reveal the previous 10 matches | |
M-> |
Scroll to the bottom of the matches | |
M-< |
Scroll to the top of the matches | |
M-p |
History | Pull up the previous history element |
M-n |
Pull up the next history element |
Done!
When your target is properly highlighted, you’re done. Hit RET to select it.
If you’re completing a M-x command, the command will be executed. However, if
you’re entering a filename for, say, find-file or a buffer
name for switch-to-buffer, you may be intentionally typing
a nonexistent name, to create a new file or buffer, which therefore can’t
possibly have a match! In this case, you use C-RET to select not the
highlighted match, but the exact text you’ve typed, as is.
Complementary Packages
Vertico is designed to be enhanced and customized via a set of complementary packages. I also recommend installing Marginalia, which provides annotations in the Minibuffer adjacent to command names, file names, buffer names, and more.
(unless (package-installed-p 'marginalia)
  (with-demoted-errors "%s"
    (unless package-archive-contents
      (package-refresh-contents))
    (package-install 'marginalia)))
(with-demoted-errors "%s" (marginalia-mode +1))
Now M-x sw-to looks like Figure 11 and C-x C-f looks like Figure
12:

Figure 11: M-x with Marginalia

Figure 12: C-x C-f with Marginalia
Other Incremental Narrowing Frameworks
I think Vertico is one of the best INFs, but Emacs has a few other built-in INFs
to choose from, and more in the Package Manager. The built-in INFs are
Icomplete ( M-x icomplete-mode), Ido ( M-x ido-mode)
(“Incremental Do”: see the Ido manual) and Fido
( M-x fido-mode). Unlike most modern INFs, their interface is
horizontal. When you hit M-x, you’ll see something like this:
M-x {execute-extended-command | enable-theme | dired-at-point | …}
You navigate through the matches with the left- and right-arrow keys.
(I’m showing an abbreviated version; you’ll typically see half-a-dozen
candidates, possibly spread across at most two minibuffer lines.)
Note that you don’t need to hit TAB to see these candidates: that’s a
big part of what makes an INF more efficient. These will narrow as you type.
They all work together, and if you want to use them, you should probably turn all three of them on in your Init File:
(icomplete-mode +1)
(ido-mode +1)
(fido-mode +11)
Most modern INFs have chosen, like Vertico, to go for a vertical presentation of the candidates, using a multiple-line expanding Minibuffer; this gives more room for long command and file names, and in some frameworks, useful extra information like that provided by Marginalia.
The other vertical INF in the GNU package repository is Ivy; it has more built-in features, which are quite powerful, but due to its complexity, it may not interact as well with some Emacs subsystems. (Vertico aims for 100% compatibility and comes very close by being simple.)
Third-Party INFs
The king of Emacs INFs for some time had been Helm, which dramatically remakes dozens, perhaps hundreds of Emacs commands (though you can configure it to be more or less intrusive). Its completion buffer can take up the bulk of your screen and present scads of additional information. It allows you to do a variety of actions (like, deleting files) in mid-completion, and its fans are very devoted. I find it to be too bulky, too intrusive, and too complex and confusing. It’s also now apparently abandonware.
For Emacs purists who want to do their editing with mental powers alone, there’s Icicles. It’s amazingly powerful and I used it for some time, but I ultimately abandoned it because I had trouble getting it to work with Tramp; in addition, the author chooses not to make it available via the Package Manager and so it’s daunting to acquire92.
There are other options like Raven, Sallet, and Snails, but I have recently settled on Selectrum, one of the newest (but surely not the last) Emacs INFs. For me it combines simplicity and utility perfectly, and instead of taking a kitchen-sink approach to features, can use the same optional add-ons (like Marginalia) as Vertico.
Old-School Completion
If you don’t install Vertico or another INF, you will get Emacs’s default
completion, which remain mostly like it was in the old days. It’s completely
usable—just keep hitting tab and adding characters with the help of what you
see in the popped-up *Completions* Window—but is much improved by setting the
very recent (v30.1) Variable minibuffer-visible-completions
to t. I recommend this Init File snippet:
(setopt minibuffer-visible-completions t)
which lets you use the arrow keys in the Minibuffer to navigate the completions
displayed in the *Completions* window; typing RET selects the highlighted
candidate.
Completion in Normal Buffers
In this chapter, we’ve discussed completion in the Minibuffer, but Emacs also does completion in normal buffers. It comes in two flavors: explicitly-activated completion at Point, and implicitly-activated completion via a popup menu.
For the former, when you’re half-finished typing a word, you hit
M-/ (dabbrev-expand), and Emacs completes the word for you.
This an amazing feature and an essential skill to pickup; see
Completion at Point.
For the latter, you can arrange to have a (lightweight, non-GUI, plain-text) menu pop up as you’re typing, showing you possible completions, any of which you can select by quickly navigating to it with the arrow keys. This popup completion isn’t typically enabled for ordinary words in prose, but rather in buffers whose Major Mode usefully limits the candidates. In particular, in programming language modes, where library functions and symbols in the buffer are presented. See Pop-up Menu Completion.
References
- Free Software Foundation. 2020. Interactive Do. Cambridge, MA: Free Software Foundation. https://www.gnu.org/software/emacs/manual/ido.html.
Read in Emacs with
M-x info-display-manual RET ido RET.
- [Krehel, Oleh]. n.d. Ivy User Manual. https://oremacs.com/swiper/.
Read in Emacs with
M-x info-display-manual RET ivy RET.
What is Text?
I call Emacs the “Plain Text Computing Environment”, but what exactly is text?
The notion of text is fairly intuitive to Unix users, elderly computer users of any stripe, and programmers, but may actually be puzzling to younger users who have spent all their lives interacting with GUI desktop applications, or tablets and smartphones only.
Classically, text consists of the printing characters from the ASCII93 character set: that is, upper- and lowercase letters, digits, punctuation marks, and a few whitespace characters. These are the characters that make up the bulk of your keyboard. Here’s the complete ASCII character set: ignoring whitespace, the printing characters are those from (decimal) 32 through 126:94
Dec Hex    Dec Hex    Dec Hex  Dec Hex  Dec Hex  Dec Hex   Dec Hex   Dec Hex
  0 00 NUL  16 10 DLE  32 20    48 30 0  64 40 @  80 50 P   96 60 `  112 70 p
  1 01 SOH  17 11 DC1  33 21 !  49 31 1  65 41 A  81 51 Q   97 61 a  113 71 q
  2 02 STX  18 12 DC2  34 22 "  50 32 2  66 42 B  82 52 R   98 62 b  114 72 r
  3 03 ETX  19 13 DC3  35 23 #  51 33 3  67 43 C  83 53 S   99 63 c  115 73 s
  4 04 EOT  20 14 DC4  36 24 $  52 34 4  68 44 D  84 54 T  100 64 d  116 74 t
  5 05 ENQ  21 15 NAK  37 25 %  53 35 5  69 45 E  85 55 U  101 65 e  117 75 u
  6 06 ACK  22 16 SYN  38 26 &  54 36 6  70 46 F  86 56 V  102 66 f  118 76 v
  7 07 BEL  23 17 ETB  39 27 '  55 37 7  71 47 G  87 57 W  103 67 g  119 77 w
  8 08 BS   24 18 CAN  40 28 (  56 38 8  72 48 H  88 58 X  104 68 h  120 78 x
  9 09 HT   25 19 EM   41 29 )  57 39 9  73 49 I  89 59 Y  105 69 i  121 79 y
 10 0A LF   26 1A SUB  42 2A *  58 3A :  74 4A J  90 5A Z  106 6A j  122 7A z
 11 0B VT   27 1B ESC  43 2B +  59 3B ;  75 4B K  91 5B [  107 6B k  123 7B {
 12 0C FF   28 1C FS   44 2C ,  60 3C <  76 4C L  92 5C \  108 6C l  124 7C |
 13 0D CR   29 1D GS   45 2D -  61 3D =  77 4D M  93 5D ]  109 6D m  125 7D }
 14 0E SO   30 1E RS   46 2E .  62 3E >  78 4E N  94 5E ^  110 6E n  126 7E ~
 15 0F SI   31 1F US   47 2F /  63 3F ?  79 4F O  95 5F _  111 6F o  127 7F DEL
You’ll notice right away that this 1963 American standard doesn’t really accommodate non-English speakers, which is why there are so many other character sets95. Nowadays, text would be defined to include all the printing characters, international and specialized, in the enormous standardized Unicode character set (Emacs knows 85,886 of them by name) and the 267-odd other character sets Emacs supports.
The Structure of Text
Lines are the fundamental unit of organization for most (but not all) text.
Text consists of a sequence of lines, and lines are separated by end-of-line
characters.96 We usually loosely call the end-of-line character a newline
(but see International Character Set Support for the gnarly details). You can
enter a newline, and thus begin a new line, by hitting the key Emacs calls RET
or <return>, which on your keyboard might also be labeled ENTER.
The end of a line at the very end of a Buffer is somewhat ambiguous97. Suppose we have a Buffer whose text consists of “foo”, a newline, and “bar”; that’s 7 characters, but how many lines is it? In your Buffer it looks like:
foo
bar
and to me, that’s unquestionably two lines. Emacs agrees.
C-x l (count-lines-page) reports:
Page has 2 lines (0 + 2)
and — further confirmation — if we invoke M-x display-line-numbers-mode, the
buffer looks like:
1 foo
2 bar
But there’s no newline after “bar”! If we add one, the buffer looks the same,
and C-x l and display-line-numbers-mode both still report two lines. In other words, the
number of lines is not necessarily exactly the same as the number of newline
characters.
Unfortunately, this ambiguity is simply a fact of computing life. The good news is, 1. it doesn’t usually cause any problems, and 2. Emacs has extensive facilities for dealing with it; see Manipulating Plain Text for details.
When Emacs was fresh and new in the 1970s, people entering prose text would
typically hit RET after typing 72 characters or so, and almost always before
80.98 Paragraphs were typically separated by an empty or blank line (i.e.,
a line consisting solely of a newline, or possibly a sequence of whitespace
characters followed by a newline), or by a line with leading indentation (i.e., a
few spaces), or both: exactly how you’d type it on a typewriter. Emacs’s Text
Mode (see “Text Mode” in the Emacs manual) is designed for this kind of prose text
and has support for automatic wrapping, indenting, and filling of paragraphs.
But there’s no limit to the length of a text line, and in fact in the modern world, the current convention is that each line of typed text is in fact an entire paragraph, and paragraphs therefore no longer even need to be separated by blank lines (though they may be). This convention arose with GUI applications, whose windows weren’t limited to 80 column lines and whose widths could be resized at will: single-line paragraphs auto-fill as the screen is resized, but multi-line paragraphs containing newlines do not. Emacs of course supports this convention but it’s not the default, primarily because Emacs was written by and for programmers, and both computer programs and computer data files are typically expressed as lines with explicit newlines, and the lines may have semantic significance.
For details on how long lines are displayed and what you can do to change it, see The Display of Lines.
What Isn’t Text?
There’s no law that says text can’t include non-printing characters, like, say,
a C-a (which is ASCII 1 decimal). If a file contains only printing characters,
it clearly deserves the label “text”; if it contains none, it clearly doesn’t
and instead we call it binary data. But in between, the label is a judgment
call. Regardless, Emacs needs to show you non-printing characters when they
occur.
(I’m afraid this section has to be very nerdy; none of this will surprise a programmer, but the explanation of it all involves the distant history of computing, computing Standards (gulp), and a variety of number bases. Feel free to skip ahead!)
When one of the ASCII control characters—those in the range decimal
0–3199—occurs in a Buffer, Emacs displays it specially, using the traditional
programmer’s notation for control characters: a circumflex followed by an
uppercase letter (or punctuation mark in six cases), for example ^A, which is
the same character that Emacs refers to as C-a. Table 5 shows these
in the “Control” column.
| Dec | Hex | ASCII | Control | Dec | Hex | ASCII | Control |
|---|---|---|---|---|---|---|---|
| 0 | 00 | NUL | ^@ |
16 | 10 | DLE | ^P |
| 1 | 01 | SOH | ^A |
17 | 11 | DC1 | ^Q |
| 2 | 02 | STX | ^B |
18 | 12 | DC2 | ^R |
| 3 | 03 | ETX | ^C |
19 | 13 | DC3 | ^S |
| 4 | 04 | EOT | ^D |
20 | 14 | DC4 | ^T |
| 5 | 05 | ENQ | ^E |
21 | 15 | NAK | ^U |
| 6 | 06 | ACK | ^F |
22 | 16 | SYN | ^V |
| 7 | 07 | BEL | ^G |
23 | 17 | ETB | ^W |
| 8 | 08 | BS | ^H |
24 | 18 | CAN | ^X |
| 9 | 09 | HT | ^I |
25 | 19 | EM | ^Y |
| 10 | 0A | LF | ^J |
26 | 1A | SUB | ^Z |
| 11 | 0B | VT | ^K |
27 | 1B | ESC | ^[ |
| 12 | 0C | FF | ^L |
28 | 1C | FS | ^\ |
| 13 | 0D | CR | ^M |
29 | 1D | GS | ^] |
| 14 | 0E | SO | ^N |
30 | 1E | RS | ^^ |
| 15 | 0F | SI | ^O |
31 | 1F | US | ^_ |
Thus, in your Buffer, a single control character displays as a pair of
characters. This is ambiguous: is that ^A one character, ASCII decimal 1 aka
SOH, or is it the two printing characters, ^ followed by A? There are two ways
tell:
- by movement: your cursor will skip over a control character with a single
C-f(forward-char), where it would take twoC-f’s to move over the pair of printing characters; - by color: the control characters are colored differently than the printing
characters; if your Buffer text is black-on-white, the control characters
will be red e.g.
^A; if your Buffer text is white-on-black100, the control characters will be cyan e.g.^A.
There are other characters, which are tricky to classify as printing or
non-printing, that aren’t part of the original ASCII character set: they would
occupy the slots from 128–255 decimal in an expanded table. If these
characters appear in a Buffer (one using the binary Coding System), they are
represented as a backslash followed by a three-digit number e.g. \304.101
Again, your cursor will move over such a character in one step, and they’re
colored the same as the control characters.
Inserting Non-Printing Characters
If you’re curious and want to see some of these non-printing characters in a
Buffer, you can just visit a native-code executable file on your
computer.102 But what if you need to insert one? Obviously you can’t
insert a ^A by typing C-a (beginning-of-line)—that will
just move your cursor to the beginning of the line!
The basic command for this is C-q (quoted-insert). Inserting
a control character is easy: to insert a ^A, just type C-q C-a. You can
also needlessly quote printing characters—say, C-q A—which just inserts the
printing character uppercase-A normally.
What if you want to insert “international”, non-Latin, characters from Unicode, or you want to type fancy glyphs like Æ, or ¶? See International Character Set Support for details.
Buffers
Just as in Unix “everything is a file”, in Emacs “everything is a buffer”. […] In most […] editors (and most other applications, for that matter), we have things such as dialog windows, non-editable text areas […], file-selecting widgets, etc. Not in Emacs: here, all these are buffers. — Marcin Borkowski, “TEXing in Emacs”
A Buffer is a very complex data structure. Most importantly a Buffer contains text, but additionally each Buffer keeps track of various locations (where you are now and where you’ve been recently) and parameters (like how much to indent lines), maintains an Undo history, has a Major Mode that customizes commands run in the Buffer to work distinctively on the type of text it contains, may have several Minor Modes to further tweak behavior to your taste, and has a set of key bindings that may be different from those in other Buffers. If it’s visiting a file, the Buffer keeps track of its state compared to the file on disk.103
In this chapter we’re mostly going to talk about Buffers as abstract objects—black boxes—as distinct from what they contain. The text in the Buffer is much more than just a sequence of alphanumeric characters; how it is entered and displayed is the subject of its own chapter.
The maximum Buffer size is plenty big enough for most purposes: 2,305,843,009,213,693,951 bytes; that’s about 2.3 exabytes. Practically speaking, the real limit is the amount of memory available on your system for Emacs to use.
Switching Buffers
To switch Buffers means, specifically, to change which Buffer is displayed in a
given Window. The basic command to do this is
C-x b (switch-to-buffer); it displays a different Buffer in
the current Window, prompting for the new Buffer by name, using Completion. You
can also use one of these variant versions:
C-x 4 b(switch-to-buffer-other-window)- Switch to a different Buffer not in this Window, but in the “other” Window.104
C-x 5 b(switch-to-buffer-other-frame)- Switch to a different Buffer not in this Frame, but in another Frame; if the Buffer is already displayed in a Window in another Frame, switch to that Frame and Window; if not, a brand new Frame is created and the Buffer is displayed in the Window in that Frame.
You can also switch quickly to Buffers you’ve recently used without specifying their names. Emacs maintains its list of Buffers in a ring in recency order.
C-x <C-left>(previous-buffer)- switch to the previous Buffer you were in (in this Frame); repeating this command goes further back in the Buffer-recency timeline
C-x <C-right>(next-buffer)- the same, but go forward in timeline order.
(You can also use the less felicitous bindings C-x <left> and C-x <right>.)
The User Option switch-to-prev-buffer-skip allows you to
customize which Buffers these two commands consider to be candidates.
The Global Mark Ring provides another way of switching Buffers:
C-x C-SPC (pop-global-mark) will jump to previous Mark
locations in other Buffers.
The Tab Line
Outside of Emacs, Tabs (not to be confused with the ASCII TAB character nor with tab stops) are a pervasive graphical user interface design element for navigating between multiple “objects” in an application: whether web pages, word processor documents, desktop windows, or whatever. The objects being the subject matter of the application, they would correspond to Buffers in Emacs. Yet Emacs hasn’t had Tabs until quite recently105: Completion and the Buffer Menus have sufficed for Emacs users for decades.
But now you can turn on the Tab Line. The Tab
Line is a per-Window construct: a special sticky line of tabs at the top of your
Window, each tab shows the name of a Buffer that has been displayed in this
particular Window.106 There’s also a +-sign at the right that, when clicked, pops
up a classified GUI menu that allows you to switch to any other Buffer, thus
adding another tab to the bar.
This is obviously a feature for mouse users, but if you’re a keyboard-only
person like me, I suppose you might still want the Tab Line for its visuals.
Note that the Buffers shown in the Tab Line are the same ones you can navigate
through with C-x <C-left> (previous-buffer) and
C-x <C-right> (next-buffer).
You can turn the Tab Line on for any Window with M-x tab-line-mode.
If you want this for all your Windows, say M-x global-tab-line-mode;
you can make this your default by adding this to your Init File:
(global-tab-line-mode +1)
The Package Manager is full of third-party packages for selecting Buffers;
pretty much any approach any other program or operating system has used for
something similar can be found as an Emacs package: from a very visual Mac OS
Exposé-like switcher, to my favorite, the very abstract buffer-stack.
Creating Buffers
Buffers are typically created for you, implicitly, by any number of commands:
the file visiting commands, of course, but also by many of the thousands of
other commands: the Help commands create *Help* Buffers, for example, and any of
the Emacs “applications” like the File Manager (Dired) or the Web Browser (Eww)
create Buffers to present their user interfaces. Buffers are used for almost
everything in Emacs, and you won’t even be aware of most of them; I have 175 in
my Emacs as I write this.
You can also just create a new Buffer anytime you want. The command for this is
good old C-x b (switch-to-buffer); typically, this command is
used to display a different, existing, Buffer in the current Window, as
described in the previous section. But when
switch-to-buffer prompts you for the Buffer name, if you
enter a new, non-existent, one, it instead creates a brand new, empty, Buffer.
This Buffer will be in fundamental-mode unless your chosen
name looks like a filename with an extension (say, foo.org), in which case the
Major Mode will be determined as described in How a Mode Happens to Your
File. Regardless, there will be no file associated with this new Buffer.
To Save or Not to Save
When you exit, Emacs will offer to save modified Buffers that are visiting
files, so that you don’t lose your work. But non-file Buffers don’t get this
treatment, no matter how much work you may have done in them!107 You can always
use C-x C-w (write-file) to associate a file with such a
Buffer after the fact.
It may be tempting to create new non-file Buffers or use the *scratch* Buffer
just to take some transient notes, but such notes have a way of surreptitiously
becoming important, and you will lose them if you exit without saving them
somewhere. Emacs has better ways for you to take notes.
Buffer Names
This inspires me to mention the fact that every Buffer has a name. There are no
anonymous Buffers. Not only must every Buffer have a name, but that name must
also be unique. When there are natural name conflicts, Emacs will usually
disambiguate the newer Buffer name for you. Buffers that aren’t visiting a file
typically get numeric suffixes, like *shell*<2> and *shell*<3>, but for files
things are more interesting.
The name of a Buffer that’s visiting a file is typically the basename of that
file; for example, if you visit /etc/passwd, the Buffer will be named passwd.
Since there could be any number of files named passwd in various directories, in
order for you to be able to visit more than one of them, Emacs must uniquify the
Buffer name. You can choose from a variety of uniquification algorithms. Using
the default algorithm, if you visit /tmp/passwd, having already visited
/etc/passwd, the new Buffer will be named passwd</tmp>. See
“Uniquify” in the Emacs manual for details.
You can rename Buffers at will with C-x x r (rename-buffer).
Since some applications manage their Buffers by name, renaming them might break
the app! But many, probably most, Buffers are perfectly safe to rename. While
uncommon, you can rename any file-visiting Buffer; the Buffer name won’t affect
the filename. It’s quite common to rename the Buffers of commands that re-use
the same name. Although help-mode has commands to navigate
back and forth through your history of Help invocations, you might want to
rename a given *Help* Buffer to keep it around and easily accessible.
M-x shell is the opposite: when you run it, if a Buffer name *shell*
already exists, it simply switches to it (kind of like
C-x C-f (find-file); if you want a second shell, you can
first rename the existing Shell Buffer to whatever you like.108
M-x rename-uniquely will automatically rename any Buffer for you,
using a numeric suffix.
Asterisks
It’s conventional that non-file-visiting Buffers created by Emacs commands are
named with *asterisks*; for example, the Help commands use (and reuse) the
Buffer name *Help*, and Emacs starts up with a *scratch* Buffer. When
explicitly creating your own Buffers, you can observe this convention or not, as
you like.
Hidden Buffers
Unix users are familiar with the utility of
dot files: any file basename that begins with a period is by default excluded
from the directory listing of the ls(1) command. This reduces clutter in a
directory listing from files that are always present (like . and .. in any
directory, or configuration files like .bashrc in a home directory). Of course,
you can see these “hidden” files when you need to (by passing the -a option to
ls, for example).
The same concept applies to Buffer names. Many Emacs applications that present themselves via a Buffer, such as the document viewer Doc View or the web browser Eww, use hidden Buffers to manage their state. A hidden Buffer is any Buffer whose name begins with a space character, and by default, they are not offered for completion nor listed by the Buffer listing commands. Hidden Buffers are mainly created by Elisp programmers and you probably don’t want to use Buffer names that begin with a space for your own purposes. They’re not really suitable for interactive use; in particular, Undo is turned off by default in such Buffers.
The Default Directory
In addition to a name, every Buffer has a default directory. This is analogous to the working directory of a process in Unix. The default directory of a file-visiting Buffer is the directory where the file was located. If you’re in a shell in a terminal, and you give a filename to some command via a relative path, that filename is interpreted relative to the shell’s current working directory: Emacs works the same way. If a command prompts you for a filename, the prompt will be preset to contain the Buffer’s default directory; you can delete or edit it to name a file in some other directory, of course, but if you completely delete any directory and just enter a relative path, it will be taken as relative to the default directory.
If you create a non-file Buffer, its default directory will generally be inherited from the Buffer you were in when you created it. But any Emacs command that creates a Buffer is free to set its default directory to whatever is appropriate.
The default directory is just a buffer-local variable named
default-directory. You can check what it is with
M-x pwd, which prints the value of this variable in the Echo
Area,109 and you can change a Buffer’s default directory with
M-x cd, which sets the variable to whatever directory you specify.
Note that changing the default directory of a file-visiting Buffer does not
change the directory of the file you’re editing—not even if you re-save the
Buffer. It only affects prompt defaults and the resolution of relative
pathnames you give to commands while you’re in that Buffer. To change the
directory of a file you’re editing, use M-x rename-visited-file or C-x C-w
(which is equivalent to making a new copy of the file).
Reverting Buffers
File-visiting Buffers can be reverted with M-x revert-buffer or
C-x x g (revert-buffer-quick) to make the text in the
Buffer match the text in its file. There are two major reasons for doing this:
either to throw away all the unsaved modifications you’ve made without
undergoing a tedious sequence of Undos (thus restoring the Buffer’s text to
what’s in the file), or because the file has been changed behind Emacs’s back by
some other process and you want the Buffer to reflect this. See Files:
Reverting Buffers, Auto-Reverting (Watching Files), and Files Modified
Behind Emacs’s Back for more information.
Many non-file Buffers implementing Emacs applications can also be reverted; the
exact meaning of “revert” in these Buffers depends on the application. For
example, C-x C-b (list-buffers) pops up a Buffer containing a
list of all your Buffers (see Buffer Menus), but if a new Buffer is created
later, the list won’t (for good reasons, IMHO110) be automatically updated to
show it; reverting the Buffer will do so. In Major Modes descended from
Special Mode, the key g is often bound to revert-buffer,
but check with C-h m (describe-mode) first.
Killing Buffers
There are many ways to delete or, as we say in Emacs, kill Buffers, but why would you want to? There are two main reasons:
- Each Buffer takes up in memory at least as much space as the file takes up on disk; when you kill a Buffer, you free up that space and Emacs has that much more to work with.111
- Lots of old Buffers means clutter: more Buffers to ignore in Buffer listings, more to ignore when doing Buffer-name completion, more Buffers to search through if you ask Emacs to do so. If you run Emacs as a long-running process in Server Mode (as I recommend), you might accumulate many Buffers over the space of weeks or even months!112
We’ve already seen the basic command for killing a single Buffer, by name and
with completion: C-x k (kill-buffer);
C-x 4 0 (kill-buffer-and-window) kills the current Buffer and
also deletes the Window that was displaying it; it’s especially useful when
popping up hits from a Grep command. There are also several commands
to clean up unneeded Buffers:
M-xkill-some-buffers- asks whether or not to kill each Buffer in your Emacs; it makes it clear whether or not the Buffer is modified. This command is way too tedious unless you have hardly any Buffers, and if you have a lot, a sort of highway hypnosis can set in that might result in you killing a Buffer you didn’t want to.
M-xkill-matching-buffers- This command prompts for a Regular Expression and only asks about the Buffers whose names match it, so this might be a little bit better.
M-xclean-buffer-list- is a totally automatic way to clean up a
lot of Buffers, with no prompting and no questions asked. It will of course
never kill a modified Buffer, but it will instantly get rid of Buffers that
you haven’t looked at in a while (by default,
3
days). It’s highly customizable, so you can define certain Buffers that it
should never clean up; examine
M-x customize-group RET midnight RET. See also Midnight Mode.
I think the best thoughtful (i.e. not totally automatic) way of cleaning up Buffers is via one of the Buffer Menu commands below, which give you a Dired-like interface to the task.
Buffer Menus
C-x <C-left> (previous-buffer) and
C-x <C-right> (next-buffer), along with
C-x b (switch-to-buffer) (coupled with a good Completion
framework) will form the vanguard of your Buffer navigation. But sometimes
you’ll need a way to get an overview of all your Buffers, and some tools to
manage them. This is what the Buffer Menus provide. A Buffer Menu is to
Buffers what Dired is to files.
There are three main choices:
list-buffers, bs-show, and
ibuffer.
The most basic command is C-x C-b (list-buffers); it pops up
a *Buffer List* Buffer that lists all the Buffers in your emacs, giving, along
with their names, their sizes, Major Modes, and visited file name (if any):
CRM Buffer         Size  Mode              File
.%  passwd          1699 Conf[Colon]      /etc/passwd
 %  *Calendar*       531 Calendar
 %  *Help*           554 Help
    *scratch*        145 Lisp Interaction
 %* *Messages*       305 Messages
The cryptic CRM Column shows the current Buffer (indicated by a period in the C
column), a % under R if the Buffer is read-only, and a * under M if the Buffer
is modified.
This Buffer is in buffer-menu-mode, and if you switch into
it, a number of Buffer-management commands are available. Just move to anywhere
within a Buffer’s line and the special commands will operate on that Buffer.
Some operate immediately, but some only mark the Buffers and perform the
operation when indicated. See table 6.
| Key | Action |
|---|---|
RET |
replace Buffer Menu with this buffer |
1 |
like RET C-x 1 |
o |
select buffer in Other window |
V |
… in view-mode. |
C-o |
display buffer in Other window (without switching) |
m |
mark this buffer for v or M-s a … |
v |
display this and all marked buffers |
u |
remove all marks from this line |
DEL |
back up a line and remove marks |
U |
remove all marks in the Buffer Menu |
M-DEL |
remove a particular mark from all lines |
T |
Toggle display of only file buffers |
S |
Sort lines by the column that contains Point |
{ |
narrow this column |
} |
widen this column |
b |
Bury the buffer listed on this line |
t |
visit Tags table of this buffer |
~ |
clear modified-flag |
% |
make buffer read-only |
s |
mark for Save upon x |
C-k |
mark for Kill upon x, move down |
C-d |
mark for kill upon x, move up |
x |
eXecute kill or save marks |
M-s a C-s |
Incremental Search in the marked buffers |
M-s a C-M-s |
Isearch for regexp in the marked buffers |
M-s a C-o |
Occur in the marked buffers |
g |
revert (update) the Buffer Menu |
q |
hide the Buffer Menu |
bs-show is very similar to
list-buffers; it has a very similar command set113,
but is more customizable and, in its default configuration, is a bit more
colorful. I’d recommend it over list-buffers just for that reason; you can bind
it to C-x C-b with:
(keymap-global-set "C-x C-b" 'bs-show)
The Buffer Menu that I use is ibuffer. It’s even more
colorful than bs-show, but it has the largest command set and is more like Dired
than the other two.114 It has a more extensive set of marking commands, a
much larger, stackable, set of commands to filter the Buffer Menu (e.g., by
Major Mode, by visited directory name, by size), and a much larger set of
sorting commands. It has so many commands that I won’t attempt to summarize
them here; say C-h f ibuffer-mode.
I recommend it, and I bind it to C-x C-b with:
(keymap-global-set "C-x C-b" 'ibuffer)
Note that neither list-buffers nor bs-show will list hidden Buffers (those
starting with a space). ibuffer can do this, however.
Narrowing
Many commands that perform repetitive operations (like Query Replace) will limit
their operation to the active region. Some (like Keyboard Macros) do not, but
these recalcitrant commands can be convinced to do so by narrowing the Buffer to
the Region (whether active or not).
C-x n n (narrow-to-region) hides the parts of the Buffer
outside the region, making them almost completely inaccessible. After
narrowing, you can run any command on the entire Buffer without worrying that it
will affect the hidden parts. Narrowing can also be useful just to focus your
attention on a part of your text, say a particular paragraph, or a gnarly
function, with no distractions.
Once you’ve narrowed, it’s as if the rest of the Buffer is gone. The Buffer size indicator in the Mode Line will report the size of the narrowed portion as if it’s the entire Buffer, and any displayed line numbers will be reset from 1. If you save a narrowed file-visiting Buffer, you will always save the entire Buffer, including the invisible parts—don’t worry that you might lose data by saving only the narrowed part to the file!
The Mode Line will include the word “Narrow” in the parenthesized list of Minor
Modes (even though narrowing isn’t, strictly speaking, a Minor Mode). There are
a few other giveaways. The value of Point, which you’ll recall is the offset,
in characters, from the beginning of the Buffer, remains relative to the entire
unnarrowed Buffer. One command that reveals the value of Point is
C-x = (what-cursor-position). Suppose you narrow your 500K
Buffer to one paragraph in the middle of the text; what-cursor-position will
show that Point is something like 254,120 rather than 1. Go ahead and try it!
But wait, first I’d better tell you how to restore your Buffer after narrowing
it! C-x n w (widen) does the job. Point remains where it
was, and all the hidden parts blossom forth again.
If someone new to Emacs accidentally narrows a Buffer, the usual assumption is
that, somehow, much text has mysteriously been lost, and the reaction is
dismay. For this reason, C-x n n (narrow-to-region) is
disabled by default. But it’s a very useful command, and I recommend you
enable it after you’ve tried it a couple of times.
Modes, Major and Minor
| Major Mode | Minor Modes | |
|---|---|---|
| Specialization | X | |
| Preferences | X |
The main way Emacs specializes different kinds of text — prose, programming languages, data file formats — is through Major Modes. Major Modes typically provide customized fonts, colors, and other styling; layout (indentation and such); key bindings; templating; integration with compilers, interpreters, and debuggers; and more.
Every Buffer always has a single Major Mode, and may have zero or more Minor Modes enabled. While Major Modes implement broad sets of features suited to a particular kind of text or Emacs application (an application like, say, a web browser), Minor Modes are typically independent of any particular kind of text, and instead implement user preferences and features that are generic and could enhance many or all Major Modes: things like spell check, line numbers, or folding text.
The Major Mode is, by default, shown in the Mode Line as the first word in
parentheses. If your Buffer is in python-mode, the Mode Line will show:
(Python)
(the Major Mode indicator may be followed by a list of space-separated Minor Mode indicators).
Many Major Modes are for particular programming languages, but they also exist for markup languages (TeX and LaTeX, Troff, HTML, Markdown, Org), config file formats (for INI files, and many application-specific formats like Apache, Git, Kubernetes, etc), data file formats (Json, CSV, XML, Turtle (RDF), YAML, BibTex), image files, PDF files, and more.
An important role for Major Modes is to implement interfaces to external programs, like version control systems (Git, Mercurial, etc), databases, shells, Grep, and programming language REPLs; more Modes implement 100%-Emacs applications like file managers, email systems, games, and web browsers.
Emacs ships with 0 Major Modes, and at the moment, there are at least 519 more available in the Package Manager, and even more on Github and the like. Basically, if you’re editing some kind of structured text, there’s an Emacs Mode to make the editing better.
How a Mode Happens to Your File
When you visit a file, Emacs chooses a Major Mode for you automatically,
typically based on a file extension. Files ending in .org will automatically be
in org-mode; files ending in .py will automatically be in
python-mode.
But Major Mode selection is really more complex. Emacs has a decision tree that proceeds from the file contents, through the file name, to your chosen overall default. Here’s the complete sequence.
Mode via File-Local Variable
You can explicitly set the Major Mode by including a string like this:
-*- MODE -*-
somewhere on the first non-blank line of the file, where MODE is the name of the
Mode, leaving off the trailing -mode. So this line:
-*- python -*-
will cause Emacs to choose python-mode when it visits the file. Likewise:
-*- emacs-lisp -*-
selects emacs-lisp-mode.
The Mode string can be preceded on its line by any text, and followed by even more text. This allows you to put the Mode string in a comment; thus:
/* -*- c -*- */
selects c-mode and
# -*- python -*-
selects python-mode.
File local variables, in their full glory, are a concept originated by Emacs.115 You can set additional variables this way:
-*- python; python-indent: 4 -*-
and you can also set them at the end of the file, if your language is particular about the top, or if you just prefer them there (they might be less distracting).
Mode via Shebang, or Interpreter Directive
If the Major Mode wasn’t chosen due to a file-local variable, Emacs next looks to see if the file begins with a shebang, or interpreter directive. This is a Unix concept that allows executable text files to be run as scripts by a variety of programming language interpreters. So if your file begins with:
#!/bin/sh
Emacs will select shell-script-mode. By default, Emacs knows how to map
44 interpreter names to the
right Major Mode; you can customize the variable
interpreter-mode-alist to tweak these choices or add more.
Unix says that the shebang must be the first line of a file, so if you also want some file-local variables, you’ll need to set them via the end-of-file syntax.
Mode via Filename
If the Major Mode was chosen neither by a file-local variable nor a shebang,
Emacs next checks to see if the file extension determines the Mode.116 This
is controlled by the variable auto-mode-alist, so you can
override the defaults to suit your preference. Out of the box, auto-mode-alist
encodes over 200 different file extension / Mode pairings.
This variable actually allows more sophisticated choices than just the file extension: you can base the choice on the structure of the entire file name, including the directory (so you can set a default Mode for all the files in a given directory, regardless of their basenames or extensions), and (as is typically the case in such customizations) you can even base the choice on the result of a function call.
Mode via Magic Fallback
If the Major Mode has still not been chosen, Emacs now checks
magic-fallback-mode-alist, which examines the content of
the file to determine the Mode. This default value of this variable contains
patterns and functions that recognize image formats and make distinctions about
HTML and XML file formats (which can’t easily be made via file extension).
The Last Resort
Finally, if the Major Mode remains undetermined after this entire process, the
default value of the variable major-mode is used. The
default default (!) is fundamental-mode, the ultra-minimal Major Mode that does
absolutely nothing special.
You can change the default Major Mode to something else, like for example:
(setq-default major-mode 'text-mode)
after which you’ll get text-mode as your default. (If you’re a programmer or system
administrator — one who edits system files — I highly recommend keeping
fundamental-mode as the default value of major-mode; any other choice might
result in surprising changes to a file when you save it, without your noticing.117)
But really there’s one final, ultimate, decision: in the case that major-mode’s
default value is nil, which will only be the case if you choose to make it so,
the Major Mode will be that of the Buffer you were in before you switched to a
new Buffer (by visiting a file, or creating a new Buffer say by giving
C-x b (switch-to-buffer) a nonexistent Buffer name).
Setting the Mode Explicitly
You can always set the Major Mode of a Buffer explicitly, either because the
usual process came up with fundamental-mode, or chose the wrong Mode (perhaps
due to an unusual or nonexistent file extension), or just because you prefer an
alternative Mode at the moment.
Conventionally, Major Modes exist as commands named according to the pattern
major-mode-name-mode,
so you can switch to Org Mode by invoking M-x org-mode or to Emacs
Lisp Mode with M-x emacs-lisp-mode. After switching, there might be
a visual change as the new Mode’s syntax colorization takes effect; for example,
after switching to fundamental-mode, any colorization will disappear, since
fundamental-mode doesn’t do any syntax highlighting (this is one of the most
common manual Mode changes, because since fundamental-mode does nothing visually
to the characters in the file, you can be sure you’re seeing the precise contents).
To restore Emacs’s choice of Mode, you could reinvoke the Mode’s function by
name, but the simplest way is to say M-x normal-mode. normal-mode
is not a Major Mode, but rather just a Command that instructs Emacs to go
through the entire Major Mode-choosing process again.
Help for Your Mode
If you want to know what’s up with the Major Mode Emacs has chosen, just say
C-h m (describe-mode). The *Help* Buffer will first list all
the enabled Minor Modes (because Major Modes often turn on a set of Minor
Modes); these are hyperlinked to complete descriptions later in the Buffer.
Then the documentation for the Major Mode will be presented (for some Modes,
this is quite extensive), and then typically a complete list of Major
Mode-specific key bindings will be given (there might only be a couple; for some
Modes, like org-mode, there might be several hundred!).
Finally the documentation and key bindings for all the Minor Modes will be
given. This can be a lot of documentation; for me, the Org Mode *Help* Buffer is
over 900 lines long!
Customizing Modes
It’s very common to want to customize the way a Major Mode118 works, and well-written Major Modes (the majority of them!) provide many ways to do so. You might want to change the default indentation level or the color of comments or string literals in a programming language Mode. You might want to change some of its key bindings to ones that are more mnemonic or easier to type. You might want to disable an annoying command that you find yourself accidentally invoking (I do a lot of this!).
The simplest type of customization is to modify the value of a user option,
i.e. an Emacs variable that’s explicitly intended to be used to tweak a Mode’s
behavior. The easiest way to do this is to go to a Buffer that has the Major
Mode you’re wanting to tweak and invoke M-x customize-mode; this
gathers all of the Mode’s user options together and you can use the Customize
facility to change them. You can also just set these options in your Init File
via Elisp, e.g.:
(setq python-indent-offset 2)
see User Options.
How do you find out what user options exist to be customized? Browsing the
customize-mode Buffer is a good way; you can also use
M-x apropos-user-option with a query like python indent, and don’t
forget to read the Info manual for Modes which have one.
Customize doesn’t give you a way to change key bindings, so you’ll need to hack your Init File to do that! See Modifying Key Bindings for instructions.
Finally, you may want to customize a Mode in a manner that never occurred to the
programmer who wrote the Mode, and so there’s no handy user variable to tweak.
A common desire is to turn on several specific Minor Modes whenever you’re in a
given Major Mode: for example, spell checking. But that’s just one of any
number of possible Minor Modes. The programmer of the Foo Major Mode shouldn’t
try to provide user options like foo-enable-spellcheck because even though spell
checking is a common desire, there’s more than one way the user might want to do
it, and more to the point, there is an unlimited number of extant and
not-yet-written potential Minor Modes of interest. And you may want to enable a
behavior that’s not even a formal Minor Mode119.
Fortunately, Emacs has a general purpose mechanism to solve this problem; it’s
pervasive and part of what makes Emacs so malleable: Hooks. Hooks exist to
provide a way for an action of some kind to also perform some other arbitrary
actions at your behest. Every Major and Minor Mode FOO-mode respects a
variable FOO-mode-hook which is intended to contain a list of functions. Each
function in this list is executed, in order, after the Mode is done initializing
the Buffer. You simply add functions to this list; the functions can do
whatever you want.
So, if you want spell checking in Org Mode, and you prefer
flyspell-mode to ispell-minor-mode,
you can add this line to your Init File:
(add-hook 'org-mode-hook 'flyspell-mode)
If you don’t generally want line numbers turned on, but you do want them in
python-mode, add this line:
(add-hook 'python-mode-hook 'display-line-numbers-mode)
As the name implies, the add-hook function adds an
additional function to a hook variable, at the front of the list. add-hook is
clever and only adds the function if it isn’t already present (that way it
doesn’t run twice).
flyspell-mode and display-line-numbers-mode are both Minor Modes, and Minor Modes are designed
to be easy to add to hooks. But you can add arbitrary functions as long as they
make sense. Want to give yourself a little encouragement whenever you open an
Elisp Buffer?
(add-hook 'emacs-lisp-mode-hook
  (lambda () (message "Don't fear the parentheses!")))
More complex Modes will define more than just the default
after-Mode-initialization hook, and will run these hooks when certain actions
occur. org-mode, for example, an especially complex Major Mode, has
99 hooks.
Hooks are not really just for Modes. There are many defined for Emacs actions that occur “globally” — hooks for when Emacs starts up and when it exits, for example — and individual functions defined outside of any major Mode can have their own hooks so that users can customize their behavior.
Derived Modes and Inheritance
Almost all Major Modes are derived from some preexisting Mode that’s in some way
similar. This way, the new Mode inherits behavior from the parent (which may
have inherited behavior from its parent, and so on). The new Mode inherits the
parent’s keybindings, syntax table, abbreviations, and Major Mode hook, and can
then change anything it’s inherited, or not. Note that the new Mode’s hook will
run after all the inherited Mode hooks. So if someone invents a new variant of
the Lisp programming language, say “Neolisp”, a new Emacs neolisp-mode might
well be derived from lisp-mode.
There are five Major Modes that are commonly used as parent Modes:
text-mode, for a new Mode that deals with something similar
to natural-language prose; prog-mode, for new programming language Modes;
special-mode, for Modes that let you view data more than they let you edit it
(this includes most applications); tabulated-list-mode, for Modes that present a
view of data in sortable columns (and which is itself derived from
special-mode); and finally, fundamental-mode, the most minimal Mode of all.
Note that prog-mode, special-mode, and tabulated-list-mode exist only to be
derived from, whereas text-mode and fundamental-mode are themselves often used
as Major Modes.
Basic Major Modes
Here are a few basic Major Modes that can be useful when Emacs doesn’t have a better idea for your text.
fundamental-mode
This is the basic Mode in reference to which many other Modes are defined. It’s perfectly fine for editing any kind of text, it just doesn’t provide any special features: it has no Mode-specific key bindings and no colors to distinguish different kinds of text. Every character in the Buffer looks exactly like itself.
It’s occasionally useful to turn off the fancy features of a specialized Mode by
switching a Buffer into fundamental-mode; see
Setting the Mode Explicitly.
text-mode
For editing plain, unspecialized, natural language prose, i.e. blank-line separated paragraphs consisting of sentences. This is the Mode Agatha Christie would have used for her books, if she’d had Emacs instead of her typewriter. Quite minimal. See Text Mode,
org-mode
You can add a little more structure to your prose by using
org-mode. Lines that start with an asterisk form the
nested headlines of an outline, and you can fold (hide) and unfold the text of
the outline levels, easily reorder them without cutting and pasting, etc.
* My Header
Some text.
** A Nested Sub-Header
* Next Header
I’m massively under-selling Org Mode here; it’s one of Emacs’s secret weapons and can do (sometimes it seems) practically everything. See Org Mode.
Programming Language Modes
As of version 30.2, Emacs ships with Major Modes for at least
Ada, Assembly Language, AWK, C, C++, Common Lisp, Emacs Lisp, Fortran, Icon,
Java, Javascript, M4, Makefiles, Metafont, Modula2, Object Pascal, Objective-C,
Octave, Pascal, Perl, Pike, PostScript, Prolog, Python, Ruby, Scheme, Shell
(Bourne-, C-shell-, and rc-derived flavors), Simula, SQL, Tcl, Verilog, and
VHDL.
In such a Mode, Emacs does all the sorts of things you expect of an integrated development environment (IDE): syntax highlighting to colorize and fontify the different syntactic elements of the code, specialize textual objects for the language (so Emacs’s notion of symbols match the languages identifiers, and its functions match the languages function definitions), balance parentheses, complete identifiers, enable commands to insert and delete comments, indent and dedent the lines appropriately, show documentation of built-in functions, jump from function and identifier uses to their definitions, expand source code templates (for control structures and the like), send function definitions to the language interpreter (REPL), interact with a debugger, compile code, and jump from compiler error messages to the locations in question.
Some of the common features of IDE’s are handled by independent, orthogonal
Minor Modes. On-the-fly syntax and style checking (linting) is often handled by
Flycheck120 or for languages that use the Language Server Protocol, Eglot or
lsp-mode. Spellcheck in comments and string literals is handled by
flyspell-prog-mode. Project navigation is the domain of
Projects or the much fancier Projectile. Version control has
its own chapter, as do build tools, searching, and
debugging.
Application Modes
Many Major Modes, descended from special-mode, exist to implement
applications. There are innumerable examples: Dired the file manager; the Grep
family; Eww, the web browser; Gnus, the mail user agent; VC, the version control
system. The more elaborate applications may really be a complex of several
Major Modes; the Gnus “application” consists of
17
Modes. See Part III: NEVER LEAVE EMACS: APPLICATIONS for details on many of
these.
Minor Modes
Minor Modes work like mix-ins: enable as many as you like. Emacs turns on a dozen by default to implement things like the automatic handling of compressed or encrypted files, and I typically have a couple dozen other Minor Modes enabled too. Emacs ships with 0, and at the moment, there are at least 166 more Minor Modes available in the Package Manager, and even more on Github and the like.
Minor Modes come in two flavors, global and Buffer Local, and some come in both.
When you turn on a Buffer Local Minor Mode, it’s only enabled in the current Buffer;
if you want it on in another Buffer too, you need to turn it on there
separately. This is why we often add Minor Modes to a Major Mode’s startup
hook: so that they’re automatically turned on in all Buffers in that Major Mode.
But Minor Modes that are likely to be generally useful in any Major Mode often
come in a global flavor; when you turn on a global Minor Mode, it’ll be on in every
Buffer that’s created. We’ve seen how you turn on line-numbers in a Buffer with
M-x display-line-numbers-mode; but there’s also M-x global-display-line-numbers-mode.
It’s up to the programmer who implements a Minor Mode to decide whether to
provide a global command, a Buffer Local command, or both.
Some Minor Modes will be listed in the parentheses of the Mode Line, after the Major Mode. Right now, my Mode Line shows:
(Org Ind Fly PgLn NoMouse! Fill)
org-mode is the Major Mode and all the rest are Minor Modes. Minor Modes may
shorten their Mode Line indicator121 dramatically (“Ind” above is org-indent-mode),
and some choose to provide no indicator at all (global ones tend to use no
indicator). Minor Modes are used so heavily nowadays they can take up a lot of
Mode Line space. Each of these indicators provides various actions for mouse
clicks; see the Mode Line chapter.
We’ve seen how to add Minor Modes to hooks, but you can also turn them on and
off manually. Any Minor Mode command, like M-x flyspell-mode, will
toggle that Mode: if it’s currently off, it’ll be turned on, and vice versa.
(This is different from Major Mode commands, which only turn the Mode on; since
there’s always one and only one Major Mode in a Buffer, you can’t simply turn it
off: all you can do is turn on (and thus replace it with) a different one.)
Global Minor Modes work the same way, affecting all Buffers. The only practical
way to turn on Buffer Local Minor Modes in your Init File is via hooks, but you
can directly turn global Modes on in your Init File like, for example:
(global-display-line-numbers-mode +1)
Application Buffers
Broadly speaking, there are two kinds of Buffers in Emacs: those that are visiting files, and those that aren’t. In file-visiting Buffers, we are editing (or at least viewing) the contents of a file.
Non-file-visiting Buffers can be loosely subdivided into two further types. The
first is temporary Buffers. When you ask Emacs to display some information with
a command like M-x list-colors-display or M-x list-holidays,
the results are displayed in temporary Buffers. Of course, you can create a
brand-new, empty, non-file-visiting Buffer as simply as
C-x b (switch-to-buffer) NEWNAME. You might even scribble
notes in it, or use it to gather text from other buffers for editing. Such
Buffers are transitory and thus unimportant: if one becomes important to you,
you save it to a file with C-x C-s (save-buffer): now it’s a
file-visiting Buffer.
The second type of non-file-visiting Buffer is what I’ll call Emacs Applications: Buffers that implement the user interfaces of special purpose programs: Buffers that you interact with. Such Applications include file managers, web browsers, shells and terminals, version control programs, mail user agents, games, and much more.
As I write this, my Emacs has 59 non-hidden Buffers, and 34 of them, the majority, are Applications: I would say that proportion is completely typical. Application Buffers are what make Emacs a Lisp Machine: a plain-text computing environment. You could turn that around and say that Application Buffers exist because Emacs is a Lisp Machine: the fact that it’s so readily programmable has resulted in people using it to create so many Applications.
We’ve already discussed a few Applications without emphasizing it: the Help, Apropos, and Info subsystems; and the Minibuffer. These Applications, and many more, exist as user interfaces to Emacs itself, but most, as we’ll see soon, are Emacs front-ends to your computer, to the network (and the web), and to Unix command-line applications. And some are completely stand-alone Applications, rather than front-ends to anything else (for example: the Calculator, Calendar, and various Games and Amusements).
(You can also think of the fancier file-visiting Major Modes as applications: IDE’s for programming languages, document viewers, and the like; in a Lisp Machine, it’s really hard to make these distinctions.)
Every Application is unique, but most of them start out inheriting behavior from
a Major Mode called special-mode. As a result, lots of
Applications share a certain amount of behavior and key bindings, which I’ll
discuss briefly here.
But first and foremost, an Application Buffer is just that: a Buffer. Most of what you’ve learned about Buffers applies to Applications. Of course, there will be differences, but in general in any Application you already know things like:
- how to navigate within it (use the motion and search commands)
- how to copy text (or data) from it (just select text and use
M-w(kill-ring-save)) - how to get help about it (
C-h m(describe-mode)) - how to switch between Applications (just switch Buffers)
- how to kill an Application (
C-x k(kill-buffer))
This is one of the advantages of Emacs as a computing environment: you have less to learn because you already know these things.
Application Buffers start out and almost always remain read-only, and inherit
the following key bindings from special-mode (see Table 7), but
remember that any Application will add more bindings, and very often
change some of the inherited ones, in the name of usability. Almost
all special-mode commands are just handy shorthands for commands you already
know, shown in the “Also” column.
| Key | Also | Action |
|---|---|---|
SPC |
C-v |
scroll forward |
DEL, S-SPC |
M-v |
scroll backward |
< |
M-< |
go to beginning-of-buffer |
> |
M-> |
go to end-of-buffer |
- |
C-u - |
give next command a negative arg |
0…9 |
C-u 0 ... |
give next command a numeric arg |
?, h |
C-h m |
show help for mode |
g |
C-x x g |
revert the buffer |
q |
C-x 0 |
hide the Application window |
Note that most Applications don’t have a command to stop or terminate them; you
can just switch away from their Window (special-mode’s q command is an easy way)
and never come back. As usual, if you want to clean up, you can just kill the
Application’s buffer.
Windows
Figure 13: Emacs Data Structures
Legend:
| + | One or more |
| 1 | Exactly one |
| 1? | One or none |
When Emacs starts up, it presents a Frame containing a single Window. This Window displays a Buffer, and has its own Point. Optionally, a Window (almost always) has a Mode Line, and (less frequently) any of a Header Line, a left Fringe and a Right Fringe; see Figure 14.
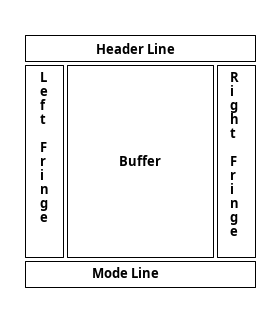
Figure 14: The Parts of a Window
The Frame can be tiled into multiple Windows in a rectangular grid; that is, any Window can be recursively subdivided into more Windows, horizontally or vertically; see Figure 15.

Figure 15: Tiling Windows
At any moment, one Window is the distinguished selected Window122; most editing commands, including self-inserting commands, take effect in the Buffer of the selected Window.
Different Windows may display the same Buffer123, and they don’t need to display the exact same part of the Buffer: one could display the beginning of the Buffer while another displays the end, and there may or may not be any overlap. If you can see the same part of the Buffer in two Windows, and you modify the text there, you will see the modifications in both Windows. Since each Window has its own Point, you can move and scroll independently in different Windows displaying the same buffer.
Splitting Windows
Since it’s impossible to have a Frame with no Windows, there’s no command to
create a Window out of thin air. If you want a new Window, you have to pick an
existing Window; switch to it, if it’s not the selected Window; and split it.
We’ve already discussed this in Basic Commands to Manipulate Windows. The
fundamental commands are C-x 2 (split-window-below) and
C-x 3 (split-window-right).
There are two new commands that perform a higher-level sort of split that would
take a little fiddling to do manually. The both split your current Frame into
two equal halves, preserving your complete current window layout in one of the
two halves (with its windows scaled down to take up half the Frame), and giving
you a new, big, half-Frame-sized window to use as you like.
C-x w 2 (split-root-window-below) puts the new big window at
the bottom of the Frame (where C-x 2 would put the new window) and
C-x w 3 (split-root-window-right) puts it on the right (where
C-x 3 would put it). I find C-x w 3 to be the more useful of the two, because
fiddling with side-by-side Windows is always trickier.
I know this is hard to picture; just set up two or more Windows in a Frame and
say C-x w 2 and you’ll get it immediately; then do C-x w 3 right after that.
Deleting Windows
There are two basic commands for deleting Windows:
C-x 0 (delete-window) and
C-x 1 (delete-other-windows): in other words, you either
delete this, the selected, Window, keeping all the rest, or you delete all the
other Windows, keeping only this one.
C-x w 0 (delete-windows-on) prompts for the name of a buffer
and deletes all the Windows that happen to be displaying it.
None of these three commands in any way affect the buffer being displayed: in particular, they do not kill the buffer.
Switching Windows
To “switch Windows” means to change the selected Window, without necessarily
changing the number or layout of the Windows. Mouse users can switch Windows by
just clicking anywhere in another one. For those of us that prefer the
keyboard, the most basic command to change the selected Window is
C-x o (other-window), which switches to the Other Window;
repeated invocations cycle through all the Windows in the current Frame.
Which Window is the “other” one? Simple: it’s the next Window in a pre-order,
depth-first traversal of the Window tree arranged in a cyclic ring! It’s a
little hard to express in a less-nerdy manner, but if your Window configuration
were that in Figure 16, and the selected Window was the Window labeled
S (for selected), then the Other Window is Window 1, and repeating C-x o would
cycle through the Windows in numeric order, returning to Window S after Window
6.
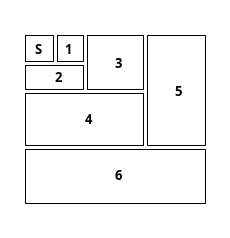
Figure 16: The Mysterious Other Window
C-x o is fine when you have only two Windows (a very common configuration), and
okay for three, but after that it’s frankly kind of tedious and if you
overshoot, you have to circle all the way around again!124
Optional packages to the rescue! I use the windmove package, which essentially
gives you four new directional versions of C-x o: switch to the Window to the
right, the left, the one above, and the one below. By default these are on the
shifted arrow keys. So in Figure 16, if you’re at S and want to
switch to 5, you can just say <S-right> <S-right> <S-right> (or take another
route, like <S-down> <S-down> <S-right>) rather than six C-x o’s. windmove is
not so much about minimizing the keystrokes as making them more direct and easy
to think about.
Another package that’s well-liked is Oleh Krehel’s ace-window, which gives you
one new function, which you would probably bind to C-x o; when executed, the
Windows all display a transient label in their upper-left-hand corners—by
default a digit—and you just type the label of the Window to which you want to
switch. That’s three keystrokes to switch to any Window, regardless of how many
Windows are in your frame. It’s also kind of visually sexy.
You can choose between either of these, or use both, or search the Packages for
many other possible solutions. Here’s a recommended Init File snippet that sets
up windmove:
(unless (package-installed-p 'windmove)
  (with-demoted-errors "%s"
    (unless package-archive-contents
      (package-refresh-contents))
    (package-install 'windmove)))
;; <S-{left,right,up,down}> switches windows
(with-demoted-errors "%s" (windmove-default-keybindings))
If you want ace-window, replace or supplement the snippet above with this one;
feel free to choose a different keystroke if you want to preserve C-x o.
(unless (package-installed-p 'ace-window)
  (with-demoted-errors "%s"
    (unless package-archive-contents
      (package-refresh-contents))
    (package-install 'ace-window)))
(keymap-global-set "C-x o" 'ace-window)
Finally, there are of course innumerable commands that have the side-effect of
switching Windows. I’ll just mention here the C-x 4 family of commands that
switch to the Other Window and then do something in it; these commands are great
when you can think just one step ahead, knowing not only that you want to switch
Windows but what you intend to do when you get there; see Table 8.
(See KIlling Buffers for C-x 4 0, which I think is more of a buffer-killing
command.)
| Key | Action in Other Window |
|---|---|
C-x 4 C-f |
Find a file |
C-x 4 f |
… the same |
C-x 4 r |
… the same, but read-only |
C-x 4 b |
switch to a different Buffer (with completion) |
C-x 4 C-o |
… the same |
C-x 4 d |
open Dired on some directory |
C-x 4 C-j |
Jump to this buffer’s directory in dired |
C-x 4 m |
compose an email |
C-x 4 . |
find the definition of the identifier at Point |
C-x 4 a |
find ChangeLog file and Add an entry |
Window Configurations
Often, working in Emacs consists of a fugue-like state of rapidly and almost
automatically switching from Buffer to Buffer, with Windows coming and going, as
you multitask between, say, authoring, coding, doing email, managing files, and
browsing the web. But sometimes you need an exact configuration of Windows and
Buffers to stick around (for example, see Figure 49). In this case,
a popped-up Window showing *Help* or an email can be an irritant if it means you
have to manually restore your Window Configuration.
There are several facilities to cope with this. The oldest is to use a
Register: set up your Windows and Buffers exactly as you want them and then
store that configuration in a register with
C-x r w (window-configuration-to-register). It will prompt
you for a single-character Register name; pick a (preferably) mnemonic letter.
Now, after the usual vicissitudes of the day—popped-up Calendars, Shells, and
Web Browsers—have messed-up your beautiful layout, just restore it with
C-x r j (jump-to-register), which will prompt for the
Register name you’ve used.
To be precise, a Window Configuration records the exact sizes and relative positions of all the Windows in the current Frame, and exactly which Buffer was displayed in each Window, and what portion of the Buffer was visible. (You can also save and restore all the Window Configurations in all your Frames in one go; see Frames.)
Using Registers requires a little forethought, but it does guarantee perfect
restoration of your layout. A more on-the-fly if less precise method is to use
Winner Mode. This is a global Minor
Mode that essentially allows you to Undo Window configuration changes. So when
your carefully-arranged layout is messed up because you had to send that email,
and needed to get help while doing it, just use
C-c <C-left> (winner-undo) (perhaps repeated a few times)
until you get your configuration back. If you overshoot, you can undo the undo
with C-c <C-right> (winner-redo).
I use Winner Mode all day long and consider it essential. I recommend this Init File snippet (the bindings I describe are my own more felicitous versions of the defaults):
(winner-mode +1) ; undo window config changes
;; add more felicitous bindings
(define-key winner-mode-map [(control c) (control left)] 'winner-undo)
(define-key winner-mode-map [(control c) (control right)] 'winner-redo)
There are of course other third-party Packages that deal with Window configurations; I might mention the Hyperbole package that does that (and also many other things).
The Tab Bar
Another way to manage Window Configurations is via the very new Tab Bar. Not to be confused with the Tab Line, the Tab Bar is a Frame-specific set of different transient Window Configurations.
Really, I think the Tab Bar is best thought of as a task-based desktop organizational framework. Many people use distinct window manager “desktops” or “tabs” to separate their applications this way: you’ve got your email application and its many windows in one desktop, your game’s windows in another, your word processor in a third, and maybe your web browser in a fourth.
The Emacs way is to do all (or most) of these activities in Emacs, and the Tab Bar gives you that same kind of organization. A given “task” is not so much a precise, unchanging Window configuration, but rather the set of Windows and buffers as you were last using them when you were working on that task. The Tab Bar lets you switch between tasks rather than preserving precise Window configurations.
Before the introduction of the Tab Bar, people would often use a dedicated Frame for each “task” or “desktop”. The Tab Bar lets you do it in one Frame.
Note the differences between a Tab and a Window config in a Register:
- Tabs have long names, while Register names are restricted to single characters.
- The set of available configurations is (by default) visible in a Tab Bar at the top of the Frame, while the Register config is hidden away.
- The configuration of Windows and Buffers in a Tab can be changed as you work, whereas a Register config can only be created from whole cloth once and then restored, precisely, many times.
Turn on the Tab Bar with M-x tab-bar-mode; this is a global Minor
Mode and so the Tab Bar will be active in all current and future Frames. When
you enable the Mode, a single configuration will be created, named for the
current buffer. You can change the configuration at will: split Windows and
change buffers all you like. So far it doesn’t seem any different from not
using tab-bar-mode.
Suppose you’ve laid out a nice configuration for editing your book, but now you
want to read your email for a while. Since this is a distinct task that will
implicitly use a different set of Windows and buffers, you should create a new config
with C-x t 2 (tab-new) (or use your mouse to click the
right-hand + sign in the Tab Bar). Now, in this new, second, config (which
you’ll notice has popped up in the Frame’s Tab Bar), you can open your mailer
and read and compose emails. To get back to your book, just click on the
book-tab, or switch configs with one of the tab-switching commands in Table
9: your Windows and buffers are restored to the way they were right before
you started reading mail. You can now switch back and forth between tasks, or
add a new task when needed.
| Key | Action |
|---|---|
C-x t 2 |
create a 2nd (really, a new) tab |
C-x t C-f |
… by Finding a File |
C-x t f |
… (the same) |
C-x t b |
… by switching to a Buffer |
C-x t d |
… by Dired |
C-x t o |
switch to the Other (next) tab |
C-x t RET |
… by name (with completion) |
C-x t 0 |
zero (delete) this tab |
C-x t 1 |
make this tab the only 1 (delete all others) |
C-x t r |
Rename this tab |
C-x t m |
Move this tab to the right |
C-x w ^ t |
move this window to its own new Tab in the Tab Bar |
A Register configuration has one advantage that a Tab Bar config doesn’t have: a Register config is immutable. You’ll note that while you’re in a given Tab, you can change the Windows, buffers and their visual relationship at will, so once you’ve laid out a precise configuration in your Tab, you may still want to store it in a Register so you can get it back, or use Winner Mode to undo config changes.
If you use desktop-save-mode to save and restore the state of your Emacs between
sessions, using tab-bar-mode will result in all your Tabs being restored as
well.
I must admit that before writing this section, I was completely confused about the Tab Bar and the Tab Line. So what is the difference between them?
- There’s one Tab Bar per Frame, but there’s one Tab Line per Window
- Each tab in the Tab Bar is a (fluid) named Window configuration, whereas each tab in the Tab Line is a Buffer that you’ve displayed in the current Window.
You can of course use both of them at once.
Tweaking Window Sizes
Speaking of Window configurations with precise layouts, well, how exactly do you arrive at those precise Window sizes?
Mouse users can just click and drag with mouse button 1 on a Mode Line to resize a Window in the vertical axis (that is, make a Window taller or shorter), or on the Window divider line between two side-by-side Windows to make a Window narrower or wider. Of course, to make one Window taller or wider, Emacs will have to steal space from a neighboring Window (because tiling). And note that when clicking in a Mode Line, you need to avoid clicking on any of the Mode Line components that have their own response to mouse clicks—most printed text or graphics in the Mode Line reacts to mouse clicks. Find a spot (typically blanks) where the mouse cursor changes to a double-headed arrow before clicking.
For us mouse avoiders, there are key bindings that achieve the same effects; see Table 10.
| Key | Action |
|---|---|
C-x ^ |
make selected window one line taller |
C-x } |
make selected window one character wider |
C-x { |
make selected window one character narrower |
C-x - |
shrink this window if its buffer doesn’t need so many lines |
C-x w - |
similar, see below |
C-x + |
make all windows the same height (balance windows) |
The first three commands in Table 10 can take a positive numeric
argument \(N\) to operate \(N\) lines (or characters) at a time, and can take a
negative arg to operate in the opposite direction. But fiddling with Window
sizes is tricky and when you want to, say, make a Window wider, usually a
precise number of characters doesn’t immediately jump to mind such that you
efficiently utter something like C-u 17 C-x }. You really want to repeatedly
invoke C-x }, perhaps with your keyboard’s auto-repeat, until it looks exactly
right. But these two-stroke bindings are infelicitous and can’t be
autorepeated, so I recommend the following felicitous bindings (unassigned in a
stock Emacs) for your Init File:
(keymap-global-set "C-{" 'shrink-window-horizontally)
(keymap-global-set "C-}" 'enlarge-window-horizontally)
(keymap-global-set "C-^" 'enlarge-window)
The windsize package defines four mnemonic key bindings on the control-shifted
arrow keys which by default resize by 8 columns or 4 rows per keystroke; I
include these in the Init File:
(require 'windsize)
(windsize-default-keybindings)  # resize windows on C-S-<left> etc
Finally, C-x - (shrink-window-if-larger-than-buffer) is very
handy when you’re working in a buffer that only has a few lines in it, but whose
Window eats up 50% of your screen real estate.
C-x w - (fit-window-to-buffer) does the same thing, but is
also able to shrink windows horizontally, for users who use a lot of
side-by-side windows.125
C-x + (balance-windows) divides all the Frame-space evenly
between all the Windows.
Vertical Scrolling
Even though there are often better ways to move, if you just need to move one
character forward, nothing beats C-f (forward-char) or
<right> (right-char). On the other hand, if you know you
need to move somewhere, but don’t really know exactly where, nothing beats
scrolling for an overview of your text.
We’ve already met C-v, M-v, and
C-M-v in an earlier chapter, and you can of course also use the
scroll bars and the mouse wheel.
Remember that moving means “moving Point”, i.e. changing your position in the buffer. Strictly speaking, scrolling isn’t a way of moving Point: it’s a way of adjusting the portion of the buffer’s text that’s visible in a Window; but this often has the side-effect of moving Point.
Here we have a 10-line Window. Imagine that the buffer is hundreds of lines larger than the Window. The Window line numbers are at the left, and the buffer line numbers are to the right of them.
The word “FOO” is in the middle of buffer line 655, which happens to be shown in
Window line 5 at the moment, and Point, indicated by |, is at the beginning of
“FOO”. (Lines 650 and 661, and many more, are outside the Window.)
       650   Lorem ipsum dolor sit amet, consectetuer adipiscing elit
+---------------------------------------------------------------------+
|  1 | 651 | Lorem ipsum dolor sit amet, consectetuer adipiscing elit |
|  2 | 652 | Lorem ipsum dolor sit amet, consectetuer adipiscing elit |
|  3 | 653 | Lorem ipsum dolor sit amet, consectetuer adipiscing elit |
|  4 | 654 | Lorem ipsum dolor sit amet, consectetuer adipiscing elit |
|  5 | 655 | Lorem ipsum dolor sit |FOO, consectetuer adipiscing elit |
|  6 | 656 | Lorem ipsum dolor sit  BAR, consectetuer adipiscing elit |
|  7 | 657 | Lorem ipsum dolor sit amet, consectetuer adipiscing elit |
|  8 | 658 | Lorem ipsum dolor sit amet, consectetuer adipiscing elit |
|  9 | 659 | Lorem ipsum dolor sit amet, consectetuer adipiscing elit |
| 10 | 660 | Lorem ipsum dolor sit amet, consectetuer adipiscing elit |
+---------------------------------------------------------------------+
       661   Lorem ipsum dolor sit amet, consectetuer adipiscing elit
If we scroll up by 4 lines, say with C-u 4 C-v, the line with FOO will now be
displayed in Window line 1; Point remains at the beginning of “FOO”.
       654   Lorem ipsum dolor sit amet, consectetuer adipiscing elit
+---------------------------------------------------------------------+
|  1 | 655 | Lorem ipsum dolor sit |FOO, consectetuer adipiscing elit |
|  2 | 656 | Lorem ipsum dolor sit  BAR, consectetuer adipiscing elit |
|  3 | 657 | Lorem ipsum dolor sit amet, consectetuer adipiscing elit |
|  4 | 658 | Lorem ipsum dolor sit amet, consectetuer adipiscing elit |
|  5 | 659 | Lorem ipsum dolor sit amet, consectetuer adipiscing elit |
|  6 | 660 | Lorem ipsum dolor sit amet, consectetuer adipiscing elit |
|  7 | 661 | Lorem ipsum dolor sit amet, consectetuer adipiscing elit |
|  8 | 662 | Lorem ipsum dolor sit amet, consectetuer adipiscing elit |
|  9 | 663 | Lorem ipsum dolor sit amet, consectetuer adipiscing elit |
| 10 | 664 | Lorem ipsum dolor sit amet, consectetuer adipiscing elit |
+---------------------------------------------------------------------+
       665   Lorem ipsum dolor sit amet, consectetuer adipiscing elit
This is why Emacs calls C-v “scroll-up-command”, rather than “scroll-down”: the
buffer lines have moved up in the Window. It’s also true that more buffer lines
are suddenly visible at the bottom of the Window (lines 661-664).
So scrolling isn’t really moving: the position of Point has not changed! However, it is a rule that Point is always visible in the Window, so if we were to scroll up one more line, Point would have to move to remain in the Window.
If we scroll by large amounts — bigger than the size of the Window, say by a screen-full at a time — then Point will be moving every time. But the motion of Point is really just a side-effect.
Conversely, if you move Point off the top or bottom of the Window with a true
Point-moving command like C-p (previous-line) or
C-n (next-line), because Point must remain visible, Emacs
will scroll the Window to achieve this! By how much will it scroll? The
default is to scroll Point to the center of the Window, which I hate – I think
it makes scrolling jumpy and my eyes lose track of Point.
Different people simply don’t agree about these things, but Emacs being Emacs, all aspects of scrolling can be fine-tuned with a variety of variables. I use:
(setq scroll-conservatively 100000)
The result of this (just trust me…) is that the Window only scrolls by one line if I move one line off the top or bottom. (If you read the documentation for that variable, the number will make sense.)
Where in the Window is Point?
Sometimes you want Point to stay where it is in the buffer (in front of some given word, perhaps), but you want it to be on some other Window-line. If Point is on the bottom line of the Window, you might want to center it so that you can see as many lines before and after it as possible.
You can do that by fiddling with numeric arguments for C-v and M-v, but as usual
there are commands to make that easier. C-l (recenter-top-bottom) will scroll the Window so that Point is in the center
line; immediately repeating C-l will scroll Point’s line to be at the top of the
Window; one more C-l scrolls it to the bottom; yet one more starts the cycle
over126. I use this command constantly; so much nicer than vaguely yanking
the scroll bar.
Conversely127, you might want to really move Point to a particular,
different, Window line, without scrolling the lines at all.
M-r (move-to-window-line-top-bottom) does that, and it
cycles through the same positions that C-l does when you repeat it; first Point
jumps to the line at the center, then the top and finally the bottom: the
visible lines remain the same, in the same positions.
These are easy to understand if you just try them out: pull up some text that’s
significantly bigger than your Window ( C-h C-c (describe-copying) will probably do), scroll a few screenfulls in with two
or three C-v’s, and then type several C-l’s in a row until you get the idea.
Now do the same with a sequence of M-r’s.
Finally, new to me as I write this paragraph in 2021128 is C-M-l (reposition-window), which recenters the Window heuristically, trying to
bring useful information into the Window, like a complete paragraph or a
complete function definition.
The Display of Lines
While the size of a Buffer is effectively unlimited (2.3 exabytes), the size of a Window definitely is not. It depends on the resolution of your display, your chosen font size, the current size of your Frame, and the sizes of any other Windows in that Frame. Scrolling copes well for buffers with many more lines than the Window has room for, but (in my opinion) is basically awful for lines longer than the Window is wide.
Continuation Lines
By default, horizontal scrolling is completely avoided by virtue of continuation lines. When the actual length of a line in a buffer—i.e., the number of characters between the beginning of the line and a newline character—is longer than the Window width, Emacs displays it wrapped on as many Window lines as it requires. So there are two kinds of lines: actual lines (determined by the content of the buffer), which Emacs calls logical lines, and the screen lines needed to display the logical line in full. Any extra screen lines needed for this are called continuation lines.
Continuation lines imply some ambiguity: the additional screen
line-breaks would masquerade as actual newlines in the buffer text. To solve this
problem, the continuation line-breaks are indicated by bent arrows in the right
and left Fringes of the Window129; if you have
display-line-numbers-mode turned on, you’ll note that the continuation
lines don’t get line numbers (display-line-numbers-mode numbers logical lines); see Figure 17.

Figure 17: Continuation Lines
All the line-motion commands work in terms of logical lines, so getting to the last word in a logical line continued into many screen lines (say from the cursor in Figure 17 to the word “estates”) requires using horizontal motion commands (or, of course, Incremental Search).
Line Truncation
The occasional continuation line is no hardship, and if you have many, it may
be because your Window is only temporarily too skinny and will soon be
wider. But when every line in the buffer is too long to fit (as in Figure
17), it can really be annoying. I use a tiling window manager
and as result, my Emacs frame can often be somewhat narrow, and Emacs itself
tiles its Windows, so every C-x 3 (split-window-right) can
mean more continuation lines. What to do?
My solution is to use line truncation instead of continuation lines, via this Init File snippet:
(setq-default truncate-lines t) ; good for tiling window managers
With this setting, there are no continuation lines: the line is (visually) truncated at the right-hand Window boundary and the right fringe shows a right-pointing arrow to indicate that there’s more of the logical line off to the right. This avoids the disconcerting continuation lines, but at the cost of horizontal scrolling.
Since I hinted that I hate horizontal scrolling (especially yanking back and forth on a horizontal scroll bar), this may sound like a counterintuitive choice, but of course, if you simply move Point into the off-screen part of a truncated line, Emacs scrolls automatically; remember, Point is always visible in the Window, so this means anything that moves Point, like searching, causes automatic horizontal scrolling as needed.
Still, even automatic horizontal scrolling can be annoying, but thanks to Winner
Mode, which lets me use C-x 1 (delete-other-windows) to get a
wide Window and with one keystroke restore my previous Window configuration,
truncated-lines work for me.130 See Figure 18 (and notice
how many more (partial) lines are visible).

Figure 18: Truncated Lines
You probably don’t want truncated lines as a global default the way I have it,
but you can switch any Window back and forth between continuation and truncated
with M-x toggle-truncate-lines.
Visual Line Mode
Neither truncated lines nor continuation lines are suitable for actually working with (i.e., editing or reading) the modern style of single-line paragraphs, or any other bunch of really long lines. For this purpose, you want Visual Line Mode.
Visual Line Mode wraps your lines into continuation lines at word boundaries,
exactly the way your phone does it; Emacs inserts no indication of wrapped lines
at the fringes (though display-line-numbers-mode still gives it away).
Let’s pretend my copy of War and Peace is formatted with single-line paragraphs. In Visual Line Mode it would look like Figure 19.

Figure 19: Visual Line Mode
The biggest difference is that in Visual Line Mode, the vertical line motion
commands (like C-n (next-line) and
C-p (previous-line)) move by screen lines, rather than
logical lines. So this is definitely the natural way to work with single-line
paragraphs.
You can use M-x visual-line-mode to switch in and out of this
mode in any Window, and if, unlike me, most of your files are structured as
single-line paragraphs, you can make it your default everywhere with this Init
File snippet:
(global-visual-line-mode +1) ; single-line paragraphs rule
The Horizontal Scroll Bar: the Last Resort?
With truncated lines, sometimes you actually do need to scroll horizontally. In
a graphical-mode Emacs, you may have a horizontal scroll bar, which is certainly
one way to do it. If you don’t have a horizontal scroll bar and you want one,
you can turn it on and off in the current Window with
M-x toggle-horizontal-scroll-bar, or make it a global default with
this Init File snippet:
(horizontal-scroll-bar-mode +1)
You can also scroll horizontally with C-x > (scroll-right)
and C-x < (scroll-left), which are the keyboard equivalents
of yanking on the horizontal scroll bar. By default each invocation scrolls by
the Window’s width (with a slight overlap), but of course they take a numeric
argument; multiple C-u’s are useful here. Naturally you can also change the
default scroll units.
The defaults are very infelicitous bindings so I recommend adding this to your Init File and using these instead.
(keymap-global-set "C-<" 'scroll-left)
(keymap-global-set "C->" 'scroll-right)
The Header Line
A Window can optionally display a Header Line at the top which is rather like an
additional Mode Line. Header lines are generally created by certain Major Modes
and the most common use is to display headers for column-oriented data. Try
M-x list-buffers to see one in action; like most columnized Header
Lines, you can usually sort the columns by mouse-clicking in the Header. The
Header is really a display of the contents of the Buffer-Local Variable
header-line-format; it’s in no way part of the Window’s
Buffer’s text.
The Fringes
The left and right Fringes are very narrow areas of the Window mainly used to
display graphical indicators that are matched to Window lines, most commonly
continuation lines and truncated lines (see The Display of Lines), but also
buffer boundaries that eliminate the ambiguity of the presence of blank lines at
the end of a buffer (see
Displaying Boundaries and
“Useless Whitespace” in the Emacs manual); to indicate added and deleted lines in
diff-mode; and in the special modes for running debuggers
for various programming languages (including, of course, Elisp).
If you’d like a see a Fringe in action, try making a new buffer (C-x b
newbuffer), make it the only Window in the Frame (C-x 1), and type in one line
of text. Note all the blank screen lines after your single logical line. How
do you know those screen lines aren’t actual empty lines in the Buffer
(consisting of many blanks and/or newlines)? Now say
M-x toggle-indicate-empty-lines; you should see a change in the left
Fringe. Now actually add a few empty lines at the end of the Buffer by hitting
RET a few times: note how the Fringe makes clear which lines are really in the
Buffer and which are just an artifact of the display.
Follow Mode
If you have a very wide, high-resolution display, it may seem like you’re
wasting screen real estate when you’re editing a buffer whose lines are
significantly shorter than its Window’s width: much of the right-hand side of
the Window will just be blank space. The Unix system dictionary
file---/usr/share/dict/words on my machine—is a particularly skinny example,
since each of its 123,985 lines is a
single word; see Figure 20.

Figure 20: The Tragedy of Wasted Screen Real Estate
Follow Mode lets you exploit this empty space to show more lines of your Buffer. Just
say M-x follow-mode and now split your Window with
C-x 3 (split-window-right). Normally, after C-x 3, the new
Window initially shows exactly the same text as the old Window: the top screen line of
the old Window is the top screen line of the new Window. But when Follow Mode
is active, the top line of the new Window is the line after the bottom line of
the old Window: it’s as if the two Windows comprise a single virtual Window that’s
twice as tall as the original. Another C-x 3 gives you a virtual Window that’s
three times as tall. You can have as many splits as make sense, given the
lengths of your logical lines. Figure 21 shows the same file after six
C-x 3’s; I’ve turned on display-line-numbers-mode to show how the screen
lines are related to the Buffer’s logical lines.

Figure 21: Follow Mode
Follow Mode isn’t just a trick to initialize the positions of the lines in the
Windows! If you move Point off the bottom of one Window with some invocations
of C-n (next-line), the cursor will appear at the top of the
next Window. If you search for a word that’s visible in one of the other
Windows, Point (and the cursor) will just jump there without scrolling any of
the Windows. And if you do scroll, all the other Windows scroll in lock-step to
maintain the tall virtual Window effect. You can delete Windows and re-split
them at will, and you can have C-x 2 (split-window-below)
splits with different Buffers in the same Frame; Follow Mode will keep all the
Windows that are displaying the same buffer in sync.
There’s a related Minor Mode, next-error-follow-minor-mode,
which is typically bound to a keystroke in modes like
grep-mode, occur-mode,
compilation-mode, and the like, which makes motion in the
hits Buffer cause automatic scrolling in the associated target Buffer.
Scrolling Many Different Buffers at Once
This style of lock-step scrolling can be useful with different Buffers displayed
in separate Windows, too. Suppose you have two Buffers with related data: the
information on line \(N\) of the first Buffer is related to that on line \(N\) of
the second Buffer, and so on. You can display these two Buffers side by side,
with their lines lined-up, but if you scroll one of them, now you’re out of
sync. M-x scroll-all-mode will synchronize all the Windows in the
Frame as you scroll one of them.
The (New) Windows Keymap
As of Emacs v29.1, there’s a new Prefix key C-x w that holds a small number of
new or previously unbound Window commands.
| Key | Action |
|---|---|
C-x w - |
fit window to buffer |
C-x w 0 |
delete all windows displaying this buffer |
C-x w 2 |
open a 2nd window below all your current windows |
C-x w 3 |
open a 2nd window to the right of all your current windows |
C-x w s |
toggle Side-windows |
C-x w ^ f |
move this window to its own new Frame |
C-x w ^ t |
move this window to its own new Tab in the Tab Bar |
We’ve already discussed some of these. Side windows are a fairly obscure
feature that I’ve never used (you can’t set them up without using Elisp), though
they might be a prominent part of libraries or package that I don’t use. The
C-x w ^ commands tear a window out of its current Frame or Tab.
The Mode Line in Detail

Figure 22: The Mode Line
Every Window has a Mode Line at its lower edge131. If your Frame only has one Window, its Mode Line is above the Frame’s Echo Area. The Mode Line displays dynamic information about the Window’s Buffer—the Buffer name, its Major Mode, and more: some of this info is shown in a terse and even cryptic form.
The Mode Line is completely customizable, but out of the box it has the following main components:132
U:@**-  *scratch*    All L1   Hg:94daf  (ELisp ElDoc)
CEFBB-     BUF       POS LINE    VC     (MAJOR MINOR ...)
- C
- a terse indication of the Buffer’s Coding System or character set
- E
- the Buffer’s end-of-line convention
- F
- an
@if this is a client frame - B
- the Buffer’s state relative to the file on disk (if it’s visiting a file)
- BUF
- the Buffer’s name (which is typically also the name of the file it’s visiting, if any)
- POS
- the position of the visible Window text vis à vis the Buffer text
- LINE
- the number of the line Point is in
- VC
- the Version Control state (if the Buffer is visiting a file under Version Control)
- MAJOR
- the Buffer’s Major Mode
- MINOR
- (some of) the Buffer’s Minor Modes
C — Coding Systems
There are about 50 single-character values indicating the most common Coding
Systems that can appear in the C column. Here are a few of them; how likely you
are to see any of these depends on where you live, what language you speak, and
the kind of files you edit. The real way to learn a Buffer’s encoding is to
execute M-x describe-current-coding-system in the Buffer.
U |
various Unicode UTF encodings |
1 |
ISO Latin-1 |
- |
US ASCII |
= |
raw, unencoded (binary) data |
* |
Windows 1250 |
D |
various DOS code pages |
c |
Chinese GB2312 |
B |
Chinese BIG5 |
J |
Japanese |
K |
Korean |
E — End-of-Line Encodings
This can be a single character if the Buffer’s end-of-line encoding is the normal one for your operating system, or else a word in parentheses.
: |
(Unix) |
Unix newlines (line-feeds) |
\ |
(DOS) |
MS-DOS (Windows) CRLFs |
/ |
(Mac) |
Old Macintosh carriage returns |
F — Client Frame Indicator
If there is an @ in this position it indicates that this Frame was created by
the Emacsclient (and so this Emacs is necessarily an Emacs Server); see Client / Server.
B — Buffer State
This indicates the Window’s Buffer’s state versus the file it’s visiting, if any.
-- |
Buffer unmodified |
** |
Buffer modified |
%% |
Buffer read-only and unmodified |
%* |
Buffer read-only and modified |
BUF — Buffer Name
This is simply the Buffer name, which for file-visiting Buffers is usually the basename of the file, possibly modified for disambiguation.
POS — Visible Text Position
This is a hint of how much of the Buffer is visible in the Window.
Top |
Beginning of Buffer is visible |
Bot |
End of Buffer is visible |
All |
All of Buffer is visible |
NN% |
NN percent of Buffer precedes visible portion |
LINE — Point’s Line Number
Self-explanatory.
VC — Version Control State
If the Buffer’s file is under Version Control (VC), the Mode Line will indicate
the file’s VC state in the form: BE-ID (for example, Hg:94daf):
- BE
- the (abbreviated) name of the VC back-end
- -
- the status of the file, indicated by a single character
- ID
- the version number (or version identifier) of the file
For the possible values of BE, see the list of version control systems (VCS’s)
in Version Control. ID is whatever your system uses to identify a version
number; for RCS it might look like 1.22 whereas for a distributed VCS like
Mercurial or Git it will probably be a hexadecimal number like 94daf.
The : can actually be any of the following status indicators:
- |
file is unmodified (or unlocked) |
: |
file is modified (or locked) |
! |
file contains merge conflicts or was removed from VC |
? |
file is in VC but missing from the working directory |
@ |
file was added locally but is not committed |
Note that in an old-fashioned lock-based VCS (like RCS), a username may also be
present---e.g., RCS:jim:1.3—indicating that user jim has the file locked.
MAJOR — Major Mode Name
The name of the Buffer’s Major Mode, with the -mode elided, so e.g. Fundamental
for fundamental-mode, Org for org-mode.
MINOR — Minor Modes
This is a space-separated list of strings, called “indicators” or “lighters”,
identifying enabled Minor Modes. Unlike the Major Mode indicator, these are
optional: a given Minor Mode may choose to use a very abbreviated indicator, or
none at all. So many Minor Modes are typically in use that many of the ones
that are enabled by default—e.g. auto-encryption-mode,
auto-compression-mode—use no indicator just to save space
in the Mode Line.
The Mode Line and the Mouse
The Mode Line, being one of the few things in Emacs that’s inaccessible to the keyboard, has a small number of mouse bindings. They come in two flavors:
- mouse clicks on Mode Line text (or images) (e.g. the Buffer name, a Mode indicator, the Coding System character (class C above)), and
- mouse clicks in any of the blank space between the textual elements; these clicks allow you to select, resize, or delete windows.
Taking the latter category first, we have the following:
| Mouse Button | Mouse Action | Effect |
|---|---|---|
mouse-1 |
click | select the Mode Line’s Window |
| drag | resize Windows vertically | |
mouse-2 |
click | like C-x 1 in the Mode Line’s Window |
C-mouse-2 |
click | like C-x 3 in the Mode Line’s Window |
mouse-3 |
click | like C-x 0 in the Mode Line’s Window |
As for mouse clicks in the textual or graphical elements, they vary to suit: just hover the mouse over the element and, in the Echo Area, you’ll see a brief description of the element and what various clicks will do.
Optional Mode Line Features
There are several optional Mode Line features that you can turn on, and you can
customize the appearance with a variety of formats and Faces. The best way to
do this is via M-x customize-group RET mode-line.
-
size-indication-mode - displays the total size of the
Buffer after POS, in a form like
74% of 712k. -
column-number-mode - displays Point’s column number next to the line number
display-time-mode- displays the current time, load average, and an indicator when you have new mail.133
-
display-battery-mode - displays the percentage remaining of your laptop’s battery charge.
There are also at least 61 third-party packages to enhance your Mode Line, including popular theming to make your Emacs look a little less Emacs-like.
Frames
Figure 23: Emacs Data Structures
Legend:
| + | One or more |
| 1 | Exactly one |
| 1? | One or none |
When you fire up Emacs, a new “window” pops up: not an Emacs Window, but an operating system or desktop window. Earlier I mentioned that, since Emacs had multiple Windows two years before Graphical User Interfaces were commercially available, it needed a new term for this object: a Frame.
A Frame consists of at least one Window, and has a Menu Bar, Tool Bar, Scroll Bars (vertical and horizontal)134, and an Echo Area, as in Figure 24.

Figure 24: A Frame with Two Windows
You can create as many additional Frames as you like, and use them as another way to organize your work, as you can with the Tab Bar for example.
You can of course delete any Frames you create; deleting a Frame does necessarily
delete all the Windows in it, but as usual in no way kills the Buffers in those
Windows. Deleting the last and only Frame is the same thing as exiting Emacs
with C-x C-c (save-buffers-kill-terminal);135 as always, Emacs
will ask for confirmation if you have any unsaved Files.
Frame Commands
The main commands for working with Frames are all on the C-x 5 prefix (see Table
12); they’re completely analogous to the C-x 4 family
of Other Window commands: where a C-x 4 command is a shortcut to something in
another Window, the corresponding C-x 5 command does the same thing in a new
Frame.
| Key | Type | Action |
|---|---|---|
C-x 5 2 |
Create | create a 2nd frame |
C-x 5 C-f |
Find a file in a new frame | |
C-x 5 f |
… the same | |
C-x 5 r |
… the same, but Read-only | |
C-x 5 b |
switch to a Buffer in a new frame | |
C-x 5 C-o |
Open a buffer in another frame | |
C-x 5 m |
compose an eMail in another frame | |
C-x 5 d |
open a Dired in another frame | |
C-x 5 . |
find the definition of the identifier at Point | |
C-x 5 5 |
run the next command in a new frame | |
C-x 5 0 |
Delete | zero-out (delete) the current frame |
C-x 5 1 |
make the current frame the 1 and only frame | |
C-x 5 u |
Undelete the most recently deleted frame | |
C-x 5 o |
Switch | switch to the Other frame |
C-x w ^ f |
Move | move the selected Window to its own new Frame |
The fundamental Frame-creation command is
C-x 5 2 (make-frame-command) (mnemonic: makes a 2nd Frame);
you can also make a new Frame initialized with some file, Buffer, or the like.
The most general-purpose of these commands is
C-x 5 5 (other-frame-prefix), which waits for your next
command (any key binding, including
M-x (execute-extended-command)) and then displays that next
command’s Buffer in a new frame. (It’s the Frames version of
C-x 4 4 (other-window-prefix).) So while a command like
M-x apropos normally pops up its list of commands in a new Window in
the current Frame, C-x 5 5 M-x apropos will pop up that Buffer in a brand new
Frame. It’s a shorthand for some more complex sequence of commands like:
C-x 5 2 M-x apropos C-x 4 b *Apropos* RET C-x 1
C-x 5 0 (delete-frame) deletes the current Frame; as
mentioned above, if the current Frame is the only Frame, this is equivalent to
exiting Emacs136. C-x 5 1 (delete-other-frames) deletes
all your Frames except for the current one. These two commands are analogous
to C-x 0 (delete-window) and
C-x 1 (delete-other-windows). You can undelete the most
recently deleted Frame with C-x 5 u (undelete-frame); with a
Prefix argument of N you can undelete the N-th most recently deleted Frame.
N.B. The ability to undelete Frames (a relatively new feature) is off by default; you need to enable it in your Init File with:
(undelete-frame-mode +1) ; bring back deleted frames
Finally, C-x 5 o (other-frame) is like
C-x o (other-window), but it always switches to another
Window in a Frame other than the current one (so it has no effect if you only
have one Frame). If you repeat this command, it cycles through all the Frames
you have open. Note that Emacs has to delegate this action to your window
manager (WM) or operating system (the WM is in charge!), so you may have to
tweak your WM or Emacs itself to make this work the way you want; see
“Frame Commands” in the Emacs manual for details.
Frames and Monitors
Some lucky people have more than one monitor connected to their desktop computer
(especially in an office situation). You can pop up a Frame on a particular
monitor with M-x make-frame-on-monitor; you’ll be able to use
Completion on whatever monitor names your operating system has assigned.137
Controlling Graphical Window Elements
Some people find the various GUI elements of Frames to be an annoyance. While I recommend that you exploit the Menu Bar and Tool Bar while you’re getting comfortable with Emacs, here’s how to disable any of these elements if and when you want to (I disable all of these).
Best is to use Customize via M-x customize-group RET frames. If
you’re inclined to disable any of these elements, you may also want to disable
GUI dialog boxes and tool tips (and use Emacs Completion instead)138; use
M-x customize-group RET menu. You can also just add one or more of
these snippets to your Init File:
(menu-bar-mode -1) ;turn off menu bar
(tool-bar-mode -1) ;turn off tool bar
(scroll-bar-mode -1) ;turn off vertical scroll bar
(horizontal-scroll-bar-mode -1) ;turn off horizontal scroll bar
(tooltip-mode -1) ; turn off GUI tooltips
(setq use-file-dialog nil use-dialog-box nil) ; turn off GUI dialogs
Customizing Frame Appearance
You can extensively customize the appearance of your Frames: things like size, position on your monitor, fonts, colors, cursors, and much, much more. Many of these can’t be done via Customize; see “Frame Parameters” in the Emacs manual.
If you use desktop-save-mode, it will remember any changes to your Frame
parameters, including implicit changes: if you embiggen the font or screen
position of a Frame, the next time you start up Emacs, that Frame will be
restored at its last screen position and font size (assuming your window manager
is okay with this).
Saving Frame Configurations
We discussed how you can save your Window configuration in a Register with
C-x r w (window-configuration-to-register) so that you can
restore it with a keystroke. That Window configuration is merely the set of
Windows in your current Frame. But you can also save your entire configuration
of all Frames with all their Windows in one step with
C-x r f (frameset-to-register).
Frames in Non-Graphical Mode
Even a non-graphical Emacs supports multiple Frames, but in a very limited manner: each Frame always uses the full screen of the terminal it’s running in, so you can only see one at a time, and elaborate Frame parameters aren’t supported (just because terminals can only do so much compared to what Emacs can do in graphical mode).
Files
Most of what we think of as “editing files” really consists of editing Buffers, but there are a number of topics that apply specifically to files and how they relate to Buffers. For files as the contents of directories, and performing file maintenance operations like copying, renaming, and the like, see Directories.
Visiting Files
As already mentioned, the usual way to visit a file (i.e., load it into Emacs
for editing) is C-x C-f (find-file), but there are a few
other useful variants. First, we have variants for finding files in specific ways:
C-x C-r(find-file-read-only)- This is just like
C-x C-ffollowed byC-x C-q(read-only-mode); you can use this when you want to make sure you don’t forget and start editing a file you only want to look at. M-xfind-file-existing- This is just like
C-x C-fbut it won’t let you create a new file. I’ve never used it; it’s probably most useful if you’re trying to pull up a file whose name contains wild cards (glob characters), like*or?, because it won’t expand them. It’s a little-known (and by me, little used) feature of find-file that if you use wild cards in the file name, it will load all the matching files into multiple Buffers.
Let’s talk about neatness. Some people accumulate dozens of file Buffers in
their Emacs (even hundreds, for users of server-mode), but others like to keep
a lean and mean Emacs by killing Buffers ASAP when they’re done with them.
C-x C-v (find-alternate-file) is designed for the ASAPers.
It replaces the file you’re editing with a different file, whereas C-x C-f adds
an additional file to your Emacs. It’s just like doing C-x k (kill-buffer) immediately followed by C-x C-f, except it
also reuses the Window of the killed Buffer, so your Window layout doesn’t
change at all. This is also often used when you visit a file and immediately
realize that it wasn’t the file you meant: C-x C-v let’s you correct the
mistake. Note that this is a brand-new Buffer, so if you’ve made any
Buffer-local changes to the previous file’s Buffer, like say turning on a Minor
Mode, they are lost.
Then we have a family of convenience commands that simply open a file in a
different Window. C-x C-f, C-x C-r, and
find-file-existing all open the file in the current Window;
these commands save you the effort of splitting Windows and rearranging Buffers:139
C-x 4 f(find-file-other-window)C-x 4 r(find-file-read-only-other-window)C-x 5 f(find-file-other-frame)C-x 5 r(find-file-read-only-other-frame)
Finally, M-x find-file-literally visits a file but shows you the
literal contents of the file. This means that the Major Mode will be
fundamental-mode, regardless of what it would normally be
(so no syntax highlighting); line ending- and character set-conversion will not
be done, and multi-byte characters (as in Unicode) will be shown as individual
bytes. Normally helpful features like automatic handling of compressed,
encrypted, and archive files (see below) will not be done.
When visiting a non-existent file (to create it), you might want to specify a
path that contains one or more non-existent directories. Suppose the directory
~/txt exists, but contains only plain files—no subdirectories—and you say
C-x C-f ~/txt/emacs/how-to.org. Emacs will happily open up a new Buffer for
you, but you’ll see this message in the Echo Area:
Use M-x make-directory RET RET to create the directory and its parents
You should take the advice. You don’t have to do it immediately, but as soon as you start typing in this Buffer, you’ll start getting warning messages as Emacs repeatedly tries, but fails, to create the Buffer’s checkpoint file in the non-existent directory:140
Error (auto-save): Auto-saving how-to.org: Opening output file:
  No such file or directory, ~/txt/emacs/#how-to.org#
You can also use M-x make-directory anytime you need a new
directory, just as with mkdir in the shell; note that make-directory always acts
like mkdir -p and makes all necessary intermediate directories for you.
Find File at Point
M-x find-file-at-point is extremely useful for when you’re looking
at the name of a file in some Buffer, and want to open that file141. Just
move Point to immediately before, within, or immediately after the file name,
and issue the command (it’ll give you a chance to tweak the name in the
Minibuffer). In addition to filenames, it also handles URLs at Point via the
Browse URL subsystem.
The command M-x ffap-menu will offer up for completion all the files
and URLs mentioned in the current Buffer.142
If you really like ffap, you can invoke ffap-bindings in your Init
File and it will remap 18 file-visiting
commands (e.g. C-x C-r or C-x 4 C-f) to use
ffap.
Persisting Files Across Sessions
You can arrange for the complete set of files you’re currently editing to be restored when you exit and then restart Emacs. See The Desktop.
Large Files
When you visit a file, the entire contents of the file is loaded into memory. Modern computers have so much memory available that this is rarely an issue, but disk is still bigger than RAM, and you don’t want your Emacs to slow down, much less be terminated by the operating system, because it uses too much memory.
When you visit a large file, Emacs will ask you to confirm that you really want to open it:
File Delicate Friction.zip is large (106.1 MiB), really open? (y)es or (n)o or (l)iterally
If you choose “(l)iterally”, the file will be opened with
find-file-literally. One of the problems with huge files
is that syntax-highlighting may be slow; visiting the file literally will use
fundamental mode and there won’t be any syntax-highlighting to slow you down.
So what defines a “large” file? The variable
large-file-warning-threshold. It’s default value is a
conservative
10,000,000 bytes; I
recommend setting it to at least 100MB.
(setq large-file-warning-threshold (* 100 1024 1024)) ; 100MB
If you need to edit truly large files that won’t fit in memory (say multiple gigabytes in size), you can do it with the VLF package. See The Package Manager for more information.
A related issue is files with extremely long lines, which can cause certain
Major Modes to struggle. Files with such lines are typically computer-generated
and aren’t usually intended to be edited by humans: things like minified
Javascript or byte-code.143 The solution to this problem is
global-so-long-mode; it automatically switches buffers
visiting files with long lines to so-long-mode, which
handles them with no problem. I recommend it for your Init File:
(unless (version<= "29.1" emacs-version) ; no longer necessary!
  (when (version<= "27.1" emacs-version)  ; only available recently...
    (global-so-long-mode +1)))    ; speed up long lines
Saving Files
We’ve already mentioned the basic commands for saving files (really, saving
Buffers): C-x C-s (save-buffer) and
C-x s (save-some-buffers). You can additionally save an
edited Buffer under a different file name with
C-x C-w (write-file) (this effect is sticky: if you continue
editing and then save with C-x C-s or C-x s, it will use the new name you
chose). If you want to make a modified version of an existing file, rather than
copying it first to a new name, you can just do C-x C-f and then immediately do
C-x C-w to save it under the new name. To be clear, C-x C-w does not rename the
file, but rather makes a new file with a new name.
You can also tell Emacs to ignore any modifications you’ve made to a Buffer, so
that you don’t accidentally save them to the file with a C-x s or an impulsive
C-x C-s. Just use M-~ (not-modified); after doing it,
you’ll notice that the modification asterisks ** in the Mode Line have changed
back to --, indicating the unmodified state, and Emacs won’t ask you about
saving this Buffer (until you modify it again).
Read-Only Buffers, or, Emacs is More
Emacs makes an excellent pager—i.e., a replacement for programs like more(1)
and less(1). Just do C-x C-r (find-file-read-only) (so that
you don’t accidentally modify the file) and now you can view the file and scroll
and search through it.
Even better is to turn on the Minor Mode M-x view-mode, which
makes the Buffer read-only (if it isn’t already) and let’s you page through it
with SPC and backwards with DEL; it also redefines many printing characters to
scroll by half-screenfuls, by lines, set marks and jump back to them, and many
other things handy for browsing.
You can arrange to have view-mode turned on automatically whenever you make your
Buffer read-only (which also happens if you visit a file that you don’t have
permission to edit). I recommend turning this on in your init file:
(setq view-read-only t)
Reverting Buffers
We’ve all experienced the regret of making extensive changes to a Buffer, and
then wishing we hadn’t! If you change your mind about all the edits you’ve done
since your last save, you might think you need to enter upon a long, tedious
sequence of Undos until you get back to the unmodified version, or use
C-x k (kill-buffer) and then revisit the file144. But
really, all you need to do is ask Emacs to
revert the buffer with
M-x revert-buffer or the new command
C-x x g (revert-buffer-quick): this means that Emacs will
refresh the Buffer contents from the file on disk (revert-buffer will ask for
confirmation), and you can then start over with your editing. Remember that if
you made changes and saved them, then reverting can’t undo the changes you
saved; you need Version Control for that.145 Note that, when you revert, this is
the same exact Buffer, so if you’ve made any Buffer-local changes, they are
preserved.
You naturally can’t revert Buffers that aren’t visiting files. Or can you?
Actually, many dynamic Application Buffers can be reverted! Examples include Buffers
viewing web pages in the Web Browser (reverting reloads the page), Dired Buffers
(reverting updates the Buffer to match the directory on disk), the Buffer Menu, and
many more. You’ll commonly find revert-buffer bound to g
in Application Buffers.
Auto-Reverting (Watching Files)
Sometimes you want to visit a file that’s regularly changing on disk. In
view-mode, you can use F
( View-revert-buffer-scroll-page-forward) to manually revert
the Buffer from disk to see any updates, but you can also put a Buffer into
auto-revert-mode, and Emacs will watch the file and
automatically revert the Buffer whenever there’s a change.
This is very handy when you’re editing a LaTeX or Org Mode document and
periodically generating a new PDF which you’re viewing in
doc-view-mode as you work (see PDFs and Image Files).
Log files are notable in that they are only appended to. You can use
auto-revert-mode here, but a better choice is
auto-revert-tail-mode, since it doesn’t reload the entire
(possibly huge) file every time: it just loads new lines from the end. (This is
like the shell’s tail -f command.)
Backup Files
Emacs never modifies your file on disk until you tell it to, but it’s very careful about saving your work for you in a number of ways.
- Backup files
Emacs preserves the previous version of your file when you first save a file. If your file is named
foo, the backup will be calledfoo~(note the tilde).Backup files are, by default, stored in the same directory as the file being backed up, but you can arrange for the backups to go in a subdirectory, or in a completely different location, by Customizing
backup-directory-alist.Note that, by default, if your file is under version control, Emacs won’t bother to make any kind of backup files, unless you tell it to (see
vc-make-backup-files).146 It also doesn’t make backup files in temp directories (like/tmpon Unix systems). All these settings can be tweaked.
- Numbered Backups
You can also have Emacs make numbered backups, so that you can keep more than just the previous version. The oldest numbered backup file of the file
foowould be namedfoo~1~;foo~2~would be newer, and the most recent is the one with the highest number (there’s no limit to the number kept!). Numbered backups are off by default; you can set them as your default, but you can also manually rename any one backup file to it’s numeric form:M-x rename-file RET foo~ RET foo~1~ RET
and from that point on, Emacs will make numbered backups of that file (that is, until you delete all the backups; then it would start over with simple backups).
I don’t recommend numbered backups; in general using your preferred version control system is much better practice, and Emacs has excellent VCS support.
Auto-Save Files
Emacs doesn’t change a file’s backup every time you save—only the first time
since you started editing it; this is because most people Save Early and Often,
hitting C-x C-s (save-buffer) frequently, and the backup file
is your way of recovering from a long session of file changes.
So Emacs also, by default, auto-saves your file while you’re editing it147;
I think of these as checkpoint files. The auto-save file for a file foo is
called #foo#. If Emacs (or the system) were to crash before you could save your
edits, you could recover almost all of them from this file. Auto-saving happens
(by default) every 300 characters you type, or every 30 seconds that you’ve been
idle, or when a system error is encountered, whichever comes first. You can of
course tweak these parameters if you’re either more paranoid or over-confident.
You can recover lost data by manually fiddling with the file and its contents from the auto-save file, but the simplest approach is just to visit the file you were editing and then say:
M-x recover-file
and, after a cautious confirmation dialog, Emacs will replace the contents of the Buffer with the auto-save file contents. In fact, if you visit a file which has an auto-save file which is newer than the file itself, Emacs will offer to do this recovery automatically.
If your entire session crashes (dropped connection to a remote host, laptop battery runs down) and you’ve been lazy about saving your work, you can fire up Emacs again and say:
M-x recover-session
and Emacs will walk you through the recover-file process for each file that
needs it.
If you like to live dangerously, you can turn auto-saving off, but I really
discourage this; there’s no noticeable overhead and the auto-save file is
deleted every time you do an explicit save with C-x C-s, so they don’t clutter
up your directories. I would also discourage the micro-management of exactly
how auto-saving works which Emacs allows (EIPNIF). But see
“Auto Save” in the Emacs manual for the gory details.
Lock Files
You can’t (normally) edit two copies of the same file in the same Emacs, because
of the way C-x C-f works, simply switching Buffers if you try to
visit a file that’s already loaded.148 But what if you fire up two Emacsen
and edit the same file in both? A recipe for disaster? Well, there’s no need
to worry as the two Emacsen will detect the conflict and notify you (but only if
you try to modify the file when the other Emacs already has it modified). Emacs
will ask:
FILENAME locked by keith@krampus... (pid 290502): (s, q,p,?)?
If you type s you can “steal” the file from the other Emacs—this is safe; it
just flips the roles of the two participants, and now if the other Emacs user
tries to modify their Buffer, they will be the intruder and be asked the same
question.
You can also type q to abandon the attempt, or type p to proceed into danger
with no protection, if you insist.
Who are these “other users”? Nowadays, most computers, like your laptop, are effectively single-user systems (though all real operating systems support logins for multiple users), but when Emacs was born, few people had their own computer and instead worked together on the same mainframe or minicomputer via multiple hardware terminals: so file editing conflicts could occur.
But they can still occur on your single-user laptop: the other user is you, in a different terminal, or desktop, or the like. So lock files are still important.
Lock files are implemented (on Unix systems) as symbolic links and look something like this example (I mention this only in case you stumble upon one, and wonder what it is):
.#emacs-tutorial.org -> keith@krampus.1173283:1613350748
Files Modified Behind Emacs’s Back
Sometimes a file in your Emacs will be modified by some other process, behind Emacs’s back. For example, you might synchronize files across multiple computers with an application like Syncthing, and thus you might change a file on your phone or desktop when you also have the file loaded in the Emacs on your laptop.149 If you start to modify the Buffer (say, by typing in it), when the file has changed on disk, Emacs will ask:
FILENAME changed on disk; really edit the buffer? (y, n, r or C-h)
If you’re not surprised at this (in the file synchronization case above, you
probably won’t be), you can type r to revert the Buffer.
If you are surprised, you can type n and your attempt to edit will be aborted;
now you can investigate the situation. If you’re lucky, you’ll discover that
you do indeed want the changes that were made on disk, and you can say
M-x revert-buffer to refresh the contents of the Buffer and get back
to work. (If you type C-h at the prompt, all these options will be summarized.)
If your Buffer was already modified in Emacs when the disk file got changed150, then the question will be:
FILENAME has changed since visited or saved. Save anyway? (yes or no)
This is a much more annoying situation. If you proceed with your save, you will lose the changes on disk, but if you revert, you will lose the changes in your Buffer! If you don’t care about one of the two, you’re okay: you can revert, throwing away your Buffer changes, or else save and allow the text currently in the Buffer to trump the contents on disk. But as Emacs says, “you risk ruining the work of whoever rewrote the file”.151
If you want the best of both worlds, you’ll need to combine the two versions.
The solution in that case is M-x ediff-current-file, which uses the
very powerful Ediff subsystem to let you merge changes in the disk file into
your Buffer, and vice versa; see Diffing and Merging.
The cryptic Table 13 summarizes your options when your
Buffer and your file are at odds. As in the Mode Line, -- indicates unmodified
and ** indicates modified; :-) means we want the modifications, and :-( means we
don’t.
| Buffer \ Disk | -- |
** :-( |
** :-) |
|---|---|---|---|
-- |
(no conflict) | C-x C-w¹ |
M-x revert-buffer |
** :-) |
C-x C-s |
C-x C-s² |
M-x ediff-current-file |
** :-( |
M-x revert-buffer |
C-x k³ |
M-x revert-buffer |
Notes:
- We don’t want the disk file content; since the Buffer’s not modified,
C-x C-shas nothing to save, butC-x C-wwill write the Buffer out: just use the same filename. - We want the Buffer modifications, but don’t want the disk file modifications.
Since the Buffer is modified,
C-x C-swill write it out, but you’ll have to confirm that you really mean to clobber the modified disk file. - We want neither the Buffer modifications nor the disk file modifications. In this case, you should kill your unwanted modified Buffer, and use Version Control to recover the version of the file that you want.
Compressed Files
Emacs handles compressed files transparently. If you visit a file that’s been compressed by any of the common Unix compression tools (compress, bzip2, gzip, lzip, lzma, xz, and zstd), it will be automatically uncompressed into the Buffer, and when you save it, the changed Buffer will be recompressed.152
The Major Mode for a compressed file will be chosen in the usual way; the file
extension used to choose the mode will be the one “underneath” the compression
extension (e.g., a file foo.org.bz2 will use bzip2(1) for the compression, but
the Buffer will be in org-mode).
This is all actually handled by the Minor Mode
auto-compression-mode, which is on globally (i.e. in all
Buffers) by default. If you don’t like this behavior, you can toggle the mode
off as usual.
Encrypted Files
Emacs handles encrypted files in the same transparent manner that it handles
compressed files. Unlike compression, there are not that many general-purpose
encryption tools; Emacs only directly supports GNU Privacy Guard (GnuPG)153
— see its manual. The default file extension is .gpg; if you visit an
encrypted file with that extension, it will be decrypted into the Buffer, and
when you save, it will be encrypted back to the file on disk.
The Major Mode for an encrypted file Buffer will be chosen in the usual way
based on the underlying file extension, if any, so foo.org.gpg will come up in
org-mode.
This is all actually handled by the Minor Mode
auto-encryption-mode, which is on globally (i.e. in all
Buffers) by default. If you don’t like this behavior, you can toggle the mode
off as usual.
There are some differences compared to compressed files, of course. Emacs turns
off auto-save-mode for the Buffer of an encrypted file, to avoid exposing your
unencrypted text in a checkpoint file. Additionally, encrypting and decrypting
a file requires you to specify a passphrase or key of some kind, for which
you’ll be prompted.
GnuPG is a complex program and you’ll have to do some studying to really understand it. The most important concept is the distinction between symmetric and public key encryption. Public key has major advantages but requires some setup and preparation; you can easily do symmetric encryption without any. See EasyPG Assistant for more information on Emacs GnuPG integration.
Archive Files
You can also directly edit archive files, like tar files; 7z, ar, arc, lzh, lzh-exe, rar, rar-exe, squashfs, squashfs, zip, and zoo archives; and all types of OpenDocument files (word processing, spreadsheet, presentation, graphics, and formula files) and EPUBs, which are stored as ZIP archives containing multiple parts. The interface has many similarities to Dired.
When you visit an archive, you are shown what looks like the table of contents
listing of that archive format. Here’s the Buffer contents I see when I visit
the tar archive for one of my Emacs packages via C-x C-f
refer-mode-1.18.0.tar:
drwxr-xr-x   keith/keith         0 refer-mode-1.18.0/
-rw-r--r--   keith/keith        72 refer-mode-1.18.0/refer-mode-pkg.el
-rw-r--r--   keith/keith       612 refer-mode-1.18.0/dir
-rw-r--r--   keith/keith     50555 refer-mode-1.18.0/refer-mode.el
-rw-r--r--   keith/keith     30243 refer-mode-1.18.0/refer-mode.info
-rw-r--r--   keith/keith       437 refer-mode-1.18.0/README
Note that the Mode Line will show the size of visible Buffer text, which is what it always does (see, for example, Narrowing), but this is deceiving. For the above tar file, the Mode Line says the Buffer contains 384 bytes, but Emacs really has loaded the entire tar file into memory, and its size is actually 92K. I mention this just because it’s not unusual for archive files to be very large. If you try to visit a really big archive, you’ll get the large file warning, to make sure you really want to do it.
Via the Buffer of an archive file, you can edit any of the component files
transparently. Just position Point on the desired file’s line and hit e, f, or
RET154 You’ll now be in a Buffer containing the contents of that file; the
Buffer name in the Mode Line will be something like refer-mode.info (refer-mode-1.18.0.tar).
You can edit at will using all the features of Emacs; when you save the Buffer, the edited contents will replace that file in the archive---but only in the archive Buffer: the archive file on disk won’t be modified until you save the archive Buffer itself. So fully saving a file from an archive is a two step process: save the file, then save the archive containing it. When you save the Buffer of the component file, you’ll see a message like this one in the Echo Area:
Saved into tar-buffer ‘refer-mode-1.18.0.tar’. Be sure to save that buffer!
In addition to editing the archive contents, you can manipulate the archive
itself. You can delete, rename, or change the owner, group, or mode of any of
the component files. You can copy a file out of the archive to the disk, and
you can add a new file to the archive (you’ll get a new empty Buffer to which you
can add content). In the archive Buffer, just do the usual C-h m (describe-mode) or hit ? for help; see “File Archives” in the Emacs manual.
Many archive formats implement their own compression scheme, but tar archives
don’t; they are usually compressed by any of the standard Unix compression
programs (like gzip(1) or bzip(1)); tar-mode works on compressed tar archives,
too.
Most of the other archive formats support the same kinds of operations, with the same key bindings, but there are a few lacunae (in particular, not all the other archive formats support changing owner, group, or mode—probably because these are Unix concepts and some of the other archive formats were developed on MS Windows).
Emacs’s support for tar files is fully implemented in Elisp, so you don’t need
to have a tar(1) program installed, but the other archive formats require the
appropriate program to be installed as a helper.
Document Files (PDFs and the Like)
Emacs can display various types of formatted documents, in particular, PDFs155, OpenDocument (and older Microsoft Office) files, EPUB e-books, PostScript, and DVI files. (Since most of these documents aren’t plain text, Emacs needs to be running in graphical mode to display them; otherwise it will necessarily fall back to a degraded view.)
All of these file types require some supporting non-Emacs software to be installed via your operating system’s package manager; see Table 14.
| Format | Requires |
|---|---|
| MuPDF156 or GhostScript | |
| EPUB | UnZip and (optionally) nov157 |
OpenDocument, .docx |
UnZip, unoconv and GhostScript |
| PostScript | GhostScript |
| DVI | GhostScript or TeX Live |
Microsoft .doc |
unoconv |
All of these document types are handled by
doc-view-mode, which
provides scrolling and paging commands (somewhat similar to
view-mode); see Table 15.
| Key | Action |
|---|---|
RET, C-n, <down> |
scroll one line forward (or next page) |
C-p, <up> |
scroll one line backward (or previous page) |
SPC |
scroll one window forward (or next page) |
DEL, S-SPC |
scroll one window backward (or previous page) |
n, <next> |
go to Next page |
p, <prior> |
go to Previous page |
< |
go to top of page |
> |
go to bottom of page |
M-< |
go to beginning of document |
M-> |
go to end of document |
There are six commands to change the size of the page text:
P |
assure full Page is visible in window |
H |
assure full Height is visible in window |
W |
assure full Width is visible in window |
+ |
enlarge the page text |
- |
shrink the page text |
0 |
reset the page text size |
If the document you’re viewing is one that you’re also authoring (say in LaTeX,
org-mode, or some other markup language), you can update it
after you’ve made changes by reverting the Buffer with the g
( revert-buffer) command (or equivalently, r). But I recommend
using M-x auto-revert-mode (see Reverting Buffers); you can add this
snippet to your init file to make it your default for doc-view-mode:
(add-hook 'doc-view-mode-hook 'auto-revert-mode)
Toggling the Display Mode
All these document formats have an underlying encoding. PostScript and PDF
files really have a plain-text encoding; DVIs have a binary encoding, and EPUBs
and OpenDocument files are Zip archives that contain several files in a variety
of formats. The point being, you might want to view the underlying encoding,
the raw data, rather than view the document. The command
C-c C-c (doc-view-toggle-display) will toggle back and forth
between the two views.158
Just the Text, Please
Viewing “documents” may sometimes be necessary, and even superficially
attractive, but it clashes with the very nature of Emacs as a plain-text engine.
These documents are basically images, and the more you have to deal with them,
the more you’ll miss the ability to use keyboard macros, powerful searching,
textual objects, and all the rest of the synergistic power that Emacs provides.
This can be mitigated somewhat with C-c C-t (doc-view-open-text),
which toggles the Buffer to a plain-text version of the document, where you can
use all your powers. C-c C-c (doc-view-toggle-display) will
toggle back to the graphical view.
Searching
Searching in doc-view-mode is awkward compared to searching in plain text
Buffers because it can’t highlight the matched hits the way
isearch-forward does159.
C-s (doc-view-search) does a regular expression search
forward, but since it can’t highlight the hits, it simply reports the number of
hits in the Minibuffer with a message like “DocView: search yielded 5 matches.”
Now hit C-s again to jump to the page with the first hit. Subsequent C-s’s
advance to further pages with hits. To initiate a brand new search (with a
prompt for a new regexp), use C-u C-s. The same procedure works backwards with
C-r (doc-view-search-backward).
This is obviously a little sad, as it can be tricky to spot matches in a page.
One solution for arbitrary document formats is to switch to text mode with
C-c C-t and do your search there. I find this pretty satisfactory, really.
Additionally, after you’ve initiated a search and moved to a given page of hits,
you can pop up a GUI tooltip window that lists all the hits on the page with
some context by hitting C-t (doc-view-show-tooltip).
But for PDFs, PDF Tools implements incremental search in a completely normal manner, with highlighting of the hits in the graphical view. Highly recommended.
Slicing
Since graphical documents are fundamentally designed with print in mind, they
often have a large amount of whitespace around their edges, sometimes excessive
amounts (I’m looking at you, default LaTeX format…). A more compact view with
minimal borders can be achieved with the slicing commands. Easiest to use is
s b (doc-view-set-slice-from-bounding-box) which does the
slice automatically; you can also manually set the slice with the mouse after
executing s m (doc-view-set-slice-using-mouse). To restore
the whitespace, invoke s r (doc-view-reset-slice).
Better PDF Handling with PDF Tools
If you install the 3rd-party package pdf-tools, you will have a much-enhanced
version of doc-view-mode for PDFs (only). It requires you to install the
external package poppler from your OS package manager.
Some of its advantages are that pages are rendered into memory on the fly160; it
has a true incremental search with highlighted hits in the graphical view and
even has M-x occur; you can follow links; make and view annotations;
manipulate attachments; and display a document outline (table of contents).
C-c C-c will toggle between pdf-view-mode and doc-view-mode; there are a few
things PDF Tools can’t do that doc-view-mode can.
I recommend auto-revert-mode for pdf-view-mode also:
(add-hook 'pdf-view-mode-hook 'auto-revert-mode)
Image Files
You can view image files (Emacs knows dozens of formats) as well as document
files. Just visit an image file and it will be displayed (only in a graphical
mode Emacs, of course). There are two non-graphical displays:
C-c C-c (image-toggle-display) toggles between graphical and
the raw underlying bytes (you’ll be in fundamental-mode),
while C-c C-x (image-toggle-hex-display) will switch to a
hex-dump display of the raw data (see Binary Data Files).
Browsing Images
While viewing an image in image-mode, you can visit the
next image file161 in the same directory with n
( image-next-file); p
( image-previous-file) goes the other way; these commands
reuse the same Buffer and Window and so don’t fill your Emacs with image
Buffers. w ( image-mode-copy-file-name-as-kill) will copy
the absolute pathname of the image you’re viewing to the Kill Ring.
You can also mark images with m ( image-mode-mark-file) so
that you can define a collection of files for later manipulation. This works by
setting marks in the Dired Buffer of the image directory162; when you’re
done, you can switch to the Dired Buffer and do, well, anything: change
permissions, tar or zip up the files into an archive, copy or mass rename the
files, or use Tramp to upload the files to another machine. Dired also has two
modes for viewing thumbnails of image files.
Resizing Images and Animations
When you visit a file it will be resized to fit the Window. If you resize the
Window, by default the image will be resized with it. There are several
commands for explicitly scaling the image; if you do this, the automatic
resizing when the Window size changes will be disabled until you reset the image
size with s 0; see Table 16.
| Keys | Action |
|---|---|
s h |
Show full Height in window |
s w |
Show full Width in window |
s b |
Show Both full height and width in window |
s o |
Show image unscaled at Original size |
s 0 |
reset image scaling to auto |
RET |
start or stop animating the current image163 |
If you set the image to its original, unscaled, size, you can scroll it in the
Window with most of the usual view-mode motion and
scrolling commands; see Table 17.
| Key | Action |
|---|---|
| SPC | scroll image up |
| DEL, S-SPC | scroll image down |
| C-b, <left> | scroll image left |
| C-f, <right> | scroll image right |
Binary Data Files
We’ve just seen that, while Emacs is primarily a plain-text engine, it has helpful modes for displaying graphical data files like images and formatted documents. Most graphical data files are actually binary data164, i.e., a sequence of arbitrary bytes not intended to be interpreted as characters — letters, digits, punctuation — in any particular character set165. There are many other types of binary data files, including compiled executable programs, database files, audio files, and so on. You may never need to view this raw data (unless you’re a programmer or system administrator), but if you do, Emacs is ready.
If you visit a binary data file for which Emacs doesn’t have a special Major
Mode defined, it will come up in fundamental-mode, and you’ll be looking at
the raw bytes. Here’s what the beginning of an MP3 file from my collection
looks like:

Figure 25: The Mae Shi’s Heartbeeps in fundamental-mode
(See What Is Text? for an explanation of the cyan characters.)
You can see, for example, that the MP3 format allows for text in the audio file
(these are ID3 tags for metadata). Emacs supports a friendlier or at least more
traditional format for displaying binary data, called a hex dump, via
M-x hexl-mode—Figure 26 shows the beginning of the
same file in hexl-mode:

Figure 26: The Mae Shi’s Heartbeeps in hexl-mode
(If you know you’re visiting a binary file you can skip the mode-change via the
shortcut M-x hexl-find-file.) As with many alternative-display
modes, you can switch back to the previous Major Mode with C-c C-c.
All the usual motion commands work appropriately in hexl-mode, and you can
modify the Buffer by typing self-inserting characters (hexl-mode also has a
number of other ways to insert bytes — but either way, make sure you know what
you’re doing).
Note that because many binary data formats contain fixed-length sections and
have alignment restrictions166, hexl-mode puts the Buffer in
overwrite-mode (you can change that if you know what you’re
doing). If you’re going to edit binary data in fundamental-mode, you probably
want to turn on binary-overwrite-mode for the same reason.
Editing binary files is only for Real Programmers and not the faint of heart,
but if you have to do it, it actually works in Emacs: which is to say, it won’t
work in many other editors, which may corrupt the file when you save it (say by
deleting or adding white space or helpfully converting assumed-character sets).
What you see in the Buffer in fundamental-mode or hexl-mode in Emacs is exactly
what will get written to disk.
References
- Ashley, Mike. 1999. The GNU Privacy Handbook. Cambridge, MA: Free Software Foundation. https://www.gnupg.org/documentation/guides.html.
- Free Software Foundation. 2017. The GNU Privacy Guard Manual. Cambridge, MA: Free Software Foundation..
Read in Emacs with
M-x info-display-manual RET gnupg RET.
- Post, Ed. July 1983. “Real Programmers Don’t Use Pascal.” Datamation. https://www.ee.ryerson.ca/~elf/hack/realmen.html.
Directory Editing with Dired
Emacs is thought by the uninitiated to be a (mere) text editor, so of course it
can edit files. But it can also edit directories (“folders” to some). What
does it mean to “edit” a directory? It means to do the sorts of things that are
normally done with Unix shell commands (like cp(1), rm(1), or chmod(1)) or a
file manager, like Windows Explorer (File Explorer), Apple’s macOS Finder,
or the venerable Norton Commander and its Unix clone, Midnight Commander.
Emacs handles directories via a special Major Mode,
dired-mode (Dired for short). Dired was one the first file
managers, having existed in ITS TECO Emacs since at least 1978. Dired is to
files what Buffer Menu is to Buffers.
To invoke Dired, just visit a directory, rather than a file, with
C-x C-f (find-file) or any other file-visiting command.
(Make sure your completion system doesn’t instead helpfully choose a filename
within that directory.) You can also invoke Dired directly with
C-x d (dired). The result will be a Buffer that looks like
the output of the Unix ls(1) command with its -l option167. Here’s the
source code directory of one of my Emacs packages:
")
Figure 27: C-x d (M-x dired)
This is not the same as the result of M-! (shell-command) ls
-l ~/src/refer-mode which would look superficially similar; nor is it the same
as M-x list-directory. For one thing Dired has colorized some of
the filenames, but most importantly, rather than being in
fundamental-mode, the Dired Buffer is in
dired-mode.
In dired-mode you can of course move around in and search the Buffer with all
the usual commands you already know, but the Buffer is read-only so you can’t
modify it168, and many printing characters are bound to useful commands for
manipulating the files. For example, if you move Point to any of the lines
representing a file, then hitting RET invokes
dired-find-file and visits that file in a new Buffer.
Dired is even more useful with the many enhancements from the Dired Extra package. I recommend adding this to your Init File:
(add-hook 'dired-load-hook (lambda () (require 'dired-x)))
and this chapter will assume you have done so.
Basic File Operations
| Key | Unix | Action |
|---|---|---|
RET, e, f |
cat |
visit (Edit, Find) this line’s file |
a |
… and clobber Dired buffer | |
o |
… in other window | |
v |
more, less |
… in view-mode |
^ |
ls .. |
open Dired on the parent of this directory |
F |
visit all marked files | |
C |
cp |
Copy file |
c |
tar -cZ |
Compress files into a tar archive |
D |
rm |
Delete file |
G |
chgrp |
change Group |
H |
ln |
make Hardlink to this file |
i |
insert this subdirectory into Dired | |
k |
vanish (“Kill”) marked lines (not files) | |
M |
chmod |
change Mode (permissions) |
O |
chown |
change Ownership |
P |
lpr |
Print file |
R |
mv |
Rename file |
S |
ln -s |
make absolute Symlink to this file |
T |
touch |
update file’s Timestamp |
Y |
ln -s |
make relative symlink to this file |
w |
copy this file’s basename to the kill ring | |
0 w |
… absolute pathname | |
C-u w |
… relative filename | |
W |
firefox |
view this presumably HTML file in your Web browser |
Z |
gzip, tar |
(un)compress and/or (un)tar this file |
= |
diff |
compare this file to another |
+ |
mkdir -p |
create a new subdirectory |
!, X, & |
run shell command on file (see below) | |
? |
1-line help or describe errors | |
B |
Byte-compile elisp files | |
L |
Load elisp files into Emacs | |
: d |
Decrypt file | |
: e |
Encrypt file | |
: s |
Sign file | |
: v |
Verify signature |
Table 18 lists some of the basic Dired file operations; the Unix column
gives roughly analogous shell commands. All the commands operate on the file
named on the current line — you don’t have to have Point precisely on the
filename part of the line. Some of the commands operate immediately (e.g., the
file visiting commands), but most will either ask for confirmation or for
additional information. C will ask for the name of the new, copied, file; M
will ask for the new file mode; D will ask if you’re sure you want to delete the
file, and so on.
Most of these commands can be applied to multiple files; see below.
Subdirectories
Inevitably some of the files in your Dired Buffer will be directories
themselves (initially at least, every Dired Buffer will contain the standard
Unix . and .. directories). There are two ways to work with the contents of a
subdirectory:
- open it in its own Dired Buffer (just use any of the Dired file visiting
commands such as
RET,ef,o, ora), or - insert (expand) its contents into the current Dired Buffer with
i(dired-maybe-insert-subdir).
Both approaches have merit. I usually prefer inserting unless I want to start working in two-panel mode with Dired DWIM.
When you insert a subdir, it looks much like it does when you run ls -lR.
Here I’ve issued the i command from the makefiles line:
-rw-r--r--   1 keith keith  231 Oct 16  2008 Makefile
drwxr-xr-x   2 keith keith 4.0K Jun 29 13:29 makefiles
-rw-r--r--   1 keith keith  437 Feb  7 17:34 README.ascii

/home/keith/src/refer-mode/makefiles:
total used in directory 28K available 93.5 GiB
drwxr-xr-x 2 keith keith 4.0K Jun 29 13:29 .
drwxr-xr-x 4 keith keith 4.0K Jun 30 13:07 ..
-rw-r--r-- 1 keith keith  290 Jan 19 17:15 Makefile.gnumake
-rw-r--r-- 1 keith keith 1.2K Jan 19 17:18 Makefile.help
-rw-r--r-- 1 keith keith 1.2K Feb  7 17:35 Makefile.org
(If you type i on a non-directory, it’s an error; if you type it on a directory
that’s already inserted, Point will jump to the first file in that
subdirectory.)
The subdirectory header lines — e.g. /home/keith/src/refer-mode/makefiles: in
the above — support some special actions. Typing l
( dired-do-redisplay) on one of these lines updates the
contents, so that a file newly created (by some other program) in the
subdirectory will appear, deleted files disappear, and any changes to file
sizes, permissions, etc, will also be updated. $
( dired-hide-subdir) will toggle the visibility of the
contents of the subdir, leaving the header line.
< and > move Point from directory file to directory file in the Buffer, and the
usual list-motion key bindings (C-M-n, C-M-p, C-M-u, C-M-d) move in terms of
inserted directory header lines.
When any subdirectories are inserted, all the files visible in them can be manipulated along with all the files in the directory proper; this includes all the file marking commands discussed below.
Compressing and Archiving Files
Z ( dired-do-compress) is somewhat special. If applied to a
single regular file, or several marked files, it compresses or uncompresses
them, based on the file extension169.
If applied to a directory (a subdirectory of the Dired Buffer, which includes
the . and .. entries), Z creates a compressed tar archive of all the files in
that directory170. If applied to an archive file, the Z command will
extract its contents. Dired knows some
17
compression and archive types.
Dired is the easiest way I know to create a tar archive containing a precise and
arbitrary set of files. It’s easy to tar up a directory of files from the shell
with tar cvzf archive.tar.gz some-directory. But what if you only want a subset
of the files in some-directory? Maybe just the .mp3 files but not the .jpg and
.pdf files, but including the README.txt? You can carefully list all the files
to be included on the command line: pretty tedious! Or use tar’s --exclude option,
but that’s going to be even more tedious if there are lots of files to exclude.
With Dired, it’s easy. Just use the powerful file marking commands to select
exactly the files you want, and then invoke
c (dired-do-compress-to), and the tar file will contain
exactly the files you marked.
Deleting Files by Flagging
In addition to D ( dired-do-delete), which deletes the
current file, you can take a more
thoughtful approach to cleaning up a directory by flagging a set of files for
deletion, and then, after suitable contemplation, delete them all. The command
d ( dired-flag-file-deletion), rather than deleting a file,
sets the D flag in the Dired Buffer; here I’ve typed d on all the squiggle-file
(backup file) lines:
D -rw-r--r--   1 keith keith  436 Jan 19 16:49 README.org~
  -rw-r--r--   1 keith keith  50K May  1 15:47 refer-mode.el
D -rw-r--r--   1 keith keith 1.2K Dec 22  2017 refer-mode.el~
  -rw-r--r--   1 keith keith  21K Jun 28 15:30 refer-mode.org
D -rw-r--r--   1 keith keith 1.6K Sep  7  2020 refer-mode.org~
If you change your mind about any of them, you can undo the flag with
u ( dired-unmark). When you’re ready, you can actually
execute all the deletions with x ( dired-do-flagged-delete).
The confirmation prompt will clearly list all the files about to be deleted to
help avoid tragic mistakes.171
For more convenience in cleanup, ~ (dired-flag-backup-files)
will mark all backup files, and the command
% & (dired-flag-garbage-files) will add D flags to all the
files that look like “garbage”172 and
% d (dired-flag-files-regexp) will flag all files whose names
match a regular expression.
The flagging commands---d and its friends—are actually a special case of the general Dired
concept of marking.
Marking Files
When manipulating files in the shell, you can use wildcards (glob characters) to handle multiple files at once. Dired itself doesn’t support wildcards, but it has a few (superior) tricks up its sleeve.
Most of the basic commands in Table 18 take a numeric argument; given
an argument of \(N\), the command will be applied to the next \(N\) files. So C-u 2
D will delete the file on the current line and the file on the line after it.
dired-mode is descended from special-mode and like most
Special Modes, you can use the digits alone as numeric arguments, so just plain
2 D is equivalent.
However, this is really only ever used for a very small number of files, like two or three, because having to count is both annoying and error-prone. On top of that, the files you want to operate on might not be contiguous! The solution is to mark the set of files of interest.
We saw above how the d command flags files for deletion, but Dired also has a
general purpose mark, spelled *. You can apply this mark to any file or
directory (and advance Point to the next file) with m ( dired-mark);
u ( dired-unmark) will remove the mark on the current line
and advance (DEL unmarks and moves in reverse), and U
( dired-unmark-all-marks) will remove all the marks and flags in the
Dired Buffer. m itself takes a numeric argument; or, if the Region is
activated, will mark all the files within it. Finally, if you hit m on an
expanded subdirectory header line, it will mark all the files within that
directory (if you hit m on a directory proper, it only marks that directory
filename). Here I’ve marked two README files; in addition to the * mark, the
filenames are colored a bold orange:
    drwxr-xr-x   2 keith keith 4.0K Jun 29 13:29 makefiles
  * -rw-r--r--   1 keith keith  437 Feb  7 17:34 README.ascii
  * -rw-r--r--   1 keith keith  455 Jan 19 19:26 README.org
    -rw-r--r--   1 keith keith  436 Jan 19 16:49 README.org~
Sometimes it would be easier to mark the files you’re not interested in, rather
than those you are. Just mark the uninteresting files and hit t
( dired-toggle-marks), and the marks will all flip. The
easiest way to mark all the files in the Dired Buffer is to hit t when no files
are marked (you can always achieve that state with U, or can memorize the
sequence U t as “mark all files”).
You can move from marked file to marked file with
M-} ( dired-next-marked-file)
and M-{ ( dired-prev-marked-file).
When there are * marks in the Buffer, most of the basic Dired commands will
operate on all the marked files, instead of on the current line.173 So to
copy 10 files to a different directory, just mark the files and say C. Some
commands have to make specific interpretations in the presence of marks,
or may ignore them if they just don’t make sense.
Some Dired commands will add their own special marks to files. The C command
adds a C mark to the new file that just got created by the copy; the H command
will likewise add an H mark and the S and Y commands an S mark to the new files
they create174. Here’s part of my Dired Buffer after I’ve copied (with the
C command) the upload.el file to the name Y, hard-linked it to X with the H
command, and relatively-symlinked it to Z (with the Y command). That’s three
new files that weren’t in the directory (and hence weren’t in the Dired Buffer)
previously.
  -rw-r--r--   1 keith keith 3.6K Jun 26 13:44 TODO
H -rw-r--r--   2 keith keith  251 Jan 19 16:40 X
S lrwxrwxrwx   1 keith keith    9 Jun 28 15:02 Z -> upload.el
C -rw-r--r--   1 keith keith  251 Jan 19 16:40 Y
  -rw-r--r--   2 keith keith  251 Jan 19 16:40 upload.el
These marks serve as an indicator that the operations were done and these files
won’t be affected by any commands operating on the standard * or D marks that
may be in the Buffer. But they aren’t just cosmetic.
Suppose you make copies of 10 files. All the copies will be marked
with the C mark. Now perhaps you want to change the file permissions of the
copied files to read-only. Just change the C marks to * marks with
* c ( dired-change-marks) and now
M ( dired-do-chmod) will change the modes of the 10 copied
files.
The Mark Keymap
Manually marking files with m may not seem like any competition for shell glob
patterns, so Dired has a whole slew of commands to make marking multiple files
easier; they can be found on the *-prefix key in dired-mode; see Table
19.
| Key | Action |
|---|---|
* * |
mark all executable files |
* / |
mark all directories |
* @ |
mark all files that are symlinks |
* . |
mark all files with a given file extension |
* % |
mark all files matching a regexp |
* s |
mark all files in the current Subdirectory |
* O |
mark all Omitted files |
* c |
Change all given marks to some other mark |
* N |
display Number of marked files |
If you’re familiar with the ls(1) command’s -F (--classify) option, the
mnemonics for * *, * / and * @ will be obvious. * %’s mnemonic is that Dired has
a % prefix full of regexp operations.
Issue any of these marking commands and the matching files will be marked with
*’s. You can combine several of them, and also mix in t, m and u commands until
you’ve got exactly the combination of files you want.
All of these marking commands will instead unmark if given a prefix argument via
C-u (universal-argument).
Why is there no command to mark plain files, i.e., non-directory files? That
seems like an oversight! The reason is that you can achieve that effect in
several ways: you can mark all the files with U t and then say C-u * / to unmark the
directories, or you can unmark all with U, mark the directories with * /, and
then toggle the marks with t.
* N ( dired-number-of-marked-files) is a little out of place
in the * Keymap, in that it doesn’t mark any files, but it’s a handy command
that will display in the Echo Area the number of marked files and their total
size.
Mass Name Changes by Regular Expression
A classic file management problem that was left unsolved by the founding fathers
of Unix (Ken, Dennis, Brian, et al.) is operating on many files while changing
their names according to some pattern: for example, copying a bunch of files but
adding a .bak extension, renaming files to their lowercase equivalents, and the
like. People used to resort to verbose and error-prone shell for-loops or scripts involving sed(1) or
perl(1), and a number of special-purpose utilities have appeared over the years
to address this need (such as rename(1), mmv(1), zsh(1)’s zmv), but how to do it
is still a popular query in the search engines.
Dired provides a suite of commands to handle this, on the % prefix (mnemonic:
kind of like C-M-% (query-replace-regexp)); see Table 20.
| Key | Action |
|---|---|
% R, % r |
Rename files with new names |
% l |
rename files to Lowercase equivalents |
% u |
rename files to Uppercase equivalents |
% C |
Copy files with new names |
% H |
Hardlink files with new names |
% S |
Symlink files with new names |
% Y |
symlink files relatively with new names |
% m |
Mark files that Match regexp |
% g |
mark files containing regexp matches |
Note that for all these commands, we are using Emacs regular expressions, not shell wildcard (glob) patterns!
The exemplar for all these commands is % R
( dired-do-rename-regexp). Suppose we want to rename the
two files README.ascii and README.org to about.ascii and about.org — in other
words, we want to change the README part of each filename to about, preserving
any other parts of the filenames (such as, the extensions).
First, we have to mark the two README files, and then invoke % R.175 The
prompts go as follows:
Rename from (regexp): README
Rename README to: about
and now we start renaming:
Rename ‘README.ascii’ to ‘about.ascii’? [Type yn!q or C-h]
This prompt is similar in spirit to the way query-replace-regexp
works:
y or SPC |
to perform this renaming |
n or DEL |
to skip to the next renaming |
! |
to perform this and all renamings with no questions |
q |
skip this renaming and quit |
C-h |
explain these options |
If we don’t choose ! or q, then we’ll be asked the same question about each of
the remaining files:
Rename ‘README.org’ to ‘about.org’? [Type yn!q or C-h]
You need to be familiar with regular expressions to do fancier stuff176;
for example, we can add a .bak extension to a set of files by specifying $ as
the from regexp and .bak as the replacement (because $ is the regexp that
matches the end of any filename).
Note that the regexp is only applied to the basename of the file —
e.g. README.org not /home/keith/src/refer-mode/README.org. If you give any of
these commands a 0 numeric argument, then the regexp is applied to the absolute
pathname, and you can then modify the directory structure as well.
% l and % u are convenient ways to do a simple case transformation on the entire
basename of the file (including the extension if any).
The % C, % H, % S, and % Y commands work like % R, mutatis mutandis.
Finally, we have two commands that merely mark files (with no action) based on
regular expressions. They consider all the files in the Buffer and mark the
ones that match. % m (also available as * %) just does the match based on the
file basename, so % m x would mark all files whose names contain the letter x.
% g is just like % m except that it applies the regexp to the complete contents
of the files, rather than to their names. It marks all the files that contain a
match for the regexp. Think of it as the Grep of marking commands.
If you give either of these last two commands a prefix argument, they unmark, instead of marking.
What Went Wrong?
We’ve learned a number of useful file manipulation commands, but we have to face the fact that sometimes, some of them are going to fail. Errors in Emacs are usually simple: you hear a beep and there’s a message in the Echo Area telling you what went wrong. But if you’re having Dired act on several, even hundreds, of files in one stroke, you neither want to miss an error, nor be swamped by too many.
Suppose we try to copy a bunch of files to a different directory, but it turns out we don’t have permission. Dired will display a message like this:
Copy: 17 of 17 files failed--type ? for details ((refer-mode.org README.org ...))
and we can use ? to pop up the *Dired log* Buffer for a complete record of which
operations failed (and why); in this case we’d see lines like:
Thu Jul  1 11:58:13 2021	Buffer ‘refer-mode’

Copy: ‘/home/keith/src/refer-mode/GNUmakefile’ to ‘/etc/GNUmakefile’ failed:
(file-error Opening output file Permission denied /etc/GNUmakefile)
Writable Dired
Dired Buffers are read-only Buffers, so that you can’t accidentally corrupt the contents and confuse Dired. What if you edited the name of one of the files and then tried to operate on it? You’d get errors.
On the other hand, what if, when you edited the name of a file, it magically
renamed the file to the new name? That would be an easy and natural way to
rename files. More importantly, it would allow you to rename files using all
your Emacs skills: use M-l (downcase-word) to change part of
a filename to lowercase; use M-% (query-replace),
C-M-% (query-replace-regexp), or Rectangle commands to
mass-rename a set of files without needing to mark them: even use a Keyboard
Macro!
This is exactly what Wdired allows. You simply switch the Dired Buffer from the
default read-only mode with the natural keystroke
C-x C-q (dired-toggle-read-only) which you’ll recall normally
toggles read-only-mode on and off. The Mode indicator in the Modeline will
change to Editable Dired, and now you can change filenames via whatever means
you like. You can even change a file name like foo.org to /tmp/foo.org to move
it to a different directory; you can use relative or absolute paths for this,
and Dired will create new subdirectories as needed!
The changes don’t happen instantly, so you can take your time; edit one
filename, think about things, and edit another. Maybe then change one of them
back (with Undo if you like!). When you’re done with your changes, you commit
them with C-c C-c and then all your renames happen at once177; the Buffer is
then restored to the normal read-only dired-mode. If you experience Renamer’s
Remorse, you can instead cancel all your changes with C-c ESC.178
But there’s more. If you have a symlink, you can edit either the symlink name,
its target, or both. If you kill or delete a filename completely, the file
will be deleted.179 And if you edit the permission string of a file, it
will be chmod’ed (so you could remove the write permissions on a file by editing
-rw-r--r-- into -r--r--r--).180 Any of these changes only take effect when
you commit.
This trick of editing a read-only Buffer to effect real, but indirect, changes is used elsewhere in Emacs.
Two-Panel Dired
Many file managers use a two-panel design: they divide a window into two (usually side-by-side), to make it easy to copy or move files from one directory to another. It’s useful to run Dired this way as well. I recommend adding this to your Init File:
(setq dired-dwim-target t) ; suggest other visible dired buffer
With this setting, you can just arrange for two Dired Buffers to be visible, and
when you give any command that needs a target directory (like C (copy) or R
(rename)), the default will be the directory of the other Dired. You don’t have
to accept this new default destination when prompted—you can override it in
any individual case—and this setting only has an effect when you have two
visible Dired Buffers.
DWIM, by the way, stands for “Do What I Mean”, and is named for an error-correcting feature in an old Lisp system dating from 1966.
Searching and Replacing
Normally, if you want to search through all the files in a directory you use
M-x grep, M-x lgrep, or M-x rgrep (see Meet
the Greps). But you can also use the power of Dired marks to limit your search
to a possibly idiosyncratic selection of the files in your Dired Buffer.
Just set your marks and run A ( dired-do-find-regexp); any
marked directories will be searched recursively, and if you don’t have any
marks, the file or directory at Point will be searched.
A Xref Buffer containing all the hits will pop up and you can navigate through them; see Figure 28.

Figure 28: Search for “keys” within files in Dired
This search is really more of an Occur. You can also do an Incremental Search
through the marked files. This is done with M-s a C-s
( dired-do-isearch) or M-s a C-M-s
( dired-do-isearch-regexp)181. These are basically
entry points to multi-isearch-files, with the marked files
eliminating the need to enter a bunch of filenames; see Multi-Isearch for details
You can also do a search and replace across your marked files with Q
( dired-do-find-regexp-and-replace). This pulls up all the
files with hits, one at a time, and in each runs a
M-% (query-replace) for you. There are other ways (which I prefer) to do a
search and replace across multiple files; see Xref and Writable Grep.
Diffing and Comparing
You can compare (“diff”) the file at Point with another file with =
( dired-diff). You’ll be prompted for the second file; if
the first file has a backup file, that will be the default (and vice versa). If
the Region is active, the files at Point and Mark are the ones compared. A
prefix argument will let you specify the options given to diff(1).
You can also compare two directories in an interesting manner. Open two Dired
Buffers on two different directories182; for the best demonstration, the
directories should be similar but not identical, e.g. one might be an older
version of the other. Then, in either Buffer, say
M-x dired-compare-directories. Hit RET at the prompt:
Mark if (lisp expr or RET):
Now you’ll (most likely) see that there are marked files in both directories:
these are the files in each directory with unique names. So in directory \(A\),
if the file foo is marked, it means that there is no file named foo in directory
\(B\), and so on. Or, equivalently, the unmarked files in each directory are
those that also exist (with the same names) in the other directory. Keep in
mind that this comparison is done purely at the level of the file names; the
contents do not enter into it.
Even just as a visual aid, this is useful for eyeballing the differences between
the two directories. You can make use of the marks in either or both
directories to do further comparisons (with =), deletions, or copying.
If you know a little Elisp, you can mark the files more precisely than by comparing their names; you can mark them based on their sizes, modification times, owner, permission, etc. Do:
C-h f dired-compare-directories
for more information.
Reverting and Sorting the Dired Buffer
The contents of a directory can change out from under Emacs, so you can refresh
Dired’s notion of the directory contents with g, which is bound to
revert-buffer (as you might expect). This will reveal any
new files, omit any files that were deleted outside of Emacs, and make the
displayed file sizes, permissions, etc reflect the current state.
The l command ( dired-do-redisplay) is a less broad version
of this: it only redisplays the info for the marked files (or next \(N\) files, if
given a numeric argument), or the files in a subdirectory, if issued on a subdir
headline.
You can also sort the Dired Buffer by modification time (most recent files
first), rather than the default alphabetical order, with s
( dired-sort-toggle-or-edit). With a prefix arg, you’ll be
prompted to set the options for the ls(1) command that lists the files; the
default options are -al183; the -a option causes files whose names begin
with . to be included. If you don’t want to see dot files, do C-u s -l RET
(removing the a option) and the Buffer will be refreshed to exclude them. You
can also throw in other ls(1) sorting options, like -r, -S, -t; see the ls(1)
man page with M-x manual-entry. New options given in this manner
are sticky in that they persist through subsequent g’s.
While the -l option is mandatory, you can hide everything but the filename with
( ( dired-hide-details-mode). That gives you a minimalist
skinny Dired Buffer. Another ( brings the details back.
You can customize the default ls options by setting
dired-listing-switches in your Init File; I add -h
(--human-readable) to print file sizes in a friendlier format (like 1K, 234M, 2G),
for example. But check the variable’s documentation for details; some ls
options can break Dired.
Finally, the Dired Buffer supports a limited version of Undo, bound to the usual
keys (e.g. C-/). This command can’t magically undelete files,
but it can revert changes to the Buffer itself. You can use it to recover
changed marks, killed lines, or hidden subdirectories.
Omitting Uninteresting Files
Certain files can be considered uninteresting because you rarely want to
manipulate them (except perhaps to delete them): you typically don’t want to
visit them, copy them, or anything else. These files include build artifacts;
checkpoint, lock and backup files; and the . and .. directories. The problem
with these files in Dired is that they take up screen real estate (requiring
more scrolling), and often have to be unmarked after you’ve marked, say, all
directories, or all the files that match a regexp.
You can omit these files from your Dired listing with C-x M-o
( dired-omit-mode), which toggles Omit Mode on and off.
You can also mark all the files that Omit Mode would omit with * O
( dired-mark-omitted).
If you’d like to have these files omitted from your Dired Buffers by default, as soon as you open up any Dired Buffer, add this to your Init File:
(add-hook 'dired-mode-hook 'dired-omit-mode)
You can un-omit them after that with C-x M-o.
The precise definition of which files are omittable is controlled by the
variables dired-omit-files and
dired-omit-extensions. See
the Dired Extra manual for details and
examples.
Running External Commands
If Point is on a file line in a Dired Buffer, then !
( dired-do-shell-command) prompts for a command and runs it
synchronously on that file; &
( dired-do-async-shell-command) does the same thing
asynchronously. So if Point is on a file foo.sh, and you want to know how many
lines or words are in that file, you just type ! wc, and the result is displayed in
the Echo Area; this is equivalent to M-! wc foo.sh (except you didn’t have to
type the filename), and the output is handled in the same way. You won’t be
surprised that & wc is equivalent to M-& wc foo.sh, and runs the wc command
asynchronously.
But these commands are not exact equivalents. When you type ! the prompt looks
like this:
! on foo.sh [sh]:
The sh in the brackets is the suggested default command, so if you wanted to run
this shell script rather than count its lines, you could just hit return. There
may be more suggestions than just the one shown; you can use M-n
( next-history-element) to scroll through them in the usual
way; see Future History. Emacs has commands to suggest for
39
possible files types and you can of course add your own via the
dired-guess-shell-alist-user variable.
! and & operate on multiple files in the standard Dired ways, via numeric
arguments and marks. When you run a command on multiple files, a Window will
open above the prompt listing all the files that will be affected—a nice
reassurance.
What is the nature of the command?
Dired’s ! and & actually take an arbitrary shell command, so you can add options
to the command (e.g. ! wc -l) and it can even contain pipes and other
shell-specific stuff, with the filename appended to the end of the command.
Emacs quotes all the filenames for you and the command is run once for each
file. So if you mark the files bar, baz, and foo, and say ! wc, Emacs will run
wc bar, wc baz, and then wc foo, synchronously.
You can run just one wc command for all the files by saying ! wc *; this
wildcard is interpreted by Emacs and NOT given to the shell.184 Instead of
expanding to all the files in the directory as it would in the shell, Emacs will
put the list of filenames being operated on at the location of the *, so cp *
some-directory will work correctly185. The filenames being operated on are
the marked files, or the file at Point, or the \(N\) files at Point if you uses a
numeric argument of \(N\), in the usual Dired interpretation. The order of the
files in the expanded file list will match the order in which they occur in the
Dired Buffer.
If you use ? instead of *, Emacs will run a separate invocation of the command
for each of the multiple files, just like in the no-* case.186 What’s the
point of this, then? Well, you can repeat the ? in the command and Emacs
replaces each ? with the same filename. The silly command ! mv ? /tmp/ && touch ?
will move each file to /tmp/ and then replace it (in the original directory)
with a new empty file of the same name.
Again, this special interpretation of ? only applies if it’s surrounded by
whitespace. But there’s one more special wildcard:
`?`,
which is interpreted exactly as ? except for the surrounded-by-whitespace
requirement. This means you can make backup files with a command like
! cp ? `?`.bak.187
You mentioned running commands in parallel?
The & command operates exactly like the ! command, except that it runs
asynchronously. So if you want to run your external PDF viewer on that Dired
file, you probably want &. If you use & with \(N\) files, without using * in the
command, it will run \(N\) separate commands in parallel.
Image-Dired
Dired can also be used as an image gallery, displaying thumbnails of image
files. Just mark the files you’re interested in188 and say C-t C-t
( image-dired-dired-toggle-marked-thumbs); see Figure
29. If no files are marked, C-t C-t will display the thumbnail
for the file at Point.

Figure 29: Inline thumbnails in dired-mode
You can of course see any image full-size by visiting its file, which will
naturally come up in image-mode, but doing this will eventually clutter your
Emacs with many image Buffers. If you just want to view some images more
transiently, rather than RET, use C-t i ( image-dired-dired-display-image),
which will repeatedly use a single Buffer called *image-dired-display-image*;
within this Buffer f will full-size the image and s will resize it back to the
Window size. C-t x ( image-dired-dired-display-external)
will display the image with an external image viewer, outside of Emacs.
A limitation of Dired is that it can only list files one per line, so you may
have to do a lot of scrolling. Instead of inline thumbnails you can pop up an
additional Window containing a new Buffer of thumbnails only. Again, mark the
files of interest (or all of them) but this time invoke C-t d to display the
thumbnails Buffer; see Figure 30.

Figure 30: Image-Dired Thumbnails Buffer
In the thumbnails Buffer, you can move around with the usual motion commands;
RET pops up the *image-dired-display-image* Buffer with a view of the image
corresponding to the current thumbnail, and SPC and DEL page the display Buffer
forward and backwards through the images. The Dired Buffer is linked to your
motion through the thumbnails, so if you navigate to a thumbnail and then jump
to the Dired Buffer, Point will be on the file corresponding to the thumbnail.
You can also mark, unmark, and flag files from the thumbnail Buffer.
Tagging and Commenting Images
Images can be tagged and commented from the Dired Buffer. The image files
themselves are not altered by this process; the tags and comments live in a
metadata file in your user-emacs-directory. This allows
you to set Dired marks on all the files with a given tag; after you’ve done some
tagging perhaps C-t f cat would mark all your cat images.
| Key | Action |
|---|---|
C-t t |
add a Tag to all the marked files |
C-t c |
add a Comment to all the marked files |
C-t e |
Edit both |
C-t r |
Remove the given tag from marked files |
C-t f |
mark all Files with given tag |
Remote Directories
In addition to opening a directory on your local disk, Dired can also open a
directory on a remote computer, perhaps your office desktop at work. I almost
didn’t think to mention this, because it’s in no way a special feature of Dired,
but just falls out of Emacs’s ability to manipulate remote files via Tramp. So
when you run Dired, if you name a directory using Tramp’s remote file syntax,
then naturally the Dired Buffer is remote, and all the Dired operations—file
copies, renames, deletions, visits, even shell commands via
! (dired-do-shell-command)—run on the remote host. Just as
naturally, in a local Dired, you can copy or rename a file to a remote host:
when prompted for the target filename, just use Tramp syntax. This even works
with the mass name-changing functions, and works seamlessly in two-panel DWIM
mode. See Tramp for details.
More Dired Entry Points
Normally C-x d (dired) is invoked with a directory name, but
you can also invoke it with a glob pattern: C-x d *.el will bring up a Dired
Buffer with all, and only, the Elisp files in the default directory.
And there are more ways to get a Dired Buffer than just
C-x d. C-x C-j (dired-jump) or
C-x 4 C-j (dired-jump-other-window) from within a file Buffer
will open Dired on that file’s directory. M-x find-name-dired will
prompt you for a directory, and then for a filename, possibly containing Unix
wild cards (glob characters); it will generate a Dired Buffer containing all
the matching files under the named directory, recursively. So you might want to
run Dired on all your Elisp source files under your source code directory with:
M-x find-name-dired RET ~/src RET *.el
This command is a convenient interface to the Unix find(1) command;
find-dired is a more full-featured version that let’s you
specify any find options you like. find-grep-dired is much the same, but limits
the files to those that contain a Regular Expression as for grep(1).
You can use find-name-dired to find files from anywhere on your system if you
give / (the top-level root directory) as the starting directory, but if you have
a large disk with many thousands of files, this can be slow.
M-x locate is the Emacs interface to the Unix locate(1) command that
uses a database of filenames and so runs much faster.189
M-x locate-with-filter has an additional prompt for a Regular
Expression that’s used to filter (limit) the hits.
You shouldn’t try to quote any of the arguments to any of the find- and locate-
commands—Emacs takes care of that for you—with the exception of find-dired
(because that one requires you to enter a raw find command).
Many Major Modes provide custom entry points to Dired. For example,
doc-view-mode can pop up a Dired on its cache directory, EMMS will open Dired
on the music files in your playlist, and Projectile will open Dired on your
current project.
Third-Party Directory Tools
There are some 67 packages in MELPA that provide
various enhancements to Dired, like fancy multi-panel layouts, sidebars,
displaying file-type icons next to the files, cleaning up duplicate files, and more. One of the
most useful is Pierre Neidhardt’s disk-usage package, which finds the files and
directories that are taking up the most space; see Figure 31.

Figure 31: M-x disk-usage and Dired
References
- See “Dired” in the Emacs manual.
- Kremer, Sebastian and Free Software Foundation. 2022. Dired Extra. Cambridge, MA: Free Software Foundation..
Read in Emacs with
M-x info-display-manual RET dired-x RET.
Searching …
Searching is one of the most important Emacs skills. It’s pervasive: since it works in (and across) your Buffers, it works, identically, not only within a file you’re editing, but within the user interfaces (UIs) of Emacs and its many subsystems—the Help system, Dired the file manager, the Emacs documentation, your shells and terminals, your mail, your calendar and diary, your web browser, your music player—everything. Imagine if you could explore and find your way around the UI—the menus and toolbar—of a GUI application like your web browser the same way you can search the text of one of its web pages. And to top it off, Emacs’s search facility is far more powerful than that of any GUI application.
Searching can be divided into two major flavors: incremental search style and occurrences style. Incremental Search, which you may think of as “find as you type” — a now common user interface feature invented in Emacs in the 1970s — is probably the most important. It takes you hit-by-hit through all the match locations in that Buffer (with highlighting).

Figure 32: Incremental Search in Action
Occurrences-style search works more like a web search engine: you type in your
query and Emacs pops up a new Buffer full of hits, from any of which you can
jump to the actual occurrence. There are many forms of this, exemplified by
M-x occur, which presents the matches from your current Buffer.

Figure 33: … Transformed to Occur with a Keystroke
Occur also resembles the output of the Unix grep(1) command (especially with the
--color option turned on): the Buffer of hits is like the lines of grep output,
except you typically can’t click on a hit in the terminal and be taken to that
line of the matching file. That is, unless you run grep under Emacs; see Meet the Greps.
Incremental Search
Incremental Search (Isearch) is a commonly used way to move around when you’re editing text: it’s so fast and easy, I’ll even use it just to move to a spot in the same line. As befits one of the most heavily used features of Emacs, Isearch is very powerful and thus very complex. But if you have an idea of what’s possible, you can start out easy and add fancy features as you gain experience. I would say I use most of these features, but not all, and a few were surprises when I delved deep into the manual in order to write this chapter.
The command C-s (isearch-forward) starts a search and prompts
in the Minibuffer for a search string:
I-search:
Suppose you’re looking for occurrences of the word “and”: just start typing it. As soon as you type the letter “a”, all the “a”’s visible in the current window will be highlighted a light blue, except the very next “a” after Point, which will be violet-red190; in fact, Point has been moved to this location. Now the prompt looks like:
Pending I-search: a
Add “n” to your search, and all the highlights will be updated: now only occurrences of “an” will be highlighted, and if necessary, Point will be moved ahead to the first match. Add your final “d” and now only “and”’s are highlighted.
Pending I-search: and
If the first “and” after Point isn’t the one you want, just type C-s again, and
Point will advance to the next “and”; you can keep C-s’ing through the hits. If
the next hit is off-screen, the window will scroll. When you’ve reached the
“and” you wanted, just hit RET to terminate the search; Point is now at the end
of the chosen “and”.
The whole point of the incremental part of Isearch is that you often don’t need
to type the entire string that you’re searching for: once Point reaches the
right spot, just hit RET and you’re done. You can also start C-s’ing ahead at
any point. If you’re searching for the word
“pneumonoultramicroscopicsilicovolcanoconiosis”,
there’s a good chance you’ll have found it after “pn”; at any rate, you probably
won’t have to type in all 45 characters.
Failing Searches and Making Corrections
If the string you’re searching for isn’t present in the Buffer, Emacs will beep and you’ll see in the Minibuffer something like:
Failing char-fold I-search: zq
It’s likely that a prefix of your search string (here, “z”) is in the Buffer,
but the complete string (“zq”) is not. Perhaps you meant to search for “zap”:
just use DEL (isearch-delete-char) to delete the “q” and
make your correction.
If you’re typing quickly, you might get in a whole bunch of non-matching
characters at the prompt; that’s okay: you can delete them all one at a time
with DEL, but hitting C-g will delete all the non-matching characters in one
go.
When moving from hit to hit with additional C-s’s, you may overshoot
the hit you want. DEL will “correct” this mistake too, taking you back to the
previous hit.
If you hit the end of the Buffer during a search, Emacs will likewise beep and
indicate search failure; but if you hit another C-s, your search will wrap
around to the beginning of the Buffer and continue searching from there. The word
“Wrapped” will appear in the prompt to indicate this; if you go all the way
around, returning to your starting point, and keep going, the prompt will change
to “Overwrapped” to make it clear that you’ve seen all these hits already, and
there are no more new ones.
Editing Your Search
Suppose you’ve started Isearching for the word “stolidity” and only then
noticed that you really meant “solidity”. You don’t have to do eight DEL’s and
then type a “t” and then retype “olidity”: you can put your Isearch into edit
mode with M-e (equivalently, M-s e); now you can use all the usual editing
features of Emacs, as you usually can in the Minibuffer, to go back and just
delete that “t”. When your edit is done, restart your Isearch with any of RET,
C-s, or C-r191 and continue from there.
Aborting Your Search
Because C-g, usually keyboard-quit, in Isearch has the
handy use of zapping non-matching search characters, you need to use two C-g’s to
abort your search, leaving Point where you started.
Quick Search Exit
For the sake of editing speed, any other non-Isearch Emacs command will also end
the search successfully, and be immediately executed. You could exit with
M-f (forward-word), for example: C-s zap M-f is equivalent to
C-s zap RET M-f: both will leave Point at the end of the word following “zap”.
Scrolling
Scrolling commands normally terminate the search and then scroll, as per above,
but I like to be able to scroll the window in mid-search, to see what’s coming
up (or what’s behind me). This Init File snippet allows most scrolling commands
(like C-v (scroll-up-command),
M-v (scroll-down-command), and
C-l (recenter-top-bottom)) to work this way.
(setq isearch-allow-scroll t) ; scroll while searching
The Region is Set for Free
When you end a search successfully, you’ll notice this message in the Minibuffer:
Mark saved where search started
This means that the Region (though inactive) is now around the text, from where
you started the search to where you are now, and you can do whatever you like to
the region (kill, copy, or modify it). You can jump back to where you came from
with C-x C-x (exchange-point-and-mark) or C-u C-SPC
( set-mark-command).
Changing Directions
If you know the string you’re looking for precedes Point, you can instead start
your search with C-r (isearch-backward). You can reverse
direction at any time with C-r, and change back to going forwards again with a
C-s, as needed. The commands M-s M-< and
M-s M->, which jump to the first match or last match
respectively, without terminating your search, can be useful for fine-tuning
your position before or after changing directions.
Restarting Your Last Search
Immediately after starting a search with C-s, if you type another C-s, it will
search for the last search string you used (the same is true if you start with
C-r—an immediate C-r reinvokes your previous search). Think of the sequence
C-s C-s as “redo my last search” (same for C-r C-r).
Isearch maintains a history of your last
16 search strings in the usual
ring structure. Just use M-p and M-n as usual to navigate through your
searches; when you’ve pulled up the one you want, you can edit it before
starting the search with another C-s or C-r. There are separate histories for
simple string search and for regular expression search.
Searching for Funny Characters
If you need to search for a non-printing character (which would normally
terminate your search), you can do so by quoting it with C-q.192 So you can search
for a C-g (ASCII 007) with C-s C-q C-g. To include an explicit newline in your
search string, just use a simple C-j (the ASCII linefeed or newline character),
which you don’t have to quote.
Case Sensitivity and Whitespace
Searches are case-insensitive193 by default, so “and” will also find “And” and “AND”, etc. But if you include an uppercase letter anywhere in your search string, then the search is performed case-sensitively.
Whitespace is treated abstractly: by default, a single space will match a sequence of any whitespace characters (space, tab, formfeed, and newline in most Major Modes). This is called lax space matching.
Varieties of Isearch
The cases just described are only defaults; you can toggle any of them on or off
in mid-search with the following special isearch-mode commands, any of which
only affects the current search and doesn’t “stick” for future searches (but you
can set your preference of default for each; M-x customize-group RET isearch).
M-s c- Case Folding
Toggle case folding on and off; this command is also on
M-c. On by default. M-s SPC- Lax Space Matching Toggle lax space matching on and off; when off, one space character matches only a single space and not a run of spaces or a combination of other whitespace characters. On by default.
M-s 'Diacritic Folding Toggle diacritic folding194 on and off. (Mnemonic: the apostrophe
'is like an acute accent.) When on, an unadorned letter will match that same letter with any diacritical mark. So, searching for “cafe” will also find “café”. Off by default. I recommend turning this on by default with this Init File snippet:(setq search-default-mode 'char-fold-to-regexp) ; cafe = café
M-s wWord Search Toggle word search on and off. When on, the search string will only match complete words (so “an” will match neither “any” nor “man” nor “pants”). Your search string can be a sequence of space-separated words and those complete words will match with any amount or combination of whitespace and punctuation between them. Off by default.
M-s walso has a global binding to isearch-forward-word, which initiates an incremental word search.M-s _- Symbol Search
Toggle Symbol Search on and off. Symbol search is exactly like word search,
except it deals with symbols rather than words, according to the current Major
Mode. In programming language modes especially, Emacs symbols represent
variable and function names, which can contain punctuation characters which
aren’t typically allowed in Emacs words. An example is that most languages
allow
_in symbols, but_is usually not considered part of a word.195 (Hence theM-s _mnemonic.) Off by default. M-s iSearch Invisible Text
Emacs has the ability to make text invisible;
M-s itoggles whether or not an incremental search will match text that’s currently invisible. For example, Outline Mode and Org Mode let you hide (“fold”) the text within nested subheadings, so you can focus on the outer text; Selective Display hides indented text (say in programming language modes) for the same reason. Off by default.M-s r-
I’ve saved the best (perhaps) for last.
M-s r(also onM-r) toggles between simple string search, which we’ve been discussing, and regexp search, which uses the powerful pattern matching language of regular expressions. This is so important and so heavily used that you can start out in a regexp search via the global bindingsC-M-s(isearch-forward-regexp) andC-M-r(isearch-backward-regexp). Off by default.Other than searching for complex patterns rather than simple strings, incremental regexp search is almost identical to Isearch, supporting all the features described in this section. The main exceptions are that lax spacing is not on by default (you can toggle it on with
M-s SPC) and that diacritic folding is not available.Why does Emacs have both simple string search and regular expression search? In editors that only have regexp search, you have to do a lot of quoting of the regexp metacharacters (like a simple
.or$); on the other hand, if you only have string search you can’t do powerful searching. So we have to have both, equally easy to use.
Nonincremental Search
Emacs’s incremental search is now the standard way to search; almost all
editors and many other applications (e.g. web browsers, shells) have adopted the idea196.
But I suppose you may occasionally want to do a non-incremental search, and you
can do that with C-s RET or C-r RET — in other words, begin your search by
hitting return and the prompt will change from I-search to Search, and now you
have to type your complete search string without seeing any intermediate
matches. When you’ve typed it in, hit RET to do the search and you’ll be taken
to the first match. Period. Your search is over. To find the next hit, you
have to do C-s RET RET, which will reuse the previous search string.
So disappointing. This is the way all searches used to work before the invention of incremental search.
Why would you want to do this? I guess you can think of it as equivalent to C-s
followed by an immediate M-e to edit the search string. Perhaps nonincremental
search is for people who haven’t yet learned how to yank.
Yanking Into the Search
| Key | Action |
|---|---|
C-w |
Yank next word from buffer |
C-M-w |
Yank next symbol from buffer |
M-s C-e |
Yank remainder of line from buffer |
C-M-z |
Yank string up to given character |
C-M-y |
Yank character at Point |
Frequently you want to search for some text that is right in front of you in
the current Buffer, and the properly lazy Emacser never wants to type in text
unnecessarily. Instead, you can yank text at Point right into your Isearch. You
can do this right after starting a search, or after you’ve typed part of your
search string. You can also yank in text from the Kill Ring in the usual
manner with C-y and M-y. See Table 22.
Transitioning to Other Search Types
| Key | Action |
|---|---|
M-r |
Switch to regexp search |
M-s o |
Switch to occur |
M-% |
Switch to query-replace |
M-s h r |
Terminate search, leave highlights |
You’ll find that Isearch is your goto-search—the one you automatically reach
for—but isearch-mode provides shortcuts to transition to other searches, so
that you don’t have to abort your Isearch and start over.
You can switch from simple string search to regular expression search with
M-r— perhaps your simple search isn’t finding enough matches; you may need to
use M-e to convert your search string to a more complex regexp.
I use the M-s o transition a lot: without terminating your Isearch, it pops up a
Buffer of hits, search-engine style, as if you had done M-x occur;
see Figure 33.
You might decide in the middle of your search that you want to convert all the
matches to something else; M-% will switch to a query-replace, using your
search string as the text to replace. If you’re doing a regexp search when you
hit M-%, it will switch to query-replace-regexp instead.
Finally, while it’s not really a transition to a different kind of search,
M-s h r will terminate your search, leaving all the hits in the Buffer
highlighted in a color of your choice; see Highlighting.
Help
With isearch-mode having 80-odd key bindings, you might have trouble remembering
them all, so just try to remember C-h C-h, which will pop up a special Isearch
help Buffer. For another perspectives on all this, see
“Incremental Search” in the Emacs manual.
Occurrences
Incremental Search gives you an overview of the matches for your search string (via colorization), but if your Buffer is large and your matches are spread out, you won’t be able to see very many of them without stepping through them all
M-x occur (also on the global binding M-s o) gives you a more compact
overview of the matches in a separate Buffer named *Occur*. It might look like
this (partial view of the *Occur* Buffer):
29 matches for "^#\+name:" in buffer: use-emacs.org
   125:#+NAME: info-nodes
   209:#+name: age-in-years
   4277:#+name: image-mode-scaling-commands
   4290:#+name: image-mode-scroll-keys
   4404:#+name: basic-dired
   6218:#+NAME: shell-commands
   6695:#+NAME: face-count
This is rather like a results page from a web search engine. It tells you how
many total matches there were, and each hit shows the complete line it occurred
on, preceded by its line number; you remain in the Buffer from which you issued
the occur command.
This gives you a nice overview, and you can jump directly from match to match
with C-x ` (next-error) or its more mnemonic binding, M-g M-n
(Go to Next hit).197 Each M-g M-n moves Point to the next matching line in
the original Buffer—the Point in the *Occur* Buffer follows along—so you can
step through all the hits.
(Why “next-error”? These search hits don’t seem like errors! The reason is that
this is just one of many use cases for a command that originated to step through
the error messages from a compiler for a programming language; see Compiling Code.)
Instead of staying in the original Buffer and stepping though all the hits, you
can switch to the *Occur* Buffer and navigate to the lines of interest, where
you can hit RET to jump to that line in the original Buffer or C-o to stay in
the *Occur* Buffer but scroll the original Buffer to show that line in context.
Of course you might use an Isearch to navigate in the *Occur* Buffer, and in a
big *Occur* Buffer, I actually sometimes use… M-x occur! Yes, an occur within
an *Occur* Buffer is a way to narrow the occurrences to a more precise list.
This all just works because, well, buffers are buffers and text is text, even
though *Occur* is the user interface of the M-x occur application!
Writable Occur, or occur-edit-mode
One of the more amazing features of occur is occur-edit-mode, bound to e in the
*Occur* Buffer. This one of Emacs’s Indirect Editing features. Normally, the
*Occur* Buffer is read-only, but typing e allows you to edit the Buffer. The
amazing part is that when you’re done editing, give the command C-c C-c198
( occur-cease-edit) and all your edits are applied to the
matching lines in the original Buffer! You can use any techniques to make these
changes: not just manual slogging, but things like
M-% (query-replace) or a Keyboard Macro.
Multi-Buffer Searching
With a long-running Emacs server, I typically have fifty or more buffers going at any given time — files, shells, emails, web pages, directories, etc. How on earth do you find anything?
The best way to search all of your Emacs is to say C-u
M-x multi-occur-in-matching-buffers. You’ll be prompted for a
regular expression to target the buffers you want to search; just enter “.”:
List lines in buffers whose names match regexp: .
Then you’ll be prompted for your search string (actually another regexp); we should get lots of hits for “the”:
Collect strings matching regexp: the
Normally this command only searches buffers that are visiting files, and the
first regexp is matched against the buffer’s visited filename, but with the
prefix argument (C-u), it searches all buffers, so that will include Dired
buffers, music player buffers, Help and Apropos buffers, shell and terminal
buffers: everything.
I just did such a search for the word “the”: in about one second, a new *Occur*
Buffer popped up showing “3518 matches in 2609 lines total across 108 buffers”.
The Buffer looks mostly like a normal *Occur*, but the matches are
grouped by Buffer; here’s an incomplete, edited example (all the occurrences of
“the” will be colorized):
3518 matches in 2609 lines total for "the":
24 matches in 17 lines in buffer: sittin-on-the-dock-of-the-bay
      1:{title:Sittin' On the Dock of the Bay}
      6:[G]Sittin' in the mornin' [B]sun
      7:I'll be [C]sittin' when the ev - [B]en - [Bb]in' [A]comes
6 matches in buffer: captain-beefheart
      4:*  The GREAT essential records
      7:- Doc at the Radar Station (1980)
     10:* The Good
     13:- The Spotlight Kid (1972)
241 matches in 185 lines in buffer: texmf.cnf
      9:% (Below, we use YYYY in place of the specific year.)
All the usual Occur commands work in this Buffer, including e (occur-edit-mode).
Instead of multi-occur-in-matching-buffers, you can instead use plain old
M-x multi-occur, which prompts you, one at a time, for the set of
Buffers to search; you can use completion on the Buffer names.
You can also do a multi-incremental-search. Personally, I think this is more
awkward than Multi-Occur, but your mileage may vary. It’s just like a regular
Isearch except, when you hit the end of a Buffer, a C-s, instead of wrapping
around to the beginning of that Buffer, advances to the next Buffer that
contains a match. M-s M-< and M-s M-> are
especially useful here to skip over entire buffers and keep searching.
There are several entry points. In Table 23, “listed” means you’ll be prompted to list the targets (buffers or files), and “regexp” means you’ll enter a regular expression to match the targets.
| Targets | String Search | Regexp Search |
|---|---|---|
| Buffers, listed | M-x multi-isearch-buffers |
M-x multi-isearch-buffers-regexp |
| Buffers, regexp | C-u M-x multi-isearch-buffers |
C-u M-x multi-isearch-buffers-regexp |
| Files, listed | M-x multi-isearch-files |
M-x multi-isearch-files-regexp |
| Files, regexp | C-u M-x multi-isearch-files |
C-u M-x multi-isearch-files-regexp |
… and Replacing
One of the main reasons to search is in order to move to a new location. The other is to replace text.
The most important find-and-replace command is
M-% (query-replace). It prompts for a string to replace
(we’ll use “vim”):
Query replace (default foo → bar): vim
and then the replacement text (we’ll use the obvious):
Query replace vim with: emacs
Emacs then finds the first match for “vim” after Point, highlighting it (and all the upcoming matches) in the manner of Isearch, and then asks what to do with this match:
Query replacing vim with emacs: (? for help)
Basically you type y to do this replacement or n not to do so, and Emacs then
jumps to the next match, and we repeat the process until we finish with the
final match in the Buffer.
To do the entire Buffer, first jump to the beginning with
M-< (beginning-of-buffer). With a negative prefix
argument199, the replacements can be done backwards from Point.
With a simple prefix arg—just C-u—the search string is matched as a
whole-word as if for M-s w ( isearch-forward-word).
There are many more valid answers to the replacement question than just yes and no; see Table 24.200
| Key | Action |
|---|---|
SPC, y |
replace this match and proceed |
DEL, n |
skip this match and proceed |
! |
replace all remaining matches without asking |
^ |
jump back to previous match |
, |
replace this match but don’t proceed yet (stay here) |
u |
undo previous replacement |
U |
undo all replacements |
e, E |
edit the replacement string |
RET, q |
Quit without replacing this one |
. |
replace this match, then quit |
C-r |
enter Recursive Edit |
C-w |
delete match and enter Recursive Edit |
Most important is ! which replaces all the remaining matches in one go, no
questions asked. It’s typical that you intend to do all the replacements, but
want to see the first few in context before committing yourself with !. Sometimes you
don’t have time to see the effect of the replacement because Emacs has jumped to
the next match and scrolled the replacement off-screen; in this case, just hit ^
to jump back to where you were and take a look (more ^’s will step back through
more replacements). When you’re happy, just hit SPC to continue replacing where
you left off.
If you’re not happy with the replacement you’ve just done (maybe you hit y on
autopilot when you meant n), you can undo it with u; Point will jump back to
that spot, undo the change, and you can think again; any action is possible
here. You can even undo all the replacements you’ve done so far with U, after
which you might want to edit your replacement text with E and then start over,
all without quitting the query-replace.
Sometimes you do want to quit early; q or . will do the job201: perhaps you only
wanted to do your query-replace in the current paragraph.
Actually, in that case you’d be wiser to set the active region around the text
you want to replace within; if the Region is active, query-replace will only
operate on matches within it, and so you can safely use the convenient ! without
affecting anything outside the Region.
Sometimes you’re stepping through replacements and find a spot where you want to
use a completely different replacement string—but just this once. You could
quit with q, manually do the replacement, and then reinvoke M-% from that
location to continue—Emacs helpfully offers your previous search string and
replacement as the default. The disadvantage of this is that you can no longer
use ^ to go back to locations from the preceding M-%, since it was terminated;
nor will U undo any of those changes. Not a big deal, but there’s a fancier
way: instead of quitting, use C-r to enter a Recursive Edit, make your anomalous
change, and use the usual C-M-c (exit-recursive-edit) to exit
the Recursive Edit and continue your query-replace session. C-w is a handy
shortcut.
Once you’ve done a few Query Replaces, you’ll notice that it’s case-smart. Firstly, if your search string is entered in all lowercase letters, it is matched in a case-insensitive mode (just as with Isearch). In our “vim” → “emacs” example, if one of the vims in the Buffer is capitalized (“Vim”) then you’ll see this prompt:
Query replacing vim with Emacs: (? for help)
Note that instead of replacing with “emacs”, it’s going to use “Emacs”, to match the case of the “Vim”. Likewise, if there’s a “VIM” the replacement will be “EMACS”.
If your search string contains any uppercase letters, the searches will be done
case-sensitively, and likewise your replacement text will be used without
modification. So M-% “Vim” → “emacs” will only match “Vim” and will replace it
with your all-lowercase “emacs”. If your search string is all lowercase but
your replacement string contains any uppercase letters, the search is
case-insensitive but the replacement will be done exactly as given every time.
In Table 25, we summarize the three cases: the String column is the
text in your Buffer, and the Replacement column shows the result of responding
with y; an empty Replacement means that the particular String wasn’t considered a
match.
| Search | Replace | String | Replacement |
|---|---|---|---|
vim |
emacs |
vim |
emacs |
Vim |
Emacs |
||
VIM |
EMACS |
||
Vim |
emacs |
vim |
|
Vim |
emacs |
||
VIM |
|||
vim |
Emacs |
vim |
Emacs |
Vim |
Emacs |
||
VIM |
Emacs |
You’ll notice in the initial prompt that there’s a default search and
replacement pair which is your previous invocation (in the example above, it’s
to replace “foo” with “bar”). Just hit RET to accept it and begin the process.
Alternately, you can use the familiar M-p and M-n to cycle through your history
of Query Replace invocations. At any point you can edit either the search
string part or the replacement part.
Some other Emacs commands—such as Dired’s Q command,
M-x xref-query-replace-in-results, or
M-x tags-query-replace— will invoke a Query Replace for you on
multiple buffers. In these multi-Buffer replacements, ! will do unconditional
replacement just in the current Buffer; use Y (note the caps) to replace all of
the remaining matches in all the remaining buffers, or N to skip to the next
Buffer without replacing the remaining matches in the current Buffer.
Query Replace with a Regular Expression
If Query Replace isn’t powerful enough for you, you can try
C-M-% (query-replace-regexp), where instead of a simple
search string, you use a Regular Expression. It works much like M-%, but your
regexp search pattern can match much more flexibly. For example, we might want
to go beyond just replacing “vim” with “emacs” via this regexp:
\<\(\(neo\)?vim\|vi\|ed\|\(vs\)?code\|sublime\( *text\)?\|atom\)\>
which allows us to replace a whole collection of apostate editors with Emacs.
In addition to supporting a fancier search string, query-replace-regexp also
supports special features in the replacement string. In order to start using
these very handy features, as long as you stick to letters, digits, and
whitespace—all of which, as regexps, work as you’d expect—you can start
using query-replace-regexp without waiting to become an expert in Regular
Expressions. But if you want to use any other characters in your regexp, even
just the humble period (.), you’ll have to learn how to escape them first.
If you include \# in the replacement text, that pair of characters is replaced
by the number of replacements that have already been performed, so if our Buffer
contains:
foo foo foo foo foo foo
and we execute C-M-% foo RET foo\# at the beginning of the Buffer, the resulting
Buffer is:202
foo0 foo1 foo2 foo3 foo4 foo5
The sequence \? in the replacement text will result in a prompt for a string, so
that you can replace each \? with whatever you like. Consider this command:
C-M-x foo RET foo\?. First you’ll need to decide whether or not to perform this
replacement, as usual, by responding y or n; if you choose to do the
replacement, you’ll now get an additional prompt:
Edit replacement string: foo
Now you can edit the replacement to be foobar, barfoo, antiparticle, the empty
string (to delete the match), or anything else. For the next replacement, you’ll be
prompted anew, and can respond with a completely different string (or use M-p’s
to pull up replacements from the history). You can use more than one \? if you
like.
Almost the most powerful feature of query-replace-regexp, though, is that you
can refer to the text matched by the regexp, and the text matched by any
capturing parentheses within it, in the replacement text via back references. In
the replacement string, \& stands for the entire match. Even if you aren’t
using any of the pattern-matching features of regexps, this can save you some
typing. C-M-% emacs RET the amazing \& RET replaces each “emacs” with “the
amazing emacs”; since “emacs” is all lowercase, this replacement is case-smart.
When your regexp matches more than just a literal string, then a back reference
is the only way to include the match in the replacement. Suppose you want to
put quotes around all the numbers in your Buffer. The regexp [0-9]+ matches any
number, so you can do this with C-M-% [0-9]+ RET "\&" RET.203
Capturing parentheses let you refer to just a part of the match. Suppose you
have a number of strings of the form “foo56”, “foo765”, “foo3” and the like, and
you need to change all the “foo”’s to “bar”’s, yielding “bar56”, “bar765”, and
“bar3”, but not change any standalone “foo”’s that don’t have an attached
number. You can do it this way: C-M-% foo\([0-9]+\) RET bar\1 RET. The \1
refers to the first parenthesized subexpression; if you have two sets of parens,
you can use \2 as well. This means you can change all numbers like “10K”, “542M”,
and “2.3G” to “10 K”, “542 M”, and “2.3 G” with C-M-% \([0-9.]+\)\([KMGTPEZY]\) RET \1 \2 RET.
You could also change all the foo[0-9]+ matches to just plain “foo” with the
command C-M-% foo[0-9]+ RET foo RET or in fact delete all trailing numbers
from any words with C-M-% \([a-z]+\)[0-9]+ RET \1 RET.
Because of back references and the other handy backslash-sequences, if you
actually want to include a backslash in your replacement, you’ll need to double
it. That is, \\ is replaced with a single \.
| Regexp | Replacement | Example Match | Result |
|---|---|---|---|
emacs |
the amazing \& |
Emacs | The Amazing Emacs |
[0-9]+ |
"\&" |
3645 | “3645” |
foo\([0-9]+\) |
bar\1 |
foo765 | bar765 |
\([0-9.]+\)\([KMGTPEZY]\) |
\1 \2 |
10K | 10 K |
foo[0-9]+ |
foo |
foo765 | foo |
\([a-z]+\)[0-9]+ |
\1 |
xyz123 | xyz |
Elisp Replacement Strings
Above, I said back references were almost the most powerful query-replace-regexp
feature. Undoubtedly the most powerful feature is the ability to apply an
arbitrary Elisp expression to the matched string and use the result as the
replacement: that is, to compute a replacement from each match. \,
(backslash-comma) followed by an Elisp expression can be used anywhere in the
replacement, including more than once. Within the expression, you can use all
the backslash sequences we’ve discussed above.
To use the feature you need to be pretty well-informed about both Regular Expressions and Emacs Lisp, so I won’t go into this any further after giving a trivial example. Note that the Elisp expression:
(1+ x)
where x is some number, returns the successor of that number, so (1+ 6)
evaluates to 7. Remember that \# can be used to number your replacements, but
that the numbering starts at zero. We can arrange for the numbering to start at
one with the replacement string:
foo\,(1+ \#)
so our example above would yield:
foo1 foo2 foo3 foo4 foo5 foo6
See Regular Expressions and Programming the Lisp Machine for more information.
Other Entry Points
There are two other string replacement commands that you can use:
M-x replace-string and M-x replace-regexp. They are
non-interactive versions of M-% and C-M-% respectively. They work exactly the
same, including their interpretation of prefix arguments and of replacement
strings, they just run in “batch mode”: they do all the replacements without
any questions. I literally never use these commands, because the interactive
versions are just as fast as soon as you decide it’s okay to hit !, and I always
like to see the first one or two replacements before I commit. That said, a
single Undo will undo all the changes in one go (also true of the interactive
versions).
Meet the Greps

Figure 34: M-x grep
Emacs also has its own interfaces to grep(1) for searching across files outside
of Emacs, whether (1) a set of specific files, (2) some or all of the files in some
directory, or (3) some or all of the files under some directory, recursively.
These searches pop up a *grep* Buffer of clickable hits (each of which pulls up
the file and takes you to that location).
Before we explain how to invoke the Greps, let’s take a look at the workings of
the *grep* Buffer; it works the same regardless of how it was invoked.
The *grep* Buffer and Grep Mode
You can see from the screenshot above that a *grep* Buffer looks just like an
*Occur* Buffer—lines of hits prefixed with line numbers—except that the
*grep* Buffer also includes file names; the format looks exactly like the output
of grep(1). Table 27 summarizes the buffer’s key bindings. It
shouldn’t be surprising that the Buffer’s Grep Mode has many key bindings and
actions in common with Occur Mode; for historical reasons, there are some
discrepancies in the key bindings, and Grep Mode also has some actions that
don’t make sense in Occur Mode. See Compilation Mode and its Many Descendants
for a side-by-side comparison.
Grep Mode is enabled in the hits Buffer (*grep*) and some of its actions affect
one or more target buffers that it pops up for you.
| Key | Action | |
|---|---|---|
| 1 | RET, C-c C-c |
jump to hit in target file |
C-o |
display hit … | |
n |
jump to Next hit in target file | |
p |
… Previous … | |
| 2 | M-n, TAB |
move point to Next hit in *grep* |
M-p, <backtab> |
… Previous hit … | |
}, M-} |
move point to next file in *grep* |
|
{, M-{ |
… previous … | |
C-c C-f |
toggle next-error-follow-minor-mode Mode |
|
| 3 | SPC, S-SPC |
scroll target buffer up |
DEL |
scroll target buffer down | |
< |
scroll target buffer to top | |
> |
scroll target buffer to bottom | |
| 4 | g |
revert buffer |
C-c C-k |
Kill running grep |
|
C-c C-p |
writable grep |
|
| 5 | 0 … 9 |
digit argument |
q |
Quit hits buffer | |
h, ? |
help for mode |
The Grep Mode commands come in several groups:
- Commands that visit the file containing the hit at Point in a pop-up Window,
scroll the Window to the hit, and make this the selected Buffer so you’re
ready to edit. There’s also a display command,
C-o, to do all that but stay in the*grep*Buffer. - Commands that just move from hit to hit in the
*grep*Buffer; you could of course use plain oldC-n(next-line) andC-p(previous-line), but depending on your search, a hit might comprise more than one line. There are also handy commands to move from file to file, and a command to togglenext-error-follow-minor-mode. - Commands that scroll the target Buffer from within the
*grep*Buffer; very handy when you’ve usedC-o. - Commands to revert the
*grep*Buffer (to re-run thegrepcommand and update the Buffer); kill the runninggrepcommand204; or do an Indirect Edit. - The usual Special Mode conveniences: easy digit arguments, Mode help, and a quit command.
next-error Integration
You can navigate from hit to hit from wherever you started your Grep without
switching to the *grep* Buffer via
C-x ` (next-error) 205 or equivalently
M-g M-n (they also work inside the *grep* Buffer). This works
even when the *grep* Buffer is no longer visible.
Indirect Editing with Writable Grep
One of the Grep facility’s most amazing features is that you can edit the text
of the hits in the *grep* Buffer and then, with a keystroke, write your edits
back to the original files. This “indirect editing” feature works the same way
as Writable Occur; unfortunately the keystroke to invoke it---C-c C-p— from a
*grep* Buffer isn’t the same as for an *Occur* Buffer.206
This requires the optional wgrep Package from the GNU repository. I recommend
this snippet for your Init File:
(unless (package-installed-p 'wgrep)
  (with-demoted-errors "%s"
    (unless package-archive-contents
      (package-refresh-contents))
    (package-install 'wgrep)))
Plain Old M-x grep
How do we acquire one of these wonderful *grep* Buffers? The fundamental way is
with M-x grep, which will prompt you for a grep command line; so,
this obviously assumes you’re familiar with the Unix grep(1) command, and
familiar with Regular Expressions (Regexps) as well. The default command line
(on Linux) is:
grep --color -nH --null -e
You’re expected to fill in your Regexp, and the paths of the files you want to search, at the right. Don’t forget to quote both appropriately, just as in the shell. For example, you might edit the command like this:
grep --color -nH --null -e '^def ' *.py
in order to see the functions defined in all the .py files in the default
directory.
You’re free to change the options (perhaps adding a -i to do a case-insensitive
search), but see below for details. You can also use something fancier than a
single grep command, like a pipeline of grep’s, or anything else that meets the
requirements of the *grep* Buffer.
If you’re unfamiliar with Regexps, you can change grep to fgrep and do a plain
text search, but you still need to be familiar with Unix shell quoting; if you
aren’t, skip ahead to lgrep.
With a prefix argument, C-u M-x grep will fill in the complete grep command to
search for the Symbol at Point in files matching the selected Buffer’s file
extension, so this is a good way for those unfamiliar with grep(1) to get
started. And of course Emacs keeps a history of the grep commands you’ve used
in this session, which you can access in the usual ways.
Local Directory Grep with M-x lgrep
M-x lgrep is a convenient front-end that composes a Grep command for
you that searches all the files in a given directory; it’s especially
convenient for Emacs users who aren’t yet au courant with Unix concepts like
Regexps, shell quoting, and file globbing. When invoked, it prompts you for
three things: a Regexp, a filename or glob pattern, and finally a directory, and
it constructs and immediately runs a grep command for you. Let’s use M-x lgrep
to search for “foo” in all the files in our default directory. The Minibuffer
prompts look like this:
Search for: foo
Now specify the files to search in:
Search for "foo" in files matching wildcard (default all):
Just hit RET for all (significant) files, but it’s also totally fine to enter
one or more filenames separated by spaces (your Completion system can help you),
or use one or more space-separated glob patterns (wildcards).
Finally we have to say which directory contains the files:
In directory:
Hit RET to search the selected Buffer’s default directory.
This will be a case-insensitive search by default. Don’t try to quote any of
these values; lgrep will quote them for you.
With a prefix argument, C-u M-x lgrep, you’ll be able to edit the composed grep command before
Emacs runs it; so you could change grep to fgrep here if you don’t want to use a
Regexp, for example. If you do this, you’ll see that the composed command is
very complex, because Emacs adds a boatload of options to ignore the types of
files you don’t usually want to include in a search (such as Emacs
backup and auto-save files).
lgrep shares histories for each of the three prompts with rgrep.
Recursive Grep with M-x rgrep
lgrep does a flat search of files in one directory, but you can search an entire
directory hierarchy recursively with M-x rgrep. It has the same
three prompts as lgrep and the only difference is it also searches the starting
directory’s subdirectories, and so on, recursively. You can for example search
your entire home directory by entering ~ as the starting directory.
M-x rzgrep is a variation that will search gzipped files207.
You can specify them at the “files matching wildcard” prompt with the glob
pattern *.gz, or be more specific with something like *.org.gz, or search both
compressed and uncompressed files with multiple space-separated glob patterns
(e.g., *.org *.org.gz). This command requires that you have zgrep(1) installed
on your system. Since rzgrep is a confusing name, you can also invoke it by the
alias zrgrep.
As for lgrep, with a prefix argument, you’ll be able to edit the composed grep
command before Emacs runs it.
Just the Skeleton with M-x grep-find
rgrep composes a complex shell command that uses find(1) (the Unix directory
hierarchy tool) to run the appropriate grep command for you. Like lgrep, the
composed command ignores many files such as backup files. Occasionally you might
not want this assistance; C-u M-x rgrep will let you edit the command, but it
can be annoying to have to delete most of the over 1,500 characters to customize
it. M-x grep-find gives the bare-bones, 57-character version of an
rgrep command that you can edit to do precisely what you want. Needless to say,
you’ll need to be familiar with the very hairy (but essential) find(1) command
for this.
Grep Files Aliases
When entering file names or glob patterns at the “files matching wildcard”
prompt for any of lgrep, rgrep, or rzgrep, you can type any of a set of handy
aliases that stand for more or less complex glob patterns. You can customize
the variable grep-files-aliases to add your own shortcuts.
| Alias | Generated Glob Patterns |
all |
* .* |
am |
Makefile.am GNUmakefile *.mk |
asm |
*.[sS] |
c |
*.c |
cc |
*.cc *.cxx *.cpp *.C *.CC *.c++ |
cchh |
*.cc *.[ch]xx *.[ch]pp *.[CHh] *.CC *.HH *.[ch]++ |
ch |
*.[ch] |
el |
*.el |
h |
*.h |
hh |
*.hxx *.hpp *.[Hh] *.HH *.h++ |
l |
[Cc]hange[Ll]og* |
m |
[Mm]akefile* |
tex |
*.tex |
texi |
*.texi |
Grepping from Dired
Which grep Is It, Really?
Any compatible program can be used with any of the Grep-family commands instead
of plain old grep: in particular, you can use egrep or fgrep instead. What
exactly makes a compatible command?
For M-x grep, where you specify the command invocation yourself, any command is compatible
if it produces the standard grep output format, i.e. lines that look like:
FILENAME:LN:text
where FILENAME is the path to the file containing text, and LN is the number of
the matching line. grep(1), egrep(1), and fgrep(1) are all capable of producing
this output format.209 Version control systems all support a grep
subcommand and have options to produce a compatible format, like git grep or
hg grep; these commands can be invoked via M-x grep, though there are also
more specific ways to use them via third-party packages like Magit and
Projectile.
Some popular grep replacements like ag(1), ripgrep(1), ack(1), and the like, can
be used as drop-in replacements, but they may be better used via third-party
packages specifically designed for them.
The lgrep and rgrep commands also require this output format, but they
additionally make assumptions about the availability of certain command line
options, which is much more complex; to customize which grep program is used by
these commands, Customize the variable grep-template.
Regular Expressions
Some people, when confronted with a problem, think “I know, I’ll use regular expressions.” Now they have two problems. — Jamie Zawinski (comp.lang.emacs)
Regular Expressions (Regexps) have already come up several times in this book. Much as I’ve tried to avoid mentioning them up to this point, the fact is that they’re used everywhere in Emacs: in Incremental Search, Query Replace, Grep, Dired, Apropos, and more.
If you’re a programmer, an apostate from any other programmer’s editor, or just a Unix user familiar with the standard command line tools, you’ll already be familiar with the concept, and can skip ahead to see how Emacs Regexps differ from what you may be used to. If you’re keen to learn and add Regexps to your tool kit (it’ll be worth it, never mind Zawinski’s cheeky remark), check out the References at the end of the chapter. But here I’ll try to give an explanation of what they even are, and the minimum you need to know to make use of some Emacs Regexp-based commands.
Powerful Pattern Matching
The job of Regexps in Emacs is to enable more powerful searching and matching.
Regexps are a mini-language for expressing patterns that describe, or match, sets
of strings210. When you search for the word “Emacs” with the non-Regexp
C-s (isearch-forward), you’re actually using a pattern that
happens to only match exactly one string: “Emacs”. But you’ll recall that, due
to Case Folding, if you search for “emacs”, you’re using a pattern that matches
a larger set of strings, including not just “Emacs” but also “emacs”, “EMACS”,
“eMacS”, etc. Thanks to Lax Space Matching, if you search for “GNU Emacs”,
it will also match strings like “GNU Emacs” or “GNU”, a newline, and
“Emacs” at the beginning of the next line. But that’s about it for the pattern
language of Isearch.
You’re probably familiar with the common notation, or syntax, where a
*-character or ? is a wildcard, as in Unix shell file globbing patterns: you
might write *ing to match files ending in “ing” or c?t to
match files named “cat” or “cot”. This means that you can’t readily try to match
strings that include asterisks or question marks, because of their
interpretation as wildcards: they are not plain old characters, but what we call
metacharacters, because they’re functioning on a level above the literal.
Regexps are a much more powerful pattern language than that. They were
formalized in 1951 by the mathematician Stephen Kleene and were probably first
implemented in a text editor by Ken Thompson in QED sometime between 1967 and
1970211. From there they appeared in the original Unix editor ed(1)
circa 1973; then, because of their general utility, in other tools like
grep(1); and then spread rapidly into every editor that’s worthy of the name;
they were in GNU Emacs from the beginning.
Regexps let you write compact, expressive, patterns that specify matches in terms of:
- beginnings and endings of lines and of strings
- beginnings and endings of words
- sets of characters (e.g. alphanumerics, vowels, whitespace)
- repetitions of Regexps (e.g. zero or more, between 3 and 12)
- grouping of sub-matches with the ability to refer back to them
In order to express these things, our notation needs to have eight
metacharacters; here are the first seven (the Regexp * and ? metacharacters do
not have the same meaning they have as glob metacharacters):
. * + ? [ ^ $
In your Regexp you may well need to match one of these metacharacters literally:
you can do this by quoting or escaping the metacharacter with the eighth
metacharacter: the backslash,
\. So
\*is the Regexp that
matches an asterisk, and a backslash can be used to quote itself by doubling it.
But don’t use backslash to quote plain, non-metacharacters, like 1, b, or w, for
example, where it may have a special interpretation; see Backslash Constructs below.
Knowing this, you can make use of Emacs commands that ask you to enter a Regexp,
many of which are useful with plain non-meta, characters: just add a backslash
to any of the eight metacharacters that you want to search for literally. Keep
in mind that all characters except the eight metacharacters stand for themselves
in a Regexp, so Emacs is indeed the Regexp that matches “Emacs” and
\*grep\*
matches “*grep*”.
Here’s how to translate file globbing patterns into equivalent Regexps:
| Glob | Regexp | Interpretation |
|---|---|---|
* |
.* |
zero or more of any characters |
? |
. |
any single character |
[a-z] |
[a-z] |
any one of the characters from a to z |
{a,b,c} |
\(a\❘b\❘c\) |
either a or b or c |
Note that .—we sometimes call that “dot”—“matches any character” just
like ? in file globbing, including punctuation and whitespace212, for example.
Other handy Regexps for matching text include \b, which matches a word boundary
i.e. the beginning or the end of a word, and \w, which matches only word
constituents (typically alphanumerics, though it depends on the Major Mode). So
the Regexp to match words that start with an “e” and end with an “s” would be
\be\w*s\b, which will match “Emacs”, “editors”, “examples”, “es”, and many
others. That regexp translates to: match the strings which
- at a word boundary (
\b) - have an
e - followed by zero or more word constituents (
\w*) - followed by an
s - at another word boundary (
\b).
Unique Aspects of Emacs Regexps
If you’re familiar with Regexps from non-Emacs contexts, you probably already
know that there are several distinct Regexp syntaxes out there. Every
application and programming language seems to have its own flavor with subtle
differences from the others: there are the basic Regexps of grep(1), the
extended Regexps of egrep(1), the heavily enhanced Regexps of perl(1) and the
PCRE library, and so on.
You’ve probably guessed that I’m going to tell you that Emacs’s Regexps are of
yet another flavor. In the fundamentals, Emacs Regexps are more like grep(1) Regexps,
in that (, |, ), {, and } and are ordinary characters and the backslashified
versions are metacharacters. So in Emacs you do grouping (which captures) with \( and
\), alternation with \|, and counted repetition with \{ and \},
Emacs supports the non-greedy repetition operators *?, +?, and ??, and the POSIX
character classes (such as [[:blank:]]).
Emacs’s . matches any character excepting a newline. To search for a newline,
insert one literally with C-j (its ASCII value). You can also use the POSIX
space character class ([[:space:]]) or the whitespace syntax class (\s-), when
appropriate.
Backslash Constructs
Our Regexp notation, like most others, also includes a lot of backslash constructs, including many that are unique to Emacs, supporting purely Emacs concepts like the Buffer, Point, syntax classes, character categories, and symbols.
We have non-capturing (“shy”) groups with \(?: ...\) and explicitly-numbered
groups with \(?NUM: ...\). \sCODE matches a character whose
syntax class is CODE. So,
for example, \s- matches any whitespace character, while \sw matches a
word-character. \SCODE (note the uppercase “S”) matches any character whose
syntax class is NOT CODE.
The point of \s and \S is that the characters that comprise a given syntax class
can differ from Major Mode to Major Mode213. So the word-class might
include the apostrophe or it might not. Syntax classes let you write Regexps
that work in any Mode. Table 28 lists the class codes.
| CODE | Syntax Class |
|---|---|
- |
Whitespace characters |
w |
Word constituents |
_ |
Symbol constituents |
. |
Punctuation characters |
( |
Open parenthesis characters |
) |
Close parenthesis characters |
" |
String quotes |
\ |
Escape-syntax characters |
/ |
Character quotes |
$ |
Paired delimiters |
' |
Expression prefixes |
< |
Comment starters |
> |
Comment enders |
@ |
Inherit standard syntax |
! |
Generic comment delimiters |
Some other unique Regexp metacharacters include \` and \' (that’s backtick and
apostrophe) to match at the beginning and end of the Buffer, respectively, and \=
to match at Point. In addition to the common \< and \> to match the beginning
and end of words, we also have \_< and \_> to do the same for symbols.
References
- See “Regexps” in the Emacs manual.
- Friedl, Jeffrey E. F. 2002. Mastering Regular Expressions. Sebastopol, CA: O’Reilly..
Unlimited Undo with Redo
The ability to undo editing changes is fundamental. GNU Emacs had “unlimited” undo when it was released in 1985, a time when most editors had at most the ability to undo the single most recent change.
Just Undo It
It’s very simple to just undo the last thing you did — whether inserting,
modifying, or killing some text. Just hit C-/ (undo), and
your change is undone. Point is always moved to the location where the Undo
occurred (which is why people use Undo to move around). After undoing, just
continue with your editing.
If you invoke undo several times in a row, you’ll see that it keeps undoing back
in time. You can undo all the way back to the first change you made to the
Buffer. If you visit a file, make changes, and then decide you don’t like any
of the editing you’ve done, you can Undo them all away (though this could be
tedious and you’d be better off reverting the Buffer instead). You can Undo
back through file saves, and you can even Undo your Undo’s (see Redo, below).
To make undoing less tedious, Emacs groups long sequences of uninterrupted
insertion into undoable chunks. So if you type “uninterrupted”, and then hit
C-/, the whole word is undone in one step, rather than requiring 13 invocations
of C-/, one for each letter. This is called amalgamation and by default the
chunk size is 20, so, if you type
“antidisestablishmentarianism” you’ll have to type two C-/’s to undo it.
Emacs puts undo on two additional keystrokes: C-_ and
C-x u, and of course you could always say M-x undo. C-_ is the
oldest of these key bindings (and is the one that’s hardwired into my brain),
but C-/ is admittedly easier to type (C-x u is mnemonic, but highly
unfelicitous).
What, When, and Where Can You Undo?
If you delete a word (“foo”) in Buffer A, then delete a word (“bar”) in Buffer
B, and then, back in Buffer A, you hit C-/, the word “foo” comes back, even though
the deletion in Buffer B was more recent. If you now change to Buffer B and
Undo, “bar” comes back: each Buffer’s undo history is independent.
Only changes to the contents of a Buffer are undoable. It doesn’t matter what
command caused a change: entering text by typing is undoable but so is any other
command that enters text: yanking from the Kill Ring, inserting the result of
running an external command with C-u M-! (shell-command),
inserting a file with C-x i (insert-file): it’s all undoable.
Any command that kills Buffer text is undoable, as is any textual object kill
command like M-DEL (backward-kill-word). It makes no
difference if you killed text with a keystroke, a mouse action, or a
M-x (execute-extended-command) command.
All commands that modify text are undoable, like
M-t (transpose-words) or
C-x C-u (upcase-region). A command like
M-% (query-replace) that makes mass changes is also undoable.
The scale of any of the above changes has no effect on their undoability. If
you kill the entire Buffer contents with, say,
C-x h (mark-whole-buffer) followed by
C-w (kill-region), or change the whole Buffer to uppercase with
C-x C-u214, or insert the contents of a 3-megabyte file, a single Undo will
happily undo the change.
It also doesn’t matter how long ago you made a change; if you made a change to a Buffer a week ago, and your Emacs has been running all that time, you can still undo it. However, once you’ve killed a Buffer, its undo history is gone, and exiting Emacs of course kills all your Buffers.215
How Unlimited is Unlimited?
Actually, there are limits, changeable, to the Undo facility. The defaults are so big that Undo is effectively unlimited.216
How far back you can Undo is controlled by two User Options; there’s also a hard
limit on the maximum size of any single change (see
undo-outer-limit). You can Customize all of these. See
“Undo” in the Emacs manual for details.
Undo in the Region (Selective Undo)
The most amazing feature of Undo is that you can limit your Undoing to a subset of the Buffer. Imagine that you’ve been editing for an hour, and then decide that you don’t like the changes you made to one paragraph thirty minutes ago — but you do like all the rest of your changes. It would be awful to have to Undo everything you’ve done in the last twenty-nine minutes just to restore that one paragraph.
No problem: all you need to do is set the Active Region around that paragraph and start Undoing. None of the work you’ve done outside of that paragraph will be Undone, and Undo will stop if you go all the way back to the first change you made to that paragraph.
Redo, or Undo the Undos
It’s very easy to overshoot when you’re Undoing. You’re typing at speed, make
a mistake, and hit a few C-/’s to Undo it. But you hit one too many! You
can’t just immediately type C-/ again: that would just Undo one step further.
What to do?
You just have to stop Undoing. Not for a length of time, but just by issuing
any Emacs command that isn’t undo. You could invoke
C-f (forward-char), a nice harmless command, or
M-x calendar, or anything else, but
C-g (keyboard-quit) is a perfectly fine way to stop Undoing
(and by now it’s probably wired into your lizard brain as the “oops” command).
So after C-g just Undo again with C-/ and it does the same thing as always:
undoes the last change to the Buffer, which happens to be your superfluous
Undo. The distinction between Undo and Redo may take a little getting used to,
so play around with it. (If you can’t get used to it, see undo-tree.)
What Can’t You Undo?
You can’t Undo anything that’s not a change to the contents of a Buffer. So you
can’t Undo changes to the layout of your Windows, like a
C-x 0 (delete-window) or a
C-x 2 (split-window-below), or a switch from one window to
another. (But a recommended separate facility allows you to undo those changes.)
You also can’t Undo killing a Buffer, which is another reason Emacs is careful to ask for confirmation if you try to kill an unsaved file-visiting Buffer.217
Don’t confuse the contents of the Buffer with how it’s presented: if you
highlight a word with M-s h . (highlight-symbol-at-point),
changing it’s color to yellow, that doesn’t change the actual text at all, and
so is not undoable with the Undo facility (of course, you can “undo” the
highlight manually).
You can’t Undo the deletion of a file with M-x delete-file or
Dired’s D (dired-do-delete) command, or anything else like
that; that’s the province of your operating system’s undelete facility or of
your Version Control system.
Certain Buffers don’t have Undo turned on; any Buffer whose name starts with a space (see Hidden Buffers) has Undo turned off. You can turn Undo off in any Buffer if you like, but why would you?
special-mode Buffers (and Buffers in Modes that inherit from special-mode),
which are read-only by default and usually implement applications, may or may
not implement Undo.
Finally, you can’t Undo non-Emacs actions that Emacs takes for you, like sending an email, an instant message, or a tweet!
The undo-tree Alternative
A fair number of people think that the way Undo works is one of the most confusing things about Emacs, right up there with the workings of the Kill Ring. And just like the latter, there are alternatives available (thanks to the extensible nature of Emacs).
The undo-tree package is the most popular alternative. Instead of a linear list
of changes that (confusingly?) includes undos, it organizes the undo history as
a branching tree, which makes it easier to understand. The author cheekily
asserts:
The only downside to this more advanced yet simpler undo system is that it was inspired by Vim. — Toby Cubitt
It’s an impressive package and it can coexist with standard Undo (you can switch
back and forth, or set up separate key bindings) but I find it to be more
intrusive than the default Undo, especially if you turn on its visualizer and
integrated diff (which is what makes it especially easy to understand). See the
screenshot at the Emacs Wiki. Personally, I think with a little practice you
can get completely comfortable with standard Undo. But if you want undo-tree
just add the following snippet to your Init File:
(unless (package-installed-p 'undo-tree)
  (with-demoted-errors "%s"
    (unless package-archive-contents
      (package-refresh-contents))
    (package-install 'undo-tree)))
;; to replace standard Undo everywhere
(with-demoted-errors "%s" (global-undo-tree-mode))
Approaching Programming: Keyboard Macros
I believe I can state without the slightest hint of exaggeration that Emacs keyboard macros are the coolest thing in the entire universe. — Steve Yegge
Thanks to its nature as a Lisp Machine, Emacs is probably the most completely customizable and extensible piece of software in existence. Emacs is written in Emacs Lisp (Elisp) running in a Lisp interpreter that you can modify in real time, as it runs, to change almost anything, and any brand new code you write can run immediately, and interact with all the rest of Emacs itself.
This is fantastic and amazingly powerful. The only problem is, you need to be an Elisp programmer to do it! We’ll address the goal of becoming an Elisp programmer in in Programming the Lisp Machine, but in this chapter, we’ll talk about how you can do some programming with no Elisp skills.
Nothing is more tedious than manually making repetitious mass edits to a file or
files. M-x query-replace and especially
M-x query-replace-regexp can handle relatively simple cases,
especially if coupled with any of the Greps and Writable Grep, or Writable
Occur; Dired’s Q (dired-do-find-regexp-and-replace) command
is also available, and the Xref facility can do mass renames of identifiers in
your program source code.218
But some mass edits are too complicated for any of those solutions.
A Keyboard Macro (hereafter, a Macro) is a shorthand way of re-executing a longer sequence of commands. A function in a programming language (like Elisp) can be thought of in exactly the same terms, but to write one you have to compose the function in a Buffer219, and evaluate it (assuming you know the syntax and semantics of the language).
Instead, a Macro is quickly defined at the point where it’s needed: you tell Emacs to start recording, embark on a sequence of commands (key strokes) to perform one instance of your task, and then stop recording. Now you can immediately re-run those steps, whether once or twice or by telling Emacs to run the Macro as many times as it takes to do all the repetitions. Then you just forget about it.
Or instead, you might re-run the macro hours (or days) later, assuming you haven’t exited Emacs, and if the Macro has turned out to be generally useful, you can save it for future sessions, optionally giving it a name and possibly binding it to a key. You can have several anonymous Macros defined in your session and switch between them, and you can edit any of them to fix a bug or make an enhancement.
Note that Macros are defined globally and are not Buffer-local. You can define a Macro in one Buffer, and then switch to a different Buffer to execute it.
Your First Macro
Suppose you have a list of author names in inverted form and want to change them all to a different format:
Brackett, Leigh
Durrell, Gerald
O'Brian, Patrick
Ambler, Eric
Fleming, Fergus
Mundy, Talbot
Instead of “Brackett, Leigh” you want “Leigh BRACKETT”, and so on.
In order to make these changes with a Macro, you just have to do the first one while recording, and then all rest can be done automatically.
Here’s my algorithm. I have to start by positioning Point at the beginning of the list. Now I perform these steps:220
M-u(upcase-word)- giving “BRACKETT”
C-d(delete-char)- eliminating the comma
M-t(transpose-words)- flip the two parts
C-f(forward-char)- move to the beginning of the next line
To turn this algorithm into a Macro and apply it, you only need to learn three things:
- how to start recording,
- how to stop recording, and
- how to invoke the Macro you just defined.
You start recording with C-x (; you’ll
see the message “Defining kbd macro…” in the Echo Area and the indicator “Def”
will light-up in the Mode Line until you’re done. Now you perform the actions
that comprise your Macro, any sequence of commands of any length; now you’ve done
the first of presumably many repetitions of your task.
You stop recording with C-x ); you’ll see
“Keyboard macro defined” and the “Def” indicator will go away.
Now you can invoke the macro with
C-x e (kmacro-end-and-call-macro): it re-executes your
sequence of commands. Since we ended the Macro by moving to the beginning of
the next line, we’re ready to invoke it immediately without having to move into
position. We’ll call C-x e five more times, and the result will be:
Leigh BRACKETT
Gerald DURRELL
Patrick O'BRIAN
Eric AMBLER
Fergus FLEMING
Talbot MUNDY
Repeating a Macro
Perhaps you noticed this message in the Echo Area after your first C-x e:
(Type e to repeat macro)
After any C-x e you can immediately rerun the Macro by just typing e.
You can also have Emacs repeat the Macro for you. You can give C-x e a numeric
argument, and Emacs will repeat it that many times. Occasionally it’s obvious
how many times you need to invoke a Macro, but it’s much more common that you
just know you need to invoke the Macro a lot. It’s very common to want to
reapply the Macro as many times as possible, all the way to the end of the
Buffer.
You can auto-repeat the Macro by giving C-x e a numeric argument of zero
(standing for infinity) as in C-u 0 C-x e. The Macro will just repeat over
and over until it gets an error (which will usually happen at the end of the
Buffer) or until interrupted with C-g (keyboard-quit).
If you want to apply a Macro to a big chunk of text, but not the whole Buffer,
just Narrow the Buffer with C-x n n, go to the beginning of the
narrowed region and invoke the Macro infinity times. When it beeps,
having hit the end of the (narrowed) Buffer, you’re done, and you can widen it
again with C-x n w.
It is possible to define a Macro that loops infinitely! A simple example is:
C-x ( foo C-x )
In other words, a Macro that just inserts “foo”. If you C-u 0 C-x e this Macro,
it will just insert one “foo ” after another, forever, until you fill up all of
memory and maybe crash your Emacs — welcome to Computer Programming! Best
only to use C-u 0 with a Macro that can fail (like a Macro that includes a
search).
Aborting a Macro Definition
If you need to abort the definition of your Macro, perhaps because you realize
your algorithm isn’t exactly right, all you need to do is hit
C-g (keyboard-quit). This terminates the Macro definition
mode and discards all the steps you just recorded. It does not undo all the
commands you invoked however, so if you want to start your definition over from
scratch, you’ll have to Undo. If you want to pick up your aborted Macro
definition and fix it without having to redo the whole thing, see
C-x C-k l (kmacro-edit-lossage) below in Editing Your Macro.
Line-by-Line Macros
Many Macros, like our example, are intended to be applied to a line at a time;
that’s why we used C-f at the end, to advance to the beginning of the next
line. But there’s a special command to simplify both the definition and
execution of this kind of Macro.
You just define your Macro, starting at the beginning of the first line, without
worrying about ending up at the beginning of the next line; then, definition
finished, you set the Region around any sequence of target lines, and invoke
C-x C-k r (apply-macro-to-region-lines). This invokes your
Macro exactly once on each line of the Region; it automatically positions Point
at the beginning of each line before each repetition. So with C-x C-k r our
Macro could be as simple as M-u C-d M-t.
What Happens If You Make a Mistake?
As you’re defining, if any command you invoke raises an error, the definition will be aborted. The steps that comprise your Macro have to be error-free. By far the most common such error must be searching for some text that doesn’t actually exist.
Searches are a very common part of many Macros; often you use a search to get to the next place in the Buffer that you want to change. The natural effect of this is to terminate automatic repetitions of your Macro when there are no more matches, so that kind of error is not only okay, but a key part of Macro design. But often you’ll discover that your search is perhaps too specific and the resulting error will blow up your Macro early; you’ll just have to come up with a better search.
Remember that Undoing is just another Emacs command, so you if make a
non-error-raising mistake while defining, you might be able to just Undo it
rather than starting over! In our example above, what if instead of upcasing
the name I accidentally downcased it? Instead of aborting and starting over I
could just immediately Undo and then do the upcasing I intended. The Macro would
now be: M-l C-/ M-u C-d M-t C-f, which is, I suppose, less efficient, but it
will work just as well.
Speaking of mistakes, while you can (technically) use the mouse in defining a Macro, I think it’s a bad idea. The mouse is a very complex device, its effect depending on exactly where the mouse cursor is at the moment, so replaying mouse events is very unreliable.
Minibuffer Prompts
If in defining your Macro you invoke a command that prompts you for input via
the Minibuffer, then when the Macro is run, you will not be prompted again: the
command will use the same text you entered during definition. This is usually
what you want. For example, suppose your Macro is gathering text from the
current Buffer and saving it in another Buffer via
M-x append-to-buffer, which prompts you for the name of the other
Buffer: if you need to run that Macro a hundred times, you don’t want to have to
retype the Buffer name each time!
Because of this behavior, it’s also common to just define a Macro that invokes a
single M-x command that you are about to use several times; defining:
C-x ( M-x append-to-buffer RET stuff RET C-x )
means you can just say C-x e to gather some text, rather than the long-winded
M-x append-to-buffer plus at least a M-p to pull up the Buffer name you’re using.
There’s one thing to keep in mind though: in entering something like a Buffer name, you should be conservative in exploiting the conveniences of your Completion framework! In normal Emacsing, you might enter a Buffer name by typing only a few letters and hitting return when Completion presents the right name. If you do this in a Macro definition, the next time you run the Macro you might get a different, unintended, Buffer name! This is most likely to happen with a Macro that you run intermittently throughout a sesssion: perhaps your Completion framework offers up matching Buffer names in a different order depending on how recently you used them. It’s good Macro practice to type out the whole name explicitly in this scenario.
The Keyboard Macro Map
| Keystrokes | Category | Action |
|---|---|---|
C-x ( |
Define | start defining a Macro |
C-x C-k s |
… the same | |
C-x C-k C-s |
… the same | |
<F3> |
… the same | |
C-x ) |
end Macro definition | |
<F4> |
… the same (if defining) | |
C-x e |
Execute | Execute latest Macro |
<F4> |
… the same (if not currently defining) | |
C-u <F3> |
execute latest Macro and append new commands | |
C-x C-k r |
apply Macro line-by-line in Region | |
C-x C-k C-n |
Ring | make earlier Macro the current Macro |
C-x C-k C-p |
… reverse direction | |
C-x C-k C-d |
Delete the current Macro from the Ring | |
C-x C-k C-v |
View current Macro definition | |
C-x q |
Query | Query the user |
C-x C-k q |
… the same | |
<F3> |
Count | Insert Macro counter value at Point |
C-x C-k C-i |
… the same | |
C-x C-k C-c |
set the Counter’s value | |
C-x C-k C-f |
define the counter’s Format | |
C-x C-k C-e |
Edit | Edit the current Macro definition |
C-x C-k RET |
… the same | |
C-x C-k e |
Edit a Macro by its name or binding | |
C-x C-k l |
turn the Last few commands into a Macro | |
C-x C-k SPC |
edit (debug) the current Macro step-by-step | |
C-x C-k b |
Bind | Bind the current macro to a keystroke |
C-x C-k n |
Name the current macro for M-x |
|
C-x C-k x |
store the current macro in a register |
There’s a whole family of Macro commands on the C-x C-k prefix, and a few other
handy key bindings as well. In Table 29 I’ve gathered
them in several groups. Let’s take a look.
Macro Definition Commands
Instead of the C-x ( and C-x ) commands I’ve been using above, you should
probably use the quicker and cleverer <F3> and <F4>.221 These two commands
are context-sensitive. <F3> begins a Macro definition just like C-x ( and <F4>
terminates a Macro definition just like C-x ), but if you’re not in the middle of
defining a Macro, <F4> instead executes the Macro like C-x e does, and since
it’s a single keystroke, you can felicitously re-invoke it several times in row;
hence, it doesn’t need the “(Type e to repeat macro)” trick. So with these
keys, whipping up and executing a Macro is as simple as: <F3> defining commands
<F4> <F4> <F4> ....
If you give <F3> a C-u prefix i.e. C-u <F3>, it allows you to extend the
definition of your current Macro: it executes the Macro once but then reenters
definition mode, allowing you to add more commands to the end of definition.
Terminate this extension with <F4> as usual and the next time you execute it, your
added commands will be included.
This is a simple way of editing your Macro (for more elaborate editing see Editing Your Macro below).
You can also think of it as allowing incremental definition: define your Macro in stages. Going back to our author-name-reformatting Macro above, we could have defined as before:
<F3>- start defining
M-u- upcase last name
C-d- delete comma
M-t- transpose words
<F4>- done!
But now after trying it a couple times, we might decide that we really want to add a “bullet” at the beginning of the line, so we can extend the definition:
C-u <F3>- append commands to Macro definition
C-a- go to beginning of line
+ SPC- add a “bullet”222
<F4>- done!
Now our remaining author names will come out like this:
+ Lynda BARRY
+ Ian FLEMING
The Macro Ring
You can have any number of Macros defined simultaneously.223 They are
stored in a typical Emacs ring structure, so if you define a second Macro in
your session, it’s pushed onto the front of the Macro Ring, eclipsing your
previous definition. From now on, all Macro invocations via <F4> and friends
execute the new one.
Unless you rotate the Macro Ring of course! To execute your previous Macro, do
C-x C-k C-n (kmacro-cycle-ring-next).224 The previous Macro’s
definition will be shown in the Echo Area; it’s a mite cryptic, but you should
be able to recognize it since you defined it recently! Here’s how our extended
author-name-reformatting Macro appears:
Macro: M-u C-d SPC M-t C-a + SPC
Repeating C-x C-k C-n will cycle around the Ring; just stop when you’ve found
the Macro you want and now <F4> will execute that one instead, and keep
executing that one until you rotate again or define a newer one.
If you overshoot in your cycling,
C-x C-k C-p (kmacro-cycle-ring-previous) will reverse
direction. You can quickly delete the current Macro with
C-x C-k C-d (kmacro-delete-ring-head), and there are a few
more Macro Ring commands and a mechanism for shorthand keystrokes, but these are
for real professionals: I’ve never had a complex-enough set of Macros to have
needed them; see “Keyboard Macro Ring” in the Emacs manual.
You can review the Macros in the Ring with
C-x C-k C-v (kmacro-view-macro-repeat); it displays the
definition in the Echo Area without actually rotating the Ring; an immediate C-v
cycles to show the next. While you’re cycling, you can execute the
currently-displayed Macro by immediately typing C-k, without having rotated it
to the front of the Ring.225
If you really need to use several different Macros at a time, you might find it easier to just bind them explicitly to keys, or give them names; see Naming and Binding Your Macros.
Macro Query
Keyboard Macros really are a programming language, but they do seem like they’re
not a Turing Complete one, since they’re lacking the necessary conditional
statement.226 However, the handy C-x q (kbd-macro-query)
command directly supports a limited amount of conditional or dynamic action
within your Macro.
The most basic function of C-x q is to stop at a certain point and ask you if
you want to continue with the Macro. Suppose we’re about to define our
author-name-reformatting Macro, but we know in advance that we only want to
apply it to some of the lines in the Region. We could just live with not being
able to run it over the whole Buffer automatically (via
C-x C-k r (apply-macro-to-region-lines)) and invoke it
manually one line at a time. But we could instead begin the Macro with C-x q
i.e. C-x q M-u C-d M-t.
Each time we run the Macro, C-x q will ask in the Minibuffer:
Proceed with macro? (Y, N, RET, C-l, C-r)
and wait for a response, which can be any of the following:
| Key | Action |
|---|---|
Y |
Finish this iteration normally and continue with the next. |
N |
Skip the rest of this iteration, and start the next. |
RET |
Stop the macro entirely right now. |
C-l |
Redisplay the screen, then ask again. |
C-r |
Enter recursive edit; ask again when you exit from that. |
If we’re running the Macro with C-x C-k r, We can respond Y on the lines where
we want to apply the Macro, and N where we don’t.
Most powerful is that we can enter a Recursive Edit, which would allow us to make a local, manual, tweak in each execution.
Macro Counters
Every Macro has its own counter which you can use to number things while it
executes. Perhaps instead of a bullet list of reformatted authors, we want to
make a numbered list. All we need to do is use C-x C-k C-i (or <F3>, which is
equivalent when you’re already defining) at the appropriate spot in our
definition: C-x C-k C-i . SPC M-u C-d M-t. Now when we run our Macro with C-x
C-k r the result is:
0. Gerald DURRELL
1. Patrick O'BRIAN
2. Eric AMBLER
3. Fergus FLEMING
4. Talbot MUNDY
If you move around or do other things and then <F4> your Macro again, it will
continue with number 5. You can reset the count with
C-x C-k C-c (kmacro-set-counter).227
I’m sure you’ve noticed that the Macro Counter starts at zero… That’s because
programmers count from zero. If you’re not a programmer, or you’re a programmer
who wants to act like a normal human at this moment, just set the Counter to 1
before you invoke the Macro for the first time: C-u 1 C-x C-k C-c.
In addition to its Counter, each Macro also has it’s own Counter Format. You
can change it by calling C-x C-k C-f (kmacro-set-format) at
the beginning of your definition.228 This allows you to get leading zeros
or spaces for a fixed-width number column:
0013. Eric AMBLER
or even number your list in hexadecimal. If you’re a programmer, you’ll have
guessed that this uses a printf format string; see
“Formatting Strings” in the Elisp manual.
Editing Your Macro
In the old days, it was inevitable that after (or during) the definition of an
elaborate Macro, you would discover a mistake; there was nothing to do but start
over from scratch. But we 21st century Emacsers have
C-x C-k C-e (kmacro-edit-macro-repeat) and can edit our
definition to correct it, or further enhance a working Macro.
We’ve seen C-u <F3>, but that’s just a poor man’s approximation229 that
only allows you to append new commands to the end. C-x C-k C-e pops up a
special Buffer *Edit Macro* that displays the definition line-by-line with
explanatory comments, and you can delete steps, rearrange them, and add new steps
at will. Let’s edit our author-name-reformatting Macro. C-x C-k C-e edits the
current Macro (at the front of the Ring), so if the one you want to edit isn’t
there, rotate the Ring appropriately,
;; Keyboard Macro Editor.  Press C-c C-c to finish; press C-x k RET to cancel.
;; Original keys: C-x C-k C-i . SPC M-u C-d M-t

Command: last-kbd-macro
Key: none

Macro:

C-x C-k C-i           ;; kmacro-start-macro-or-insert-counter
.                     ;; self-insert-command
SPC                   ;; self-insert-command
M-u                   ;; upcase-word
C-d                   ;; delete-char
M-t                   ;; transpose-words
Note that there are several Elisp comments in this Buffer: everything from a semicolon to the end of the line is a comment. These comments are insignificant to your Macro editing; nothing you might change in a comment here (including deleting it entirely) has any effect. In general, differences in whitespace are also insignificant.
The defining parts of the Buffer are the non-whitespace characters following the
word Macro: (and ignoring the comments). Each command in the definition
consists of the keystrokes used to invoke it, spelled the way Emacs spells them
when you use C-h c (describe-key-briefly) (which is the way
you see these keys spelled throughout this book). So SPC for the Space key, RET
for Return, etc. Remember, amounts of whitespace (including line breaks) make no
difference: the definition could be all on one line like:
C-x C-k C-i . SPC M-u C-d M-t
the three keystrokes C-x C-k C-i could be split across three lines, etc.
If you repeat a command several times in a row, you might see this format:
4*M-u ;; upcase-word
which means you typed four M-u’s here; you can use this notation yourself.
Suppose you want to change your Macro to merely capitalize the author’s last
name instead of uppercasing all of it. Just change M-u to
M-c (capitalize-word) and hit C-c C-c to save your change.
Simple as that: now instead of “Eric AMBLER” you’ll get “Eric Ambler”.
Note that the Original keys section at top preserves the original definition in
a comment; you can grab bits of it if needed. Additionally, the *Edit Macro*
Buffer is a Buffer like any other you might edit, so of course you can use Undo
within it. But if you do mess up or change your mind, you can always just bury
or kill the Buffer and your Macro remains unchanged.
If you’ve named or bound your Macro to a key (see below), you can edit it with
C-x C-k e (edit-kbd-macro). And you can also turn a sequence
of editing commands you just happened to type into a Macro after the fact with
C-x C-k l (kmacro-edit-lossage), which pops up an *Edit
Macro* Buffer loaded with the last 300 keystrokes you typed (you’ll almost
certainly delete a lot of them).
Debugging Your Macro
Real programming languages have interactive debuggers to help you find bugs in your programs230, typically by single-stepping through the code: that is, running the program one instruction at a time so you can see the effect of each one clearly and incrementally.
Surprisingly, Emacs also has a debugger for Macros!231 Position yourself
for the execution of your Macro but instead of <F4> or C-x e, run it with
C-x C-k SPC (kmacro-step-edit-macro), Emacs will pop up a
small Window showing the definition of your Macro, and give you a prompt. If
you type SPC at the prompt, it will execute the first command of your Macro —
you’ll see the effect in the original Buffer — and prompt you again. If you
type SPC for every command in the definition, you will have executed the Macro
just as if you had typed <F4>: only much more slowly!
This slow stepwise execution can reveal to you a bug in your Macro, which you
could then fix with the Macro editor (C-x C-k e). But at each step, you can
instead skip the current command, or insert a new series of commands before or
after it: any such changes you make are saved and become part of the Macro’s
definition, so this is also a more interactive and perhaps intuitive way of
editing your Macro. See “Keyboard Macro Step-Edit” in the Emacs manual for
detailed instructions.
Naming and Binding Your Macros
If the Macro Ring seems a little too ascetic to you, you can easily bind your
latest Macro to a key with C-x C-k b (kmacro-bind-to-key).
This cautious command will prompt you for a keystroke; if you choose one that’s
already in use, it will ask you if you’re sure you want to replace that binding
with your Macro.
Since there are something between 200 and 1,000 active key bindings in a typical
Emacs, you might have trouble coming up with an unused keystroke! As a
convenience, if you type any of the digits 0-9 or the capital letters A-Z, your
Macro will be bound to that key in the C-x C-k keymap. So if you type C-x C-k b
and repond Q, your Macro will be bound to C-x C-k Q.
With C-x C-k n (kmacro-name-last-macro) you can instead, or
also, give your Macro a long name that you can use with
M-x (execute-extended-command).
Both of these binding commands only last until the end of this Emacs session.
If you want to save your Macro permanently, pull up your Init File, jump to the
end of it, and invoke M-x insert-kbd-macro; this command will prompt
for the name of your Macro232 and convert it to Elisp, which it will insert
into the current Buffer at Point. It might look a little cryptic; here’s one
possible form for our author-name-reformatting Macro:
(fset 'reformat-author-name
   (kmacro-lambda-form [escape ?u ?\C-d escape ?t] 0 "%d"))
If you gave your Macro a key binding as well as a name, you can use
C-u M-x insert-kbd-macro instead, which will also save your key binding:
(fset 'reformat-author-name
   (kmacro-lambda-form [escape ?u ?\C-d escape ?t] 0 "%d"))
(global-set-key [24 11 81] 'reformat-author-name)
With this code in your Init File, your Macro will be available every time you begin an Emacs session.
A Musical Example
Let’s finish up with one more example. I play the ukulele and guitar and have hundreds of files of lead sheets. I usually write them out in this format: song lyrics with the chords written above the lines, like so:233
        A             D             A7        Gbdim
And she said, "By the time that you open your eyes
           G        D7          G
There will not be a shoulder in sight."
This is convenient for editing, but when I’m done with a song, I want to convert it into the de facto standard ChordPro format (which is harder to edit):
And she [A]said, "By the [D]time that you [A7]open your [Gbdim]eyes
There will [G]not be a [D7]shoulder in [G]sight."
Obviously converting from the former to the latter calls for a Macro; here’s the one I whipped up:
C-e      ;; move-end-of-line
M-\      ;; delete-horizontal-space
C-u -    ;; self-insert-command
M-C-k    ;; kill-sexp
C-n      ;; next-line
[        ;; self-insert-command
C-y      ;; yank
]        ;; self-insert-command
C-p      ;; previous-line
After using this for a while, I made some tweaks to it; then I turned it into an Elisp function to make it more robust; and ultimately it grew into a Major Mode for editing ChordPro files.
The Customize Facility
The simplest kind of Emacs customization is to change the value of any of the 3,132 User Options or Faces. While an Elisp programmer might choose to do this via an Elisp expression in the Init File, it’s very easy for the non-programmer to do via the interactive Customize facility, which presents the variable’s default value, its current value, its legal possible values, its documentation, links to related variables, and an easy interactive way to modify the value.
One of the big advantages of Customize over customization via Elisp, even for experienced Elisp programmers, is the amount of bookkeeping that Customize does for you. It keeps track of what you’ve customized, allowing you to restore or further tweak the value of something you changed and now regret.
Entry Points
The entry points to the Customize facility range from customizing one single Variable or Face, up to high-level browsing of everything customizable; Table 30 summarizes most of them.
M-x customize-variable |
Customize a single named User Option |
M-x customize-variable-other-window |
… in the other Window |
M-x customize-face |
Customize a single named Face |
M-x customize-face-other-window |
… in the other Window |
M-x customize-mode |
Customize all Variables related to a major or minor mode |
M-x customize-group |
Customize GROUP, which must be a customization group |
M-x customize-group-other-window |
… in the other window |
M-x customize |
Customize anything or everything |
M-x customize-browse |
… same, via a tree-structured interface |
M-x customize-apropos-options |
Customize all loaded Options matching a REGEXP |
M-x customize-apropos-faces |
Customize all loaded Faces matching a REGEXP |
M-x customize-apropos-groups |
Customize all loaded groups matching a REGEXP |
M-x customize-apropos |
Customize loaded Options, Faces and groups matching a PATTERN |
(customize-variable also goes by the name customize-option, and
customize-variable-other-window is also known as customize-option-other-window.)
A Package has to be loaded before you can Customize it. If you try to Customize
a User Option, and customize-option won’t Complete the variable name, that
probably means you haven’t yet loaded the Package. Most Variable and Function
names begin with the name of the Package. Say you’re trying to Customize
crossword-auto-check-completed; the Package that contains this function is
crossword; this will almost always be the case. So just do M-x load-library RET
crossword and you will then be able to Customize the Variable.
To aid browsing and navigation, customization Variables are organized in groups;
often each Emacs package in the Package Manager defines its own group, but there
are also broader groups defined. M-x customize-group let’s you see
all the Variables and Faces for such a group; M-x customize-group RET isearch will
show you everything you can change about Incremental Search, for example: around
40 Options
.
While you can discover the Customization groups via Completion on
M-x customize-group, if exploration is your goal you can use
M-x customize and navigate through all the groups and subgroups in a
leisurely manner.
You can also enter the facility via Apropos. Suppose you want to tweak the
options relating to how sentences are recognized, but you don’t know the name of
the appropriate group. M-x customize-apropos with the keyword
“sentence” will bring up five pertinent Variables.
Experiment Without Fear
You don’t have to worry very much about entering the Customize facility and messing things up. All the changes you make happen in three steps: first editing a value, then setting it (which causes it to take effect in this session), and finally saving the change for future sessions. You can feel free to edit a value just to see what it looks like: doing so won’t have any effect unless you also set it. If you’ve edited a value and it looks undesirable to you, you don’t even have to restore it if you haven’t set it yet. You can simply kill the Buffer, or bury it and never come back; it will be as if you were never there. And if you have set it, Customize remembers the previous value and makes it easy to restore it. It’s even easy to find changes you’ve saved for all future sessions and restore them, if it turns out you don’t like something you’ve done.
Changing the Value of a Variable
Depending on which entry point you’ve chosen, the Customize Buffer will have one or possibly many Variables or Faces you can change.
Let’s consider doing M-x customize-variable RET list-command-history-max (see
The Minibuffer). In the Customize Buffer, we’ll see something like:
List Command History Max: [Value Menu] Integer: 32
   [State] : STANDARD.
   If non-nil, maximum length of the listing produced by ‘list-command-history’.
We can see the name of the Variable234, its current value (here 32), its customization state (here “STANDARD”), and its documentation.
You can change the value by editing the current value in the Buffer (just change the 32 to something else) or by clicking235 the “Value Menu” button.
Some Variables are simple and only accept a single sort of value (say, a number or a string), but others have more complex possibilities, and the Value button gives you a way of unambiguously entering them: Boolean variables can toggled on or off, for example, and it’s very common for Variables to allow an out-of-band nil option that can be interpreted in a variety of ways (described in the Variables’s documentation).
It’s also very common for a Variable to take a complex value, like a list of things; in this case, there will be additional buttons to add or delete individual elements of the list. See “Changing a Variable” in the Emacs manual for complete details.
When you change the value, whether by clicking or editing, the State button will change from “STANDARD” to “EDITED”. To actually apply your edit you need to set the value. Click on the State button and you’ll see a menu of options:
| Set for Current Session |
| Save for Future Sessions |
| Undo Edits |
| Revert This Session’s Customization |
| Erase Customization |
| Add Comment |
The first two should be self-explanatory; “Undo Edits” restores this Variable to the value it had when you entered the customization Buffer; “Revert” restores the value to the last saved value (or restores the default Emacs value if you’ve never saved it), and “Erase” restores the standard value (what the Option would be if you started up an uncustomized Emacs). “Add Comment” let’s you document your changes and saves a comment that will be displayed along with this value in future Customize sessions.
Customizing Multiple Options
While customize-variable and customize-face present one value at a time, most of
the other Customize entry points let you view and change multiple values in one
go. So each Customize Buffer has three extra buttons at the top:
Operate on all settings in this buffer:
 [Revert...]   [Apply]   [Apply and Save]
These buttons let you finish up multiple edits in one stroke: “Apply” will set all the Variables in this Buffer whose values you’ve changed; “Apply and Save” also saves them for future sessions; and “Revert” will undo any sets you’ve done.
Customizing a Face
Customizing a Face is much the same as customizing a Variable; it’s mostly just a little more colorful.
Let’s say you don’t like the look of string literals in your favorite
programming language. Just pull up a file, position Point on one of the
offending strings, and say M-x customize-face. The prompt will look
something like:
Customize face (default ‘font-lock-string-face’):
(The default Face is that of the character where Point is.) Hit return and you’ll be given a Customize form:

Figure 35: Customizing a Face.
(This Face only defines a “Foreground” color so the other attributes aren’t
shown; click Show All Attributes to change others.) If you click on the
“Choose” button, the colorful *Colors* Buffer (see Figure 43) will pop up; browse it, and click
the color you like (you can instead just type a color name236 or RGB triplet
#RRGGBB into the form where it says “LightSalmon”237).
Note that if you customize a Face this way starting from, say, a python-mode
Buffer, it will affect all Modes and Buffers that use this exact, named, Face.
A given Major Mode may define its own Faces, but font-lock-string-face is a
standard Emacs Face and is used by many, perhaps most, Major Modes for
syntax-highlighting string literals. The good news is, if you hate that Face in
one Mode you probably hate it everywhere, so a sweeping change is appropriate! But if
you only hate it for strings in python-mode, you’ll have to get fancier to only
change it there — I won’t go into this here, but such is the power of Emacs
that this is completely doable.
Customize Buffers Are Non-Modal
Like almost all of Emacs, Customize Buffers are not modal. That is, when
you fire up a Customize Buffer, you don’t have to commit to finishing the
job right now. Take your time. The Buffer keeps track of your state. You can
set one or more new values without saving them. This allows you to spend some
time seeing how you like the changes you made. If you like them, you can just
switch back to this Buffer later and then click “Apply and Save” (bound to
C-x C-s in Customize Buffers). If you kill the Buffer after
“Apply” but later (in the same session) reinvoke Customize with the same
Variable or Face, you’ll see that Emacs has remembered your changes, and you can
now save them, revert them, or make further changes.
If you’re really casual about your customizations, you might forget to save the ones you set for future sessions. I recommend this setting for your Init File, which causes Emacs to check with you when you exit—you’ll be able to pull up a special Customize Buffer that contains all the values you’ve set but haven’t yet saved, and you can take care of it.
(add-hook 'kill-emacs-query-functions
          'custom-prompt-customize-unsaved-options)
Long-Term Customization Management
There are some convenient commands for the long-term management of your
customizations. M-x customize-unsaved (also known as
M-x customize-customized) will pull up a Customize Buffer that
pulls together all the customizations you’ve made in this session but haven’t
yet saved, which makes it easy to review, possibly change, and then save them
all.
From an even longer-term perspective, M-x customize-saved will give
you a Customize Buffer containing all the customizations you’ve ever saved,
across all sessions; this is very handy if, after a month or so, you figure out
you’re unhappy with something you’ve changed, and want to undo or tweak it.
While we’re thinking in the long term… GNU Emacs has been around for
41 years already, and I’m confident that it will
be around for many more years to come; there have been 1.37
new Emacs releases every year, on average. That means it won’t be long before
your OS package manager presents you with a fresh new Emacs in which some User
Options will inevitably have been changed. M-x customize-changed
(a.k.a M-x customize-changed-options) will present a Customize
Buffer containing all these changed variables for you to consider.
Finally, if, like me, you’ve changed some User Options directly via Elisp in
your Init File, M-x customize-rogue will let you see all of these in
a Customize Buffer.
Where Are Customizations Saved?
The Customize Facility saves your customizations at the end of your Init File in two sections, one for User Options that looks like this:
(custom-set-variables
 ;; custom-set-variables was added by Custom.
 ;; If you edit it by hand, you could mess it up, so be careful.
 ;; Your init file should contain only one such instance.
 ;; If there is more than one, they won't work right.
 ...)
and one for Faces:
(custom-set-faces
 ;; custom-set-faces was added by Custom.
 ;; If you edit it by hand, you could mess it up, so be careful.
 ;; Your init file should contain only one such instance.
 ;; If there is more than one, they won't work right.
 ...)
As the warning indicates, you should avoid editing these special sections. If
you notice something there that you want to fix, do it via M-x customize-saved.
It’s also possible to tell Emacs to store these Customization sections in a different file entirely; this is only necessary if you’re doing something fancy with your Init File, like generating it programmatically for example.
Customizing Key Bindings
The one thing the Customize Facility doesn’t support is customizing your own key bindings; you have to do that in Elisp; see Modifying Key Bindings.
The Package Manager
Emacs organizes most of its 22,721 commands and functions into 508 libraries: groups of functions related by purpose. When brand new functionality is added, as opposed to existing functionality being merely enhanced, the new code is organized as a new library; the libraries comprise 1,621 files of Emacs Lisp source code that are shipped together with Emacs.
Rather than Emacs just forever acquiring more and more new functions, and
getting bigger and bigger all the time (which certainly still happens to some
extent), this scheme allows major chunks of code that perhaps not everybody
wants to use to be loaded into memory in a lazy fashion. If you’re not going to
be printing to a Postscript printer today, why bother loading the 226K ps-print
library? This lazy approach is called autoloading; you’ll see the
word when looking at the documentation for commands and functions via the Help
facility, as in:
ps-print-buffer is an autoloaded interactive Lisp function in ‘ps-print.el’.
Autoloading also speeds up start-up.
The next step up from library is package. A package is effectively a library—that is, Elisp source files—together with data files, Info documentation, and metadata (in the form of author information, a package description, a version number, and typically a list of dependencies: other packages that this package itself uses).
You can think of packages as plug-ins: software that adds new functionality to Emacs. You can install and uninstall them in real-time, as you use Emacs, without having to quit and restart.
Thanks to packages, third parties can write their own libraries and easily contribute them to collections of packages (called repositories or repos), and thanks to the metadata, these repositories are also searchable. The Free Software Foundation maintains two repositories of contributed packages (called GNU- and NonGNU-ELPA238), and there are two major community-maintained repositories (MELPA and Marmalade), and probably more that I don’t know about.
I recommend the GNU and NonGNU repositories, with 780 packages between them, and MELPA with 6,247, but I don’t recommend Marmalade; it moves at a more aggressive pace and when I used to use it, packages could get updated several times a day and any one of those updates might be (briefly) buggy. But your mileage may vary!
Every package manager—for a programming language, the app store on your phone, or an application like a web browser—comes with security concerns, and Emacs is no different. Be sure to see Security for more information.
Configuration
Recent versions of Emacs come with the GNU and NonGNU ELPA repositories configured and ready to use. This Init File snippet adds the MELPA repo as well, and also assigns repo priorities that put a premium on stability (so, if a package appears in both the carefully curated GNU repo and in MELPA, we prefer the GNU version, all else being equal; you can change this if you prefer to live on the bleeding edge).
Note that the MELPA repo comes in two flavors: the stable repo and the unstable
repo. I give the stable repo a higher priority than the unstable via the
package-archive-priorities variable.
About Packages
How do you find out about these exciting additional packages? I mention several in this book, and you can find out about many more by following various Emacs mailing lists, blogs, and web forums. But mostly you find them by searching and browsing in Emacs.
If you’ve got the name of a package to hand, perhaps Vertico, you can read it’s
description via C-h P (describe-package). This will pop up a
*Help* Buffer showing at least the package metadata, like this:
Package vertico is available.

     Status: Available from gnu -- Install
    Archive: gnu
    Version: 0.20
     Commit: 1bd5438da9c661e2df5e9516f36d9cbc6d100a34
    Summary: VERTical Interactive COmpletion
   Requires: emacs-27.1
   Homepage: https://github.com/minad/vertico
 Maintainer: Daniel Mendler <mail@daniel-mendler.de>
     Author: Daniel Mendler <mail@daniel-mendler.de>
The description may include extra text; the Vertico *Help* Buffer has 700-odd
more lines of documentation.
Searching and Browsing
A quick way to find packages is via
C-h p (finder-by-keyword), which pops up a Buffer containing
a list of keywords—for example:
calendar      calendar and time management tools
languages     specialized modes for editing programming languages
mail          email reading and posting
matching      searching, matching, and sorting
However, this list is limited to built-in packages that come with Emacs, and those in the built-in repos.
Much better is to use M-x list-packages, which will download all the
package descriptions from all the repos you have configured (four, in the Init
File snippet above) and add them to the built-in packages. Here’s a tiny
excerpt from the thousands of entries in my *Packages* Buffer:
Package              Version       Status     Archive    Description

ace-jump-mode      2.0           available  melpa-stable  a quick cursor location minor mode for emacs
afternoon-theme    0.1           available  nongnu        Dark color theme with a deep blue background
vertico            0.20          available  gnu           VERTical Interactive COmpletion
org                9.4.4         built-in                 Export Framework for Org Mode
csv-mode           1.18          installed                Major mode for editing comma/char separated values
The *Packages* Buffer is called the Package Menu. Hitting RET on any of these
lines pops up the same description that C-h P would present. You can sort the
entries by clicking on the columns in the Header Line (typing
S (tabulated-list-sort) will sort on the column containing
Point), and of course use Incremental Search or Occur.
You can also filter the entries (rather like an in-Buffer Occur) by metadata
keyword with / k (package-menu-filter-by-keyword); / k
calendar is exactly like selecting calendar from C-h p, except it
includes all the packages in the repos you configured.
/ n (package-menu-filter-by-name) filters by package name,
and / / (package-menu-clear-filter) will restore all the
entries.
The *Packages* Buffer is in fact your Emacs package manager, and you can do all
your package maintenance in this Buffer; see Package Maintenance below.
Installing Packages
You can install a package by name, from any Buffer, with
M-x package-install: the package will be downloaded if necessary,
compiled, and loaded: it’s now ready to use. Once installed, the package is
available in future sessions (though some packages require enabling, typically
done in your Init File, and configuration, typically done via
Customize).
Installed packages live in your User Emacs Directory (see
user-emacs-directory, typically ~/.emacs.d/) in a
subdirectory elpa.
You can also install packages directly from your Init File, like this:
(unless (package-installed-p 'vertico)
  (with-demoted-errors "%s"
    (unless package-archive-contents
      (package-refresh-contents))
    (package-install 'vertico)))
(with-demoted-errors "%s" (vertico-mode +1))
This is a good way to make sure all the packages you like are installed in all your different Emacsen on your different computers, assuming you synchronize your Init File; if you only use Emacs on one computer, it’s simpler just to install your packages manually (actually, that’s all I do even though I use multiple Emacs installations: I’ll quickly notice if a package is missing in some other installation as soon as I try to use it).
Probably the most common way to install packages is from within the Package Menu.
Package Maintenance
Package maintenance consists of installing new packages you want to use, deleting old ones you no longer use, and updating your packages to the latest versions. All of these tasks are typically done in the Package Menu. Table 31 lists the most useful maintenance key bindings; searching was described above, and navigation is similar to any other Special Mode Buffer.
| Key | Action |
|---|---|
RET, ? |
describe the package |
i |
mark package for Installation (with an I) |
U |
mark all (installed) packages with Upgrades (with a U) |
d |
mark package for Deletion (with a D) |
~ |
mark all obsolete packages for deletion (with a D) |
u |
Unmark this package |
x |
eXecute all marks |
g, r |
Refresh buffer from repo |
The Package Menu works similarly to a Dired Buffer: you apply various marks to
different packages (marks appear in the leftmost column), unmark any (with u) if
you’ve changed your mind, and, when you’re ready, execute all your marks with
x (package-menu-execute). Any packages you’ve marked for
installation will be downloaded, compiled, and activated, and those marked for
deletion will be deleted (you can always reinstall them again at a future date).
You should periodically use the
U (package-menu-mark-upgrades) command to check for packages
that have new, upgraded, versions available. It will compare all the versions
of your installed packages with the latest versions in the repos and mark any
upgradable package with a U. (This can take a minute or so, depending on the
repo, and so runs in the background.) When it’s done, use x to upgrade the
packages; after the new versions have been installed, it will offer to clean up
obsolete versions for you.
As of v29.1, you can upgrade a package from outside the *Packages* Buffer with
M-x package-upgrade and even upgrade all your packages with
M-x package-upgrade-all.
Should You Write Your Own Packages?
Creating a proper Emacs package is easier than any other language I’ve
used,239 but it still involves a few additional steps (e.g. writing
metadata) compared to just creating your own library (which just requires you to
create a file of Elisp somewhere in your load-path).
There’s probably no need to go to the extra trouble of packaging if you’re going
to be the only user of your library.
But if you want to contribute your library to the Emacs community, then you’ll need to package it; just follow the instructions in §41 of the Manual, Preparing Lisp code for Distribution.
Updates and Bugs
Emacs Updates
I’ve mentioned before that there have been an average of
1.37 new Emacs releases every year in GNU Emacs’s
41-year lifetime. That means it won’t be long
before your OS package manager presents you with a fresh new Emacs.
Emacs’s backward compatibility is excellent, so it’s unlikely that you’ll experience any breakage when you fire up your new Emacs: your Init File will almost certainly still work perfectly, your key bindings will still be the same. At most, some things may look slightly different: changes in default fonts or colors for example, and you can always fix these if you’re unhappy. You may see some deprecation warnings if you’re using functions that are being phased out; the Emacs developers tend to give a lot of lead time for deprecated functions, so there’s no need to panic.
However, it is likely that there will be new features that you will want to know
about. C-h C-n (view-emacs-news) will display the change
log, a very extensive list of all the user-visible changes in the version of
Emacs that you’re running: that is, everything that changed from the way it was
in the previous version. If only you could get this kind of information for all
the web services you depend on! If you invoke this command with a prefix
argument, C-u C-h C-n, you can request the change log for any previous version
of Emacs, all the way back to version 1.1 (the text of which is very quaint!).
After you’ve glanced at the change log for your new Emacs, you should run
M-x customize-changed to see if there are changes to any of User
Options that you’ve customized.
Emacs Bugs
What, does Emacs have bugs? Since all software does, I’m afraid so. One of the unique things about a Lisp Machine is that you can actually fix many bugs yourself, live, while your Emacs is running, without recompiling, re-installing or even restarting.
Assuming you’re a programmer that is. If you’re not, and you find a bug, you
should report it. But first, you should try to make sure that this really is an
Emacs bug, and not a problem stemming from some settings in your own
Customizations or Init File. This means firing up a fresh Emacs with the -Q
option, which avoids loading your init file and even some of the system-wide
initialization, thus giving you a really pristine Emacs:
emacs -Q
Now try to replicate your bug. You may need to manually load a package that
you require in your Init File if you think it’s implicated in the bug; you can
typically use M-x load-library to load it. The point is to have as
few non-standard customizations and loads as possible.
The Manual contains an excellent chapter on reporting bugs, and you should really read it before reporting one: after all, you’re having a problem with free software that you didn’t have to pay for, and asking people to help you with your problem for free. You can at least try to make it as easy for them as possible.
If you can replicate your bug in this -Q environment, you can report it. Just
say M-x report-emacs-bug and an email composition Buffer will pop
up, with some instructions in another window. The email will be populated with
up to several hundred lines of data about the current state of your Emacs:
exactly which version you’re running, how your Emacs was compiled, which
packages you currently have loaded—all the kinds of information needed to help
figure out your bug. (You can delete any personal info that you might be
uncomfortable sharing.) You need to add a description of the bug, ideally
including a step-by-step recipe showing how to make the bug happen. (“Put point
at the beginning of the second word of a line with at least five words in it,
and now…”)
If you’ve set up your Emacs to send mail, you can just use
C-c C-c (message-send-and-exit) and your bug report will be
emailed to the Emacs maintainers! (If you can’t send mail from within Emacs,
you can cut-and-paste the contents of the message into the mailer you use, as
explained in the help window.) There’s no guarantee that the Emacs maintainers
can fix your bug, of course: they may not even be able to reproduce it, if it
has something to do with your computer or operating system or the phase of the
moon.
Not Emacs’s Fault!
If you can’t replicate your bug in this -Q environment, then it’s probably not a
bug in Emacs but in your Init File. You’ll have to fix this on your own.
Generally the way you do this is to comment out all of your Init File except for
the first line (really, the first complete s-expression, which might span
several lines), save it, and fire up a fresh Emacs normally. Now see if your
bug is fixed. If it is, you know the problem is not in that first line, but
rather in the part of your Init File that you commented out!
But where? Well, now uncomment (i.e. restore) the next complete s-expression and repeat the process. Eventually you’ll have restored the line that contains the bug and you’ll know because suddenly the bug occurs again. Now just fix the offending line and restore the rest of your Init File, and you’re done!
This process can be really tedious if you have a large Init File240. There
are much more efficient ways to do this: really, any programmer would use binary
search to find the bug, and there are tools in the Package Manager to do
this automatically (see bug-hunter).
Helping Squash Bugs
If you’re a programmer, you can volunteer to help fix Emacs bugs; all reported
bugs are listed in the Emacs Bug Tracker. You can pick one out and see if you
can fix it; see “Contributing” in the Emacs manual for more information. There’s an
excellent interface to the bug tracker in the Package Manager called debbugs
that makes this even easier.
Exiting Emacs
All good things must come to an end, meaning you will occasionally have to exit
your Emacs. As you know, the usual command to use is
C-x C-c (save-buffers-kill-terminal). Note that if you are
in an emacsclient instance, C-x C-c only terminates that client, leaving the
server running. See Client / Server for details on how to terminate the Server.
If you have any modified Buffers (unsaved files) when you exit, Emacs will ask if you want to save these files before exiting with a prompt like:
Save file emacs-tutorial/emacs-tutorial.org? (y, n, !, ., q, C-r, C-f, d or C-h)
This prompt is really from the function save-some-buffers
which C-x C-c calls. Your options for each file are summarized in Table 32.
| Key | Action |
|---|---|
SPC, y |
save the prompted buffer |
! |
save all remaining unsaved buffers |
C-f |
switch to this File and stop exiting |
C-r |
peek at this buffer, Read-only |
d |
view a Diff of this buffer |
C-g |
cancel the whole exit command |
. |
save just the current buffer and exit |
DEL, n |
don’t save the prompted buffer |
RET, q |
don’t save this or any remaining buffers |
The C-r and d responses allow you to peek at the file in question to figure out
whether or not you want to save or abandon your modifications.
If, after this process, you still have modified Buffers because you answered n
or q to one of the prompts, Emacs will ask:
Modified buffers exist; exit anyway? (yes or no)
(Emacs really wants to make sure you don’t lose your data!)
Additionally, if you have any running subprocesses, you’ll get a another cautious prompt:
Active processes exist; kill them and exit anyway? (yes or no)
Along with this you’ll see a *Process List* Buffer showing all your
subprocesses. The processes in question might be shells or terminals, or
long-running commands you’ve fired up with M-&. Remember that if you kill
Emacs, which is the parent of these subprocesses, the subprocesses will
probably themselves die.241
It’s easy to type C-x C-c by accident, and who wants to terminate their
long-running Server full of dozens of files? There’s no problem if you have any
modified file-visiting Buffers or subprocesses, thanks to the above prompts, but
I personally never want Emacs to exit unless I’m about to reboot. So I have
this snippet in my Init File:
(setq confirm-kill-emacs 'yes-or-no-p) ; exiting emacs is silly
which causes Emacs to ask me still once more if I really mean it.
I highly recommend exiting Emacs explicitly when you terminate your login
session (this of course includes rebooting or powering-off your computer). This
assures that Emacs has a chance to save your files, and arrange for persistence
if you’re using the Desktop (see below). There’s no need to exit Emacs when you
sleep your computer, though if you’re the cautious sort242 you might do
C-x s (save-some-buffers) before sleeping (I do).
Occasionally, you might want to exit Emacs only to fire up a fresh one
immediately. I don’t do this very often, but occasionally in my Elisp hacking I
might mess up the state of my Emacs, and rather than try to figure out exactly
where I screwed up, I just want to start over. You can do this easily with
M-x restart-emacs. The shutdown procedure I just described (saving
buffers, killing processes…) is exactly the same, but then a new Emacs is
immediately fired up for you, using the same command line options and arguments
you originally used.
The Desktop: Persisting Your Buffers
You can easily have most of your file-visiting Buffers restored each time you
start up a fresh Emacs by turning on desktop-save-mode and
I recommend this for your Init File:
(desktop-save-mode +1) ; restore files from previous session
Not only are your file Buffers restored: so is your location (Point) in each Buffer, its Major Mode, and even your Frames243, their Window configurations, and all your Frame parameters (like fonts and font sizes).
desktop-save-mode also saves the Tabs in your Tab Bar, the contents of all your
Registers, your EWW web Buffers, and probably more (Emacs packages can readily
hook themselves into desktop-save-mode).
By default, remote files loaded from other systems are excluded from being
restored (in order to speed up restoration; also, the network or certain remote
hosts might be unavailable when you restore). You can change this by
Customizing desktop-files-not-to-save.
You can trash your saved Desktop configuration with
M-x desktop-clear—you might want to do this if it’s been such a long
time since you last ran Emacs244 that you’re no longer interested in any of
the files you were last editing and they’re just clutter now. desktop-clear
zaps the saved Desktop config and also kills all the Buffers that were
initialized from that config.
desktop-save-mode definitely slows down your Emacs startup speed. Since I use
the Emacs Server, and only fire up Emacs at most once every few weeks, I don’t
mind this at all. But you can Customize
desktop-restore-eager in order to make the restoration of
your Buffers happen lazily—that is, delayed in the background instead of
all at once—which can give you a responsive fresh Emacs immediately.
By default, there’s only one saved Desktop configuration, and you generally don’t want another Emacs to use it: that will just cause conflicts! So the Desktop config is locked by the first Emacs that restores it, and any additional, newly fired-up Emacs will ask you if you really want to steal the lock:
Warning: desktop file appears to be in use by process with PID 1004.
Using it may cause conflicts if that process still runs.
Use desktop file anyway? (y or n)
The only good reason to say yes is if the locking Emacs crashed, and was unable
to give up its lock, and isn’t actually running anymore245. Note that there’s no
desktop conflict when using emacsclient, since it connects to the running
Emacs and its desktop.
If you want to fire up a nonce Emacs, perhaps just to test a change to your Init
File246, and don’t intend to steal an existing desktop, just add the
--no-desktop option; see Starting Emacs!.
Starting Emacs!
Because I advocate using a long-running Emacs in Client / Server mode, I haven’t talked much about the details of starting up a fresh new Emacs, which weirdly makes this chapter the last thing in Part I of the book.
Emacs has a number of command-line options to vary the details of how it starts up. Many of the options are very exotic and only useful to people doing really fancy stuff—for these, you can read the man page or see “Emacs Invocation” in the Emacs manual.
The rest of the options can be divided into two categories: those for scripting Emacs, and those for occasional everyday use. Most any option in that latter category that you find yourself using all the time can be better done in your Init File. Of course, my definition of these two categories is just rhetorical: there’s no real division in use.
File Arguments
As usual for Unix programs, all command-line arguments that don’t start with a hyphen are taken as the names of files to visit. So this command:
emacs file1 file2 file3
has the same effect as firing up Emacs with no arguments and then using
C-x C-f (find-file) once for each file.
There’s one exception: an argument of the form +123 positions Point at line 123
of the first file named on the command line. The full form of this option is
+LN:CN where LN is a line number and the optional CN is a column number.
This old-fashioned option is used by certain programs to fire up Emacs at the
precise line where an error has occurred. vi(1) supports the same option, for
example. In Emacs, we usually turn this inside-out by calling
M-x compile from inside our running Emacs, and using
C-x ` (next-error) to load the files and jump to the error
location; see Compiling Code. The + option might still occasionally be useful
to an Emacs user via emacsclient(1).
Occasional Options
| Option | = Long Option | Action |
|---|---|---|
-d DISPLAY |
--display=DISPLAY |
open Emacs on named X display |
-nw |
--no-window-system |
open Emacs in this terminal |
-daemon |
--daemon |
start the Emacs server |
--version |
display version and exit | |
-q |
--no-init-file |
don’t load user’s init file |
--no-desktop |
don’t load saved desktop | |
--debug-init |
debug your init file | |
-Q |
--quick |
don’t do any initialization |
Table 33 lists what I think are the most useful occasional options.
-d and -nw let you choose between running this Emacs in Graphical mode versus
in a terminal. You’ll recall that I’m an advocate of using Graphical mode. If
you’re running Emacs in a graphical environment (e.g., a Unix system running X
windows, or under MS Windows or Mac OS), Emacs will default to Graphical mode;
-d is mostly for X windows experts doing fancy things. If you’re on a system
that’s not running in Graphical mode (like some big server machines, or in the
console of your Unix desktop), you’ll get Terminal mode by default and won’t
need -nw. -nw is mostly needed for those who are running a Graphical system but
want to use Emacs in external terminals as if it were vim(1).
The -daemon option is one of two ways of starting up the Emacs Server; see
Client / Server for details.
The final group of options are mostly used for testing and debugging your Emacs
configuration. -q runs an Emacs without loading your Init File or
Customizations. It can be handy for a quick check of whether or not some recent
Init File tweak you made has broken something: if the suspected breakage doesn’t
occur with -q, the problem has to be in your Init File. Since Desktop Save Mode
has to be enabled in your Init File, -q implies --no-desktop, which tells Emacs not to
load any saved Desktop; see The Desktop.
A certain happy category of bug that can occur in your Init File causes an
explicit error each time you start Emacs. I call this a “happy” bug because
it’s the easiest kind of Init File bug to detect and fix! It can be hard to tell from the
startup error where it is in your Init File, so just restart Emacs with
--debug-init and Emacs will jump into the Elisp debugger when the error occurs,
and you’ll be able to tell exactly where the buggy code is.247
-Q is a more extreme version of -q that also doesn’t load any system-wide init
file or Elisp248, nor any X window system resources. This is the option to
use if you think you’ve found a bug in Emacs: replicating the suspected bug
under -Q makes it very unlikely to be your fault; see Updates and Bugs.
Scripting Options
What does it mean to “script Emacs” when the whole idea of the Lisp Machine is to do everything inside Emacs with a real programming language, Emacs Lisp?
Well, sometimes we have to exist briefly in the world outside of Emacs, and use
Emacs as if it were a tool like AWK or sed(1); after all, Elisp is a much more
powerful programming language than either of those. Additionally, you may want
to automate some of your Emacs tasks via a build automation tool like make(1); I
do that to automate the building of this book; see the Colophon. Table
34 lists some of the options useful for this sort of thing.
These options take effect in the order given, which can be significant.
| Option | Long Option | Action |
|---|---|---|
-batch |
--batch |
run in batch mode |
-l FILE |
--load=FILE |
Load an elisp file |
-L DIR |
--directory=DIR |
add DIR to load-path |
-f FUNC |
--funcall=FUNC |
call function named FUNC (with no parameters) |
--eval=EXPR |
evaluate elisp expression | |
--script FILE |
run Elisp from FILE in batch mode | |
--kill |
exit Emacs unconditionally |
-batch puts Emacs into batch mode, which means it won’t fire up any sort of
interactive display: it will just process the remaining command line options,
and then exit. It implies -q and is usually used with some combination of -l,
-f, or --eval.
The --eval option evaluates an arbitrary Elisp expression. This example is a
homemade variation on the --version option:
emacs -batch --eval '(message "%s" (emacs-version))'
Most Emacs functions aren’t designed for command-line use, though: they use
Buffers rather than simply printing text to the standard output. But it’s easy
to write Elisp functions suitable for the command-line: you might collect some
in a file that you can load with -l and then invoke a function in it with -f.
But if you’re going this far, you might as well write a proper Elisp script, for
which the --script option is handy. Here’s a dumb Emacs script that counts
words in the files named on the command line:
#!/usr/bin/emacs --script
(dolist (file argv)
  (with-temp-buffer
    (insert-file-contents file)
    (message "%s: %s words" file (count-words (point-min) (point-max)))))
ADDITIONAL TOPICS
Completion at Point
Up to now, when we’ve talked about completion we’ve been talking about it in the Minibuffer. But we can also do completion in any buffer, at Point. This might be familiar from the way IDEs complete keywords and symbols for various programming languages, and Emacs Major Modes for programming languages do this too; see Pop-up Menu Completion. But Emacs also does this for ordinary text in any buffer, and it’s an amazing feature, called dynamic abbreviation expansion or Dabbrev for short249.
Dynamic Abbrevs
As you begin typing a longish word that you know or just suspect you’ve typed
before, hit M-/ (dabbrev-expand) after the first few
characters and the word will complete (or expand) in place. For example, I just
typed “char” and M-/ expanded it to characters — exactly what I wanted.
If that wasn’t the word I wanted, I would just have immediately hit M-/ again,
and it would have changed the completion to another word starting with “char”:
in my case, one of character, charts, or charlie. Why? Because those are all
the words that start with “char” that I’ve used in this book.
More M-/’s would cycle through all the words that match; I just stop when I get
to the one I want.
The completion candidates are selected from the preceding words in the buffer, sorted so that the first one offered is the nearest preceding matching word; the next would be the second-nearest, and so on.
If I keep cycling after rejecting the match that’s closest to the beginning of the buffer, or if there’s no matching preceding word at all, then candidates will be offered that are ahead of me in the buffer (again in the order of closest to farthest).
Suppose my buffer contains just this one line; I’ve just typed “com” and Point
is indicated by |:
completely completeness completer com| completes completest completing completion
What is the sequence of completions offered up by a repeated series of M-/’s?
The first completion offered is completer, followed by completeness and
completely. We’ve hit the beginning of the buffer, so the next M-/ would offer
completes followed by completest, completing, and completion.
What happens if, having rejected the last match in the buffer, we hit yet
another M-/? Aha! In that case, M-/ proceeds to look for matches in
other buffers! This almost makes it seem like M-/ can read your mind, and the
effect and usefulness of this increases the more buffers you have.
By default, M-/ will only examine other buffers that have the same Major Mode,
so that if you’re editing poetry in latex-mode, say, it won’t offer you the
names of variables and functions from your buffers full of Elisp code. But if
these same-mode buffers don’t have any candidates, it will then consider all
types of buffers.
You can fine-tune this to make it behave exactly the way you like via
M-x customize-group RET dabbrev; see “Dynamic” in the Emacs manual.
The tricky part of Dabbrevs is, how many characters do you type before hitting
M-/? If you type too few, you could get so many candidates that it might take
you ten times as long to cycle to the one you want as it would to just retype
the word. But even one character could be okay if the word you want is long and
you just typed it a line or so ago. If you don’t seem to be getting what you
want after a few tries, just Undo and either type the whole thing, or try
C-M-/ (see Dabbrevs via Menu).
Once you get used to M-/, you’ll develop a sort of automatic ability to know
when to use it, and it will both dramatically speed up your typing, and reduce
the number of typos you enter.
You can also complete a sequence of words. Suppose you’re writing about your
favorite Czech composer250 and need to type his name again. You type “Le” and then
M-/ completes “Leoš”; now immediately type SPC M-/ and his last name, “Janáček”
appears (this is assuming that you have his full name, “Leoš Janáček”, somewhere
in your Emacs). You can keep typing SPC M-/ to add more words: in general, you
can complete an n-word sequence, possibly containing some very long words, in
about \(n \times 2\) keystrokes via a long sequence of SPC M-/’s, though frankly I’ve
probably never used this technique for more than two or three words.
Dabbrevs via Menu
There’s another command to do completion at Point sort of indirectly, via your preferred completion framework. (I would say this is not worth using unless you’ve set up an INF like Vertico or Ivy, or are happy using the mouse.)
Type a partial word but this time invoke
C-M-/ (dabbrev-completion). Instead of instant completion at
Point with the first candidate, and the need to cycle through them, you’ll be
presented with a complete list of candidates using whatever interface your INF
uses (Ivy will use a pop-up menu, Vertico the Minibuffer).
I don’t use this as often as M-/ but it’s sometimes handy.
Hippie Expand
If Dabbrev isn’t fancy enough for you, you can use Hippie Expand. Hippie works
exactly like M-/ (dabbrev-expand), except it chooses from a
much wider range of sources of candidates. One of the sources is simply
dabbrev-expand itself, but it can also expand filenames, entire lines,
parenthesized lists, kills from the kill ring, etc. You can customize which
sources you want to use and in what order. Most people that use Hippie just
bind it to M-/ in place of dabbrev-expand, but you can use a different binding
in order to have access to both. (The one thing Hippie can’t do is expand
sequences of words the way Dabbrev can.)
The only problem with Hippie Expand is that there are so many candidates it can
offer, what you get can seem like a crap shoot. Really, I think it would be
more useful if it offered completions the way dabbrev-completion does
(implementing that would be a fun project).
But it’s quite amazing, and I bind it to M-/ to replace dabbrev-expand; try it
and see what you think!
Pop-up Menu Completion
There’s also pop-up menu completion. This form of completion-at-Point is primarily for completing symbols—e.g., the names of variables, functions, and the like—in programming language modes, though it’s more general than that. There are two main frameworks to choose from, and either needs to be installed from the Package Manager: Company and Corfu.251 Candidates for completion can come from many sources, some built-in and most from optional back-ends, so that besides symbols for a programming language, you can complete email addresses, dictionary words, and Unicode math symbols and emojis by name, among others.
Corfu is modern, clean, and “standards compliant”, meaning it uses the official Emacs APIs to get its completion candidates, whereas Company instead uses its own backends—but then, there are 75 of them in the Package Manager. One disadvantage of Corfu is that it only works in a graphical-mode Emacs.
Both work roughly the same way: as you type the name of a symbol, a menu of
completions pops up at Point, either automatically or upon a keystoke, as you
prefer; you scroll to the completion you want (with TAB or some other key), and
hit RET to accept and expand it at Point. For some symbols, a one-line
description will appear in the Minibuffer. You can see from Figure
36 and Figure 37 that they look similar: here I’m in Emacs
Lisp Mode and have started typing the name of function: at the point at which
I’d typed “with-s” and paused for a fraction of a second, I get the menu.

Figure 36: company-mode in an Emacs Lisp buffer

Figure 37: corfu-mode in an Emacs Lisp buffer
In my opinion, popup-menu completion doesn’t really do too much for you that
Minibuffer completion doesn’t—except for automatically insinuating itself as
you type, if you choose that mode of activation—assuming you’re using a good
Incremental Narrowing Framework, but your mileage may vary. Without popup
completion, you can just invoke M-TAB (complete-symbol)
(which is the same as C-M-i) and complete the symbol in the Minibuffer; see
Figure 38.

Figure 38: complete-symbol in an Emacs Lisp buffer
Since you get to use all the narrowing features of your preferred Minibuffer
completion framework, I prefer plain old complete-symbol to popup completion.
If you want to try popup completion, I guess I would recommend Company; just add this snippet to your Init File:
(unless (package-installed-p 'company)
  (with-demoted-errors "%s"
    (unless package-archive-contents
      (package-refresh-contents))
    (package-install 'company)))
(add-hook 'prog-mode-hook (lambda () (with-demoted-errors "%s" (company-mode))))
Registers
When you’re working in Emacs, you might save a lengthy chunk of text in the Kill
Ring so that you can yank it back in several different places with a simple
C-y (yank). The Kill Ring can hold many distinct chunks, but
they’re all anonymous and get pushed deeper into the Ring with each new thing
you kill (and if you kill enough text, the oldest items will disappear from the
Kill Ring). It would be nice to be able to give certain chunks of text names so
that you can easily remember how to access each of them.
Almost every programming language has the notion of a named variable that you can set to some value for convenient reuse, and you could use Emacs Lisp variables for this purpose, but Elisp is verbose and you need to understand the subtleties of the language to use it.
So Emacs offers Registers: special
purpose named variables that can hold not just text, but a variety of things
that you might want to hang on to and eventually get back. The name of a
Register is limited to a single character: any ASCII character except for * or
C-d (which have a special interpretation). Most people stick to letters
(Register a is different from Register A) and digits. (See below for naming tips.)
For each type of thing you can store, there’s a command to set the content of
the Register, and a command to get the content. There are only two getters:
C-x r i (insert-register) serves for Register types whose
content gets inserted in a Buffer, and
C-x r j (jump-to-register) serves for those types that hold
something that you in some sense jump to.
| Type | Set | Get | Contents |
|---|---|---|---|
| Text | C-x r s |
C-x r i |
an arbitrary blob of text |
| Number | C-x r n |
C-x r i |
a number |
| Rectangle | C-x r r |
C-x r i |
a rectangle |
| Position | C-x r SPC |
C-x r j |
location of Point in this Buffer |
| Window Config | C-x r w |
C-x r j |
Windows layout of the current Frame |
| Frame Config | C-x r f |
C-x r j |
the layout of all your Frames |
| Keyboard Macro | C-x C-k x |
C-x r j |
the most recent Keyboard Macro |
Register Preview and Contents
Whenever a Register command prompts you for a Register name, it displays a
transient Buffer that contains a preview of the contents of all defined
Registers, as an aide memoire. You can see this preview252 at any time with
M-x list-registers. Because a Register can contain a huge amount of
text, the content can be truncated in these previews. If you want to see the
entirety of the value in a Register, use M-x view-register.
Registers are global data structures (not Buffer Local), so that they can be used to move things from one Buffer to another.
Text in Registers
The set command for text is C-x r s (copy-to-register) or its
alias C-x r x. It prompts you for a Register name and then
stores the text between Point and Mark (i.e., the Region) in that Register. With
a prefix argument, it deletes the text from the Buffer after storing it (you can
think of this as moving the text from the Buffer into the Register).
The get command for text is C-x r i (insert-register) or its
alias C-x r g; it inserts the value into the Buffer at Point.
You can append or prepend text to a Register with
M-x append-to-register and M-x prepend-to-register; see
“Text Registers” in the Emacs manual.
Numbers in Registers
There is a special set command for numbers because you can use a proper number in a
Register as a counter; C-x r + (increment-register) will add
\(1\) to the current value of the Register (or some other increment, if given as a
prefix argument). This can be useful for Keyboard Macros in which you need to
count more than the one thing that the built-in Macro Counter can count.
Rectangles in Registers
C-x r r (copy-rectangle-to-register) saves a rectangle to a
Register, and C-x r g inserts it into a Buffer. See Rectangles for details.
Buffer Positions in Registers
You can store the position of Point in the current Buffer in a Register, with
C-x r SPC (point-to-register), which has the aliases
C-x r C-SPC and C-x r C-@. The get command for
positions is C-x r j (jump-to-register), which takes you
directly to that saved location. The Buffer itself is recorded along with your
position, so you can jump from one Buffer to another.
File- and Buffer Names in Registers
You can also store a filename in a register, in which case C-x r j will actually
do a find-file for you (if the file is already in your
Emacs, it will jump to its Buffer). But strangely, there’s no set command to
store a filename in a Register253: the
Manual says to use Elisp. As of
v29.1, you can now jump to a Buffer named in a register, but just as with
filenames, there’s no command to store one, though again it’s easy to write one.
So I’ve defined the missing function; I put it on C-x r C-f.
(defun kw-filename-to-register (filename register)
  "Store a filename in a register.
Interactively, if a prefix arg, prompt for FILENAME.  With no
prefix arg, use `ffap-file-at-point' to get the filename at point; if
that fails, use the buffer file name; if there is none, prompt for the
filename.  Reads the REGISTER using ‘register-read-with-preview’."
  (interactive
   (let ((filename
          (if current-prefix-arg
              (read-file-name "Filename: ")
            (or
             (progn
               (require 'ffap)
               (ffap-file-at-point))
             (buffer-file-name)
             (read-file-name "Filename: ")))))
     (list
      filename
      (register-read-with-preview
       (format "Filename %s to register: " filename)))))
  (set-register register `(file . ,filename)))

(keymap-global-set "C-x r C-f" 'kw-filename-to-register)
But if the idea of giving short names to a variety of files that you visit frequently seems appealing, you should probably check out Bookmarks instead.
Window and Frame Configurations in Registers
As discussed in Window Configurations,
C-x r w (window-configuration-to-register) will store your
current Frame’s Window Configuration in a Register, and
C-x r f (frameset-to-register) will save your Frame
Configuration (i.e., all your Windows in all your Frames). In both cases,
C-x r j will restore it.
Keyboard Macros in Registers
You can save the most recently defined Keyboard Macro in a Register with
C-x C-k x (kmacro-to-register) and invoke it with C-x r j.
Why would you do this when you can assign Macros to keys in the C-x C-k keymap
with C-x C-k b (kmacro-bind-to-key)? The main advantage is
that desktop-save-mode will save any Macros in Registers for future Emacs
sessions without any extra work on your part, while preserving C-x C-k b
bindings requires the extra steps described in Naming and Binding Your Macros.
Saving Your Registers
You can automatically save the contents of all your Registers for future sessions with the highly recommended Desktop Save Mode.
I have many Registers that have each retained their contents for years and I use them regularly; they all have mnemonic alphabetic names. But I regularly also need transient Registers that I definitely don’t care about maintaining forever. I need short-term mnemonic names but don’t want to accidentally clobber one of my “permanent” Registers. What to do?
My solution is to use control characters for the names. So for example,
Register k contains:
call_kb(key="",cmd="")
(a snippet of Org Mode code that I’ve used in this book hundreds of times), so when I
temporarily need a Register to hold a blob of text about, say, koalas, I might
use C-k as the Register name.
Rectangles
Programmers and system administrators often need to edit files of rigidly structured text, organized at least partially into columns. It can be very useful to be able to add, delete, or modify a rectangular chunk of such text, and indeed Emacs has a suite of commands to do so. But how do you indicate such a chunk?
A Rectangle is just a special interpretation of the usual Region. Normally, the Region is the linear sequence of characters (counting newlines as ordinary characters) between Point and Mark, as in Figure 39.

Figure 39: A Linear Region
But the Rectangle commands interpret the exact same Region rectangularly, as in Figure 40.

Figure 40: A Rectangular Region
Once we’ve defined a Rectangle we can easily do things to it, like say blank it out with one keystroke (Figure 41).

Figure 41: A Rectangular Region, Blanked
To work with a Rectangular Region, just set the Mark at any of the four
potential corners of the Rectangle, then move Point to the diagonally
opposite corner. At this moment, the ordinary linear Region has been defined
and will look (if you activate it with the usual
C-x C-x (exchange-point-and-mark)) like Figure
39. To switch the interpretation to rectangular, do
C-x SPC (rectangle-mark-mode), and you’ll see something like
Figure 40. (Alternatively, you can sweep out the Rectangular
Region with C-M-mouse-1 (mouse-drag-region-rectangle).)
With the Rectangular Region activated, Point is fixed to one of the four
corners. You can grow or shrink the Rectangle in any of the four cardinal
directions with ordinary motion commands (such as
C-f (forward-char), M-b (backward-word),
<down> (next-line), or whatever). Whether the Rectangle
grows or shrinks depends on the direction of the motion relative to the location
of Point.
You can cycle Point around the corners with repeated invocations of
C-x C-x, which, when the Rectangular Region is activated, is
rectangle-exchange-point-and-mark. If Point is at the
upper- or lower-right corner, rightward motion will grow the Rectangle to the
right, and leftward motion will shrink it to the left, for example.
In addition to the motion commands, commands that kill or copy the Region, like
C-w (kill-region) and
M-w (kill-ring-save), will operate on the Rectangle, and so
will commands that modify the text in the Region, like
C-x C-u (upcase-region).
To deactivate the Rectangular Region, just use
C-g (keyboard-quit).
Inactive Rectangular Regions
The motion and Region-manipulating commands described above only have their
special Rectangular interpretation when the Rectangular Region is activated.
But as you know, if the Mark is set in your Buffer, there is a Region present,
even it isn’t activated. The same is true of the Rectangular Region: if there’s
a Mark, there’s an implied Rectangle, and there is a set of explicit Rectangle
commands (see Table 36) that will operate on it whether
you activate it with C-x SPC or not (you might prefer to
activate it just so the precise extent of your Rectangle is more obvious).
| Key | Action |
|---|---|
C-x r c |
Clear rectangle (overwrite with spaces) |
C-x r d |
Delete rectangle |
C-x r k |
Kill rectangle |
C-x r y |
Yank previously killed rectangle |
C-x r o |
Open rectangle (shift rectangle right) |
C-x r t |
replace Text of rectangle |
C-x r N |
Number rectangle’s lines |
C-x r r |
copy rectangle to Register |
C-x r c changes every character in the Rectangle to a space,
“clearing” it (as in Figure 41).
C-x r o on the other hand opens up a new rectangular space where
you’ve marked your Rectangle, but preserves the original text of the Rectangle
by shifting it to the right (that includes all the text to the right of the
original Rectangle too).
Deleting or killing the Rectangle actually eliminates all the characters
contained in the Rectangle, rather than converting them to spaces as C-x r c
does, thus squashing the Rectangle out of existence and shifting all the text to
right of it leftward. If you use C-x r d (delete-rectangle),
the text of the Rectangle is gone forever254, but if you use
C-x r k (kill-rectangle) you can later yank the Rectangle
back with C-x r y (yank-rectangle).
C-x r t is probably the Rectangle command I use the most: it
replaces the text of the Rectangle with new text: you’re prompted for a new
single line of text, and that line replaces the text of each of the Rectangle’s
lines. Consider this list of some of my favorite drummers:
+ Chris Cutler
+ Max Roach
+ Tatsuya Yoshida
+ Christian Vander
I can change all the plus signs to bullets by setting a one-character-wide
Rectangle containing the column of pluses, and then executing C-x r t •.255 The
result will be:
• Chris Cutler
• Max Roach
• Tatsuya Yoshida
• Christian Vander
The new text doesn’t have to be the exact same width as the Rectangle; if instead I used the string “Drummer” the result would be:
Drummer Chris Cutler
Drummer Max Roach
Drummer Tatsuya Yoshida
Drummer Christian Vander
Old- and New-School Rectangle Commands
The commands in Table 37 were necessary before the
invention of the Rectangular Region in 2014, and of course you can still use
them, but if you’re activating the Rectangular Region via
C-x SPC you can use the easier commands discussed above.
| Key | Inactive Rectangular Region | Active Rectangular Region |
|---|---|---|
| (Old School) | (New School) | |
C-x r k |
Kill rectangle | C-w |
C-x r d |
Delete rectangle (not yankable) | C-w (yankable) |
C-x r M-w |
copy rectangle to Kill Ring | M-w |
C-x r y |
Yank rectangle | C-y |
Empty Rectangles
If you set the Mark, and then move point directly downward say four lines with
C-n (next-line), you have created an empty Rectangle with a
width of zero columns which is four lines in height. Such empty Rectangles are very
useful! If you’ve typed in my list of drummers without any kind of bullet:
Chris Cutler
Max Roach
Tatsuya Yoshida
Christian Vander
then you can add the bullets by defining an empty Rectangle extending vertically
from in front of the “C” of Chris Cutler down to the “C” of Christian Vander,
and then using C-x r t to insert the bullets.
Yanking Rectangles is Subtle
When you yank back a previously killed Rectangle with
C-x r y (yank-rectangle), the lines of the Rectangle are
inserted into the Buffer with Point being the upper-left-hand corner of the
inserted text.
If I have previously killed a 3-line Rectangle consisting of hyphens, and I position Point right before the space in the first line of this block of text:
XXXXXXXX XXXXXXXXXXXXXXXXXXXXXXXXXXXXXXXXXXXXXXXXXXXXXXXXXXX
XXXXXXXXXXXXXXXXXXXXXXXXXXXXXXXXXXXXXXXXXXXXXXXXXXXXXXXXXXXX
XXXXXXXXXXXXXXXXXXXXXXXXXXXXXXXXXXXXXXXXXXXXXXXXXXXXXXXXXXXX
XXXXXXXXXXXXXXXXXXXXXXXXXXXXXXXXXXXXXXXXXXXXXXXXXXXXXXXXXXXX
and then I say C-x r y (yank-rectangle), the result might
look like this:
XXXXXXXX----- XXXXXXXXXXXXXXXXXXXXXXXXXXXXXXXXXXXXXXXXXXXXXXXXXXX
XXXXXXXX-----XXXXXXXXXXXXXXXXXXXXXXXXXXXXXXXXXXXXXXXXXXXXXXXXXXXX
XXXXXXXX-----XXXXXXXXXXXXXXXXXXXXXXXXXXXXXXXXXXXXXXXXXXXXXXXXXXXX
XXXXXXXXXXXXXXXXXXXXXXXXXXXXXXXXXXXXXXXXXXXXXXXXXXXXXXXXXXXX
Note how yanking shoves the characters to the right, rather than replacing any of them. To instead achieve this result:
        -----
        -----
        -----
XXXXXXXX XXXXXXXXXXXXXXXXXXXXXXXXXXXXXXXXXXXXXXXXXXXXXXXXXXX
XXXXXXXXXXXXXXXXXXXXXXXXXXXXXXXXXXXXXXXXXXXXXXXXXXXXXXXXXXXX
XXXXXXXXXXXXXXXXXXXXXXXXXXXXXXXXXXXXXXXXXXXXXXXXXXXXXXXXXXXX
XXXXXXXXXXXXXXXXXXXXXXXXXXXXXXXXXXXXXXXXXXXXXXXXXXXXXXXXXXXX
you would need to first, before yanking, open up three blank lines (perhaps with
C-u 3 C-o (open-line)) and insert eight spaces on the first
of them to position Point where you want it horizontally.
C-o is very handy when yanking Rectangles. Rather than counting precisely,
you can often give it a big numeric argument to open more lines than you’d need,
say, with C-u C-u C-o to get sixteen blank lines, yank your Rectangle, and then
close up the extraneous blank lines with a couple of
C-x C-o (delete-blank-lines)’s.
Bookmarks
Emacs Bookmarks are a sort of generalization of Filename Registers, but they come with long names, some additional commands, and a Major Mode for browsing and maintenance. Most of us have a set of files, located all over the file system, that we visit on a regular basis: Bookmarks are the way to manage them, and they automatically persist across Emacs sessions256.
Bookmarks were probably originally designed as a way to save your position in a file, just like a physical bookmark does in a physical book: they let you open up a file at the exact point that you were last reading (or editing).
But for this aspect of Bookmarks, save-place-mode works
better. If you enable it in your Init File (and I recommend you do), every time
you open any file, Point will be set to the position it had when you last saved
the file.
(save-place-mode +1) ; come back to where we were in that file
The main Bookmark commands share the C-x r prefix with the Register and
Rectangle commands. and basic usage is quite straightforward:
| Key | Action |
|---|---|
C-x r m |
set or update a bookMark NAME here |
C-x r M |
set a new bookMark NAME |
C-x r b |
jump to Bookmark NAME |
C-x r l |
pop up List of all bookmarks |
M-x bookmark-insert |
insert contents of bookmarked file |
M-x bookmark-insert-location |
insert filename of bookmarked file |
When you set a Bookmark with C-x r m you’ll be prompted for a name, which is an
arbitrary string (not just a single character like a Register); typing C-w’s at
the prompt will slurp up words from Point to use as the name. The default name
will be the Buffer’s filename257. You can only bookmark files or
directories (C-x r m will work in a Dired Buffer), so you’ll get an error if
you’re in a Buffer that’s not visiting a file. Note that you can bookmark
remote Tramp files and directories: extremely useful, and there’s special
support for bookmarking chapters of Info documentation.
Each Bookmark records not only the file, but the current location of Point. You can have several Bookmarks pointing to different locations in the same file, but you’ll want to give them distinct names so you can keep them straight.
If you have a Bookmark, and you invoke C-x r m at a different location in the
same file, Emacs will update the Bookmark to reflect the new location of Point.
With a prefix arg C-u C-x r m will update the Bookmark but rather than
discarding the old location, will shadow it: when you delete the Bookmark, the
previous location will be restored. Effectively, with C-u you can push any
number of new locations on a stack and pop them off later.258
I say that a Bookmark records the value of Point, but actually it also stores some of the file’s text before and after Point, so that if the file changes slightly, Emacs can restore your location with more accuracy.
C-x r M is just like its lowercase sibling, except that it will refuse to update
an existing Bookmark.
Jumping to a Bookmark is as easy as C-x r b: just type the name and go. With a
good Completion enhancement like Marginalia you’ll get some useful extra
context.
With M-x bookmark-insert, you can also insert the complete contents
of a Bookmarked file into the current Buffer at Point; this is like
C-x i (insert-file) except you use the Bookmark name rather
than the complete filename. M-x bookmark-insert-location inserts
just the filename of the named Bookmark.
Bookmark Maintenance with the Bookmark Menu
C-x r l (bookmark-bmenu-list) pops up the Bookmark Menu
Buffer, a two-column listing of all your Bookmarks; it might look something like this:
% Bookmark     File
  Inbox.org    ~/notes/syncthing/Inbox.org
  Web Space    /ssh:example.com:/home/login/web
  backdrops    ~/images/backdrops/DB
  books        ~/books/2022.db
This Buffer works much like Dired or Buffer Menu, so you can probably start
using it without any explanation: hit RET on a line to jump to that Bookmark, d
to flag a Bookmark for deletion, and x to execute your deletions.259 Here’s
a subset of the truly Bookmark-specific commands; as always, you can use
C-h m (describe-mode) to see the expected Special Mode
commands for scrolling, opening your Bookmarks in the usual Window and Frame
variants, marking lines to open several in one go, limiting to matching
Bookmark names, and the like.
| Key | Action |
|---|---|
r |
Rename this bookmark (same file, new name) |
R |
Relocate this bookmark (same name, new file) |
k |
Kill this bookmark immediately |
d |
flag (with D) this bookmark to be Deleted |
x |
eXecute deletions of bookmarks marked with d |
a |
show the Annotation |
A |
show All annotations |
e |
Edit (including create) the annotation |
Bookmark Annotations
Bookmarks can have simple annotations attached to them; Bookmarks with
annotations are marked with an asterisk (*) at the left. From the Bookmark
Menu, use the a command to display this line’s annotation in a pop-up Window (A
will show all of them). To create or edit an annotation, use the e command.
Since a Bookmark is specific to a particular location in a file, you could theoretically annotate many lines by creating many Bookmarks, but practically speaking, the Bookmark Menu interface isn’t really up to this task. There are third-party packages that handle this properly.
Abbreviations
Most forms of completion are about making it easy for you to choose from a set of candidates, but Emacs also has a system known as Abbrevs in which a short, user-defined abbreviation, at the moment you type it, automatically expands to something (usually) much longer.
The great thing about Abbrevs is that they happen instantaneously without your having to type so much as a single extra keystroke to invoke a completion command: they just magically expand as you’re typing! Suppose you’re writing about Transylvanian cuisine and find yourself typing “Székelykáposzta” a lot. You might like the Abbrev “sk” to expand to that word, properly capitalized, so that when you type “Cooking sk is easy”, the Abbrev expands right after you type “sk”, the result being “Cooking Székelykáposzta is easy”.
Of course there’s a flip-side. Unlike completion patterns, you have to define the Abbrevs you want to use, and, since they expand magically, they might occasionally expand when you don’t want them to.
Let’s try it. First, in some writable Buffer, you need to enable the Minor Mode
abbrev-mode with M-x abbrev-mode. This is a Buffer Local
Minor Mode, so it will only apply to the current Buffer.
Next, you have to define yourself an Abbrev. You might decide to do this after you’ve
typed some long or tricky-to-spell word enough times that you notice you’re sick of
doing it, so the expansion is right there in the buffer, to the left of Point. Before
typing any further, give the expansion an abbreviation with
C-x a l (add-mode-abbrev). This command defines an Abbrev
for the word immediately before Point. It prompts for the abbreviation:
Mode abbrev for "Székelykáposzta": sk
That’s it! Now “sk” will expand to Székelykáposzta in this Buffer.
Actually, as the name add-mode-abbrev suggests, it will expand in all buffers
that are in the same Major Mode and in which you’ve turned on abbrev-mode. If
this buffer is in Org Mode, then “sk” is “Székelykáposzta” in all your Org Mode
buffers, until you either change your mind and undefine it or until you end your
Emacs session.260
You can also define global abbrevs that work everywhere abbrev-mode is enabled,
regardless of the Major Mode, with
C-x a g (add-global-abbrev).
The mnemonics for these keystrokes, then, are:
C-x a l- Abbrev, Local (to Mode)
C-x a g- Abbrev, Global
Both C-x a l and C-x a g take, as the expansion text, the text from Point
backwards to the beginning of the previous word. This means that if you type
the expansion “foo ”—note the space after the word and before Point—the
expansion will include the space, and also any trailing punctuation; this will
be clear from the prompt. For maximum flexibility you typically don’t want
trailing spaces or punctuation in your expansion text.
Multi-Word Expansions
What do you do if you want your expansion text to include multiple words? I
might want an Abbrev for the name of my workplace, The University of Chicago,
for example. With Point after Chicago, I can use a numeric argument of 4 like
so: C-u 4 C-x a l. I could also put the Region around the expansion text and
use a numeric argument of zero: C-u 0 C-x a l261 These numeric arguments work
identically for the global command C-x a g.
You can also define Abbrevs the other way around, by typing the Abbrev in the buffer and
then using either C-x a i l (inverse-add-mode-abbrev) or
C-x a i g (inverse-add-global-abbrev). This way you never
have to count the words in your expansion.
All these defining keystrokes seem to be designed for people who are constantly
adding Abbrevs on the fly as they type at speed, but for me this only happens very
occasionally. So I think the easiest way to define an Abbrev is with
M-x define-mode-abbrev and M-x define-global-abbrev.
These commands prompt you for both the expansion and the abbreviation in the
Minibuffer, so there’s no counting or Region-setting.
Abbrevs and Case
The case of the letters you use in typing an Abbrev control the case of the letters in the expansion in a manner analogous to the way case works in Isearch. If you’ve defined “wa” as an abbreviation for “wallabies”, typing “Wa” instead of just “wa” will expand to “Wallabies” and “WA” will expand to “WALLABIES”.
Unexpanding Unhappy Expansions
What do you do if an Abbrev expands when you don’t want it to? First, you should choose unlikely abbreviations to minimize this problem: if you write primarily in English, maybe don’t chose “the” as your abbreviation for “Transportable Helicopter Enclosure”. But there are certain circumstances when even the unlikeliest of Abbrevs will expand when you don’t want them to.262
When exactly do Abbrevs expand? When you’ve enabled abbrev-mode, Abbrevs are
checked for every time you type a non-word-constituent character, that is, any
character that the current Major Mode doesn’t consider to be a part of words.
Typically that’s whitespace and punctuation. So when you type “The End.”, as
soon as you type the space, abbrev-mode checks the preceding word (“The”) to see
if it’s an Abbrev, and if so it expands it. Then when you type the period after
“End”, it checks to see if “end” is an abbrev, and so on.
This means that you might get an unwanted expansion. This is especially common
when you’re briefly typing in a domain specific language in your otherwise
straight natural language prose. Suppose I need to type a URL in my Transylvanian
cooking text, and the URL includes an innocent “sk” between punctuation
characters, like https://example.com/d7/sk/45/d0/ — I would end up with
https://example.com/d7/Székelykáposzta/45/d0/! This can also come up with
snippets of HTML, say, or examples from some programming language.
There are two solutions. One is, as soon as you see the unwanted expansion,
Undo it. This will lose you the punctuation character that caused the expansion
— a slash, above — so then add the slash back by quoting it with
C-q (quoted-insert) i.e. C-q /. quoted-insert prevents
abbrev-mode from expanding the Abbrev. If you’re thinking ahead you can
obviously skip the Undo part.
Another solution is to use M-x unexpand-abbrev, which does just what
it says; you’ll still need to use quoted-insert to get the punctuation back.
A real downside is that you might be typing quickly and not notice the
expansion! Now you have an error: this is the same reason your SMS text
messages are full of embarrassing typos, and is the reason I don’t really use
Abbrevs very much. I prefer Dynamic Abbrevs: if I’m typing Székelykáposzta
often enough, it’ll be sure to complete easily with M-/.
Prefixed Abbrevs
The inverse of unwanted expansions is wanted expansions that don’t happen. Suppose you’ve defined “bac” as an Abbrev for “bacterial”, and you expect that when you type “antibac ” it will expand to “antibacterial”. But of course it doesn’t, because the word preceding the space isn’t “bac”.
You can solve this with M-' (abbrev-prefix-mark). Just type
“anti” M-' “bac” and then space; when you type M-' Emacs will insert a hyphen,
but this is a magic hyphen, and when you hit the space, “anti-bac” will expand
to “antibacterial” (and the hyphen disappears).
Turning abbrev-mode on in Your Init File
Unlike many modern Minor Modes, abbrev-mode doesn’t have a global-abbrev-mode
version, so if you want it on in all the Major Modes you use, you’ll have to
enumerate them in your Init File. The easiest way is probably to use one or
both of these two hooks:
(add-hook 'text-mode-hook 'abbrev-mode)
(add-hook 'prog-mode-hook 'abbrev-mode)
Most texty Major Modes inherit from text-mode, just as most
programming language modes inherit from prog-mode. If you
don’t want it everywhere, just add it to the hook for any Modes you want; see Hooks.
Listing and Editing Abbrevs
You can see all the Abbrevs that you’ve defined with
M-x list-abbrevs. They’re grouped by Major Mode and will
include a special entry for the Global Abbrev Table. Most definition lines will
look like:
"sk" 32 "Székelykáposzta"
You can edit any of these lines to tweak or add new Abbrevs. The number in the
middle is a count of how many times you’ve used that Abbrev, which can be
helpful if you decide to clean some of them up. You can also delete lines to
delete the definition. After making any such changes,
C-c C-c (edit-abbrevs-redefine) will update Emacs’s state to
reflect your changes. C-x C-s will save the buffer in a file that Emacs will
automatically load each time you start a session.
Saving Your Abbrevs
If you’ve defined any Abbrevs in a session, Emacs will ask if you want to save
them when you run C-x s (save-some-buffers), or when you
exit. When prompted for a filename to save them in, the default will be a file
in your Emacs Directory; Abbrevs in this file will be loaded and defined for you
when you start up Emacs.
Recursive Edit
One of the more unusual Emacs capabilities is what we call Recursive Edit; it refers to your ability to do full-on Emacs editing while you’re in the middle of doing Emacs editing. What?
Suppose you’re doing a Query Replace, which is a very structured sort of
editing: you’re stepping from one match to the next and at each stage, answering
a yes-or-no-question (replace this one, or not). It’s possible that in the
middle of this, you might need to look at some other part of the buffer, or some
other Buffer entirely, in order to decide between yes or no for one of the
matches. You could quit the Query Replace, and then restart it, but the normal
Emacs thing to do is enter a Recursive Edit—which, in a Query Replace, you can
do by using C-r.
The Recursive Edit is a way to leave the Query Replace frozen where you left it. You can then do any Emacs editing you like: you’re no longer just answering yes or no. You can scroll the Buffer, move to a different location, make a quick edit, change Buffers, send an email, or play a game of Tetris. Take as much time as you like, even days if you want (as long as you don’t exit Emacs).
It will seem as if you’ve quit out of the Query Replace, but really it’s just
waiting patiently for you to end your Recursive Edit, at which point your
windows will be restored to exactly what they looked like when you hit C-r, and
it will be waiting for you to answer the exact same yes or no question it was
asking you before your excursion.
The word recursion implies self-reference and nesting something within itself, as in the recursive acronym GNU, which stands for “GNU’s not Unix!”263. This is exactly what’s happening with a Recursive Edit: in order to let you do an arbitrary something in the middle of something else, rather then implementing a half-assed temporary-escape feature, Emacs does the simplest possible thing: it calls itself recursively to do the job. This simplest possible thing also happens to be the most powerful thing.
The only way you can tell you’re in a Recursive Edit is by peeking at the Mode Line. The section which displays Major and Minor Modes with parentheses will be wrapped in square brackets, like this:
U:@--- *scratch* All L1 Hg:94daf [(Lisp Interaction ElDoc)]
when you exit the Recursive Edit, the brackets will go away.
Since you can do anything while you’re in a Recursive Edit, that includes entering another Recursive Edit! If you do that, you’ll see another level of brackets in the Mode Line. The number of pairs of brackets indicates how deeply nested you are.
Besides Query Replace, you’ll find special key-bindings for Recursive Edit in
other highly-structured Emacs subsystems, like Keyboard Macros,
M-x ispell (see Spell Check), and the
Elisp debugger. But because Emacs is
very much a non-modal editor, there’s less call for special uses of this
powerful feature than you might think. If you’re doing file management in
Dired, or are the middle of editing a version control log message, you can just
switch Buffers, do something else, and come back later. This is even true when
you’re being prompted for information, as I described in The Minibuffer.
You can invoke a Recursive Edit manually whenever you want with
M-x recursive-edit, but I’m hard pressed to think of times when I’ve
wanted to do this.
Exiting a Recursive Edit
I encourage you to try a recursive excursion during your next Query Replace. But before you do, you need to know how to exit the Recursive Edit! There are three ways:
C-M-c(exit-recursive-edit)- exit the innermost Recursive Edit and continue where you left off (perhaps back in your Query Replace)
C-](abort-recursive-edit)- same as above, but also abort the command that gave you the Recursive Edit (perhaps your Query Replace)
M-xtop-level- abort all nested levels of Recursive Edit
If you ever happen to notice some square brackets around the mode information in
your Minibuffer, it might be because you accidentally entered a Recursive Edit,
or perhaps days ago you intentionally did so in a Query Replace but then changed
your mind entirely about it, and simply forgot to exit — you might even have
killed the Buffer in which you were doing the Query Replace! C-] is appropriate
in these situations, but C-M-c is the standard procedure.
A forgotten Recursive Edit rarely causes any problems — you could be working for weeks in one without even noticing — but you might as well clean them up when you discover them.
Visual Display and Color
Each character or span of characters in a Buffer can have any number of properties that can be used to change its Face (font, colors, underlining, slant, etc), directionality (left-to-right or right-to-left), spacing and line-height, margins, visibility, modifiability, and the like. Chunks of text of any size can have clickable actions or an entire menu associated with them and can change what a keystroke does when the cursor is at a particular location. Text can be displayed as glyphs (like emojis or icons) or full-blown images. All of this is done without any modification to the plain text of the Buffer’s visited file (if any) and so won’t interfere with or confuse external programs.
These facilities are used to build Emacs applications such as the Customize facility and Dired, and one generally needs to be an Elisp programmer to play with them, but here we’ll discuss some of the user-level commands that enable non-programmers to easily change the visual properties.
Fonts and Faces
Loosely speaking a computer font (hereafter, just “font”) is a packaging of a particular typeface design (think Helvetica), including variations in size, weight, slope, and the like. Your operating system comes with some fonts predefined, and you may have added many more via your OS package manager. More precisely, a font is one specific expression of a typeface, a weight, a slant, etc, such as “Helvetica 14 Bold”. I have 1,889 fonts installed on my system, which are all available to Emacs.
A Face is an Emacs concept: a combination of a font with any of the following additional attributes: Underline, Overline, Strike-through, Box around text, Inverse-video, Foreground (color), Background (color), or Stipple.264
Emacs predefines 150-odd different Faces, and packages can define and add many
more (my Emacs currently has 451). You can see a colorful listing
of all the currently defined Faces with M-x list-faces-display.

Figure 42: M-x list-faces-display
These Faces are used to present the typically colorful Emacs display of mode-specific syntax highlighting, hypertext links: really, everything, because in Emacs, all is text.
You don’t need to worry about specific Faces until you’re unhappy with one. If some Face in some mode rubs you the wrong way, you can easily change it; see Customize for more information.
Changing the Default Font
Most Faces are just customized versions of the default font265, and the default font is what most of your text will look like. You may want to change it from the default 10-point monospace font. As a programmer, I much prefer a monospace (fixed-pitch) font, but I like a specific one best and specify it in my Init File. You can do this yourself with something like this:266
(with-demoted-errors "%s"
  (add-to-list 'default-frame-alist '(font . "Helvetica 12")))
Changing Fonts on the Fly
The default font is Frame-specific; though there’s a default, you can change the
current Frame’s font on the fly with M-x set-frame-font; you can use
Completion to choose amongst all the fonts available on your system.
M-x menu-set-font provides a popup GUI dialog and changes the font
of all your existing and future frames (in the current Emacs session) in one go.
You can of course customize different fonts for different Major Modes and the like, and there are a number of third-party packages for working with fonts as well.
Text Scale: Changing the Font Size
Once you’ve chosen your default font, you probably won’t often feel the need to
change it on the fly, but you may well want to change the size from time to
time. You can increase the font size with
C-x C-+ (text-scale-adjust), which immediately embiggens the
font by the factor in text-scale-mode-step (default:
1.2), or decrease
the font size by the same factor with
C-x C-- (text-scale-adjust);
C-x C-0 (text-scale-adjust) will restore your default font
size.
You may have noticed that all these keystrokes are bound to the same function.
That’s because the text-scale-adjust function bases its behavior on the
keystroke that invoked it. Additionally, after it’s invoked, if any of the next
keystrokes in unbroken sequence are 0, +, or -,
ignoring any modifiers, the corresponding action is
invoked. In short, start with any of C-x C-0, C-x C-+, or C-x C-- and then you
can continue tweaking the font size with simple 0, +, or - keystrokes until you get what
you want — terminate this with any key that doesn’t involve 0, +, or -
( C-g (keyboard-quit) is always there for you).
Since for me, the first adjustment is always to enlarge the font, I bind
text-scale-adjust to the felicitous binding C-+ and start from there:
(keymap-global-set "C-+" 'text-scale-adjust) ; embiggen font
Themes and Colors
A theme is a named combination of Faces267 that broadly determines the overall look of your Emacs, especially the colors. Emacs predefines 23 Themes, and there are at least 340 more in the Package Manager, and many more on Github and the like.
If you’d like to change your Theme, just call M-x customize-themes,
which will display lines like:
[ ] wheatgrass -- High-contrast green/blue/brown faces on a black background.
[ ] whiteboard -- Face colors similar to markers on a whiteboard.
[ ] wombat -- Medium-contrast faces with a dark gray background.
Just check the box of the Theme you want and the Theme will be immediately
activated; check another box and it will switch to that theme; uncheck the box
to go back to Theme you were using before you started. Some Themes are subtle
and you might need to see them in a variety of different types of Buffers to
appreciate them. Third-party Themes you’ve installed from the Package Manager
will also be listed in this Buffer. After you’ve chosen the one Theme you like,
you can make it your default for future sessions: evaluate
C-x C-s (custom-theme-save) in the Customize Buffer.
Who creates all these Themes? Anybody, including you. If you want to try your
hand at it, run M-x customize-create-theme and answer “yes” to the
question:
Include basic face customizations in this theme? (y or n)
You’ll be taken to a special Customize Buffer where you can choose all the colors, fonts, and faces you want in your very own Theme, which you can save, make your default, and even give away to other Emacs users.
Colors
One of the most important parts of a Theme is its (presumably harmonious) color
choices. On my system, Emacs knows
752 named colors; you can
examine them via M-x list-colors-display (see Figure 43).

Figure 43: M-x list-colors-display
The Cursor
Every Window has a Point, which is indicated by a cursor. By default, the
cursor is a solid block in the currently selected Window, and a hollow block in
any other visible Windows. But you can change how the cursor is displayed if
you like. Customize the many aspects of the cursor with
M-x customize-group RET cursor. See
“Cursor Display” in the Emacs manual for more information.
By default, the cursor blinks, which drives me crazy; I turn it off in my Init File:
(blink-cursor-mode 0)
Emphasizing the Cursor’s Line
When I’m reading text with long lines, I sometimes lose my focus as I scan the
lines from left to right; it’s also an issue for me vertically with very tall
windows. To solve this problem, I invoke M-x hl-line-mode, which
changes the background of the entire line containing Point (i.e. the cursor) to
make that line stand out. As you move the Point from line to line, the
background emphasis follows along.
I turn this on automatically in many Major Modes that display lists of
things, like package-menu-mode,
occur-mode, and dired-mode via
Init File snippets like these:
(add-hook 'occur-mode-hook 'hl-line-mode)
(add-hook 'dired-mode-hook 'hl-line-mode)
(add-hook 'package-menu-mode-hook 'hl-line-mode)
Highlighting Text
By now you’ve noticed how colorful the typical Buffer is. Almost every Major
Mode does a certain amount of what we call fontification to apply Faces based on
the structure or syntax of the text. This is typically done by a Minor Mode
called font-lock-mode, which is enabled globally by
default. If you’re looking at a colorful Buffer right now, try saying M-x
font-lock-mode and you’ll be stunned to see all the colors disappear: you’ll be
staring at 100% monochrome text! This is what Emacs used to look like in the
70s. (Quick! Reinvoke that command to get your colors back!)
Fontification is mostly performed by Major or Minor Modes, so you have to be an Elisp programmer and Regular Expression wizard to do it. But there is a small collection of commands that allow you to fontify your text dynamically: we call this on-the-fly fontification highlighting.
Hi-Lock Mode
hi-lock-mode lets you highlight text that matches certain
patterns, to make occurrences of those patterns stand out dramatically. As a
programmer, I often use it to highlight the name of a function or variable in my
code so that all the uses jump out at me; you might also use it to highlight the
names of people or things in a document so that they stand out as you scroll
through. It looks rather like the highlighting of your search term that
Incremental Search does, but the Isearch highlights disappear as soon you
terminate your search: Hi-Lock highlighting sticks around until you turn it off.

Figure 44: Highlighting with M-s h
In Figure 44, I’ve highlighted all occurrences of the variable node
in pink. All the occurrences in the Buffer are pink, not just the ones visible
in the Window: as I scroll the Buffer, any node I see will be pink, and if I
type new text that contains node, that new node will immediately become pink as
well. In addition, I’ve highlighted a comment describing a bug in unmissable
yellow; all other comments that start with TODO BUG will also be lit up this
way. I consider Hi-Lock Mode an essential feature and use it all day long.
Note that these highlights don’t modify your text in any way. If you save your file, they won’t corrupt your program with hidden codes. On the other hand, if you want them to come back the next time you edit your file, you have to say so.
The Hi-Lock commands all live on the M-s h prefix; see Table
40.
| Key | Action |
|---|---|
M-s h . |
highlight symbol at Point |
M-s h p |
highlight a given Phrase |
M-s h r |
highlight text matching a Regexp |
M-s h l |
highlight entire Lines containing matches |
M-s h u |
Unhighlight a previous highlight |
M-s h f |
hi-lock-find-patterns |
M-s h w |
hi-lock-write-interactive-patterns |
The simplest command is M-s h . (highlight-symbol-at-point);
just invoke it and the symbol268 at Point, and all other occurrences of
that symbol in the Buffer, will be highlighted in yellow.
Actually, not always in yellow: the next Hi-Lock color will be used. Hi-Lock
has a default list of colors it uses; if you’ve already highlighted something
in yellow, it will use the next color to avoid a conflict. You can explicitly
choose your own color by giving M-s h . a prefix arg.
And as a matter of fact, Hi-Lock doesn’t highlight with colors: it uses Faces. You’ll recall that Emacs comes with 150 or so, and you can use any of them for highlighting.
Instead of highlighting the symbol at Point,
M-s h p (highlight-phrase) prompts you for a phrase: that is,
a sequence of words, and highlights matches. It ignores case and whitespace
distinctions when looking for matches. Of course you can use a one-word phrase,
which is like highlighting a symbol which doesn’t happen to be right at Point.
M-s h r (highlight-regexp) prompts you for a Regular
Expression and a Face, and then highlights all the matches, and
M-s h l (highlight-lines-matching-regexp) works the same way
except it highlights the entirety of any lines that contain the matches. This
is what I used in Figure 44 to highlight the Regexp TODO BUG.
Of course you can remove any of the highlighting you’ve applied, with
M-s h u (unhighlight-regexp). It will prompt you to select
one of the patterns you’ve used and it will eliminate that one. With a prefix
arg, it will remove all the patterns you’ve used in this Buffer.
I mostly use Hi-Lock transiently throughout the day. turning it on and off to enhance my focus as I work, but you can also set up persistent highlighting for a given file that will be automatically applied every time you visit the file.
Visualizing Whitespace
Whitespace—spaces, tabs, newlines, blank lines—is a big component of your text, but it can be an annoying component, mostly because it can be hard to tell these characters apart.269 Sometimes you don’t care about such subtle distinctions, but sometimes, depending on what kind of program will be consuming your text, you need to.
M-x whitespace-mode is a Minor Mode that can help by displaying the
various sorts of whitespace with a subtle (or not so subtle) differentiation.
In Figure 45 I’ve toggled it on.

Figure 45: M-x whitespace-mode
Spaces are shown as a centered dot in a gray background, which makes the excess spaces between “until” and “there” more noticeable; the space between “world” and “will” is a non-breaking space, and is shown differently. Newlines are shown as a gray dollar sign, and there’s a TAB character after the question mark shown as a right-pointing guillemet.
These are all pretty subtle, so that whitespace-mode isn’t too jarring to use.
But the trailing spaces on line 2 really stand out, as does the trailing blank line at the end of the Buffer, since these are considered to be always offensive.
You can use M-x customize-group whitespace RET to change these Faces
if you want them to be more or less noticeable.
whitespace-mode has a lot of options that you can customize, and you can also
interactively tweak them on and off in a given buffer with
M-x whitespace-toggle-options — type ? at the prompt.
If you want whitespace-mode on all the time in all your Buffers, you can use
M-x customize-variable global-whitespace-mode. Personally I only
occasionally turn whitespace-mode on, but it’s very handy when I need it.
However, I do want to always see trailing whitespace at the ends of lines, since
it annoys me and I want to clean it up. You don’t need whitespace-mode for
this; just do M-x customize-variable show-trailing-whitespace.
It’s easy to get rid of trailing whitespace when you notice it (as you will,
with this setting): M-x delete-trailing-whitespace will delete all
trailing whitespace in your Buffer, including all blank lines at the end of the
Buffer. If the Active Region is enabled, only the text in the Region is
processed. You could put this function in before-save-hook
so that these are cleaned up every time you save, but that’s a little too
helpful for my tastes.
Manipulating Plain Text
Emacs’s many modes and applications represent structured data as plain text. In this chapter we’ll look at some commands that are useful for manipulating text in a variety of domains and Modes. For other facilities that are most useful for prose, see Emacs for Writers.
Mass Line Deletions
Data is often arranged in the form of lines, and a frequent operation is to
reduce it: either by deleting certain lines or by keeping only others (which
amounts to the same thing). You can delete all the lines after Point that match
a Regular Expression in one stroke with M-x flush-lines, or the
converse with M-x keep-lines. Complete lines are deleted (or kept)
regardless of how much text your Regexp matches: M-x flush-lines RET foo deletes
all the lines that contain foo anywhere in the line.
Both of these functions instead operate on the Region if it is Active.
Your Regexp can cross line boundaries like, say, foo[[:space:]]+bar, which will
match foo and bar separated by whitespace, including newlines; in this case the
entirety of all the lines containing the match will be deleted.
Emacs makes a distinction between deleting and killing: text that’s deleted is simply thrown away270, while text that’s killed is put on the Kill Ring and so can be yanked back.
There’s a variation on flush-lines called
M-x kill-matching-lines, which works in exactly the same way except
instead of deleting, it kills the lines, so they are pushed onto the Kill Ring
in one bunch. This makes it a good way of moving a bunch of discontiguous
lines, or even of copying them, if you immediately Undo after killing them.
M-x delete-duplicate-lines is a powerful function that deletes all
but the first of any identical lines in the Region. So if the Region contains
the eight lines in column one of Table 41, then after
M-x delete-duplicate-lines it will contain only the lines in column two.
| Before | After |
|---|---|
| foo | foo |
| bar | bar |
| baz | baz |
| bar | zap |
| bar | |
| zap | |
| foo | |
| baz |
You’ll note that the order of the remaining lines stays the same, so this
isn’t simply C-u M-| sort -u….
Sorting Lines
Emacs has a powerful set of commands that sort lines, distinguished by how they interpret the sort field.
The simplest is M-x sort-lines, which uses the entire line as the
sort field. M-x sort-fields sorts based on whitespace-separated
fields within the line; use a numeric argument to specify which field; the
default is 1. M-x sort-numeric-fields works the same way, but
interprets the contents of the sort fields numerically. In both cases, if you
specify a negative field number, it means to count the fields from the right, so
C-u -1 would sort on the last field in each line.
Here are some examples. In column one of Table No description for this link, I generated 10 random words and paired them with 10 random numbers. Columns 2-4 illustrate different sorts.
| Random | sort-lines |
C-u 2 sort-fields |
sort-numeric-fields |
|---|---|---|---|
sort-fields |
C-u 1 sort-numeric-fields |
||
C-u 1 sort-fields |
|||
| 16 honkers | 16 honkers | 34 France | 2 err |
| 39 oysters | 2 err | 5 Madge | 3 cuddling |
| 99 disheartening | 3 cuddling | 59 corny | 5 Madge |
| 5 Madge | 34 France | 45 cranks | 16 honkers |
| 2 err | 39 oysters | 3 cuddling | 34 France |
| 3 cuddling | 45 cranks | 99 disheartening | 39 oysters |
| 59 corny | 5 Madge | 2 err | 45 cranks |
| 57 huskiest | 57 huskiest | 16 honkers | 57 huskiest |
| 45 cranks | 59 corny | 57 huskiest | 59 corny |
| 34 France | 99 disheartening | 39 oysters | 99 disheartening |
Note that in this example, sort-lines would happen to be the same as
sort-fields, which is also the same as C-u 1 sort-fields. In column 3, France
comes first because the sorting functions all work case-sensitively, and
upper-case letters precede lower-case letters. sort-numeric-fields is the same
as C-u 1 sort-numeric-fields.
All of these sorts are what programmers call stable sorts: that is, the relative order of records with equal keys is maintained. This means you can sort a Region again to achieve a sub-sort.
M-x sort-columns lets you indicate the sort field as a rigid range
of (single-character) columns. You do this by effectively defining the sort
fields via a Rectangle: the upper-left-hand corner of the rectangle determines
the starting column of the sort field, the width of the Rectangle in characters
determines the width, and the height of the Rectangle in lines determines
the range of lines to sort.
Consider this (slightly modified) excerpt from the table of contents of the
Emacs Manual. We want to sort these lines by the heading (e.g. “Basic Undo”),
ignoring the summary descriptions. We can’t use sort-lines because the numbers
will result in no change to the order. We can’t use C-u 2 sort-fields because
some of the headings are two words long and some aren’t: we want “Basic Help” to sort before
“Basic Undo”, but C-u 2 =sort-fields is sorting only on the second field, so all the
“Basic”’s will retain their relative order, due to the stability of the sort.
1 Erasing::             Deleting and killing text.
2 Basic Undo::          Undoing recent changes in the text.
3 Basic Help::          Asking what a character does.
4 Basic Files::         Visiting, creating, and saving files.
5 Blank Lines::         Making and deleting blank lines.
6 Position Info::       What line, row, or column is point on?
7 Arguments::           Numeric arguments for repeating a command N times.
8 Repeating::           Repeating the previous command quickly.
9 Continuation Lines::  How Emacs displays lines too wide for the screen.
The solution is to set the Mark in front of “Erasing” and Point in front of
“How” on line 9, defining a Rectangle that encompasses the entire width of the
columns we want to use as the sort field. Now M-x sort-columns will
sort the lines correctly, resulting in:
7 Arguments::           Numeric arguments for repeating a command N times.
4 Basic Files::         Visiting, creating, and saving files.
3 Basic Help::          Asking what a character does.
2 Basic Undo::          Undoing recent changes in the text.
5 Blank Lines::         Making and deleting blank lines.
9 Continuation Lines::  How Emacs displays lines too wide for the screen.
1 Erasing::             Deleting and killing text.
6 Position Info::       What line, row, or column is point on?
8 Repeating::           Repeating the previous command quickly.
Ignoring Case Distinctions
I mentioned that the sort commands are case-sensitive, which is why France comes
first in the C-u 2 sort-fields example above. You can sort in a
case-insensitive manner as well, but it’s a little awkward: you have to change
the variable sort-fold-case from its default of nil to t:
M-x set-variable RET sort-fold-case RET t
You’ll have to remember to change it back to nil unless you’re happy with
case-insensitive sorting for the rest of your session. If you like, you could
make that variable Buffer Local before changing it, with
M-x make-variable-buffer-local.
Reversing Lines
You may have noticed that there seems to be no way to sort in reverse order, and
you’re right. But you can always just reverse the order of all the lines you
just sorted with M-x reverse-region. reverse-region can of course
also be used on unsorted lines.
Numbering Lines
display-line-numbers-mode and global-display-line-numbers-mode
display line numbers in the Fringe, but you may need to occasionally actually
insert line numbers into your text. We’ve already discussed two ways to do
this: using a counter in a Keyboard Macro, or using
C-x r N (rectangle-number-lines), which is usually easier:
see Rectangles.
Whitespace and Blank Lines
Whitespace and blank (empty) lines are a common feature of most Buffers.
Whitespace encompasses several distinct but easily confused characters, most
notably the space (ASCII 32 or #x20) and tab (C-i, ASCII 9 or #x09). Those two
are confusing enough already without throwing in the formfeed (C-l, ASCII 12 or
#x0C) and the little known vertical tab (C-k, ASCII 11 or #x0B). The newline
(C-j, ASCII 10 or #x0A) and carriage return (C-m, ASCII 13 or #x0D), the two
possible line terminators, also count as whitespace in some contexts. And then
there are all the Unicode whitespace characters, like the en and em spaces, the
thin and hair spaces, and the whole family of non-breaking spaces!
The mere visibility of these characters and how to distinguish them on the screen is its own topic.
It’s no wonder there are several commands for dealing with whitespace; see also the related topic of Filling and Indenting.
Tabs vs. Spaces
Inserting a space is as simple as hitting the space bar (SPC), but how do you
insert a tab character? It’s not as simple as hitting the tab key, because TAB
is typically bound to a special command for indenting lines; even in
fundamental-mode it’s bound to
indent-for-tab-command. The guaranteed way to insert a
single, actual, tab is via C-q (quoted-insert) followed by
the TAB key (see Inserting Non-Printing Characters).
Probably more common than needing to insert a guaranteed tab is needing to
remove them. Tabs often cause problems in data files and source code for
languages that are especially picky about indentation271. Of course it’s
easy to change each tab to one space with
M-% (query-replace), but what if you want to preserve the
relative horizontal spacing? The M-x untabify command will replace
all the tabs in the region with one or more spaces, preserving the horizontal
spacing. That is, any given tab will display as one or more spaces to expand to
the next tab stop; untabify reifies each tab into as many actual spaces as it
takes to reach the same tab stop.
If you’re confused, or just never understood that Silicon Valley272 episode, see Jamie Zawinski’s explanation.
Horizontal Whitespace
Sometimes your Buffer will contain several horizontal whitespace characters in a
row, like 5 spaces or a space and a tab. There are two handy ways to get rid of
the excess. M-\ eliminates all the
whitespace around Point, while M-SPC (cycle-spacing)
replaces it all with just one actual space character (with a numeric Arg, it
replaces them with exactly that many spaces). Note that these two commands only treat
in spaces and tabs, but not any of the more exotic whitespace characters like
formfeeds and non-breaking spaces.
If you’re like me and consider trailing whitespace—i.e., whitespace
characters following the last non-whitespace character on a line—to be, in
general, an intolerable offense, you can rid yourself of all of these within
the Region with M-x delete-trailing-whitespace. This command works
on all horizontal whitespace characters except formfeeds.273
Blank Lines
Blank lines and empty lines also have some handy commands. You can of course
create a new empty line by hitting RET (newline) a few times; this takes
the usual numeric Arg so you can insert, say, four new lines with C-u RET or
seven with C-u 7 RET. This leaves Point after the last newline. The more precise
M-x ensure-empty-lines works like this but guarantees exactly \(N\)
empty lines, where \(N\) is the value of the prefix argument.
Sometimes you want Point to be before the new newlines, which is what
C-o (open-line) is for. It’s especially useful for working
with Rectangles, Picture Mode, and Artist Mode, where you need a big block of
blank lines in which you can do two-dimensional things.
C-x C-o (delete-blank-lines) is the inverse of C-o: when
Point is in the middle of a bunch of consecutive blank lines, C-x C-o reduces
them to just one blank line; an additional C-x C-o removes that remaining blank
line too.
What’s the difference between a blank line and an empty line, exactly? An empty line is what you get when you have two newlines in a row: to be precise, two newlines with an empty string between them. A blank line is two newlines with nothing but zero or more whitespace characters between them. So a line full of nothing but spaces and tabs is a blank line, but not an empty line.
There’s a variant of C-o that splits a line in two, vertically rather than
linearly: C-M-o (split-line). Here Point is represented by |:
Lorem ipsum dolor sit amet, |consectetuer adipiscing elit.
The result of a C-M-o would be:
Lorem ipsum dolor sit amet, |
                             consectetuer adipiscing elit.
M-^ (join-line) (a.k.a. delete-indentation) joins the current
line (containing Point) to the end of the previous line, regardless of Point’s
exact location in the current line. It ensures that there will be one space
between the joined lines; Point is positioned at that space (which you could
immediately eliminate with M-\).
This all means that if you repeatedly invoke M-^, it will join together several
previous lines, going backwards. So if Point is in front of “baz” (here | is
just the location of Point, not a vertical bar character):
foo
bar
|baz
two M-^’s will result in:
foo| bar baz
Indenting Lines
Indentation—that is, the presence or absence of whitespace at the beginning of a line—is an annoyingly complex topic. Fortunately, it’s less complex than it used to be decades ago, but Emacs of course still supports all the old-school complexity. I think we can ignore most it!
Indentation is primarily a concern when you’re editing structured text:
programming languages, like Elisp or Python; data interchange languages, like
JSON; or markup languages, like HTML and Latex. Emacs has a Major Mode
for almost every such language you might need to work with, and these Modes
understand the indentation requirements or conventions and handle it for you.
Mostly, it boils down to this: just hit TAB (wherever you may be
in the line) to indent the current line correctly.
The topic is most complex when you’re editing prose in a Major Mode like
text-mode. But who edits plain text prose anymore?
Decades ago I used text-mode all the time, but I probably haven’t used it for 10
or more years. Now I do all my prose in the amazing Org Mode, which uses a form
of structured text that makes straight prose more readable than text-mode, and
yet lets me publish it as plain text, HTML or a PDF274 with a keystroke.
And as a structured text mode, Org handles indentation automatically.
So the only kind of indenting I’m going to discuss here is rigid indentation,
which you may occasionally need to do in any random mode. The main command is
C-x TAB (indent-rigidly): just set the Region around a bunch
of lines, and C-x TAB will prompt you:
Indent region with <left>, <right>, S-<left>, or S-<right>.
You’re in a transient mode for as long as you hit any unbroken sequence of the mentioned keystrokes; typing any other key will exit the mode (and do whatever that other key is supposed to do).
<right> and <left> will indent or dedent, respectively, the whole block of lines
one column at a time. The shifted versions will move in larger jumps of 8
columns at a time.275 With a positive or negative numeric argument, it will
increase or decrease the indentation by exactly that many characters. The
related command C-M-\ ( indent-region),
with a numeric argument, will re-indent all the lines in the Region to the
column indicated by the argument: C-u 12 C-M-\ will leave you with all the lines
indented 12 spaces from the left, regardless of how much each line was already
indented.
The command M-m (back-to-indentation) conveniently moves
Point to the first non-whitespace character on the line: it’s like a
C-a for indented lines.
Tabs and Tab Stops
In many Major Modes, TAB is bound to
indent-for-tab-command, which typically276 causes Emacs to
insert enough whitespace to move Point to the next tab stop. A tab stop is one
of a set of specific column numbers or horizontal positions, the idea being to
use them to line your text up in columns.
If there are no explicit tab stops defined, the default is every 8
columns.277 You can define tab stops at arbitrary positions (for the
current Buffer) by invoking M-x edit-tab-stops.
Frankly, tab stops are not much used anymore, because, as mentioned above, people tend to use markup languages instead of manually laying out plain text. So I’ll say no more on this topic.
However, since TAB characters cause problems—they’re hard to distinguish from
runs of spaces, their displayed width varies depending on the tab stops so they
can seem to have different widths to different people, and their presence can
confuse certain programs—I recommend telling Emacs never to implicitly insert them, and
to always use runs of spaces instead; this Init File snippet does that. Because
EIPNIF, you can of course always insert a real tab with C-q TAB.
(setq-default indent-tabs-mode nil) ; don't insert tabs
Since you might encounter tabs in a file authored by someone else, you can
readily convert all tabs in the Region to equivalent runs of spaces with
M-x untabify; the inverse (rarely needed) is M-x tabify.
Case Changing
There are three ways to change the case of your alphabetic text: converting it to all-uppercase, to all-lowercase, and to capitalize the first letter of each word. There are two modes of invoking these case changes: by word or by region.
| Word | Region | |
|---|---|---|
| Upcase | M-u (upcase-word) |
C-x C-u (upcase-region) |
| Downcase | M-l (dowcase-word) |
C-x C-l (downcase-region) |
| Capitalize | M-c (capitalize-word) |
M-x capitalize-region |
The by-word commands change the case of the next word (leaping over intervening
non-alphabetic characters), or with a prefix arg, the next \(N\) words (a negative
argument works backwards); Point moves across each converted word. So you can
upcase the next several words in a row with repeated invocations of M-u, for example.
The by-region commands operate on the Region without moving Point. Note that
upcase-region and downcase-region are Disabled by default, just because
beginners, who aren’t comfortable with how easy it is to Undo changes, are often
disturbed when they accidentally change the entire text of their thesis to all
uppercase.
Tables
Emacs has a powerful set of commands for creating and editing plain-text tables. Here’s a plain-text version of the Verlaines discography from Wikipedia:
+-------+------------+----------------+-------+-------------+--------+
|Date of|Title       |Label           |Charted|Certification|Catalog |
|Release|            |                |       |             |Number  |
+-------+------------+----------------+-------+-------------+--------+
|1985   |Hallelujah  |Flying          |-      |-            |FN040 / |
|       |All the     |Nun/Homestead   |       |             |HMS138  |
|       |Way Home    |                |       |             |        |
+-------+------------+----------------+-------+-------------+--------+
|1987   |Bird Dog    |Flying          |-      |-            |FN077 / |
|       |            |Nun/Homestead   |       |             |HMS095  |
+-------+------------+----------------+-------+-------------+--------+
|1987   |Juvenilia   |Flying Nun      |-      |-            |FN COMP |
|       |            |                |       |             |02      |
+-------+------------+----------------+-------+-------------+--------+
|1989   |Some        |Flying          |-      |-            |FN129 / |
|       |Disenchanted|Nun/Homestead   |       |             |HMS162  |
|       |Evening     |                |       |             |        |
+-------+------------+----------------+-------+-------------+--------+
|1991   |Ready to Fly|Slash           |-      |-            |C30718  |
+-------+------------+----------------+-------+-------------+--------+
|1993   |Way Out     |Slash           |-      |-            |D31032  |
|       |Where       |                |       |             |        |
+-------+------------+----------------+-------+-------------+--------+
|1996   |Over the    |Columbia        |-      |-            |486880.2|
|       |Moon        |                |       |             |        |
+-------+------------+----------------+-------+-------------+--------+
|2003   |You're Just |Flying Nun      |-      |-            |FNCD476 |
|       |Too Obscure |                |       |             |        |
|       |for Me      |                |       |             |        |
+-------+------------+----------------+-------+-------------+--------+
|2007   |Pot Boiler  |Flying Nun      |-      |-            |FNCD501 |
+-------+------------+----------------+-------+-------------+--------+
|2009   |Corporate   |Dunedinmusic.com|-      |-            |        |
|       |Moronic     |                |       |             |        |
+-------+------------+----------------+-------+-------------+--------+
|2012   |Untimely    |Flying Nun      |-      |-            |FNCD524 |
|       |Meditations |                |       |             |        |
+-------+------------+----------------+-------+-------------+--------+
|2020   |Dunedin     |Schoolkids      |-      |-            |SMR-060 |
|       |Spleen      |Records         |       |             |        |
+-------+------------+----------------+-------+-------------+--------+
I created this by simply cut-and-pasting the Wikipedia table from the web page,
which results, in my Buffer, in one line per row, with columns separated by tab
characters. I set the Region around this and invoked
M-x table-capture and got the result you see above.
There are commands to split, merge, enlarge, and shrink cells, edit easily within a multi-line cell, justify cell contents, insert and delete rows and columns: it’s very powerful.
The only question is, who needs attractive plain-text tables now that most documents are “typeset” from a markup language like LaTeX or Org Mode? Org Mode, in fact, has its own powerful markup for tables which in my opinion is much nicer to use—it’s in many ways more powerful278, though these plain-text tables are probably easier for multi-line cells.
The main use, nowadays, for this facility is probably for programmers who want to insert plain-text tables into comments in programming language source code. If you need these, see “Text Based Tables” in the Emacs manual.
References
Zawinski, Jamie. 2000. Tabs Versus Spaces: An Eternal Holy War. https://www.jwz.org/doc/tabs-vs-spaces.html.
Folding Text
It can be very useful to fold or collapse some of your text in order to ignore or to focus on certain parts, or to get an outline-like high-level overview. Emacs provides several subsystems to do this. They can be divided into two categories: one in which you must explicitly impose an outline- or tree-like markup to your text ahead of time, and the other which recognizes and folds text based on its implicit structure.
Markup-Based Folding
Emacs has had markup-based folding since the very beginning in the form of Outline Mode; it’s basically Text Mode plus extremely simple markup to express your text in the form of an outline, which brings the ability to fold and unfold the headlines of the outline.
Outline Mode has additional commands to navigate by headline, and move headlines (and their folded components) up or down, or in and out (demoting or promoting them, headline-wise).
It’s a big payoff for such a trivial amount of markup. But for most Emacsers, Outline Mode has been rendered obsolete by Org Mode.
Org Mode does exactly what Outline Mode does, with the same markup, but adds hundreds of additional features. If you think Outline Mode sounds useful, just skip directly to Org Mode instead: it’ll be an improvement even if you aren’t interested in its extra features.
Org Mode gets an entire chapter to itself; see Org Mode for details.
Implicit Folding
The problem with markup-based folding is of course the markup. But lots of text has implicit structure that Emacs can exploit for folding without your having to add any. Most programming languages, for example, have an implicit tree structure eminently suitable for folding. But even simple indentation can be used for folding purposes.
Hideshow Minor Mode
Hideshow Minor Mode is the high-level built-in mechanism for implicit folding. When enabled, you can fold function definitions in the source code of many programming languages. Consider this Python function from Wikipedia:
def qsort(L):
    if L == []:
        return []
    pivot = L[0]
    return (qsort([x for x in L[1:] if x < pivot]) +
            [pivot] +
            qsort([x for x in L[1:] if x >= pivot]))
With Point anywhere in the definition, you can fold it with one keystroke into this:
def qsort(L):...
Note the ellipsis ... at the end of the line, which indicates the presence of
hidden folded text under this line (the dots are just for display and are
not actually actually added to your text).
Motion commands will skip over the ellipsis as if it were one character wide.
As with all the Emacs text folding subsystems, the invisible text is still there: you can search into it (which will unfold it), and if you copy a region that includes the folded text, the copied text contains all the hidden text as well; if you save the Buffer’s file when some of the text is folded, you are of course saving all the hidden text as well, and there’s no indication in the file that the text was folded (the next time you open the file, all your text will be there, unfolded).
You can unfold anything you’ve folded, and you can also fold and unfold all the top-level functions in one go. A Buffer consisting of hundreds of lines of code, when completely folded, would look something like:
def writable(path):...
def myurlopen(url, count = 0):...
def httpopen(scheme, hostport, path, parms, query, frag, count = 0):...

def snarf(url, clone):...
# checkout a locked version from rcs
def co(clone):...
# checkin (ci -l)
def ci(clone):...
Truth be told, I don’t like Hideshow. For one thing, the default keybindings
are just unusable. But this being Emacs, that’s easily fixed. The bigger
problem is that it doesn’t work very well. It seems to work fine in
python-mode, but in c-mode it does a
bad job of recognizing function definitions, and it doesn’t work at all for my
favorite (non-Lisp) programming language, OCaml (which has an admittedly very
free-form syntax). This is why I use the third-party library Yafolding instead;
see below.
See “Hideshow” in the Emacs manual for more information. If you want to use it, try this Init File snippet that adds two usable key bindings for the most commonly used commands:
;; Hideshow for folding in programming modes
(add-hook 'prog-mode-hook 'hs-minor-mode)

;; from: Joseph Eydelnant
(defvar ue-hs-hide nil "Current state of hideshow for toggling all.")
(defun ue-toggle-hideshow-all ()
  "Toggle hideshow all."
  (interactive)
  (setq ue-hs-hide (not ue-hs-hide))
  (if ue-hs-hide
      (hs-hide-all)
    (hs-show-all)))

;; add usable key bindings
(with-eval-after-load 'hideshow
  ;; toggle hiding this block
  (define-key hs-minor-mode-map (kbd "C-<return>") 'hs-toggle-hiding)
  ;; toggle hiding all blocks in buffer
  (define-key hs-minor-mode-map (kbd "C-M-<return>") 'ue-toggle-hideshow-all))
Yafolding Mode
Zeno Zeng’s Yafolding Mode is the package I prefer for folding text. It works great in every programming language I’ve tried, including OCaml with its nested function definitions expressed without any braces, because it just works based on indentation, which almost all programmers use consistently.
I only use two of its commands:
C-<return> (yafolding-toggle-element) to toggle the folding
of the “element” (typically a function definition) at Point, and
C-M-<return> (yafolding-toggle-all) to toggle the folding of
every element in the Buffer. This Init File snippet will set it up:
(unless (package-installed-p 'yafolding)
  (with-demoted-errors "%s"
    (unless package-archive-contents
      (package-refresh-contents))
    (package-install 'yafolding)))
(add-hook 'prog-mode-hook
          (lambda () (with-demoted-errors "%s" (yafolding-mode +1))))
Selective Display
The simplest, but lowest level, text folding command is
C-x $ (set-selective-display). It’s very old, and Yafolding
does the same thing in a much friendlier manner. But for reasons of historical
interest, here’s how Selective Display works.
Given a numeric argument of \(N\), C-x $ folds all lines that are indented more
than \(N\) spaces. Suppose your Buffer contains this simple outline-like text279:
Folding Text
  Markup-Based Folding
    Outline Mode
    Org Mode
  Implicit Folding
    selective display
    Hide / Show Minor Mode
    3rd-party
      yafolding
These lines are indented in steps of two, with the first line not indented at
all. So C-u 1 C-x $ would hide all lines but the first:
Folding Text...
To unfold and reveal all your text, invoke C-x $ without any argument.
Line-based motion commands like C-n, C-p, <up>, and <down> skip over the folded
text, but other commands will move into it, including searching. If you find
yourself lost in the folded text, just unfold it.
If you invoke C-u 3 C-x $ it will hide all the lines with indentation of 3 or
more spaces:
Folding Text
  Markup-Based Folding...
  Implicit Folding...
Having to count the spaces in the indentation is an awkward step. This alternative function automates the process. If you like it, you can use it to replace the standard command with:
(keymap-global-set "<remap> <set-selective-display>" 'ue-auto-selective-display)
but it’s really just a poor man’s Yafolding.
(defun ue-auto-selective-display (arg)
  "Hide lines with greater indentation than this one.
With a prefix ARG, reveal all lines.

This function simply sets `selective-display'."
  (interactive "P")
  (if arg
      (setq selective-display nil)
    (save-match-data
      (save-excursion
        (forward-line 0)
        (if (looking-at (rx (+ space)))
            (setq selective-display (1+ (length (match-string 0))))
          (setq selective-display 1))))))
International Character Set Support
")
Figure 46: M-x view-hello-file (C-h h)
Emacs has very sophisticated support for international languages and the character sets and encodings used to represent them. This is one of the more complex Emacs topics: there are 23 pages devoted to it in the manual and I won’t attempt to cover all of it here. I’ll describe the most useful facilities for a mostly-monolingual Emacs user, from my perspective as an English speaker.
In the earliest days of computing, the only characters you could use were the upper case Latin alphabetics, the base 10 digits, and a handful of punctuation characters. Pretty quickly, non-English speakers and users of non-Latin alphabets, syllabaries, and logographies—various scripts—defined their own mutually incompatible character sets, and a Tower of Babel reigned.
You would think that, since the polyglot Unicode is now the standard, with its support for 160-odd historical and modern scripts and over 150,000 characters, symbols, and emojis, there would be no need to handle any other character sets, but in addition to legacy data, Unicode is not yet completely dominant. In particular, users of Chinese, Japanese, Korean, and Cyrillic scripts still use non-Unicode character sets for various reasons. While most text editors support Unicode, they may only support Unicode (and sometimes only Unicode’s UTF-8 encoding280).
Emacs supports 1,071 character sets and
encodings, including Unicode and ISO-2022 (which allows you to switch between
different character sets in a given File). It also handles
bidirectional text: that is, you can combine scripts that are written from right
to left (like Arabic or Hebrew) with text written from left to right (like
English). For a quick demonstration of all this, invoke
C-h h (view-hello-file).
Emacs also supports 257 input
methods, which are ways of entering characters that might not have keys on your
keyboard, including both natural language scripts and various types of symbols
(e.g. mathematical). You can see all of them via
M-x list-input-methods. The Package Manager has
19 additional input methods.
Language Environment
You can enter or view any kind of text in any script in any Buffer at any time.
That is, you can have, say, Latin, Cyrillic, Hebrew, and Tamil scripts all mixed
together; the buffer popped up by C-h h is a perfect
example—see Figure 46.
But Emacs always has a notion of your default language environment. Normally, your operating system defines this281 and Emacs inherits it. (If your OS sets it wrong, or you just prefer a different one for Emacs, you can override it; see “Language Environments” in the Emacs manual.) Your language environment determines which character sets (Emacs calls them coding systems) are assumed as defaults for the files you create and edit, the script used to represent such text (and therefore an appropriate font for that script), and a way of interpreting your keyboard to enter the glyphs that comprise the script.
If your OS has declared your correct language environment and you have the necessary fonts installed, everything in Emacs should work out of the box.
You can browse all the language environments with
C-h L (describe-language-environment); here’s what you’ll see
if you choose Czech:
Czech language environment

This language environment is almost the same as Latin-2,
but sets the default input method to "czech",
and selects the Czech tutorial.

Sample text:
  Přejeme vám hezký den!

Input methods (default czech)
  czech ("CZ" in mode line)
  czech-prog-3 ("CZ" in mode line)
  czech-prog-2 ("CZ" in mode line)
  czech-prog-1 ("CZ" in mode line)
  czech-qwerty ("CZ" in mode line)

Character sets:
  ascii: ASCII (ISO646 IRV)
  latin-iso8859-2: Right-Hand Part of ISO/IEC 8859/2 (Latin-2): ISO-IR-101

Coding systems:
  iso-8859-2 (‘2’ in mode line):
	ISO 2022 based 8-bit encoding for Latin-2 (MIME:ISO-8859-2).
	(alias: iso-latin-2 iso-8859-2 latin-2)
The most practically useful section of this information is the list of input methods, which in this case are systematic ways for someone who works primarily in Czech to enter characters from the Czech script.
Inserting the Occasional Funny Character
But first let’s discuss the non-systematic way to enter characters: that is, characters that aren’t a normal part of your spoken language’s script, ones that you only occasionally need to type. This includes typographical symbols like the pilcrow or paragraph symbol ¶, the copyright symbol ©, emojis. and the odd character from some other language with a different script. With no disrespect to natural languages other than your own, I’ll call all of these funny characters.
The easiest way to insert these characters is with
C-x 8 RET (insert-char), which uses Completion to prompt you
for the name of a Unicode character. Usually you can just narrow the enormous
list of 45,000-odd candidates by typing words from their official long Unicode
name—the word “paragraph” will narrow the list to 10 different paragraph
symbols, and you’ll see the Pilcrow you want near the elegant Ethiopic Paragraph
Separator. If you know the Unicode code-point (a hexadecimal number), you can
enter that instead.
The C-x 8 prefix has a whole slew (close to 200) of other convenient key
bindings to insert common funny characters. For example, C-x 8 C inserts the
copyright symbol; C-x 8 [ and C-x 8 ] insert the left- and right-curly single
quotation marks, etc. I don’t actually know any of these and just use C-x 8 RET for
everything I need (my completion system puts the ones I use regularly at the top
of the list). To see the complete list of shortcuts, type C-x 8 C-h (or
C-h b (describe-bindings) and search for “C-x 8” in that
Buffer).
Inserting Emojis
Emojis are just Unicode characters so you can insert them with
C-x 8 RET (insert-char), but as of v29.1, Emacs has excellent
new emoji-specific support.282 These new commands are all on the C-x 8 e
prefix.
| Key | Action | |
|---|---|---|
| Insertion | C-x 8 e i |
insert an Emoji |
C-x 8 e e |
… the same | |
C-x 8 e r |
insert a Recently-used emoji | |
C-x 8 e l |
List all emojis by category in a new window | |
C-x 8 e s |
Search for an emoji | |
| Display | C-x 8 e + |
increase emoji size |
C-x 8 e - |
decrease emoji size | |
C-x 8 e 0 |
reset emoji size | |
C-x 8 e d |
Describe the emoji at Point |
C-x 8 e i (command emoji-insert) displays the emojis grouped
by category and lets you insert one with a couple more quick keystrokes; see
Figure 47.

Figure 47: Inserting an Emoji
C-x 8 e l (emoji-list) is like a high-visibility version,
using a popped-up window in which all the emojis are huge—just move Point to
the one you want and hit RET—and C-x 8 e r (emoji-recent)
is a quicker way to insert an emoji you’ve used recently.
Rather than inserting an emoji, sometimes you’re faced with one from an outside
source—perhaps in an email—and you simply can’t even tell which emoji it is!
This is especially the case at smaller font sizes. Just put Point on that
mystery emoji and hit C-x 8 e + (emoji-zoom-increase); just
that emoji will be embiggened, and you can keep hitting + until you can
recognize it. Finally C-x 8 e d (emoji-describe) will tell
you the official Unicode name of the emoji at Point, in the Echo Area. This is
way nicer than having to google-up the emoji’s name.
Input Methods
If you’re typing in a language that uses a lot of diacritical marks. like Czech,
or a completely non-Latin script, like Ukrainian, you’ll be typing C-x 8 way too
much. Instead, you want to use an input method. An input method causes Emacs
to translate the ordinary ASCII characters of your keyboard into non-ASCII characters.
Broadly, there are two kinds of input methods. One kind remaps all (or many) of
your normal keyboard keys, often to match the typical hardware computer keyboard
that would be used by the user of a given language; the input method Emacs calls
ukrainian-computer matches the Ukrainian keyboard in Figure
48.

Figure 48: A Ukrainian Keyboard
So to enter the Ukrainian φ character, you would just press the a key, and to
enter the Ukrainian E you press the T key.
If Ukrainian is your default language environment, this input method will be your default.
But perhaps you’re an English speaker with a default English language
environment who also speaks Ukrainian and therefore sometimes types large amounts
of Ukrainian text. To solve this problem, you can change the input method
associated with a given Buffer with
C-x RET C-\. After switching away from
your default like this, a simple C-\
will toggle back and forth between the two; use C-u C-\ to change to yet another
input method.
Another use for the broad type of input method is to use a non-standard keyboard
layout for your default language environment, like the well-known Dvorak
kayboard layout for English, regarded as superior to QWERTY by its partisans.
Just do C-x RET C-\ and specify english-dvorak.
The second, less broad, kind of input method only changes a few ASCII characters
and treats them as Prefix Keys that you can use to enter funny characters. For
example, there are several input methods for entering the characters of the
International Phonetic Alphabet (IPA) used by linguists, and by lexicographers to
indicate pronunciation in dictionaries, whereas the tex input method changes only a few
characters (mostly \, ^, and $) into prefixes to enter close to 2,000 funny
characters, including many technical and mathematical ones, like \exists for
\(\exists\) and \lambda for \(\lambda\); you can use TAB to complete these.283
I use latin-1-postfix as my default transient input method (the one that C-\
will switch to by default); this makes it easy for me to enter the occasional
foreign language284 proper noun by making all the ASCII characters that
are typically accented in Western European Latin-script languages into postfixes.
So after enabling latin-1-postfix with C-\, I can more easily type the French
word déçût: when I typed “e” Emacs reminded me, in the Echo Area, of the
possible stand-ins for accents, displaying: e["'/^`]—I then typed ', the pair
of which became “é”—and when I typed “c” I saw the reminder c[,] and added the
comma to get “ç”, etc.; see Table 43. Typing an e followed
by some character other than any of the special e-accent stand-ins just gives
you a plain e followed by that character—so et for example comes out as
et—and if you need to type an e followed by one of the stand-ins, you just
double the stand-in, so e^^ gives me e^ rather than ê. It’s an easy to learn
system, even if you don’t use it much.
| Keystroke | d |
e |
' |
c |
, |
u |
^ |
t |
| Buffer Contents | d |
de |
dé |
déc |
déç |
déçu |
déçû |
déçût |
| Echo Area | e["'/^`] |
c[,] |
u["'^`] |
Table 44 summarizes some of what the latin-1-postfix Input
Method can do.
| Accent | Postfix | Examples |
|---|---|---|
| acute | ' |
a' → á |
| grave | ` |
a` → à |
| circumflex | ^ |
a^ → â |
| diaeresis | " |
a" → ä |
| tilde | ~ |
a~ → ã |
| cedilla | , |
c, → ç |
| nordic | / |
d/ → ð ; t/ → þ ; a/ → å ; e/ → æ ; o/ → ø |
| others | / |
s/ → ß ; ?/ → ¿ ; !/ → ¡ ; // → ° |
| various | << → « ; >> → » ; o_ → º ; a_ → ª |
There’s also a latin-1-alt-postfix Input Method that’s only slightly different
(thought by some to be more convenient), and a latin-1-prefix Method in which
you type the activating punctuation mark before the letter. There are a couple
of dozen more -prefix and -postfix Input Methods suited to various other
combinations of scripts.
Coding Systems
Emacs supports 267 coding systems, but they only really come into play when you read (visit) or write (save) a file, because data in memory is represented in an internal format known only to Emacs; at the transition between Emacs and the file system, Emacs has to translate to or from a coding system.285
Emacs can recognize some coding systems automatically when you visit a file, or
when you save a file after editing, but some sequences of bytes in text are
inherently ambiguous. When this occurs, Emacs will choose based on an order
of preference if possible; otherwise you’ll be offered a list of compatible
coding systems and asked to identify the correct one. When Emacs chooses one for
you, you can find out which one it is with
M-x describe-current-coding-system, and if you disagree, you can
change it with C-x RET r (revert-buffer-with-coding-system).
You can force a persistent specific coding system for a particular file in two ways: via a File-Local Variable or, more broadly, set it according to a file extension. For example, to specify Chinese BIG5 via a File-Local Variable, you could add this line to the top of the file:
-*- coding: big5; -*-
Or, if all your .txt files are in BIG5, you could specify that in the
auto-coding-alist variable. That variable is flexible
enough to specify a coding system for just one file, or all the files in a given
directory, regardless of their extension.
Line Endings
One final wrinkle concerns line endings: the way text encodes where lines break. This is independent of the coding system and is indicated by control characters. There are three different ways to indicate a line ending:286
- unix
- use a control-J (ASCII 10 = #x01 =
^J) aka linefeed - mac
- use a control-M (ASCII 13 = #x0D =
^M) aka carriage return - dos
- use a pair of carriage return followed by linefeed (
^M^J) aka CRLF
As the names suggest, these three different line-endings are mandated by the three major families of operating systems. If you are a Windows user and receive a file created by a Macintosh user, you might have trouble distinguishing the breaks between lines because they are encoded differently. How massively annoying!
The good news is, the Unix operating systems287 have mostly won this battle288. Apple switched from its carriage return line endings after 2001, when they rewrote the Mac OS operating system and based it on Unix, inheriting the linefeed. So the unix category above includes Mac OS X, and the mac category only includes old unconverted Classic Mac OS data.
Unfortunately, Microsoft Windows is still sticking to its CRLF line endings (inherited from MS-DOS in 1985), by far the most awkward of the three; additionally, CRLF line endings made their way into a variety of important computing standards, like that for email, so even 100% Unix programmers will probably encounter it.
As a result of all this, every one of the 267 coding
systems comes in all three flavors of line endings: so there’s utf-8-unix,
utf-8-mac, and utf-8-dos; also big5-unix, big5-mac, and big5-dos; and so on.
You don’t usually need to specify the full names of the coding system and can
just say utf-8 and big5 and the like—they will default to your operating
system’s line-ending type—and Emacs will typically figure out the line endings
automatically when you read in a foreign file. But when you occasionally need
to save a file for a Windows user, you can do so by spelling it out explicitly.
Remote File Editing with Tramp
One of Emacs’s killer features is its ability to transparently edit files over
the Internet on remote computers via the Tramp subsystem. Instead of logging-in
to a remote computer (with ssh, say) and firing up Emacs on that computer to
edit a file, you just use C-x C-f (find-file) with special
remote-file syntax and edit the file in your local Emacs. This means that Emacs
doesn’t even need to be installed on the remote computer!
While other editors have added a version of this feature recently, Emacs has been doing this since at least 1989289. I believe that Tramp supports more remote file access protocols and features than any other editor.
Every time that Emacs asks you for a filename, you can optionally use
Tramp’s remote file syntax290. So if your username on the host
myoffice.example.com is mary, you might edit your file ~/txt/project.org
on that computer with:
C-x C-f /ssh:mary@myoffice.example.com:txt/project.org
It will pop up a Buffer called project.org and editing will work
exactly like editing a local file, at local speeds. You might notice
a few messages about the network connection flash past in the Echo
Area if you’re paying attention, but otherwise it’s hard to tell you’re
editing a remote file. Backup files and auto-save files work as you’d
expect. When you save your Buffer in any of the usual ways, your
edits are written out to the remote file. You don’t have to specially
shut-down a network connection: just kill the Buffer whenever you like
(or not).
Additionally, you can visit a remote directory with C-x C-f or
C-x d (dired) and it will of course come up in a
Dired buffer! All the normal Dired file management commands work as
usual. Pop up another Dired Buffer—either on that remote host, or
on your local host, or on a second remote host—and you’ve got
two-panel file management and can easily copy or move files from one
host to another.
If you run M-x pwd you’ll see that this Buffer’s working
directory is /ssh:mary@myoffice.example.com:txt/. This has
interesting implications. If you visit another file from this Buffer
with C-x C-f (or anything else), the default
directory will indeed be the remote directory revealed by pwd, so it’s
easy to pull up more remote files; if you don’t want another remote
file. just delete the remote part of the filename in the prompt.
Probably the most amazing feature is that Emacs functions that run external
commands, like M-x grep, M-x shell,
M-x compile, Dired’s ! (dired-do-shell-command)
and & (dired-do-async-shell-command) commands, and the like
all run on the remote host, due to the default-directory
being expressed in Tramp syntax. This means all the VC version control commands
work remotely too: pull up that remote file, make your edits, diff it against an
older version, and check in your changes with the same simple VC commands you
use on local files: Tramp makes them run remotely.
Getting Started
Let’s see if Tramp works for you out of the box! The full Tramp remote file syntax looks like:
/method:user@host#port:/path/to/file
Most of these components have default values; see Table 45.
| Component | Default | Meaning |
|---|---|---|
| method | scp |
how to connect (protocol) |
| user | local user | remote user |
| host | remote hostname | |
| port | standard port | port number for the protocol |
| path | ~/. |
remote home directory |
The most commonly used method is probably ssh or scp. If your local username is
the same as your remote username, you can skip the user@ part of the filename.
You can use a relative hostname (e.g. just myoffice) if your local host’s DNS is
set up appropriately (or if you have hostname patterns configured in your SSH
configuration). If the remote server is listening on the standard port
(e.g. port 22 for ssh), you can leave out the #port component.
You can also write the method as – if the method named in
tramp-default-method (scp) is the one you want291.
Finally, if the /path/to/file is in your remote home directory, you can use a
relative path (e.g. just file). So the shortest remote filename might be:
/–:myoffice: to pull up Dired on your home directory on myoffice.example.com
But let’s issue this command:
C-x C-f /ssh:mary@myoffice.example.com:newfile
Tramp supports completion of most components of a remote file name. If you’re
using SSH public key encryption and are running ssh-agent(1), there will be no
need for you to type your passphrase, but if otherwise, Tramp will prompt you.
You’ll know it worked if you get a Buffer named newfile and no errors!
But to confirm, do M-x pwd in this Buffer and make sure
the output looks something like:
Directory /ssh:myoffice.example.com:/home/mary/
Troubleshooting
When both the local and the remote host are running Unix, and you’re
already set up and happily using SSH for your logins outside of Emacs,
Tramp is easy to configure and use. With non-Unix operating systems
(like Windows) or less common login protocols (like, say, telnet
(heaven forbid!)), you may need to do a little light reading.
Fortunately, the 6,224-line
Tramp manual is very well written, and Tramp maintainer Michael
Albinus is one of the most responsive and helpful developers on the
help-gnu-emacs mailing list.
In my experience292, the most common problem encountered in using
Tramp is having an exotic remote shell prompt. Tramp needs to be able to
recognize your shell prompt, and does a pretty good job at it, simply
assuming that your prompt ends with one of the characters #, $, %, or
> followed by a space, which matches the defaults of most shells. If
your prompt doesn’t fit this requirement, you can fix it by changing
the value of shell-prompt-pattern (or by changing your
shell prompt).
If you use a fancy multiline shell prompt with right-hand end-of-line components, lots of colors, or perhaps an ASCII-art talking cow, then you may have trouble. This is fixable by hacking your shell’s rc file to turn off all the sexiness (only when Tramp is controlling the shell—you can still have your crazy prompt in your interactive shells).
If you’re a zsh(1) or bash(1) user, using one of these lines as the first line
of your ~/.zshrc or ~/.bashrc on hosts that you want to Tramp into should do the
job:
# for tramp
[ ! -n "$INSIDE_EMACS" ] && [[ "$TERM" == "dumb" ]] && unsetopt zle && PS1='$ ' && return # zsh
[ ! -n "$INSIDE_EMACS" ] && [[ "$TERM" == "dumb" ]] &&                 PS1='$ ' && return # bash
You can set up your fancy cow prompt after this line and it’ll work for you as usual in interactive shells.
For more information and other tips, see “Remote shell setup” in the Tramp manual.
Tramp Methods
While the ssh method is probably the most commonly used Tramp remote
file access method (it is for me), there are actually
37 in total.
Ignoring four that are for obsolete and insecure protocols293 and
two for Kerberos users, we can divide the remainder into four main
groups: methods for accessing files on Unix systems, methods for
accessing local files under different permission schemes, methods for
accessing specialized file systems, and methods specific to Microsoft
Windows.
Orthogonal to these four classes are two different types of connection: inline and external.
Inline methods maintain a persistent connection to a remote host, so
even if logging in to some remote happens to be slow, after the first
connection it will be speedier. These methods are good for frequently
editing relatively small remote files, but have relatively high
overhead that may slow down access to large files: if you know you’re
about to visit a large file, or copy large files using dired, you might opt for
the equivalent external method.294
External methods effectively use an additional out-of-band channel to transfer the data (possibly storing the data in a temporary file). These can be slower due to the need to set up and tear down the additional channel, but faster at transferring large amounts of data.
Unix Remote Access Methods
Unix users accessing remote Unix systems will typically be happy with these three methods.295
| Method | Type | Comments |
|---|---|---|
| ssh | inline | Great for small files |
| scp | external | Great for large files |
| rsync | external | Best for large files that already exist on both hosts |
Local Permission Access
Sometimes you need to access a file on your local system as if you were a different user. Tramp makes this situation look like a remote file access.
The most common situation for Unix users on their own
desktop machine is the sudo method, which lets you access a file or
directory as root via the sudo(8) program. It also allows you run a
root shell in your Emacs by visiting a file or directory as root and then
running M-x shell within that Buffer.
Since this family of methods run on the local host, you just leave the
hostname part of the remote filename empty,
e.g. /sudo::/etc/resolv.conf.
The sudoedit method is a more paranoid version of sudo that’s more
annoying to use.
su is similar to sudo but uses su(8) and allows you to edit as some other
non-root user; of course you have to have the ability (i.e., permission) to use
su(8) outside of Emacs for this to work.
doas(8) is an alternative to sudo that is the default on OpenBSD systems.
Finally, the sg method uses sg(8) to let you edit files under a different
group.
| Method | Type | Comments |
|---|---|---|
| sudo | inline | Root access |
| sudoedit | external | Paranoid root access |
| su | inline | Access as a different user |
| doas | inline | … via doas(8) |
| sg | inline | Access as a different group |
Specialized File System Access
There are a number of “file systems” that aren’t real file systems, i.e. aren’t simply organizations of bytes on a disk partition. Instead, they’re applications that offer up files, masquerading as file systems. Tramp can handle several of these. Note that all of them require external programs to be installed, and these are all external methods.
| Method | Comments |
|---|---|
| ftp | For FTP servers |
| sftp | SSH FTP |
| rclone | Many remote storage systems via rclone(1) |
| sshfs | Remote files via the sshfs file system |
| afp | Apple Filing Protocol |
| dav | WebDAV |
| davs | … via SSL |
| gdrive | Google Drive |
| nextcloud | NextCloud and OwnCloud systems |
| mtp | Media devices like phones and cameras |
| adb | Access a phone through the Android Debug Bridge |
Windows-Specific Access Methods
Microsoft Windows does things its own way. If you’re a Unix Emacs user that
needs to access files on a remote Windows machine, probably all you’ll need is
the smb method. If you’re a Windows Emacs user that needs to access remote
hosts, whether remote Unix or remote Windows hosts, you may need to use the
other methods depending on how your Window system is set up.
| Method | Type | Comments |
|---|---|---|
| smb | external | Access files via Samba or SMB |
| sshx | inline | see note |
| scpx | inline | see note |
| plink | inline | … via Putty |
| plinkx | inline | … see note |
| pscp | external | … via Putty |
| psftp | external | … via Putty |
The Tramp manual says that the methods with a trailing “x” are useful for MS
Windows users when the standard methods trigger an error about allocating a
pseudo TTY, and sure enough I need to use sshx on the one Windows machine I
occasionally use in a meeting room at work.
Frankly, as someone who’s basically never used MS Windows, I can’t pretend to understand these distinctions. As always, see the manual.
Third-Party Tramp Methods
There are several additional Tramp methods available as third-party packages, mainly for containers like docker, podman, kubernetes, lxc, hdfs, nspawn, and vagrant.
Multi-Hop Connections
Perhaps you’re at home and need to access a file on work machine
internal.example.com that’s on a non-routable private network, like a host with
10.*.*.* IP address. This would normally be impossible, but if this host is
accessible via ssh from your work desktop myoffice.example.com, say, then you can use
that as a proxy. You can Tramp into the internal host via a multi-hop filename
like this: /ssh:myoffice.example.com|ssh:internal.example.com:/filename. You
just separate the hops with vertical bars (|). You can mix different methods
(e.g. ssh to get to the proxy, but smb to get to the internal host) and
different usernames for each hop.
This implies that you can edit a file on myoffice.example.com as root by adding
a sudo hop at the end (/ssh:myoffice.example.com|sudo::/filename) and indeed
that works fine. Very powerful.
Note that some methods can’t be used in multi-hop pathnames, e.g. scp; I suspect
that external methods are the ones that don’t work. At any rate, Tramp will
tell you if you try an unacceptable combination.
Connection Cleanup
Occasionally you may find that your persistent Tramp connections are hung. This is most likely to happen if a network connection gets dropped—say, your WIFI connection gets dropped, or the remote host is rebooted, or you slept your laptop. In some cases Tramp automatically reconnects for you and you don’t even notice, but if you’re getting Tramp errors, you can fix them by cleaning up your connection and starting over.
The first command to try is M-x tramp-cleanup-connection,
which will offer all your remote connections for completion. Pick the
one that’s generating complaints, and now you can reconnect to that
host (say by revisiting the file with
C-x C-v (find-alternate-file) or
M-x revert-buffer. If you just like to keep things neat,
you can explicitly clean up connections when you know you’re done with
them.
In extreme cases, you can use M-x tramp-cleanup-all-buffers
to clean up all your connections for a totally fresh start. See
“Cleanup remote connections” in the Tramp manual for more information.
References
Free Software Foundation. 2022. TRAMP User Manual. Cambridge, MA: Free Software Foundation..
Read in Emacs with M-x info-display-manual RET tramp RET.
Client / Server
In this book I advocate living in Emacs the Lisp Machine: using pure Elisp
applications (like Calc for your calculator, EWW for your web browser, and Dired
for your file manager) and Emacs front-ends to the external applications you
need to use (like VC for your version control and Ediff for your diffing and
merging), But even if you work this way as much as possible, you’ll inevitably
need to occasionally run an application from a shell in a (non-Emacs) terminal,
and some of these applications will want to invoke “your editor”. For example,
if you use mutt(1) as your mailer296, it will need to invoke your editor
every time you compose an email; if you run git(1) in the terminal for version
control297 it will invoke your editor so you can edit a commit message.
Programs like this typically determine your preferred editor via the value of
the EDITOR environment variable. Yes, you can set EDITOR=emacs, but this isn’t
really right: Emacs is already running, and has been running since you booted
your computer, right? Every additional time Emacs is fired up, you’re divorced
from all the files, Buffers, and everything else in your main Emacs instance:
your state. Also, any vim(1) user will tell you that Emacs takes too long to
start up (this isn’t really true, but a large and insufficiently lazy Init File
can make it so).
The solution to both of these problems—speed, and isolation from your
state—is to run the Server in your main Emacs instance, and set your EDITOR to
be emacsclient.
(If you want to try out emacsclient now, fire up the Server in your running
Emacs with M-x server-start, but see below details.)
emacsclient(1) is a separate program that installs alongside emacs(1). When you
run it, all it does is instantly connect to your running Server, where all your
state is, creating a new Buffer editing the file that was named on the
emacsclient command line. When you’re done editing this file, you have Emacs
tell the emacsclient that you’re done, and the Client then terminates.
And speaking of state, when you’re in an emacsclient Buffer, you really are in
the Server Emacs: all your state is available: you can switch Buffers, split
Windows, edit other files or read some emails: anything you like. If you’ve
jumped around and have forgotten where your new client Buffer is, you can invoke
C-x # (server-edit) and it will take you back there.
A program like mutt or git will have invoked emacsclient with the
name of a temporary file where you’ll edit your email or git commit message: this
file gets visited in your Server Emacs like any other file. The external
program will be waiting for you to finish editing before it mails the email or
checks-in the commit message.
When you’re done with the edit, you’ll save the Buffer as usual, and then invoke
C-x #. When you invoke this command in a client Buffer, it tells emacsclient
that you’re “done” with this edit: it kills the Buffer containing the temporary
file, and terminates, returning control to the program that invoked $EDITOR.
Note that only the emacsclient program, not your Emacs Server, terminates: the
Server keeps running, preserving all your state.
A subtlety for Unix users, at least: C-x # tells the emacsclient to exit
successfully (i.e. with a status of zero); on rare occasions you might want to tell
it explicitly to exit unsuccessfully (i.e. with a non-zero status) so that the
program that invoked the Client via $EDITOR knows you’re unhappy with your
edit. So mutt for example would not send your email298, and git would abort your
commit. You can do this by invoking, instead of C-x #,
M-x server-edit-abort.
If your Emacs Server and your terminal are side by side when the external
program invokes emacsclient, you’ll see the temporary file suddenly appear in
Emacs. If your Emacs is not visible—because it’s on another desktop, or it’s
iconified (minimized) or buried under a pile of other windows—you’ll have to
pull it up to do your editing. You can instead arrange for the emacsclient to
open up a new Frame right in front of you; see below.
It’s not only programs using $EDITOR that can invoke emacsclient—you can invoke
it explicitly yourself.299 Invoking it with a filename, say:
emacsclient foo.c
will visit foo.c in the Server. This time it’s your shell that’s waiting
for emacsclient to terminate. You’ll notice that, in your shell, emacsclient
has printed a message and your shell is waiting for it, and hasn’t yet displayed
its next prompt:
$ emacsclient foo.c
Waiting for Emacs...
C-x # will indicate you’re finished and you’ll get your shell prompt back.
If, in your shell, you invoke emacsclient with several filenames, then the
Client loads all the files into the Server, and C-x # in one of those Buffers
will kill the Buffer and switch to the next file, which has its own Client
Buffer. When you’ve indicated you’re done with all the Client Buffers by
invoking C-x # in each, the emacsclient terminates and returns control to the
shell. You can edit all these files in any order you like and flip back and forth
between them at will.
emacsclient Operating Modes
emacsclient actually has three distinct modes of operation. The default, as
I’ve described, is to visit a file in an existing Frame of the Server Emacs.
If you use the -c or --create-frame option, it will instead open a new graphical
Frame managed by your window system, exactly as if you had invoked
C-x 5 f (find-file-other-frame) from inside Emacs. This
means you don’t have to navigate to one of your other Frames that’s possibly in
another desktop or on another monitor. (This is the option I usually prefer.)
The third possibility is to use the -t (equivalently, the --tty or -nw) option,
which will open a new non-graphical Frame right in your terminal. This has the
advantage of being most intimately connected to the terminal you’re working in,
but all the disadvantages of a non-graphical Emacs.
There are several other emacsclient options, but most of them are for people
with very special needs. Table 46 lists the only ones
I’ve ever needed.
| Option | = Long Option | Effect |
|---|---|---|
-c |
--create-frame |
Create a new graphical frame |
-r |
--reuse-frame |
Reuse an existing frame, otherwise create one |
-t |
--tty |
create a new Terminal frame |
-nw |
--tty |
… the same (“No Window”) |
-n |
--no-wait |
No wait for C-x # |
-a |
--alternate-editor |
what to run if no server |
The -n option tells emacsclient not to wait for you to “finish editing”. It
just visits the named file in the Server and you can take all the time you want
editing it. This is an asynchronous edit, unlike the default emacsclient
synchronous edit, which leaves the invoking shell or other program waiting for
you to finish. With -n, you get your shell prompt back immediately. It works
in all three operating modes: you can combine it with -c, -t, or neither. Note
that you never want to include this option in your EDITOR environment variable!
It would violate the expectations of mutt, git and friends.
The -a option says what to do if there’s no Emacs server running; it takes the
name of an alternate editor program as a parameter. The best alternate editor
is of a course a non-Server Emacs! So this command:
emacsclient -a emacs foo.c
edits foo.c in the running Server, but if there is no running Server, edits
foo.c in a fresh Emacs.
I recommend configuring your EDITOR variable in one these forms, depending on
your preference for a graphical client Frame, a non-graphical (terminal) client
Frame, or no new frame (the default). I use Posix syntax, which will work for
bash(1), zsh(1), etc, but maybe not in exotic shells. This line would go in your
~/.bashrc, ~/.zshrc, or equivalent.
| Graphical Frame | export EDITOR="emacsclient -a emacs -c" |
| Terminal Frame | export EDITOR="emacsclient -a emacs -t" |
| Existing Frame | export EDITOR="emacsclient -a emacs" |
With -c (or -t) you can fire up emacsclient without giving it a file name.
Maybe you’re working in a terminal and want to jot down a quick note in a file
that’s already in your Server Emacs; emacsclient -c will open a new client Frame
right in front of you; now, you can switch to the Buffer of interest, and when
you’re done, delete the Frame with C-x 5 0.300 Or leave the Frame open for
as long as you like.
Edit, Compile, Run Cycle
If you haven’t yet completely bought into the new Lisp Machine cult into which I’m trying to recruit you, you may still be spending a lot of time in a terminal shell.
emacsclient presents a synchronous mode of editing that allows you to work in
the terminal like a vim user: compile your program, run emacsclient to fix your
code, exit and re-compile.
This is an alternative to doing things the Emacs way, in which, instead of
living in a shell in a terminal, you’re in your Emacs: you pull up your file
with C-x C-f foo.c, compile it with M-x compile, and
jump to your errors with C-x ` (next-error). In my opinion,
the Emacs way is superior, but if I haven’t convinced you, Emacs gives you
options.
Remote Server
Another reason to run the Emacs Server is so you can connect to a remote Emacs running on another computer. This is sort of an alternative to using Tramp to edit a remote file in your local Emacs: you can instead connect to the Emacs Server that you’re running on the remote host, and do your editing there.
Tramp is much lighter-weight and is the way to go if you just want to edit a given file, especially over a slow, low-bandwidth, or unreliable network connection. But if what you want is access to your complete remote Emacs state, then you want a remote Server connection. The more state you have in the remote Emacs, the more useful this is. When you connect to the remote Emacs you have all your Buffers available: all your web browser tabs, your Registers and Bookmarks, your email, your Dired Buffers complete with all their marks, and all the rest.
It’s like a plain-text version of Remote Desktop or VNC on a Windows or Mac OS machine, except in my experience it’s much more responsive, simply because you’re only shipping compact plain text across the network most of the time, rather than high resolution images of GUI windows.301
I use this method to connect to the always-running Emacs on my work desktop from my home laptop302; this is how I occasionally work remotely, and during the pandemic of 2020 I worked this way exclusively for years. I do all my email in Emacs on my work desktop, and I’m connected to all the work servers via Tramp from this Emacs.
There’s really nothing new to learn about using a remote Server: all you do is
run the emacsclient on the remote host via SSH like this:
ssh -f myoffice.example.com emacsclient -c
If you’re running the X Windows System on a Unix system and you have enabled SSH
to use X Forwarding, this will open a new graphical Frame on your local
computer, but the Frame belongs to the remote Server running on
myoffice.example.com and makes all your state available. Simple as that.
If you don’t have X Forwarding enabled (you could enable it on the command line
with the ssh -XY options), use this form of the command:
ssh -t myoffice.example.com emacsclient -t
The two -t options give you a terminal Frame instead. If you have a terrible
network connection, the terminal version may be more responsive; I’ve used this
to good effect on long-distance trains for example, which have typically had
very sketchy connectivity. Using mosh(1) instead of SSH will make for the
most robust connection for a non-GUI emacsclient.
You do want to have a few SSH options in your SSH config for best results. I use:
ForwardX11 yes
ForwardX11Trusted yes
ForwardAgent yes
Compression yes
ServerAliveInterval 120
Be sure to put these settings at the beginning of your config file. ForwardX11
yes is equivalent to -X and ForwardX11Trusted yes to -Y. Without both of these
options, your GUI emacsclient may be very slow at updating the display.
Starting Up the Server
We’ve talked a lot about the Emacs Client, but how do you start up the Emacs Server? There are at least three ways.
The --daemon Option
Start your Server by invoking Emacs with the --daemon option. Usually you
arrange for this to happen automatically when you start up your computer: for Unix
users running the X Window System, this typically means adding the line:
emacs --daemon
to your ~/.xession or ~/.xinitrc file.
When you start up Emacs this way, the usual initial Frame with its splash screen
won’t appear. You’ll need to use the emacsclient command to connect to the
Server and open up a Frame. If you always want an initial Frame to appear
first thing, you can add an invocation of emacsclient -c in your
~/.xsession:
emacs --daemon && emacsclient -n -c
Have the OS Start the Server
If you’re on a Unix OS that runs Systemd, you can have it start up your Emacs Server for you when you log in. The main advantage of this is that Systemd will restart your Emacs if it gets killed. See “Emacs Server” in the Emacs manual.
Start the Daemon in Your Init File
You can instead start up the Server from your Init File. This means that whenever you fire up an Emacs, it will ensure that the Server is started for you. This is the method I use. This Init File snippet starts up the Server unless one is already running.303
(require 'server)
(if (fboundp 'server-running-p)         ; new in v28
    (unless (server-running-p)
      (server-start))
  ;; server-start will fail if the server is already running...
  (ignore-errors (server-start)))
Note that if you’re not a regular user of the Server, you can also fire it up
interactively on special occasions with M-x server-start.
Shutting Down the Server
There’s no reason in normal use to explicitly shut down the Server; just let it run until you’re done with Emacsing.304
But the usual command for exiting Emacs, C-x C-c
( save-buffers-kill-terminal), is a little more subtle when
you’re running the Server. If you give that command in a Client Frame (as
created by emacsclient -c or emacsclient -t), it doesn’t exit your Emacs:
rather, it offers to save your Buffers and then acts exactly like C-x #,
informing the emacsclient that you’re done editing, and then terminating the
Client, leaving the Server running. You can use this instead of C-x # if you
like, though I think developing the C-x # habit is better.
If you start Emacs with (server-start) and are in the original server Frame (not
in a Client Frame), C-x C-c will exit your Emacs, though in addition to the
usual cautions, if there are any attached Clients, you’ll be asked:
This Emacs session has clients; exit anyway? (yes or no)
Note that if you start Emacs with --daemon, then all Frames are client Frames,
so C-x C-c will never terminate your Emacs! With --daemon, you need to use
M-x save-buffers-kill-emacs to do so.
Troubleshooting
A quick way to see if your local Emacs Server is happy is to run this command in a shell:
emacsclient --eval "(print :ok)"
If you get a “:ok” in response, the Server is running and all is well.
You can check on a remote Server by ssh’ing to the remote host and running the
same command there. Due to shell quoting issues, this obvious shortcut won’t
work:
ssh myoffice.example.com emacsclient --eval "(print :ok)"
You need an extra level of shell quoting:
ssh myoffice.example.com emacsclient --eval '"(print :ok)"'
In either case, if the Server’s not running, you’ll get some message like:
emacsclient: can't find socket; have you started the server?
Very occasionally, you might try to initiate a connection to a
remote server and find that emacsclient just hangs! Before you do anything as
extreme as ssh myoffice.example.com pkill emacs, try this command:
ssh myoffice.example.com emacsclient --eval '"(top-level)"'
Occasionally you’ll have left your remote Emacs in the middle of waiting for you
to type a response in the Minibuffer or the like, which can cause your
emacsclient connection to hang; invoking top-level can
abort this.
Midnight Mode
When you’re running the Server, you tend to have a very long-running Emacs,
which can accumulate a lot of Buffers.305 (You can say
M-x emacs-uptime to see how long your Emacs has been running.)
Assuming you’re not out of space from visiting enormous files and never killing
their Buffers, there’s nothing wrong with this per se. However, you might
consider 100 or more old Buffers to be too much clutter in your Buffer Menu or
your Completion candidates. If so, midnight-mode to the
rescue. If you invoke it in your Init File:
(midnight-mode +1)
then every night at midnight, it kills all the Buffers that are more than three
days old (for file-visiting Buffers, only if they are unmodified of course).
Three days is just the default, and there are a number of exceptions. You can
readily exclude Buffers that you never want it to clean up, and force it to
always kill Buffers that annoy you. It’s very customizable, so if you use it,
be sure to investigate it by invoking M-x customize-group RET midnight.
Ubiquitous Capture & Note Taking
For all Emacs users, one of the most important tasks must surely be note taking. Note-taking styles are very idiosyncratic, and there are 70 or so third-party packages designed for note-taking, from simple editing modes, through interfaces to web-based “note services”, to complex Zettelkasten implementations, and the awesomeness of Emacs’s own all-powerful Org Mode.
But regardless of how you edit, organize, and search your notes, your primary task is to actually take them without getting distracted from the task at hand. An idea occurs to you, possibly completely unrelated to your current task, and you need to just quickly make a note of it, to be organized—fleshed out, tagged, categorized, linked or whatever is your process---later, so that you can get back to your current task with minimal distraction.
This is called ubiquitous capture by some: ubiquitous because you might take any note anywhere and anytime, and capture meaning a bare-bones jotting-down.
Emacs has two main subsystems for ubiquitous capture, which you might combine.
Remember
Remember is the simplest Emacs subsystem for ubiquitous capture. When an idea
occurs to you, just say M-x remember, and type a line or three in
the *Remember* buffer that pops up, and then issue the (nearly) universal Emacs
“I’m finished with that” keystroke, C-c C-c (remember-finalize).
That’s it! You’re back at whatever you were doing when the idea occurred to
you, your note has been safely socked away, and you can pull it up later to
organize it, flesh it out, etc. The *Remember* Buffer is in
remember-mode, but that Major Mode only has one other
command: C-c C-k (remember-destroy), which lets you abort
your note-taking if you’ve decided you really don’t have much of an idea after
all.
But where did your note go? The default destination is just to append it to the
file notes in your user-emacs-directory—on Unix systems,
that defaults to ~/.emacs.d/notes. Wherever it is, you can pull up that file
with M-x remember-notes.
Each time you capture a new note, it’s appended to the end of the file with some metadata and an annotation. Here’s what a note might look like:
** Tue Feb 14 16:10:56 2023 (new emacs command)
new emacs command
it needs to do something cool!

~/src/tint/lib/types.ml
I didn’t type the filename at the bottom; remember added that for me: it’s the
name of the file I was editing when I took the note. This can be very useful, and you can
easily jump back to that location via M-x ffap (see Find File at
Point). But if your idea is unrelated to your location, you can just delete
that line, as I will do in this case.
The first line of your note (I typed “new emacs command”) is automatically
prefixed with a timestamp, and the two leading asterisks are the syntax for a
new subheading in Org Mode, which would be a good candidate for the Buffer’s
Major Mode. You can Customize remember-notes-initial-major-mode to make this so.
I recommend adding a level-1 headline before your new note, so your notes file
looks something like this:
* INCOMING
** Tue Feb 14 16:10:56 2023 (new emacs command)
new emacs command
it needs to do something cool!
Since M-x remember always appends a note with a level-2 headline,
all new notes end up under the INCOMING category, as a reminder that you want to file
them elsewhere in fleshed-out form, perhaps just in the same file but under some
preceding level-1 headline; the result of that might look like:
* EMACS IDEAS
** Tue Feb 14 16:10:56 2023 (new emacs command)
Add to dired-mode; needs a good key binding...
(defun my-dired-jump-to-dir-of-file ()
  "Jump to directory of symlink target at point."
  (interactive)
  (dired (file-name-directory (file-truename (dired-get-filename)))))
* INCOMING
Other Entry Points
If you give M-x remember a Prefix Arg, it will insert the contents
of the Region in the *Remember* Buffer for you. You can instead use
M-x remember-clipboard to insert the contents of the system
clipboard as the initial contents; this is great for saving things from an
external web browser or other non-Emacs application.
You may want to bind remember to a key; I use C-c r myself.
(keymap-global-set "C-c r" 'remember)
This extremely simple note-taking system—just one easily accessible file in Org Mode format—may be all you require. But if you need something more, Remember can still serve as your ubiquitous-capture front-end to a more complex system. You can also store notes in multiple files named with a timestamp (so you can have separate files for each day, or week, month, or year); add entries to your Diary when you take a note; or store notes as Email messages (some people like to use an Emacs email client to manage their notes); see “Backends” in the Remember manual.
org-capture
The main alternative to the Remember subsystem is Org Capture (see “Capture” in the Org manual), which fully integrates the Remember workflow into Org Mode. In addition to just providing direct access to all of Org’s powerful facilities306 in your notes (especially easy refiling), it supports an extremely useful templating system that lets you choose, with a keystroke, a location for a given type of note and distinct initial formats and annotation types for each.
If you’re ready to make the life-altering deep dive into Org Mode, I highly recommend using Org Capture for your ubiquitous capture needs.
Org Mode
Sitting on top of Emacs is Org mode. It is the thing which made irrelevant my search for the perfect task management software. Like Emacs, you can mold it into whatever workflow works best for you at the time. Later, I discovered it is also a wonderful publishing platform […]. I have used it to author countless technical specifications, my blog, and all of my books. In “Concurrency in Go”, it allowed me to execute the code snippets embedded in the book—a form of literate programming. This ensured that the code people are reading, the output from that code, and the code exported into the book’s repository all have the same provenance. — Katherine Cox-Buday / writer, computer scientist

Figure 49: Editing This Book in Org Mode with Babel
Org Mode began with Outline Mode, a simple Major Mode for editing outlines with nested headings, which had been in GNU Emacs since the very beginning. Carsten Dominik wanted something more:
Org was born in 2003, out of frustration over the user interface of the Emacs Outline mode. I was trying to organize my notes and projects, and using Emacs seemed to be the natural way to go. However, having to remember eleven different commands with two or three keys per command, only to hide and show parts of the outline tree, that seemed entirely unacceptable to me. Also, when using outlines to take notes, I constantly wanted to restructure the tree, organizing it parallel to my thoughts and plans.
So he fixed that problem; but soon he started adding more features to it:
As this environment became comfortable for project planning, the next step was adding TODO entries, basic timestamps, and table support. These areas highlighted the two main goals that Org still has today: to be a new, outline-based, plain text mode with innovative and intuitive editing features, and to incorporate project planning functionality directly into a notes file.
org-mode is like a next-generation outline-mode. Starting from outline-mode’s
simple syntax, it adds metadata (such as a notion of author and title), markup
(italics, bold, tables), hypertext links, and the ability to export your text as
HTML, PDF, and more.307 It’s very easy to use at this level and should be your
choice for most of your “plain text” files.
But this description doesn’t come close to doing Org justice: Org is the subject of a 25,022-line manual and also incorporates calendaring, agendas, database, spreadsheets, literate programming, and metaprogramming.
While Org is huge and complex and deserving of
its own book as big as this one, it’s
actually extremely easy to use as a better text-mode or outline-mode, as a
better and more Emacs-native Markdown,308 and to mix in extra features as you feel
the need for them. Next thing you know, you can call yourself an Org user.
So all I’m going to try to do in this chapter is give an introduction to the basic Org rich markup language and how to publish simple documents, and then provide an orientation and summary of the other major Org facilities and how to find out more about them.
Org as a Simple Outliner
Headings begin with a sequence of asterisks: one asterisk is a top-level heading, two is a subheading, and so on. More asterisks marks a heading as being more deeply-nested (i.e., on a lower level), and so we have a tree structure (imagine paragraphs of text after each of the headings):
* Folding Text
This chapter is about folding text.
** Markup-Based Folding
*** Outline Mode
*** Org Mode
** Implicit Folding
*** Selective Display
*** Hide / Show Minor Mode
*** 3rd-Party
**** yafolding
Org calls these heading lines headlines. Both lower-level headlines and
non-headline text following a headline309 belong to that headline. Since
* Folding Text in the above example is the highest-level headline, everything
after it (up to the next level-1 headline, if any) belongs to it.
** Markup-Based Folding contains the next two lower-level headlines, but not
** Implicit Folding, which is on the same level.
In Org Mode, hitting TAB (org-cycle) on the first line will
fold all the text belonging to it, leaving (in this case) just one visible line:
* Folding Text...
Note the ellipsis at the end of the line, which indicates the presence of hidden folded text under this headline (the dots are just for display and are not actually actually added to your text).
Another TAB will reveal all the next lower level headlines and any contained text:
* Folding Text
This chapter is about folding text.
** Markup-Based Folding...
** Implicit Folding...
You can see that the level-2 headlines remain folded.
A third TAB unfolds everything underneath. Finally, a fourth TAB will fold
everything under * Folding Text again, starting the cycle over. You can
fold and unfold starting on any headline, not just at the highest level.
As with all the Emacs text folding subsystems, the invisible text is still there: you can search into it, and if you copy a Region containing the folded text, the copied text contains all the folded text as well; if you save the Buffer when it’s folded, you are of course saving all the folded text as well (the next time you open the file, all your text will be there, unfolded).
The tripartite cycling of TAB has a global (i.e. whole Buffer) counterpart in
S-TAB (org-shifttab), which does the same three levels of
unfolding and folding but applied to all the headlines in the Buffer
simultaneously. So the book you’re reading, which is a single
23,161-line Org Mode document, can be folded with one S-TAB to fit
completely in half a screen of my Emacs Window.
See “Headlines” in the Org manual and “Visibility Cycling” in the Org manual for more information.
Org’s Rich Markup
There are a number of lightweight markup languages designed as so-called humane alternatives to heavyweight markup languages like XML, HTML, TeX and LaTeX, and Troff: they are easier to learn and easier to type, and more readable—that is, the markup is meant to be suggestive of a typeset equivalent.
Org’s markup language is comparable to others such as Markdown, reStructuredText, or AsciiDoc, but I would claim it’s more powerful—especially for an Emacs user. Let’s take a look at Org markup side-by-side with the published result, keeping in mind that there’s more310 to many of these constructs.
The headlines demonstrated above are part of Org’s markup, and much of the text between the headlines can be thought of as paragraphs, simply separated from each other by blank lines. Within the text, there are a number of ways of indicating emphasis:
Emphasis is indicated like so: /italic/,
*bold*, _underlined_, =verbatim=,
~code~, and +strike-through+; other
markup syntax is ignored in verbatim and
code text, and is typically published in
a monospaced font.  You can escape a
markup syntax character by preceding it
with a leading Unicode zero-width space
(codepoint 200B).
Emphasis is indicated like so: italic,
bold, underlined, verbatim,
code, and strike-through; other
markup syntax is ignored in verbatim and
code text, and is typically published in
a monospaced font. You can escape a
markup syntax character by preceding it
with a leading Unicode zero-width space
(codepoint 200B).
A horizontal rule, spanning a published
page, is a line with 5 or more hyphens:
-----
A horizontal rule, spanning a published page, is a line with 5 or more hyphens:
Subscripts are indicated with an
underscore, as in H_2O, and superscripts
with a caret, as in 5^2 = 25.  -- is an
en-dash and --- an em-dash.  Org
supports over 400 named "entities" that
provide a convenient way to enter
special symbols like \lambda and
\exists.
Subscripts are indicated with an underscore, as in H2O, and superscripts with a caret, as in 52 = 25. – is an en-dash and — an em-dash. Org supports over 400 named “entities” that provide a convenient way to enter special symbols like λ and ∃.
There are several large-scale
structures.  A simple unnumbered list
looks like this:
- tables
- verse
- quote
- centered
- example

A keystroke can convert it to a numbered
list in various formats; =org-mode= will
recompute the numbering for you if you
move, delete, or add items.
There are several large-scale structures. A simple unnumbered list looks like this:
- tables
- verse
- quote
- centered
- example
A keystroke can convert it to a numbered
list in various formats; org-mode will
recompute the numbering for you if you
move, delete, or add items.
A block quote looks like:
#+begin_quote
As we enjoy great Advantages from the
Inventions of others we should be
glad of an Opportunity to serve
others by any Invention of ours, and
this we should do freely and
generously. --- Benjamin Franklin
#+end_quote
A block quote looks like:
As we enjoy great Advantages from the Inventions of others we should be glad of an Opportunity to serve others by any Invention of ours, and this we should do freely and generously. — Benjamin Franklin
and verse (or just anything where you
want unfilled lines) looks like this:
#+begin_verse
We shall have to evolve
problem solvers galore
since each problem we solve
creates ten problems more.
--- Piet Hein
#+end_verse
and verse (or just anything where you want unfilled lines) looks like this:
We shall have to evolve
problem solvers galore
since each problem we solve
creates ten problems more.
— Piet Hein
Literal examples in which markup doesn't apply can be done like this: #+begin_example Athens -> Piraeus London -> Thamesport #+end_example Example blocks are published in a monospace font. Short one-line examples can be done this way: : Rome -> Civitavecchia
Literal examples in which markup doesn’t apply can be done like this:
Athens -> Piraeus
London -> Thamesport
Example blocks are published in a monospace font. Short one-line examples can be done this way:
Rome -> Civitavecchia
Source code blocks can be used for any
programming or markup language Emacs
knows about:
#+begin_src emacs-lisp
  (with-demoted-errors "%s"
    (add-to-list
     'default-frame-alist
     '(font . "Helvetica 12")))
#+end_src
These blocks can be colorized in your
Org Mode Buffer, and also when
published.  They can also be evaluated
and used for metaprogramming and
literate programming.
Source code blocks can be used for any programming or markup language Emacs knows about:
(with-demoted-errors "%s"
  (add-to-list
   'default-frame-alist
   '(font . "Helvetica 12")))
These blocks can be colorized in your Org Mode Buffer, and also when published. They can also be evaluated and used for metaprogramming and literate programming.
Org supports hyperlinks that are
"clickable" in your Org Buffer and are
rendered as links when you publish your
document.  Simple URLs display as
themselves --- https://www.gnu.org/ ---
or you can wrap them in
[[https://www.gnu.org/][a description]].
Internal links allow you
jump between places in your document,
and many specialized Emacs-only link
types are supported (you can link to
email messages, attachments, Info docs, manual
pages, etc).
Org supports hyperlinks that are “clickable” in your Org Buffer and are rendered as links when you publish your document. Simple URLs display as themselves — https://www.gnu.org/ — or you can wrap them in a description. Internal links allow you jump between places in your document, and many specialized Emacs-only link types are supported (you can link to email messages, attachments, Info docs, manual pages, etc).
Org has phenomenal support for tables
(including spreadsheets embedded in
your document); this easy-to-type table:
| Language | Files
|-
| OCaml | 2175
| Emacs Lisp | 156
| Tcl | 13616
when published will look beautiful,
and a keystroke in your Org Buffer
(totally optional) will align the
columns for easy reading while you edit:
| Language   | Files |
|------------+-------|
| OCaml      |  2175 |
| Emacs Lisp |   156 |
| Tcl        | 13616 |
Org has phenomenal support for tables (including spreadsheets embedded in your document); this easy-to-type table:
| Language | Files |
|---|---|
| OCaml | 2175 |
| Emacs Lisp | 156 |
| Tcl | 13616 |
when published will look beautiful, and a keystroke in your Org Buffer (totally optional) will align the columns for easy reading while you edit:
| Language | Files |
|---|---|
| OCaml | 2175 |
| Emacs Lisp | 156 |
| Tcl | 13616 |
I can sum up the files column using the
spreadsheet (I never typed the 15947):
| Language   | Files |
|------------+-------|
| OCaml      |  2175 |
| Emacs Lisp |   156 |
| Tcl        | 13616 |
|------------+-------|
|            | 15947 |
#+TBLFM: @5$2=vsum(@I..@II)
A simple =C-u C-c C-c= anywhere in the
table will update all formulas; the
formulas will also be re-computed upon
publication.
I can sum up the files column using the spreadsheet (I never typed the 15947):
| Language | Files |
|---|---|
| OCaml | 2175 |
| Emacs Lisp | 156 |
| Tcl | 13616 |
| 15947 |
A simple C-u C-c C-c anywhere in the
table will update all formulas; the
formulas will also be re-computed upon
publication.
#+MACRO: uofc The University of Chicago
You can define a /macro/ like the line
above, and refer to it like this:
{{{uofc}}}.  Macros can also take
parameters, as in the date below.  There
are several predefined macros that can
expand thusly: {{{author}}}, {{{date(%Y)}}}.
You can define a macro like the line above, and refer to it like this: The University of Chicago. Macros can also take parameters, as in the date below. There are several predefined macros that can expand thusly: Keith Waclena, 2026.
#+LINK: gnu https://www.gnu.org
There's a special sort of macro for
URLs.  After defining the line above.
you can use it repeatedly in links like
these: go to the [[gnu][GNU website]] and
[[gnu:/software/emacs][Emacs website]].
There’s a special sort of macro for URLs. After defining the line above. you can use it repeatedly in links like these: go to the GNU website and Emacs website.
Inline images can also be displayed in
the Org Buffer, and will appear when
published; they can be given captions,
and can be linked to:
#+ATTR_LATEX: :width 0.1\textwidth
#+ATTR_HTML: :width 50px
[[./images/feed-icon.png]]
Captions can be added to other
structures too (like source blocks).
Inline images can also be displayed in the Org Buffer, and will appear when published; they can be given captions, and can be linked to:
![]() Captions can be added to other
structures too (like source blocks).
Captions can be added to other
structures too (like source blocks).
Comments are not exported to your published document. You can comment out a line easily. # TODO say something interesting Alternatively, you can use a block comment to do many lines at once (and block comments can be folded). #+begin_comment Say several interesting things #+end_comment You can also add a =COMMENT= keyword to a headline, and none of the text under it (including subheads) will be exported. * COMMENT This Isn't Finished Yet Write this section!
Comments are not exported to your published document. You can comment out a line easily.
Alternatively, you can use a block comment to do many lines at once (and block comments can be folded).
You can also add a COMMENT keyword to a
headline, and none of the text under it
(including subheads) will be exported.
See “Markup for Rich Contents” in the Org manual, “Hyperlinks” in the Org manual, and “Tables” in the Org manual for more information.
Simple Publishing (Exporting)
Now that you know how to use headlines to structure your text, and markup to format it, you can very easily publish your document in any of several formats.
You probably want to add some metadata, and perhaps tweak some publishing options (which Org calls export options); your first published document could be as simple as this:
#+TITLE: London Fog
#+AUTHOR: Joe Blow
#+EMAIL: joe@example.com
#+OPTIONS: toc:nil num:nil tags:nil

As Dickens said in [[https://www.gutenberg.org/ebooks/1023][/Bleak
House/]], "Fog everywhere. Fog up the river, where it flows among
green aits and meadows; fog down the river, where it rolls defiled
among the tiers of shipping and the waterside pollutions of a great
(and dirty) city."
See the Org manual for all the metadata possibilities. For most simple,
memo-like documents, I usually use these options; changing any them from nil to
t will toggle their meaning:
toc:nil- don’t generate a table of contents
num:nil- don’t number headlines
tags:nil- don’t include tags
There are couple dozen more of these.
You can export your published document via any of several back-ends; the defaults include:
- LaTeX
- for a PDF or other printed formats
- Beamer
- for a PDF that functions like a slide deck (e.g., to replace PowerPoint or Google Slides)
- HTML
- for web publishing; you can upload the resulting
.htmlfile to your website or blog311 - EPUB
- for an ebook suitable for your e-reader
- ODT
- for an OpenDocument Text file (suitable for people using LibreOffice or MS Word)
- Markdown
- for a Markdown file suitable for uploading to Github, perhaps
- Texinfo
- for a document that’s readable in Emacs via Info
- Man Page
- for a Unix manual page
- Plain Text
- for a neat-looking plain text file with filled paragraphs, etc
There are 48 other backends such as AsciiDoc and
reStructuredText, and since one of them is pandoc, you can use that to export
to even more formats.
For HTML exports, Org provides default CSS styling inline, but you can override it with your own, and there are many 3rd-party stylesheets you can choose from; I’m currently using Fabrice Niessen’s ReadTheOrg for the HTML version of this book. For LaTeX exports, you can use any LaTeX class you like (there are thousands); I use the tufte-latex tuftebook class for the PDF version of this book.
See “Exporting” in the Org manual for more information.
The Fancy Bits
Let’s take a peek at some of Org’s other offerings.
Tagging
There are several mechanisms for organizing your information. First and foremost
are tags, which are simply sets of keywords that can be assigned to any
headline. This headline has two tags, foo and bar:
* A Level 1 Headline :foo:bar:
C-c C-c on a headline makes it easy to add or edit tags with Completion.
Tags are used to classify and categorize your headlines. They form an
inheritance tree: that is, every headline is considered to have its explicit
tags, and, implicitly, all the tags on all the higher-level headlines that contain
it. For example, the headlines below that have been tagged with lisp are Lisp
(explicit), Emacs Lisp, and Common Lisp (both implicit), and the headlines
tagged with oo are Common Lisp, OCaml, and Java; functional applies to all of
the headlines except Java:
* Lisp                :lisp:functional:
** Emacs Lisp
** Common Lisp                    :oo:
* ML                    :ml:functional:
** Standard ML
** OCaml                          :oo:
* Java                             :oo:
Tags are useful just as visual indications, but you can also use them to tie together many headlines across many files in the Agenda.
You can use Org’s sparse trees to fold an entire Buffer so that only headlines with certain combinations of tags are visible, and you can then do an export that’s limited to the visible parts of the Buffer.
See “Tags” in the Org manual for more information.
Hyperlinks, Attachments, and Drawers
In addition to storing information directly under a headline in the form of paragraphs of text or tables (perhaps recursively including a tree of sub-headlines), you can use Org’s hyperlinks to link to other locations in your file or in other files (local or remote), on the web, in your email,312 in your address book, and more. You can also attach other files to your headline; attached files are easily managed with Org’s Attachment Dispatcher: it organizes them in subdirectories related to your headlines, the most important features being that large data files and binary files are stored outside your document file; that you don’t need to think about file- or directory names for the attached files; and that you can move headlines around without worrying about losing track of the associated files. Org’s drawers are sort of like lightweight attachments that live directly in your file, but are kept hidden away (no matter how big they actually are) until you need to see them.
See “Hyperlinks” in the Org manual, “Attachments” in the Org manual, and “Drawers” in the Org manual for more information.
Refiling and Archiving
Org makes it easy to refile your valuable information in controlled ways within
a file, or between files, without using error-prone cutting and pasting.
C-c C-w (org-refile) will move (or copy) the current headline
(or Region) to be under some other headline (the target), chosen with
Completion. There’s a powerful system for identifying targets, and they can be
in other files as well.
A specialized version of Refiling is archiving. When you’re in some sense
“done” with a headline (which might represent a task),
C-c $ (org-archive-subtree) will refile it to the file’s
archive file. Exactly where and how archived headlines are stored is highly
customizable, and you can choose extra information that gets stored with the
archived item (the date of archiving, where it came from, etc). Archiving lets
you keep your files lean and mean, but you can still find all your old
information by searching your archive files.
See “Refile and Copy” in the Org manual and “Archiving” in the Org manual for more information.
The Agenda
The Agenda is Org’s calendar, scheduler, project planner, TODO list, and search interface. It’s job is to gather information of interest from a selection of all your Org files and display an overview of them in a special sort of dashboard Buffer that also makes it easy to jump to an item, or directly act on it right there in the view. You define the set of files that comprise the Agenda, via the Customize Facility—if you add a directory, all its files are included, and you can also add and remove files with a keystroke as you work.
See “Agenda Views” in the Org manual for more information.
Timestamps
You can use Org’s Agenda to keep track of appointments, due dates, and the like. It’s a much more powerful alternative to the standard Calendar.
A headline can have any of several types of timestamps associated with it. These are specially formatted strings that might look like this:
<2023-02-27 Mon 10:00-10:30>
and are easily inserted or modified with
C-c . (org-time-stamp) and several other keystrokes that
differentiate between scheduled times, deadlines, and other types. Existing
timestamps support many convenient commands to tweak the date, jump to the
Agenda for that date, and more.
Org also has powerful facilities for clocking and logging how much time you spend on work tasks, estimating how much time a project will take, and generating reports based on all this.
Here’s an example Agenda dashboard generated from timestamped entries across all my Agenda files and my Diary; I’ve also configured it to display holidays (it’s actually quite colorful):
Week-agenda (W14):
Monday      3 April 2023 W14
  agenda:     Scheduled:  TODO BUGFIX
Tuesday     4 April 2023
  agenda:     13:20-14:30 APPT Doctor
  Diary:      15:30-16:30 D Meeting (Library JRL-220L)
Wednesday   5 April 2023
  Diary:      14:30-15:30 Sysadmin Meeting
  Diary:      17:00-19:00 Study Group
Thursday    6 April 2023
  Diary:      Joe Blow's Birthday: 36 years old
  Diary:      Passover
Friday      7 April 2023
  Diary:      Good Friday
Saturday    8 April 2023
Sunday      9 April 2023
  Diary:      Easter Sunday
The Agenda Buffer has 150+ handy commands for doing things like shifting the view from date to date and between daily, weekly, monthly, and annual views; directly killing, rescheduling, refiling, archiving, and adding new entries; changing priorities; filtering entries; tagging and untagging; narrowing the Agenda to certain files or Buffers; clocking in and out of tasks; searching and Occuring; and doing many of these actions to several marked entries at once. It would all be overwhelming, but I don’t think anybody needs every one of these facilities; I only use a small subset and can barely guess what some of the others are for!
See “Timestamps” in the Org manual for more information.
TODO Lists
When you’re taking notes, you can mark any headline as a TODO item with
C-c C-t (org-todo). After C-c C-t a “New Project” headline will look like:
** TODO New Project
You could just type in “TODO”, but C-c C-t is smart and each invocation will
cycle through your TODO keywords. The default sequence of TODO keywords is
simply TODO and DONE, but you can define your own sets on a file-by-file basis;
perhaps TODO, ACTIVE, DONE, DELEGATED, and CANCELED. TODO states are
distinguished between those that need action and those that don’t or are in some
sense finished; here perhaps TODO and ACTIVE need action and the remainder don’t. C-c
C-t cycles through these states in order.
When you transition an item into a finished state (like DONE,
DELEGATED, or CANCELED here), Org can log a timestamp, prompt you for
a note, and more.
The Agenda can display all your TODO items with a keystroke, filtered in a variety of ways; here’s an Agenda TODO dashboard for one of my software projects:
Headlines with TAGS match: tint
Press ‘C-u r’ to search again
  refer:  TODO autocorrect for tint                                 :bug:tint:
  refer:  DONE implement -b and -e after Tint.eval is done          :bug:tint:
  refer:  DONE tint -b and -e should print result!                  :bug:tint:
  refer:  TODO option to terminate on tint error                :feature:tint:
  refer:  TODO if any tint errors, set exit status              :feature:tint:
  refer:  TODO Fred's request:                                  :feature:tint:
  refer:  TODO fs and vs should respect order of indices        :feature:tint:
See “TODO Items” in the Org manual for more information.
Spreadsheets
Org’s table editor is great for producing beautiful tables in published output, but its tables are also useful for maintaining and manipulating data, like you might do with a spreadsheet program—especially since Org’s tables have spreadsheet capabilities.
| Language   | Files |
|------------+-------|
| OCaml      |  2175 |
| Emacs Lisp |   156 |
| Tcl        | 13616 |
|------------+-------|
|            | 15947 |
#+TBLFM: @5$2=vsum(@I..@II)
A spreadsheet is just a table with special lines at the bottom that store all the formulas. Of course you don’t have to enter or edit this line manually313; it’s entered and maintained for you by Org. As you navigate from cell to cell in the table, a keystroke lets you enter a formula for the cell or for a whole column. Formulas support simple arithmetic, powerful functions from Calc, and even full-blown Elisp expressions.
Whenever you change any of the data or formulas in your table, you can
recalculate the whole spreadsheet with C-u C-c C-c (or just one cell
with a simple C-c C-c).314
When your spreadsheet gets complex, you can toggle on the formula editor, which makes it clear which formulas apply to which cells and allows easy editing of them. And when your spreadsheet is really complex and you’re getting errors, you can turn on the formula debugger to see what’s going on.
See “The Spreadsheet” in the Org manual for more information.
Slideshow Presentations
I use Org to do all my presentations, instead of something like PowerPoint (I export to Beamer). See Slideshow Presentations for more information.
Literate Programming
Donald Knuth invented literate programming in 1984; he wanted to write computer programs in such a way that the code, along with what would normally be explanatory comments, could be read as literature. He implemented his TeX typesetting system this way, resulting in a beautiful 483 page book describing this large and complex program. The idea is that the source code of a literate program can be processed in two ways: it can be tangled to generate the source code of the program, which can be compiled or evaluated, or it can be woven to generate code for typesetting software to produce a book, article, or web page.
One of the tricky things about this is that a given programming language may require that parts of the program appear in a certain order, to make the compiler happy, which might not be the best order for the reader of the woven book to understand how the program works.315 A literate programming system needs to allow the program to be written “out of order”!
Org supports literate programming in a straightforward manner: just
write your text in Org’s markup language, and express your program
source code in separate #+begin_source blocks. If you need to change
the order of things, use Org’s
Noweb syntax.
Now you can tangle your literate program into compilable source code
with M-x org-babel-tangle-file, and weave (typeset) your
document just by exporting it via your preferred backend.
This book is in a small way a literate program, in that I tangle all the recommended Init File snippets scattered throughout the book into an actual executable Init File available for download. Many Emacs users maintain their own Init Files as proper literate programs, as I do with my own.
See “Noweb Reference Syntax” in the Org manual for more information.
Evaluating Code
One of the most amazing features of Org is that it can be used to write dynamic documents that are a mix of static text and the results of evaluating code. In other words, parts of your document can be computed every time you export it for publication.
In addition to exporting nicely formatted and colorized code for your published documents, source blocks can be evaluated in your Buffer to generate document content. For example, instead of typing in a table containing some lines of data, or even inserting it from some data file, you can use a source block that can read in the data and process it into an Org table (or any other sort of presentation: a numbered list, an example block, etc).
Your source block needn’t merely read in existing data and reformat it: it can calculate or generate the data from scratch. You might use a stats package like R to do a statistical analysis of some data and generate plots to be displayed in your document.
Any source block can have an :exports header that says whether to publish only
the source code itself (the default), or to only export the result of evaluating
the code (or both).
Normally, the code and/or results appear in the published document at the location of the source block, but if you give a source block a name, you can define the code in one location, and then call it by name elsewhere, possibly in multiple places. Source blocks can also take parameters, which can have default values. Org calls such named blocks Babel functions. This function computes the number of years from some date to now:
#+name: years-since
#+begin_src emacs-lisp :exports none :var when=1985
  (number-to-string (- (string-to-number (format-time-string "%Y" (current-time))) when))
#+end_src
I can call this function elsewhere like so:
#+call: years-since(when=1918)
which produces a one-line result:
108
Note that I provided a default value, 1985 (GNU Emacs’s birth date), for the when
parameter, since I more than once in this book mention how long GNU Emacs has
been around; if I call the function without giving the when parameter, it will
compute the age of Emacs.
A function that produces a small scalar value is often more usefully called inline like so:
GNU Emacs has been flourishing for call_years-since() years.
which results in:
GNU Emacs has been flourishing for 41 years.
There is also a :results header that let’s you specify how to interpret the
results of evaluating the block: results can be Org tables, lists, saved in
files, and more. #+call: and inline calls can specify :exports and :results
headers that apply only to that call.
You can also evaluate any source block with a C-c C-c to see how your
calculation is working: the results (if not suppressed by a header) will appear
in your Buffer.
Security Issues
The fact that Org Mode allows you to evaluate code from a file raises security concerns. Of course, a dynamic Org document that you evaluate in Emacs is no more dangerous than a file of Python code that you evaluate in the Python interpreter, but people who don’t know about Org might not expect the possibility of evaluation.
Fortunately, Org (and Emacs in general) is very careful about this. By default,
Org will ask you for confirmation before evaluating each source block. If
you’re surprised by this because you loaded and tried to export a file written
by someone else, just say “no” or hit C-g (keyboard-quit) and
then investigate the situation.
Such confirmations are unworkable if you’re editing a document that uses a lot of
executable blocks316, so we usually set org-confirm-babel-evaluate to nil
in a file-local variable. Since Emacs asks you to confirm the setting of this
variable when you visit any file that sets it, you won’t be able to evaluate any
code unexpectedly. See Security Concerns for more information.
See “Working with Source Code” in the Org manual for more information.
Metaprogramming
By metaprogramming I mean a computer program that is written in several programming languages simultaneously. You might think of a Unix shell script that allows you to connect, via pipes, several complete programs, written in various languages, as a kind of metaprogram.
Org is more meta than that, because it doesn’t require that all the different programs be compiled and installed as separate standalone executables.317 Instead, you just embed all the code in all the languages as Org source code blocks in your single metaprogram document.
Any given source code block can contain code in any supported programming language: Emacs Lisp, Python, Awk, Clojure, Haskell, OCaml, Shell: what have you.318 Out of the box, Org supports 48 languages, the Org Contrib project adds 20-odd more, and there are 82 more in the Package Manager.
If you name a source block, then another source block can call it like a function and use its result—even if the two blocks are in different languages! The input to a source block can also be a manually created Org table, including a spreadsheet.
Here’s a list of the languages Org knows out-of-the-box (computed by an Org source block, of course):
awk |
C |
calc |
clojure |
comint |
core |
css |
ditaa |
dot |
emacs-lisp |
eshell |
eval |
exp |
forth |
fortran |
gnuplot |
groovy |
haskell |
java |
js |
julia |
latex |
lilypond |
lisp |
lob |
lua |
makefile |
matlab |
maxima |
ocaml |
octave |
org |
perl |
plantuml |
processing |
python |
R |
ref |
ruby |
sass |
scheme |
screen |
sed |
shell |
sql |
sqlite |
table |
tangle |
Reproducible Research
Many of the counts, diagrams, graphics, tables, and images in this book were produced via Org metaprogramming, but a much more interesting use case, and the reason this feature was added to Org in the first place, is the facilitation of reproducible research. The idea here is that instead of the usual scientific research paper describing some data, a methodology, and summarizing the results, the paper should actually include the actual data, and the source code used to analyze and summarize it, so that other researchers can readily reproduce it.
An Org paper can include the data via attachments or drawers, and all the source code as in-line source blocks which can be evaluated right in your Emacs Buffer. See Schulte et al. This is essentially a plain-text version of Jupyter Notebooks.
Org Outside of Emacs
Org’s markup language is supported by Github as an alternative to Markdown for
README files319, is supported as an input language by pandoc, and is understood as
a syntax by other editors like vim and VS Code, though it should be noted that
the more powerful Org features (like the spreadsheet and metaprogramming) are
typically not supported.
In the use of Org for Ubiquitous Capture and note-taking, it would be very handy to be able to create and edit your Org notes on your tablet or phone—and you can.
As of 12 July 2026, there are four main Org-compatible apps. For iOS there’s beorg, orgro and MobileOrg, and for Android, orgro and Orgzly. There are also two web apps which will work on any device with a web browser: organice and org-web. All these apps typically work with a centralized cloud file store, such as DropBox, Google Drive, or iCloud.
The only one of these that I’ve tried is Orgzly; I use it daily and am extremely happy with it. I’m averse to using cloud file stores, so I have Orgzly synchronize directly with my laptops and desktops via Syncthing, and easily resolve occasional edit conflicts with Ediff.
The original version of Orgzly is apparently now abandonware, but thanks to free software, the community has responded with a new fork that’s maintained and adding new features. This new version is Orgzly Revived, and it’s currently available from Google Play and F-Droid. I haven’t yet switched to it but I probably will with my next new phone.
References
- Ballantyne, Tony. 2018. My Emacs Writing Setup. https://github.com/ballantony/emacs-writing/blob/main/EmacsWritingTips.org.
- Free Software Foundation. 2020. The Org Manual. Cambridge, MA: Free Software Foundation. https://www.gnu.org/software/emacs/manual/org.html.
Read in Emacs with
M-x info-display-manual RET org RET.
- Knuth, Donald E. 1984. “Literate Programming.” The Computer Journal 27, no. 2: 97–111. http://www.literateprogramming.com/knuthweb.pdf.
- Schulte, Eric, Thomas Dye, Dan Davison and Carsten Dominik. 2012. “A Multi-Language Computing Environment for Literate Programming and Reproducible Research.” Journal of Statistical Software 46, no. 3: 1–24. doi:10.18637/jss.v046.i03.
There’s an Org Mode Reference Card; for languages other than English see the web site.
Printing
Emacs has many convenient and useful printing commands you can use. You can print a file or any Buffer320, with or without automatic pagination and headers, and with or without colors and fonts that match what you see in the Buffer. And of course for serious publication-style printing, you can typeset various markup languages like LaTeX and Org for eventual printing.
The very first thing to do is to see if printing “just works” for you! First,
make sure you can successfully print from outside of Emacs, in whatever normal
way you do so. If that works321, try printing from Emacs: just switch to
any Buffer and say M-x print-buffer. If that works,
congratulations! If it doesn’t, skip to Configuring Printing for Unix and
good luck!
Plain Printing
Emacs printing is mostly organized around printing a Buffer. (To print a file
directly, just Visit it first. You can also print a file directly from Dired
with Dired’s P (dired-do-print) command.)
Basic monochrome printing that should work with even the oldest322 printers consists of the four commands in Table 47.
| Paginated | Not Paginated | |
|---|---|---|
| Buffer | M-x print-buffer |
M-x lpr-buffer |
| Region | M-x print-region |
M-x lpr-region |
You can print the whole Buffer, or just the Region, and you can print with
pagination or without. Pagination adds a header that identifies the Buffer, and
adds reasonable margins and page numbers. This is actually done by the old Unix
program, pr(1). You can Customize lpr-page-header-program
to change that.
These four commands are for basic printing of plain text, like listings of programming language source files and the like.
Postscript Printing
Most modern printers, including home printers, are PostScript printers323; PostScript is actually a programming language for describing page layout that printers understand. Emacs has a collection of commands that convert your Buffer to PostScript and then send it to a printer; see Table 48. The main advantage of these commands is that they can also print in color and in various fonts. All these commands paginate and add page headers.
| … with Faces | ||
|---|---|---|
| Buffer | M-x ps-print-buffer |
M-x ps-print-buffer-with-faces |
| Region | M-x ps-print-region |
M-x ps-print-region-with-faces |
Each of these commands interprets a Prefix Arg to “print” to a prompted-for file, instead of to a printer.
You almost certainly want to use these commands instead of the plain printing commands above, and I would guess you’d almost always want color. To simplify things, you could define an alias for this in your Init File like so:324
(defalias 'my-print 'ps-print-buffer-with-faces)
after which you can print your Buffer with M-x my-print.
There’s an analogous set of commands that spool instead of print; see Table 49. This is an old computer jargon term that means to queue things up for printing, and then print them later.
| Spool | … with Faces | |
|---|---|---|
| Buffer | M-x ps-spool-buffer |
M-x ps-spool-buffer-with-faces |
| Region | M-x ps-spool-region |
M-x ps-spool-region-with-faces |
After using one or more of these commands, you can send the whole bunch of
spooled documents to your printer with M-x ps-despool.
There are lots of ways to Customize PostScript printing; try
M-x customize-group ps-print, and see
“PostScript Variables” in the Emacs manual.
“Printing” to HTML
You can also convert any Buffer to colorized HTML, suitable for installing on a web site or attaching to an Email; see Table 50.
M-x htmlize-buffer |
Convert Buffer to HTML |
M-x htmlize-region |
Convert Region to HTML |
M-x htmlize-region-save-screenshot |
… saving to Kill Ring |
M-x htmlize-file |
Convert a file to HTML and save it |
M-x htmlize-many-files |
… do the same for many files at once |
M-x htmlize-many-files-dired |
… via marked files in Dired |
M-x htmlize-region-save-screenshot is designed for pasting colorized
HTML into an Email or the like; it uses inlined CSS so the colorization is
stand-alone.
Configuring Printing for Unix
Hard-copy printing is a complex topic, at least on Unix systems, and the Emacs interface to printer configuration reflects this. As a long-time Unix user, I’ve never had to set up printing under MS Windows or Mac OS—I’ll assume that it just works out of the box on those OS’s.325 But on Unix, there are scads of ways printing might be set up, and I can’t address all that here. I’ll just mention that in my experience, many current Unix systems use CUPS for printing, and CUPS provides both the traditional Berkeley Unix and System V command-line print spooling commands in addition to its web interface.
Emacs uses the lpr(1) command (the Berkeley flavor) as the default program to
print your Buffer. Some systems use lp(1) (the System V flavor) instead; you
can M-x customize-variable lpr-command to
change it.326
Emacs may need to know the name of your printer, if it hasn’t been set up as the
system default. Customize printer-name to fix that. For
some reason, on my work computer, which uses CUPS to talk to a campus-wide
remote printing service, I have to set printer-name to the empty string:
(setq printer-name "")
Why, I don’t know! This is the fault of CUPS (or our printers), not Emacs; I mention it as an example of the kind of fiddling you might have to do.
You may need to add some switches327 to the lpr-command; Customize
lpr-switches for that. I need to add my campus username to
be authorized, for example:
(setq lpr-switches '("-U" "myusername"))
You may need to change more things: finally, I need to set:
(setq lpr-add-switches nil)
in order to prevent Emacs from adding some standard switches each time it prints, which aren’t accepted by our system.
If none of that helps you, you should read the manual; see
“Printing” in the Emacs manual, and then see what you can do via
M-x customize-group for lpr.
Third-Party Packages
The Emacs package repositories I recommend currently have 6,659 third-party packages available for installation. These packages are written by enthusiastic and generous Emacs users and contain a lot of very useful code. See The Package Manager for how to find, install, and manage them, and Security for safety information.
What kind of packages are available? There are scads of Major Modes for every
imaginable programming language; Minor Modes to add convenient editing features
or fix a problem that annoyed somebody or just scratched an itch; packages that
implement new Emacs applications; Emacs interfaces to external applications, and
to web services I’ve never heard of; games and amusements; plenty of Emacs
themes; and who knows what else! (Recently
38
AI-related packages have appeared.) Here I’ll just mention a tiny selection of
additional third-party packages you might want to investigate, some because
they’re popular and others because they’re unusual. I use some of these but
definitely not all—in particular, I haven’t even tried many of these, so don’t
take these as recommendations. Just use
C-h P (describe-package) with any of the package names below
for more information.
csv-mode- Major Mode for CSV files
darkroom- remove visual distractions and focus on writing; see also
olivettiandwriteroom-mode dired-duplicates- find duplicate files locally and remotely
emacs-everywhere- use all the power of Emacs to edit non-Emacs text entry boxes (e.g. in Gmail or any other web page) in a pop-up Emacs Window
hyperbole- kitchen-sink package whose main job is to turn practically everything into a hyperlink; also includes yet-another-outliner and -contacts manager, and a window manager (for your Emacs Frames and Windows)
magit- powerful interface to the Git version control system
multiple-cursors- make the same edits at multiple places in your Buffer at the same time; sort of a sometimes-alternative to Keyboard Macros
operate-on-number- apply arithmetic functions to a number at Point
org-drill- study flash-card style via the powerful Spaced Repetition method; Emacs version of Anki
vlf- Minor Mode that allows instant viewing, editing, searching and comparing of very large files—terabytes in size
which-key- Minor Mode that reminds you of all the possible continuations of
a Prefix key like
C-x 4orC-c; great for newbies
I’ve already recommended and included in the book’s Init File the Incremental
Narrowing Frameworks vertico and its add-on marginalia; windmove for switching
Windows; and wgrep for Writable Grep.
Here are some of the other third-party packages that I’ve mentioned, and sometimes covered in detail, elsewhere in the book:
- Icicles and
selectrum - Completion; see Third-Party INFs
pdf-tools- PDF viewing; see Better PDF Handling with PDF Tools
nov- reading EPUB e-books; see Document Files (PDFs and the Like)
disk-usage- find out where all your disk space has gone; see Third-Party Directory Tools
yafolding- fold many kinds of text; see Yafolding Mode
mew,wanderlust, andnotmuch- mail user agents; see Reading Mail
elfeed- RSS feed reader; see Web and News Feeds (Syndication)
mw-thesaurus- thesaurus; see Dictionaries and Thesauri
fish-completionandbash-completion- much improved Completion for
shell-mode; see Recommended Third-Party Packages goto-last-changeandgoto-chg- navigate to the location of the last change you made in your Buffer; see Move Via Your History of Changes
Security Concerns
Computer security is a vexing topic, and I am not a security expert. Please remember that it’s your responsibility to determine the safety of every program you choose to use, including Emacs and any third-party packages. Any program you run can do anything that your operating system lets it do. But because the nature of Emacs is different from most programs, I will mention a few security issues to be aware of.
Since Emacs contains a programming language interpreter (it’s a Lisp Machine, remember), from a security point of view it’s more like Python, say, than it is like MS Word. When you use Python, of course you understand that the Python interpreter is going to evaluate code: that’s the whole point. The same is true of Emacs and Emacs Lisp.
But because many people think of Emacs as “just a text editor”, they may be surprised that Emacs can evaluate code, and surprised at when exactly that can occur. After TECO, Emacs was probably the first programmable editor. But many editors since have modeled themselves on Emacs and can evaluate code in the form of macros of some sort, which historically led to macro viruses. And spreadsheets (like Excel) of course contain executable formulas. And web browsers execute Javascript code whenever you open a web page328.
So let’s take a look at some of these cases in Emacs to make sure we understand them.
File- and Directory-Local Variables
We’ve already mentioned that you can add code to a file that will set the value
of a Buffer-Local Variable when you Visit the file. This is an extremely convenient shortcut
for the process of: 1. visiting a file, 2. remembering that you now want to change the values of some
Buffer-Local Variables, and 3. changing them with M-x set-variable.
The same facility allows you to put arbitrary code in a file to be evaluated upon Visiting. Obviously this could be dangerous if you Visit a file that was modified by a malicious person—perhaps a file that was emailed to you or that you downloaded from the web.
Suppose we have the file foo.txt that contains exactly this text:
Hello.

Local Variables:
eval: (message "Hello there.")
End:
The Local Variables: block at the end of the file sets the pseudo-variable eval
to the Elisp function call (message "Hello there."). When you Visit the file,
Emacs pops up a Window like this:
The local variables list in foo.txt
contains values that may not be safe (*).

Do you want to apply it?  You can type
y  -- to apply the local variables list.
n  -- to ignore the local variables list.
!  -- to apply the local variables list, and permanently mark these
      values (*) as safe (in the future, they will be set automatically.)
i  -- to ignore the local variables list, and permanently mark these
      values (*) as ignored

  * eval : (message "Hello there.")
As you can see, Emacs clearly displays the code that could be executed, and
asks you whether or not you want to do so. If this ever surprises you (because
you didn’t write this code, or you’re not sure exactly what it does), just say n
and Emacs will finish Visiting the file without evaluating the code. Typing i
will cause it to never evaluate this variable, even in future, different, files.
If in fact you are okay with evaluating the code, and type y, you’ll see (in
this example) the message “Hello there.” displayed in the Echo Area, since
that’s what message does.
Because EIPNIF, you can also tell Emacs that it’s always okay to evaluate code,
any code, from any file, without asking any questions. (This is the ! option
above.) I strongly discourage you from doing this, of course (and I don’t do so
myself).
Variable Safety
Less extreme than the special eval pseudo-variable are ordinary Variables that
you might set in a file. That might look like this:
Local Variables:
crazy-variable: "strange value"
other: 12
End:
Here we’re setting one Variable to a string and one to an integer. Emacs will
go through exactly the same dialog with you as for eval, above. While eval is
considered to never be safe, these two Variables, which I made up, are also
considered to be unsafe because Emacs knows nothing about them.
But because many such settings are perfectly innocent, Emacs has a way to avoid
asking you about all of them. When a Variable is defined, the programmer can
specify its safety. This is done by assigning a predicate329 that tests
whether or not a given value for that Variable is safe. For example, the
documentation for the variable python-indent-offset, which
specifies the number of leading spaces used to indent a line of Python source code
in python-mode, says:
This variable is safe as a file local variable if its value satisfies the predicate ‘integerp’.
integerp, as Emacs will tell you if you ask (with
C-h f (describe-function)), returns true if and only if the
value is a simple integer. So this File-Local Variable setting:
python-indent-offset: 4
is considered safe, and Emacs won’t ask you to confirm it, whereas these two:
python-indent-offset: "foo"
python-indent-offset: (steal-identity!)
are not.
When all the File-Local Variables in a file pass their safety tests, you can Visit the file without the confirmation dialog. If any of them fails, Emacs will use the dialog to check with you.
Third-Party Packages
When installing third-party packages via the Package Manager, remember that a third-party Emacs package can do anything your operating system would allow you to do with Emacs or Elisp yourself, including deleting files or stealing your personal data! In this sense, Emacs is no different than every other package manager—whether for a programming language, the app store on your phone, or an application like a web browser.
In an ideal world, you would personally vet the source code for any package before you install it330, but this assumes you’re a competent Elisp programmer, and realistically, very few people are willing to go to all this trouble and are more trusting or risk-taking than that. But it is at least possible: unlike the vast majority of phone apps, you have complete access to the source code of Emacs packages, thanks to free software. Even if you don’t vet the code, it’s the nature of free software that there’s the potential for many people besides the original author to vet it, and “many eyes make code safer”.
The GNU and NonGNU ELPA repos are managed by the Emacs developers and hosted by
the GNU project, and are probably more secure than other repos. That being
said, I currently use some 171 third-party Elisp
packages from GNU and NonGNU ELPA and from MELPA, the Emacs Wiki, and Github,
have used many more in the past, and have never in 41 years
encountered any malware. But that could change tomorrow, and it’s up to you to
do what you consider to be due diligence. Do some research before installing:
search the package on the web and see what people say about it; visit the
package’s home page (very likely to be found on Github;
C-h P (describe-package) will tell you), and see how many
people are using it.
Package Signatures
Packages can have cryptographic signatures, and Emacs can validate them before
installation. Not all packages are signed, however, and the default is to allow
unsigned packages to be installed. You can Customize
package-check-signature to make this more strict if you
like. Please note that a valid signature in no way implies that a package
contains safe code; it just verifies that the package hasn’t been modified (by a
possibly malicious third party) since its author signed it. It’s up to you to
determine whether or not you trust the author. See
“Package Installation” in the Emacs manual for more information.
Compiling Elisp Code
When you install a package, Emacs compiles the code for efficiency, but the act of compilation can also involve evaluating some of the code. So if you’re really worried about some code, vet it before you even install it.
Evaluating Code in Org Mode
Just as many programming language Major Modes provide a facility to evaluate source code, Org Mode also let’s you define source code blocks and will evaluate them when you export the file. The Org spreadsheet will also evaluate arbitrary Elisp functions. See the Org Mode chapter for more information, and especially the Org manual.
Authentication
Emacs sometimes acts as an intermediary when you are authenticating yourself.
Examples include editing a file via Tramp’s sudo method, connecting to your
email provider via your Emacs mailer, or logging in to a remote host via Tramp.
In these cases, you will be prompted for a password in the Minibuffer. As you
make more and more use of Emacs, this might eventually happen often enough to be
annoying: then it’s time to set up Emacs authentication.
Emacs authentication has three built-in modes:
- The simplest, and the default, form of authentication is to simply store your passwords in a file so Emacs can just look them up and submit them for you.
- Emacs also supports the freedesktop.org Secrets API, used by the Gnome, KDE, and Xfce Unix desktops; if you’re already using one of their password managers you probably want to have Emacs use it too.
- Finally, Emacs can use
pass(1), “the standard Unix password manager”.
I use pass(1) for my web site passwords, but I use an authentication file for my
Emacs password needs. You can use any of these, or combine several. I’ll only describe
file-based authentication here; see
the auth-source manual for more information.
File-Based Authentication
Check the value of the User Option auth-sources with
M-x customize-variable; this is a list of filenames and the first
filename is the default; on Unix systems this will be ~/.authinfo and I’ll
assume it. I think that you should encrypt this file, but it’s neither
mandatory nor the default. The encrypted version is ~/.authinfo.gpg (which will be
listed as the second filename in auth-sources).
To make sure you’re using an encrypted file, Customize auth-sources via
M-x customize-variable and make the .gpg filename the only member;331
you can change where it lives if you like.
Emacs may have created the default (unencrypted) file for you if it has ever asked if you want to save a password (and you answered yes). So if you’re already using an unencrypted authentication file (check for its existence), I suggest you encrypt it (see Symmetrically-Encrypting an Existing File).
Note that for historical reasons, the .authinfo file is also referred to as the
“netrc” file in some documentation. Old-timers will feel me.
.authinfo File Format
The .authinfo file consists of one line per password, and the basic format of
the line is:
machine MYMACHINE login MYLOGINNAME password MYPASSWORD port MYPORT
In general, it’s a sequence of field-name / field-value pairs, and the order of
the pairs doesn’t matter. The field names above suffice for many kinds of
services—remote logins, email authentication—but some services will use
different or additional field names. The port field was originally a TCP/IP
port number, but you can also use the symbolic port name from /etc/services, and
it’s also used loosely to identify services that don’t actually use a port (like
port sudo to specify your sudo(1) password).
The fields are space-separated, so if you have a space in a password (or in any of the field values) you can put the whole value in double- or single-quotes. If you have a quote in a field value, quote the whole value with the other style of quotes, and if you have both types of quote in a field, then, to quote the Knight Templar, “you chose poorly”.332
When Emacs needs a password, the lines in your file are considered in order, and the first to match the situation is chosen. If you have these lines:
machine example.com login joeblow83 password geheimnis port smtp
machine example.com login joeblow83 password hemmelig
then the first will be used when doing SMTP (email-sending) authentication at
example.com but the second line will be used for all other services at that
host.
Unless you name your authentication file strangely, when editing it, Emacs will
use authinfo-mode, which does simple colorization, but also
obfuscates the value of the password field, making it look like four asterisks.
This is to defeat shoulder-surfing; just move Point inside the asterisks to see
the password.
Third-Party Add-Ons
The Package Manager has add-ons for more authentication back-ends:
auth-source-1password- 1password integration
auth-source-gopass- Gopass integration
auth-source-keytar- keytar integration
auth-source-kwallet- KWallet integration
auth-source-xoauth2- XOAUTH2 integration
References
Free Software Foundation. 2022. Emacs auth-source. Cambridge, MA: Free Software Foundation. https://www.gnu.org/software/emacs/manual/auth.html.
Read in Emacs with M-x info-display-manual RET auth RET.
Programming the Lisp Machine
What one fool can do, another can. — Silvanus P. Thompson, Calculus Made Easy, 1911
You can avoid learning elisp and still be very productive using emacs, but chances are if you’re like most people you will get sucked in eventually as the lure of sanding the rough edges off of some mode or other becomes too great :) — Chris Patti
Unlike most lesser but still somewhat-customizable applications, Emacs provides a clear path from your first customization tweak to power user to full-blown extension programmer, primarily because Emacs is itself written in the language used to customize it.
Customization in Emacs Lisp
In the old days, the only way to customize Emacs was by adding Elisp to your Init File, but for at least 29 years—since version 20—the Customize Facility has provided an interactive forms-based system for most of your customization needs. I’m embarrassed to say that I used to disdain Customize (I guess I thought it was too hand-holdy, and anyway, writing Elisp is fun!)—but I was a fool. Customize is very powerful and has major advantages, and I encourage you to use it as much as possible; see The Customize Facility.
That being said, there are a few sorts of customizations that you can’t do, or
can’t do conveniently, via Customize. First and foremost is setting up custom
key bindings; another is complex customizations that require conditional logic
(say, dependent on which host your Emacs is running on, or the version of your
Emacs). Also, if you’re adding a non-trivial lambda expression to a hook, it’s
typically much nicer to edit it in your Init File in
emacs-lisp-mode than to edit it in a hole in a Customize form.
Additionally, some authors of 3rd-party libraries, especially older ones,
may have been too lazy to set up Customization for their User Options.333
Finally, if you start writing your own Elisp functions or defining your own
Faces, your Init File is the place to put them!
Where is My Init File?
For historical and political334 reasons, there are several acceptable
locations for your Init File. The oldest, most traditional, filename is
~/.emacs, though Emacs now prefers ~/.emacs.el (adding the standard file
extension for Elisp files). These locations use the root of your home directory, but there
are good reasons to prefer putting it in your User Emacs Directory, which by
default is ~/.emacs.d/ under the name init.el, or, in full, ~/.emacs.d/init.el.
I recommend the latter: Emacs will eventually create this directory anyway, to
store other files like packages you’ve installed, Abbreviations, or your
saved desktop, so why not keep your Init File in the same place? For more
information, see “Find Init” in the Emacs manual.335
Basics of Elisp Syntax
While you don’t really need to be an Elisp programmer to do simple Init File customizations, you do need to understand the bare minimum of Lisp syntax to do it correctly. Fortunately, few serious programming languages have a simpler syntax than Lisp!336
A Lisp expression is either an atom, or a list of expressions—note the recursive definition.337 The simplest atom is a symbol, which you can think of as a word, and a list is a space-separated sequence of expressions surrounded by parentheses. So all of these are expressions:
nil- an atom (symbol)
use-file-dialog- another atom
(nil use-file-dialog)- a list of two atoms
(nil (nil use-file-dialog))- a list of two expressions, an atom and a (sub-)list
That’s almost all there is to it! Your Init File consists of a sequence of such expressions, separated by (optional) blank lines and comments. Practically speaking, all your top-level expressions will be lists. Comments are notes to the reader and are ignored by Elisp; a comment starts with a semicolon and extends to the end of the line. Here’s a possible snippet from an Init File: a comment, followed by an expression that’s a list of three symbols:
;;; turn off GUI dialogs...
(setq use-file-dialog nil)
Note that using three semicolons to start the comment is just a convention338; just one would be sufficient.
There is of course a little more—but surprisingly little—to Lisp syntax than this. In particular, there are a few types of atoms other than symbols, which have their own syntax: things like numbers, strings, and such; see Variables and Symbols for details.
Quoting
One final bit of syntax is the quotation: any Lisp expression can be prefixed
with a single quote (apostrophe) character ' in order to prevent its
evaluation. Here are two quoted expressions: 'display-line-numbers-mode and
'(partial-completion substring flex). Note that we use just one ' as a prefix,
not a pair of them!
I can’t reveal the truth of when you need to quote something and when you don’t in the space I have available: this is at the heart of understanding the semantics of Lisp. See the Eintr manual for a complete discussion. But I will give a few hints below.
Setting User Options
Let’s see how to set a simple User Option in your Init File (even though you
should prefer M-x customize-option). I personally hate the GUI
dialog boxes that Emacs will occasionally pop up; I want Emacs to always use
the Minibuffer instead. There are two User Options to control this:
use-file-dialog and use-dialog-box.
The first step in setting a User Option is to read the help so that you
understand what values are legitimate, so do
C-h v (describe-variable) on each of them. Turns out both of
these are simple Booleans: I want to set them to nil (i.e. “false”, or
“off”).339
The basic Elisp function for setting a variable’s value is
setq. It takes two parameters: the variable name, and the
new value. So this snippet does the job:
;;; turn off GUI dialogs...
(setq use-file-dialog nil)
(setq use-dialog-box nil)
Some variables want to be set to a number or a string; just write the obvious:
(setq some-variable "this is a string")
(setq some-other-variable 12)
But some variables want to be set to a symbol. For example,
locale-coding-system says what to interpret as your system
locale. Your OS usually tells Emacs what this is, but if it doesn’t, you could
set it in your Init File. The point is that this variable should be set to a
symbol—perhaps utf-8-unix. You would think this would do the job:
(setq locale-coding-system utf-8-unix) ; WRONG
But this will generate an error. Since symbols serve as Lisp variables. Elisp
will try to evaluate utf-8-unix as a variable to get its value—but it’s not a
variable with a value: it’s just a symbol standing for itself. So you have to
quote it to prevent it from being evaluated, like so:
(setq locale-coding-system 'utf-8-unix)
Remember, when the help for a variable says its value should be a symbol, you need to quote the symbol.
When a variable says its value should be a function, you also want to quote it.
This is for the same reason, because most functions are represented as symbols.
The help for confirm-kill-emacs says:
How to ask for confirmation when leaving Emacs. If nil, the default, don’t ask at all. If the value is non-nil, it should be a predicate function; for example ‘yes-or-no-p’.
I have this in my Init File:
(setq confirm-kill-emacs 'yes-or-no-p)
The same goes for when a variable wants a list: you’ll need to be sure to quote the list. This is because lists of data look like function calls: or if you prefer, function calls are expressed as lists. This keeps the syntax very simple, at the cost of needing to know what’s data and what isn’t.
world-clock-list configures the cities for
M-x world-clock (see World Clock). I set it to four cities:
(setq world-clock-list
      '(("America/Chicago" "Chicago")
        ("America/New_York" "Kalamazoo")
        ("America/New_York" "Syracuse")
        ("Europe/Vienna" "Vienna")))
The value here is a list of four lists; each sub-list is a list of two strings. Note how I quote the outer list (but I don’t need to quote any of the contained values: the outer quote covers the whole thing). If I don’t quote the list, I get an error:
Invalid function: ("America/Chicago" "Chicago")
So when setting a variable to a list, quote the list.
Setting Default Values
Some variables are declared Buffer Local; when you ask for help about them, the documentation will say: “Automatically becomes buffer-local when set”. Buffer Local variables are meant to potentially have a different value in every Buffer. So customizing one actually means setting a default value, which will be the variable’s value in any Buffer where you haven’t given it a presumably different local value.
setq will only set the local value of a Buffer Local variable; to set the
default value, we need to use a different function:
setq-default.
I recommend setting the variable indent-tabs-mode to nil
so that Emacs uses only spaces—never tab characters—for indentation (see
Tabs vs Spaces). Here’s how to do it:
;;; never use tabs to indent
(setq-default indent-tabs-mode nil)
So remember, when you read the Help and it says the variable is Buffer Local,
use setq-default.
Setting Hooks
A Hook is just a regular variable with a particular purpose: to hold a list of
functions; see Hooks for an explanation. While you could technically set a
Hook in your Init File with setq, there’s a special function to make it easier:
add-hook. add-hook is preferred to setq for this purpose
because it does some extra work that’s appropriate to Hook variables.
Suppose you want to turn on spell check in text-mode and
other Major Modes derived from it. This is the right way to do it:
(add-hook 'text-mode-hook 'flyspell-mode)
flyspell-mode is of course a function that toggles a Minor Mode on and off, and
such Minor Mode functions are the most common things to add to Hooks.
If you look at text-mode-hook with C-h v after starting Emacs
with the above line in your Init File, you’ll see that its value is a list,
containing at least the symbol flyspell-mode.
Since flyspell-mode is a function, you know you have to
quote it. But why is the variable name text-mode-hook
also quoted? The variable names we use with setq aren’t quoted!
There’s a good and sensible reason, but I won’t try to go into it here (Chassell
explains it in “Text and Auto-fill” in the Eintr manual): for now, you’ll
have to just take this as a magic incantation that placates the Emacs gods.
So when using add-hook, quote both the name of the Hook, and the name of the
function you’re adding to it.
By the way, the extra work that add-hook does for you that plain setq wouldn’t
is that it only adds the function to the Hook’s list of functions if it’s not
already there (so that the function doesn’t run twice!).
Please note that you can set Hooks from Customize, and you should generally prefer to do so. But as your Elisp skills grow, you might find it awkward to edit a multi-line lambda expression in a hole in a form.
Defining Key Bindings
Defining Key Bindings is the big lacuna in the Customize Facility, but your Init
File is here for you. Let’s bind display-line-numbers-mode to a key so
you can more easily toggle it on and off. We’ll use the mnemonic C-c l for our
keystroke (see Bind It To a Key for more on this choice). If we want our new
binding to work everywhere, then we want to use
keymap-global-set according to this pattern:
(keymap-global-set "C-c l" 'display-line-numbers-mode)
By now you won’t be surprised that you have to quote the function (display-line-numbers-mode)
that you’re binding. But what’s up with "C-c l"?
This is one of many ways you can “spell” a key binding. The keymap-global-set
function takes a string that specifies the binding in the same way that Emacs
talks about it. So think of your desired binding, and then ask Emacs how it’s
spelled, and use that.
Suppose you want to bind display-line-numbers-mode mode to a function key instead—perhaps F7.
But how do you spell “F7”? Just ask Emacs: invoke
C-h c (describe-key-briefly) and when prompted for a
keystroke, hit that key. You’ll see in the Echo Area that Emacs spells it <f7>, so
you’d use "<f7>".
Remapping Commands
Sometimes you want to replace a command that’s already bound to one or more
keystrokes with an alternative command that you prefer. Suppose you’ve
installed an alternative to Dired, say neo-dired340, for directory editing.
C-h w (where-is) tells me that dired is
bound to three keystrokes341: C-x C-d, C-x d, and <menu-bar> <file>
<dired>. We can change the binding of C-x C-d with this expression:
(keymap-global-set "C-x C-d" 'neo-dired)
but now we have to do two more. Instead, we can change all the dired bindings
with this single expression:
(keymap-global-set "<remap> <dired>" 'neo-dired)
Disabling Commands
As discussed earlier, Emacs starts with some commands (thought to be confusing to newbies) disabled by default. While I think you’ll eventually enable all these commands, you might actually want to disable some other commands that you find annoying.
For example, suspend-frame is bound to C-z and C-x C-z and
“iconifies” an Emacs Frame (when running in graphical mode). What
“iconification” actually does is up to your window manager; usually it minimizes
the Frame. Since I use a tiling window manager, this command is useless to me
and actually has an annoying effect. I don’t want to accidentally invoke it, so
I disable it like so:
(put 'suspend-frame 'disabled t)
You can use this as a recipe; be sure to imitate the quoting style.
Disabling the command has the advantage of allowing you to still use it on rare occasions.
Un-binding Commands
A less extreme version of this might be to not actually disable a command, but
just remove the key binding by which you accidentally invoke it. You can do
this by binding a key to the special symbol nil like this:
(keymap-global-set "C-z" nil)
After this, C-z will just beep at you, but you can still invoke the command that
was previously bound to C-z, without going through the elaborate Disabled
command dialog, with M-x suspend-frame. See “Key Bindings” in the Emacs manual for more information..
Test Your Init File Modifications!
After every Init File tweak, you should immediately do a test to make sure you haven’t introduced an error! This is especially so if, as I recommend, you run the Emacs Server, which implies that it may be a long time before you next restart your Emacs. If it’s been weeks since you tweaked your Init File, an error at startup time will be all the more puzzling.
After saving your tweaked Init File, just do this:
M-x async-shell-command RET emacs --no-desktop --debug-init
This fires up a fresh Emacs (without bothering with all the files in your
current desktop); if it pops up with no errors, you’ve passed the first test!
You should also test the new functionality you added to see if, in addition to
not blowing up with an error, it also actually does what you expect! Then just
do C-x C-c (save-buffers-kill-emacs) to exit and breathe
easy. (Some classes of bugs won’t reveal themselves this early in the game, but
you might as well eliminate the ones that will.)
If you have made a mistake that generates an error, the --debug-init
option will pop up the Debugger; even without Elisp debugging skills, this should
help you determine where your error is—and anyway, you know it’s got to be in
the tweak you just made! Use q (debugger-quit) to quit out
of the Debugger, and C-x C-c to exit the test Emacs, and see if you can fix your
bug (in the original Emacs where you were editing your Init File). See
“Debugger” in the Elisp manual for details on the Elisp Debugger.
Defining Your Own Commands
One common reason for writing a program is to automate a repetitive editing task. Many such tasks are ad hoc and unique to one situation. Keyboard Macros are often ideal for this: they’re easy and fast to write, so you don’t feel bad about throwing them away when you’re done.
But for more complex tasks, you’ll need a real programming language, and since you’re living inside of a Lisp Machine, of course you’ll choose Emacs Lisp.
Now, I can’t teach you to program in one chapter, but you can learn if you want to, and Robert Chassell’s An Introduction to Programming in Emacs Lisp is the perfect choice. It starts from scratch, uses Elisp, the programming examples are Emacs-oriented, and the entire book can be read in Info, while you write, test, and debug your programs in Emacs.
If you’re already a programmer—especially if you know another Lisp (like Common Lisp or Clojure)—you can skim through Chassell or dive right into the Elisp manual.
What I can do in this chapter is give you a taste of what Elisp programming feels like. We’ll implement a realistic but simple new Emacs command, one that I, at least, actually find to be useful.
A Missing Command
What with the 6,503 interactive commands that Emacs starts out
with, you might be surprised to discover you need one that doesn’t already
exist. I wanted to be able to jump to a random Buffer line, and couldn’t find a
command to do it. Such a command would fit among the Goto commands on the M-g
prefix ( M-g M-g (goto-line),
M-g c (goto-char), and friends). Myself, I’d bind it to
M-g M-r.
So of course I wrote it and added it to my Init File, and now I can M-g M-r
whenever I want.
What use is such a command? I frequently have lists of things in my Emacs: some
are generated by Emacs (like the Buffer generated by
M-x list-colors-display) and some I maintain in files myself —
lists of songs or books or movies to watch, for example. Some of these lists
have hundreds of lines, and sometimes it’s easier to have Emacs pick a
candidate, rather than having to scroll through them, staring until my eyes
glaze over. (I can’t be the only person who needs this; there are dozens of web
sites that let you paste in your data and will then pick a line at random for
you — while you gaze at their ads and they gather your personal info from the
data, I presume.)
An Implementation
Here’s what I wrote. Let’s dissect the parts to see what makes Elisp code, and an Emacs command, tick.
;;; this is my new command
(defun kw-goto-random-line ()
  "Go to a randomly chosen line in the current buffer."
  (interactive)
  (goto-line (+ 1 (random (count-lines (point-min) (point-max))))))
The first thing you’ll notice, probably especially if you’re a programmer, is
all the nested parentheses; this is a hallmark of all members of the Lisp
family.342 Don’t worry about it: emacs-lisp-mode makes
it very easy to keep track of all the parens when you’re editing code.
Amounts of whitespace (except in string literals) are not significant in
Elisp343; you could write the whole function on one line to be perverse.
Lispers use a standard indentation style which is understood by emacs-lisp-mode,
so you barely have to do anything other than hit return in order to have your
function indented conventionally.
Comments
My code starts with a comment on the first line:
;;; this is my new command
Elisp comments start with a semicolon and continue to the end of the line; it’s conventional, but not mandatory, that whole-line comments start with three semicolons (some people prefer two). Comments are very useful in general, and are to be encouraged, but this comment is just a demonstration; it’s completely pointless. For one thing, it tells the reader nothing useful. It would also be pointless to use it to describe what the function does—the usual reason for such a comment in most languages—because the docstring (see below) does that for us.
Naming Things
We’re looking at a function definition: defun stands for “define function”. For
the name of this function I chose kw-goto-random-line. Elisp functions need
fairly long, descriptive names. Since there are 23,150
functions in a stock Emacs, you need a long name to make it unique (there’s
already a standard Elisp function called random, for
example, so that’s right out). When you type them, either at a M-x prompt for
commands, or in source code, Completion means you don’t need to type the whole
thing anyway, and the long names help you recognize the function you want to use
amongst the Completion candidates.
I chose goto-random-line rather than, say, jump-to-random-line, just
because Emacs already uses the goto- prefix for other related functions.
Finally, I used my personal namespace, kw-, at the very beginning: Elisp doesn’t have
real namespaces, so we use package name prefixes as a hack344, and every Emacs user
(who programs) has their own personal prefix they use to namespace their
personal functions.
You might be surprised that I’m allowed to use hyphens in my function name345; this isn’t allowed in most programming languages because it would be taken as a chained subtraction of four variables. In most programming languages, underscores are used instead of hyphens, but because of Lisp’s unique syntax, you can use almost any character in a name. In Lisp, hyphens are to be preferred over underscores.
Function Parameters
The () after the function name is the formal parameter list; this function
doesn’t have any parameters, but the empty parens are still required.
The Docstring
We know that all (good) Emacs commands have documentation that you can look up in the Help system (and that goes for non-command functions too). This documentation is a part of the function definition called the docstring. Most modern programming languages have docstrings (they were invented in the TECO implementation of Emacs in 1976), though often only as a distinguished form of comment extracted by a post-processor; in Elisp, docstrings are actually attached to the symbol that names the command, which is what makes the Help and Apropos systems possible.
A good docstring starts with a one-sentence summary of the behavior of the function. It can be much longer than that: many paragraphs, if necessary, and Elisp defines a markup language for docstrings that supports hypertext links to related functions, variables, documentation, and the like.
Commands Must be Interactive
While all Emacs commands are functions, not all functions are commands.
Commands are functions intended to be called interactively: that is, invoked
explicitly by the user, via M-x or a key- or mouse-binding.
Non-command functions, on the other hand, are intended to be called indirectly
by other commands or functions.
Why not let all functions be invoked by the user?346 The main reason is
because it results in a better user experience; otherwise, the Completion space
would be expanded at least four-fold, and it would diminish the utility of
M-x apropos-command, forcing you to plow through many functions that
you’re never going to invoke directly.
So, unless you mark a function as a command, you can’t invoke it via M-x or a
key binding. The special form (interactive) marks a function as a command,
and it has to come immediately after the docstring in the function definition.
The remainder of the defun is the code that actually implements our command. To
summarize, the overall shape of any Elisp command definition looks like:
(defun COMMAND-NAME (PARAMETER ...)
  "DOCSTRING.
MORE DOCUMENTATION..."
  (interactive)
  (IMPLEMENTATION CODE))
The Algorithm
So how can we implement jumping to a random line in the Buffer? We know how to
jump to a specific line: just call M-x goto-line with the number of
the line we want to jump to. So what if we just call goto-line with a random
number? That’s not quite right: about half of the random numbers are negative
numbers, and those are not suitable to use as line numbers. So we need a
positive random number — but even that’s not quite right: there are a lot of
positive random numbers out there, and most of them are bigger than the number
of lines in any given buffer.347
So really, we want a random number greater than \(0\) and less than or equal to
the number of lines in the current Buffer. Given that, we can just pass it to
goto-line and we’re done.
Every programming language has functions to generate random numbers, but how do
we figure out how to do that in Elisp? The Apropos system will do the job:
M-x apropos RET random RET lists seven candidates348 and we can easily spot
the obvious one: random. Alternatively, we can pop into
the Elisp manual in Info, invoke i (Info-index) and give it
“random” and be taken directly to §3.10 Random Numbers, which describes the
random function in detail. Most significantly, we see that we can give random
an optional integer parameter \(LIMIT\), which causes random to return a number
from 0 to \((LIMIT-1)\).
We also need to know how to find the number of lines in the current Buffer, so that
we can pass a suitable upper-bound to random. The same documentation-searching
techniques with Apropos or the Manual will lead us to the function
count-lines.
So our algorithm is: count the lines in the Buffer, get a random number in that
range, and pass it to goto-line.
The Actual Code
Finally, we get to the actual code that implements our algorithm. After the
(interactive) in our defun, we place one or more Elisp expressions349. (The
value of the last expression in the defun is returned from the function, but
the returned value of an interactively-invoked command is ignored.)
Our implementation is a one-liner: four nested function calls. In most programming languages, a function call looks much as it does in mathematical notation. To call a function \(f\) with the arguments \(x\) and \(y\) typically looks like \(f(x,y)\). This is a prefix notation—the function name precedes its operands—to be distinguished from the infix notation used for common binary operators like \(+\), \(-\), ×, and ÷.
But Lisp uses fully-parenthesized Polish prefix notation350, in which the
function call would look like (f x y). We just move the left parenthesis to the
left of the function name. Additionally, we don’t need to use commas to separate the
arguments: just whitespace. Our expression:
(goto-line (+ 1 (random (count-lines (point-min) (point-max))))))
in traditional notation would look something like:
goto_line(1 + random(count_lines(point_min(), point_max()))) ; this is NOT Elisp
Polish prefix notation implies that even functions that are typically written as
infix operators are written in prefix form: instead of \(1 + x\) we write (+ 1 x).
Prefix notation is more consistent, allows us to use any characters in our
function and variable names, doesn’t require us to memorize operator precedence
rules, and has deeper advantages as well.
Step 1 in our algorithm is to call count-lines. C-h f
count-lines tells us that we need to give it two parameters:
(count-lines START END)
because it’s a general purpose function that counts the lines in the Region
bounded by START and END, which are character positions in the Buffer,
i.e. possible values of Point. For START we need the position of the beginning
of the Buffer, and for END that of the end of the Buffer. The function
point-min gives us START351, and
point-max gives us END. Neither of these functions takes
any parameters, so putting them together gives us:
(count-lines (point-min) (point-max))
the result of which is the value we want to pass to random.
There’s a wrinkle: a careful reading of random’s documentation tells us that,
given a numeric parameter as a limit, it will return a random number from \(0\) to
one less than the limit. (Counting from zero makes programmers happy and is
very common.) There’s really no line \(0\) in a Buffer, and if our random number
can never be the last line in the Buffer, then our function is biased
against the last line.
Fortunately we can easily fix both of these problems by just adding \(1\) to the number of lines! The number is still random: we’ve just adjusted its range:
(+ 1 (count-lines (point-min) (point-max)))
All that’s left is to pass this adjusted random line number to goto-line:
(goto-line (+ 1 (random (count-lines (point-min) (point-max))))))
That’s our complete function; let’s take a look at it again:
(defun kw-goto-random-line ()
  "Go to a randomly chosen line in the current buffer."
  (interactive)
  (goto-line (+ 1 (random (count-lines (point-min) (point-max))))))
We can test it with M-x kw-goto-random-line.
Bind It to a Key
For some custom commands, we might be done at this point. M-x is good enough
for commands that are only occasionally invoked. But my use case for this
command is to invoke it in a long Buffer, and if I’m not inspired by the line I
land on, to invoke it again immediately, and perhaps repeat the process a dozen
times until serendipity solves my decision-making problem—kind of like the way
John Cage or Philip K. Dick used the I Ching in their music composition or
writing.
In other words, I want to bind my new command to a keystroke for easy invocation. This means I need to pick a key sequence. I can either come up with an unused one, or steal the existing binding of some command I don’t I think deserves it. (It’s completely fine to change standard key bindings: you’re just turning Emacs into your ideal editor.)
Appendix D.2, Key Binding Conventions, in the Elisp manual, addressing the authors of Elisp packages, says:
Don’t define ‘C-c LETTER’ as a key in Lisp programs. Sequences consisting of ‘C-c’ and a letter (either upper or lower case) are reserved for users; they are the only sequences reserved for users, so do not block them.
When you’re defining a command in your Init File, you’re the user, so those 52
C-c LETTER key sequences are available to use for your own commands. But for this
command, I’m going to put it on the M-g prefix along with the other goto-
commands. The M-g prefix only has nine bindings out of the box, which gives me
a wealth of available bindings to choose from. I think the felicitous and
mnemonic binding M-g M-r is perfect. Here’s the command that goes in our Init
File:
(keymap-global-set "M-g M-r" 'kw-goto-random-line)
References
- Barski, Conrad and James A. Webb. [n.d.]. Casting SPELs in Lisp—Emacs Lisp Edition: A Comic Book. https://www.lisperati.com/casting-spels-emacs/html/casting-spels-emacs-1.html.
- Borkowski, Marcin. 2021. Hacking Your Way Around in Emacs. https://leanpub.com/hacking-your-way-emacs/.
- Chassell, Robert J. 2020. An Introduction to Programming in Emacs Lisp. Cambridge, MA: Free Software Foundation. https://www.gnu.org/software/emacs/manual/eintr.html.
Read in Emacs with
M-x info-display-manual RET eintr RET. - Glickstein, Bob. 1997. Writing GNU Emacs Extensions. Sebastopol, CA: O’Reilly Media..
- Guerry, Bastien. 2013. Learn Emacs Lisp in 15 minutes. https://learnxinyminutes.com/docs/elisp/.
- Krawitz, Robert, Richard M. Stallman, Dan LaLiberte, Bil Lewis and Chris Welty. 2019. GNU Emacs Lisp Reference Manual. Cambridge, MA: Free Software Foundation. https://www.gnu.org/software/emacs/manual/elisp.html.
Read in Emacs with
M-x info-display-manual RET elisp RET.
The Emacs Community
There’s a vibrant, friendly, and helpful global community of Emacs users, including the volunteers who maintain the source code and are constantly fixing bugs and making enhancements.
Project GNU
GNU Emacs is part of the GNU project (GNU’s Not Unix!) and has its home there. You can go there for the official download page, web versions of the documentation, and more.
The GNU Emacs FAQ
The official Frequently Asked Questions (FAQ) list is available in Emacs via
C-h C-f (view-emacs-FAQ).
The Emacs Wiki
If the FAQ doesn’t answer your question, your next stop should be the
community-supported Emacs Wiki; it’s loaded with tips, tutorials, opinions,
examples, and Elisp code. Try the Emacs Newbie page. Of course it works great
with EWW: M-x eww RET https://www.emacswiki.org/.
Mailing Lists
There are many Emacs mailing lists you can subscribe to. The two most important are probably:
- info-gnu-emacs
- a read-only list of official announcements from the Emacs maintainers
- help-gnu-emacs
- you can post questions to this list and the list members will be happy to try to help you out
Web Sites and Blogs
There are innumerable independent web sites and blogs devoted to Emacs; for one stop shopping, go straight to Planet Emacslife, a feed aggregator covering over 200 Emacs blogs. If you can only read one blog on a regular basis, I’d have to recommend Sacha Chua’s indispensable Emacs News.352
Github
The last time I checked (2024), there were 6,253 public Github repositories tagged with “Emacs”.
Videos, Screencasts, and Podcasts
There are scads of Emacs videos and podcasts, available in the usual places. Try Emacs Screencasts in the Wiki for a starting point.
IRC
You can easily chat with actual humans (one assumes…) about Emacs on Internet Relay Chat (IRC).353 Project GNU says:
There are several IRC channels dedicated to discussion around Emacs on the Libera.Chat network. Use #emacs for general discussion about Emacs, #emacs-beginners for Emacs beginner help, and #emacs-til (“today I learned”) for sharing Emacs tips and tricks. See also our rules and guidelines for the official GNU and FSF IRC channels.
EmacsConf
EmacsConf is the conference about the joy of Emacs, Emacs Lisp, and memorizing key sequences. — https://emacsconf.org/
There’s been an occasional (verging on annual) free Emacs conference since 2013. You can watch the videos of past talks and download papers and such from the conference web site.
NEVER LEAVE EMACS: APPLICATIONS
In this part of the book we discuss major Emacs applications: Modes and subsystems that either replace the other applications most computer users need, or provide Emacs front-ends to them.
Some topics that could be considered Emacs applications are discussed elsewhere; for example:
- archivers
- see Archive Files
- document readers
- see Info: The Emacs Documentation Reader and Document Files (PDFs and the Like)
- file managers
- see Directory Editing with Dired
- file pagers,
tail -f - see Read-Only Buffers, or, Emacs is More and Auto-Reverting (Watching Files)
- file searching tools
- see Meet the Greps
- image viewers
- see Image Files
- printing utilities
- see Printing
- remote logins and shells
- see Remote File Editing with Tramp
- spreadsheets
- see Org Mode
External Commands, Shells and Terminals
There is a world outside of Emacs, and sadly we must occasionally interact with it directly.
Emacs provides indirect, smooth and transparent access to the outside world
through interfaces like the grep family of search commands, the vc family of
version control commands, and many more — you might well use commands like
these without even knowing that they’re interfaces to external commands.
But we still need to run the occasional ad hoc external command that no one has yet written an interface for. Emacs provides many ways to do this.
Running One Command
If you just need to run one command, you can use M-! (shell-command). It prompts you for a command354, runs it synchronously, and
shows you the command’s output (standard output and standard error combined).
For example, if you want to know the date and time355, you could say M-!, type date
at the “Shell command:” prompt, and hit return. This runs the standard Unix
command date.
As the name shell-command and its prompt implies, it uses the shell to run this
command, so you can use shell metacharacters, file globs, redirection, pipes, etc.
Already, even with such a simple command, several questions are raised.
Which shell is being used?
Emacs tries hard to use “your shell” when executing external commands. If your
shell is bash or zsh or any Posix-compliant shell, it’ll be fine. If your shell
is an exotic, not-so-Posix, shell, like say fish or rc, you may or may not have
problems. If you do, try setting shell-file-name to bash
or sh in your init file356.
Where’s the output?
If the command ran successfully but produced no output at all, you’ll see the
message “(Shell command succeeded with no output)” in the Echo Area. For
example, you might remove a file by saying, M-! rm FILENAME357. Since rm is
usually silent, Emacs will report the message above. You can try this with
the harmless command M-! true, which does nothing but succeed, and produces no output.
If the command failed358 silently, you’ll instead see the message “(Shell
command failed with code 1 and no output)”; try M-! false to see this.
If the command produces output (whether to stdout or to stderr), Emacs pops up a
Buffer named *Shell Command Output* which contains it. You can do what you like
with this: gaze upon the output before deleting the Window or killing the
Buffer, jump to the Window to copy some of the text359, or edit the output
to get it into shape for some other purpose.
However, if the command produced only a small amount of output360, it will
be inserted into the *Shell Command Output* Buffer as above, but the Buffer
won’t be popped up; instead the output will be shown in the Echo Area. (You can
still switch to the output Buffer to grab the text.) So M-! date seems to have
the effect of just showing the date and time in the Echo Area.
What happens to the output Buffer if I do M-! twice?
By default, if the *Shell Command Output* Buffer already exists, its contents
are erased before the next M-! uses it. If you’d prefer that subsequent M-!
commands append to this Buffer, you can change this in your init file361.
If you only occasionally want to keep the old contents around, you can also
rename the Buffer before the second M-!.
What do you mean, synchronously?
When I say that M-! runs the command synchronously, I mean that Emacs waits
until the command finishes: if the command takes a noticeable amount of time to
run, Emacs will appear to freeze up, and you can’t type or execute commands.
This is a usually a good thing, because it means that you can’t, say,
accidentally save a file that would affect the running command: synchronous
execution is easier to understand and so the effect is more reliable. Try
running the command M-! sleep 60 and you’ll have to wait one minute before Emacs
comes back to you: that’s synchronous execution.
Of course, you can always interrupt and terminate the external command. You’ve
probably guessed that you do this the same way you interrupt an internal Emacs
command: just hit C-g (keyboard-quit) — try it with M-!
sleep 60. This is exactly the same as Control-C’ing a command in the shell:
Emacs sends a SIGINT signal to the process.
If you’re a Unix programmer, you know that external commands are allowed to
ignore SIGINT. If you hit C-g twice, Emacs sends the unignorable SIGKILL signal
to the command.
Isn’t there an easier way to insert command output?
A common reason to run an external command is to grab its output to insert in
some Buffer. Rather then micromanaging Buffers and Windows by switching to and
from the output Buffer and copying and pasting text, you can directly insert the
output of the command into the current Buffer (at Point) instead, just by giving
M-! a prefix argument. So, if you want a time-stamp in the current Buffer, you
can say C-u M-! date.
What about standard input?
By default, the standard input of the external command is redirected to come
from /dev/null. You can see this by running M-! cat — this command terminates
immediately with no output instead of waiting for input, the way it would in the
shell. In other words, Emacs effectively runs cat < /dev/null.
Sometimes you instead want to use part of a Buffer as the input to the external
command. You could of course tediously copy the text to a temp file and say
something like M-! tr a-z A-Z < /tmp/myfile, but there’s a much easier way.
Just set the Region around the text you want to feed to the command and use
M-| (shell-command-on-region) — that’s a pipe, not an
exclamation point.
Perhaps you want to know how many words are in the previous paragraph. Just set
the Region around the paragraph with M-h (mark-paragraph)
and say M-| wc -w and you’ll see the answer in the Echo Area (there are
80)362.
Sometimes you want the output of the external command to actually replace some
text in your Buffer; giving M-| an argument will do this. For example, if you
just typed a whole paragraph of an email in which you really wanted to yell at
someone but forgot to hold down Caps Lock, just set the Region around the
paragraph and say: C-u M-| tr a-z A-Z, which will feed the paragraph to tr, and
replace the paragraph with tr’s all-uppercase and shouty output363.
Can I run any program this way?
I’m afraid that fully answering this question requires us to enter rather deeply into the Unix weeds364. You can run any classic Unix command-line application, keeping in mind that if it reads from standard input, you need to redirect stdin from a file, as in:
M-! tr a-z A-Z < /etc/passwd
or from the current Buffer, as with M-|: you can’t expect to provide input by
typing at the program (but see Interactive Shells below).
You can fire up GUI programs that don’t use the terminal, like, say, firefox
(best done asynchronously; see What if I don’t want to wait?).
But you can’t necessarily run every program that prompts a human for input (from
/dev/tty, a.k.a. The Terminal) with M-!, or M-|. Some such programs may
work with M-&, but it’s highly dependent on how exactly they use the
terminal365. There aren’t a lot of Unix command-line programs that ask
questions and expect answers, but there are a lot that allow for
single-character input. Many so-called Curses
applications fall into this category: programs like top, htop, vi, vim, less,
more, mutt, and many more.
Additionally, most Curses applications also address the screen i.e. clear the
screen, move the cursor around — up and down and left and right — as an
animation perhaps, or the way vi lets you move the cursor with the hjkl or arrow
keys. Even if they don’t ask for input, these programs won’t work successfully
because cursor addressing requires a terminal emulator366. If you try to
run such a program, the output (consisting largely of what we call escape
sequences) will look like garbage.
The good news is:
- Emacs implements native versions of many of these kinds of Curses programs;
instead of
top, useproced; instead ofmutt, any of Emacs’s mailers; instead ofless,M-xview-mode; instead ofvim, Emacs withM-xevil-mode; and so forth. - If you really want to run
vim(!) ortopormuttinside Emacs, you can; you just can’t useM-!to do it; see Terminal Emulation below.
What if I don’t want to wait?
While synchronous execution is often a good thing, sometimes you want to run a command asynchronously — what if you want to fire up a PDF viewer for example, as a background process367? You don’t want Emacs to be frozen until you’re done reading.
All you need to do in this case is run M-& (async-shell-command). Unlike M-!, after M-& Emacs doesn’t freeze because
it’s not waiting for the command to finish; you can continue working368.
The output Buffer in this case uses a different name: *Async Shell Command*.
There’s one big difference between this Buffer and the synchronous *Shell
Command Output* Buffer: the background process is connected to the *Async Shell
Command* Buffer. This means that if you kill that Buffer, Emacs will kill the
background process associated with it. It will ask permission first:
Buffer "*Async Shell Command*" has a running process; kill it? (yes or no)
Also, if you terminate Emacs itself, all running async processes that Emacs started will be killed. It will display a list of these processes and ask you first: “Active processes exist; kill them and exit anyway? (yes or no)”.
If you instead terminate an asynchronous command outside of Emacs (that PDF viewer probably has a quit command), Emacs will notice and mention this in the Echo Area (e.g. “pdfviewer filename.pdf: finished.”).
Since async commands tend to stick around for a long time, if you run a second
M-&, Emacs will ask:
A command is running in the default buffer. Use a new buffer? (yes or no)
If you don’t want to wait for the previous command to terminate, you should say
“yes”. Really, I’ve never had a reason to answer this question with “no”. Also,
most of the commands one typically runs asynchronously don’t produce any useful output,
so the fact that the *Async Shell Command* Buffer is always popped up is kind of
annoying. I recommend the following settings for your init file:
(setq async-shell-command-buffer 'new-buffer) ;multiple async commands ok!
(setq async-shell-command-display-buffer nil) ;don't pop up the buffer
Managing Asynchronous Processes
If you fire up a number of asynchronous processes in a long running Emacs, you might want to check on them and see what state they’re in.
M-x list-processes pops up a Buffer listing all the asynchronous
processes of which Emacs is the parent.
It might look like this:
Process ▼   PID     Status  Buffer                TTY          Thread Command
OCaml       447866  run     *OCaml*               --           Main   ocaml -nopromptcont
Shell       3779765 run     *Async Shell Command* /dev/pts/0   Main   /bin/zsh -c llpp web/emacs-tutorial.pdf
compilation 418697  run     *compilation*         /dev/pts/6   Main   /bin/zsh -c make clean check
ielm        941277  run     *ielm*                /dev/pts/4   Main   hexl
ispell      1495152 run     --                    --           Main   aspell -a -m -d en_US --encoding=utf-8
server      --      listen  --                    --           Main   (network server on /run/user/1000/emacs/server)
shell       274144  run     *shell*               /dev/pts/5   Main   /bin/zsh -i
You can find your M-& commands by looking in the Command column.
The Buffer column contains clickable links that take you to the Buffer of the
command; you can thus access any output the process has produced. In addition,
if you issue the command d
(process-menu-delete-process) it will kill the
process on that line, and g (revert-buffer)
will update the list-processes Buffer to reflect any changes in the state or existence of the
processes (running M-x list-processes again has the same effect).
For example, if you say M-& sleep 60 and then M-x list-processes, you will see
your command listed;
if you type g within 60 seconds, it will still be there, but if you type it
after 60 seconds, your process, which will have terminated, will be gone from
the list.
You may notice processes in this list that you didn’t start with M-&. These are
processes that Emacs starts for you in response to various commands. In the
above, you can see, from top to bottom:
- an interactive REPL for the OCaml programming language
- an external PDF viewer (
llpp) - a compilation in progress (
make clean check) - an interactive REPL for Elisp (
ielm) - the spelling checker (
aspell) - a
network serverprocess (which is due to my running this Emacs in Server Mode) - an interactive shell that I’m using (
zsh -i)
The only one of these processes that I invoked with M-& is the PDF viewer.
Run Commands from Dired
Another way to run an external command is from a Dired Buffer. This is great if you already happen to be in Dired, but if you’re about to run a command on several files, it’ll often be worth your while to pop up a Dired Buffer first. This lets you pick and choose the files in various ways when a simple file glob isn’t enough. The dozens of basic Dired commands let you do standard file management with a single keystroke (delete, rename, copy, etc), but Dired also has powerful ways to run arbitrary programs on precisely selected sets of files, synchronously, asynchronously, or in parallel. See Running External Commands in Dired.
Interactive Shells
If you anticipate the need to run a whole sequence of shell commands in the near
future, you might as well fire up a shell! M-x shell will pop up a
new Buffer with your shell running in it, in the directory of the Buffer in
which you invoked it (so, if you’re editing a file, the shell comes up in the
directory of that file); the Buffer is in a special Major Mode,
shell-mode.
You can now use that shell much as you would in a terminal. Type commands at the prompt, hit return, and see the output. There are advantages and disadvantages to running your shells in Emacs; the advantages are substantial.
shell-mode Advantages
First and foremost, shell-mode implements an editable transcript of your entire
session. Shell Buffers subsume the features of fancy terminal programs and
add-on terminal multiplexers like tmux and screen, but with the advantage of
using native Emacs features and key bindings that you already know, which are in
sum far more powerful than any given terminal, and which are completely
customizable and extensible.
- Say goodbye to pagers like
lessandmore! Never again will you need to pull up the previous command just to append| lessto it (and then pointlessly re-run it!). Just use any Emacs scrolling or motion commands to view any of the output in this session (but especially seeC-c C-r(comint-show-output)). This is of course like using the scroll bar in a terminal, but far more precise, and once you get where you’re going: - you can easily copy and paste or even edit in place any of the output;
- or open any filename or URL in the output without copy-pasting, retyping, or
mousing (just use
M-xfind-file-at-point,M-xbrowse-url or the like); - or zap uninteresting previous output with a keystroke
(
C-c C-o(comint-delete-output)); - and rather than scrolling, you can search back through any of the output in
this session with all the power of incremental search and
M-xoccur.
You can do any of these things while the program is running and generating more output.
Parenthetically, it should be noted that shell-mode is a descendant of
comint-mode, from which many Emacs interactive modes are
made (such as most programming language REPL modes), so many of the above
advantages also accrue to any comint Buffer (with the same key bindings).
Command History
shell-mode implements its own command-line history operations in place of your
shell’s (though you can link the two histories together); these commands are
tightly integrated with Emacs.
If you’re at the shell prompt, a sequence of
M-p (comint-previous-input) (or <C-up>) commands will pull
up your previous shell commands in place, at the prompt;
M-n (comint-next-input) (or <C-down>’s) will change
direction. (In most shells, plain up- and down-arrows do this, but in a Shell
Buffer, these are the normal Emacs cursor-motion commands, so they actually move
within the Buffer (i.e., within the transcript), as do C-p and C-n).
But you can also move back in the transcript to previous commands at their
original prompts with C-c C-p (comint-previous-prompt); when
you do this you can see the command’s output in context
( C-c C-n (comint-next-prompt) goes the other way.)
Re-running Commands
If you’re at a previous prompt, you can hit
RET (comint-send-input) to copy that command to
the prompt at the end of the transcript and resubmit (i.e., re-execute) it (you
can edit it before hitting RET).
C-c RET (comint-copy-old-input) does the same thing without
submitting the command, so you can edit it at the end of the transcript instead.
It’s a subtle but useful distinction; try both to see what I’m talking about.
In fact, with RET and C-c RET you can re-run shell commands that appear in the
output of shell commands: in other words, you don’t have to be at a previous shell
prompt. So if you do cat README and the README file contains a shell command
like this:
This command prints a Coordinated Universal Time (UTC) timestamp in
ISO 8601 format:

    env TZ=Zulu date +%Y-%m-%dT%H:%M:%SZ

and here's why.
you can execute that shell command without cutting-and-pasting: just position
Point anywhere in that line and hit RET or C-c RET, possibly after editing the
command however you like.
Searching Command History
There are two ways to search your command history. If you just search backward
with C-r (isearch-backward), you will search back through
the transcript, and when you find your way to the command you want, you hit RET
or C-c RET as just described. This involves searching past false matches in the
output of previous commands, so you can instead search the history of commands
in place, like a conventional shell in a terminal, at the latest prompt at the
end of the transcript, with M-r (comint-history-isearch-backward-regexp).
Shell Control Characters
Most shells support the commands in column one of Table 51, so you
may be used to them (unless you’ve turned on vi bindings!); because many of
these keystrokes already have a use in Emacs, the shell-mode equivalents (shown
in column two) are prefixed with C-c.
| Shell | Emacs | Action |
|---|---|---|
C-a |
C-a or C-c C-a |
Go to beginning of line (after prompt) |
C-c |
C-c C-c |
Interrupt the running command |
C-d |
C-c C-d |
Send EOF |
C-e |
C-e |
Go to end of line |
C-c C-e |
*Go to prompt at end of Buffer | |
C-o |
C-c C-o |
*Discard output |
C-n or ↓ |
M-n or C-<down> |
Retrieve the next command |
C-p or ↑ |
M-p or C-<up> |
Retrieve the previous command |
C-r |
M-r |
Incremental search of command history |
C-u |
C-c C-u |
Kill (erase) current line (back to prompt) |
C-w |
C-c C-w |
Kill (erase) previous word |
C-z |
C-c C-z |
Stop the running command |
C-\ |
C-c C-\ |
Quit the running command |
ESC . |
C-c . |
Insert previous final argument |
Two actions (*marked) are not perfect equivalents, in order to make them more useful in an Emacs context.
C-c C-e goes to the end of the line if you’re at the final prompt at end of the
transcript, but if you’re elsewhere, it jumps to the end of the transcript.
Unix’s ancient Control+O command is usually overridden or ignored in modern
shells.
Manipulating the Transcript
You can edit the transcript using any commands you like, but shell-mode defines
some convenience features.
C-c C-r(comint-show-output)- scrolls the first line of this batch of output to the top of the Window; this is what to type if the output of your command was too long to fit in the Window, rather than scrolling backwards imprecisely, hoping to spot the beginning of the output.
C-c C-o(comint-delete-output)- deletes the last batch of
output from the transcript (replacing it with the string
*** output flushed ***). C-c M-o(comint-clear-buffer)- delete everything from
the transcript except for one prompt, exactly what you see when you first run
M-x shell. C-c C-s(comint-write-output)- write the output of the
last executed command to a file; this is equivalent to, but nicer than,
explicitly navigating to the beginning and end of the output, setting the
region, and executing
C-x C-w(write-file).
Directory Tracking
shell-mode tracks cd, pushd, and popd commands369 and synchronizes
the Buffer’s default-directory with them, so as
you move around in the shell, file-related Emacs commands (like
C-x C-f (find-file)) will be aware of where you are
(so if you type cd /etc and then C-x C-f passwd Emacs will pull up
/etc/passwd).
Terminating the Shell
You can terminate your shell just as you would in a terminal: run the shell’s
exit command (typically exit or logout) or send the shell EOF, with
C-c C-d (comint-send-eof). If you do this, the shell Buffer
remains; it will be dead — unresponsive — but you can view it and manipulate
the transcript; you can kill the Buffer when you’re really done. You can also
save a step and just run C-x k (kill-buffer) without
properly exiting the shell; Emacs will, as usual, tell you the Buffer contains a
running process, ask if you really want to terminate it, and if so, kill the Buffer.
Multiple Shell Buffers
If you’ve already fired up a shell, M-x shell will return you to that same shell
Buffer, but you can have as many distinct shells as you like. If you want
another one, you can either manually rename the Buffer first, or instead invoke
C-u M-x shell, which will prompt you for a Buffer name for a brand new shell.
To be precise, with no argument, M-x shell looks for a Buffer named exactly
*shell* and switches to it if it exists; if no such Buffer exists, it fires up a
new shell in a Buffer with that name.
An easy way to manage the common situation of one-shell-per-software-project is
to use C-x p s (project-shell) instead of M-x shell; see
Managing Projects for more information.
There’s no one-size-fits-all way to manage a collection of many shell Buffers, so if you don’t want to use the usual Buffer selection commands to choose the one you want, you’ll have to explore the Package Manager, which has many third-party packages offering a choice of schemes for managing and tracking shell Buffers (none of them suited me, so I wrote my own370).
What about the memory usage of the shell Buffer?
The transcript can take up a lot of space in your Emacs. If you run a command which starts spewing output uncontrollably, it could conceivably eat up all of memory, which is annoying. Why isn’t this a problem in a terminal? Simply because no terminal that I know of stores an unlimited amount of output: they all truncate it at some (probably customizable) limit (the default is often a mere 1,024 lines).
While shell-mode doesn’t have any limit by default, you can set one (expressed
in lines), and I recommend it. However, to maximize the usefulness of the
transcript, I recommend setting it to a fairly sizable number. This init file setting
uses the number of lines in War and Peace:
(setq comint-buffer-maximum-size 65336) ; must be able to cat War and Peace!
(add-hook 'comint-output-filter-functions 'comint-truncate-buffer)
shell-mode Disadvantages
shell-mode does have some disadvantages, compared to running a shell in a
terminal.
- As mentioned above, you can’t run raw-mode or Curses applications371.
shell-mode’s completion is simply nowhere near as good as that ofzsh(which I think has the best completion of any shell),fish, or evenbash— all of which can complete command-line options for many standard commands. Do you know all the long options for GNUtar?zshdoes:$ tar --<TAB> zsh: do you wish to see all 170 possibilities (171 lines)?
and if you hit
TAB, will display them with documentation!I used to think this was a major weakness, but thanks to the valiant contributors to the Emacs ecosystem, no longer! See Recommended Third-Party Packages for a solution.
Recommended Third-Party Packages
To get completion in shell-mode that’s almost as good as
zsh(1) in a terminal, install the fish(1) shell via your OS package manager (I’m
assuming you already have the ubiquitous bash(1) installed), and add this code
to your Init File.
(dolist (pkg '(fish-completion bash-completion))
  (unless (package-installed-p pkg)
    (with-demoted-errors "%s"
      (unless package-archive-contents
        (package-refresh-contents))
      (package-install pkg))))

(add-hook 'shell-mode-hook
          (lambda ()
            (when (and (executable-find "fish")
                       (require 'fish-completion nil t))
              (fish-completion-mode +1)
              (when (and (executable-find "bash")
                         (require 'bash-completion nil t))
                (setq fish-completion-fallback-on-bash-p t)))))
Shell Init File Tweaks
I recommend the following code snippet for your shell’s init file; it’s at least
suitable for bash(1) (add to your ~/.bashrc) or zsh(1) (add to your ~/.zshrc).
Remember that regardless of which shell you use in your terminals,
M-x shell runs the shell defined in
shell-file-name.
The INSIDE_EMACS environment variable will be non-empty (hence the -n) in
subprocesses fired up by Emacs (like the shell run by M-x shell).
We want to set TERM to a terminal that supports ANSI SGR color control sequences for
programs that emit them (notably, grep(1), ls(1), and diff(1)) — ansi is fine
for this. We define aliases to encourage programs to produce colorized output.
We also want to convince programs never to direct their output to a pager like
more(1) or less(1) — the shell-mode transcript is itself
the best pager; we do this by setting PAGER to cat(1).372
Of course, in general we prefer M-x manual-entry to man(1),
M-x grep and friends to grep(1), M-x dired to ls(1), and
M-x ediff and friends to diff(1), but if you’re in a shell Buffer
you’ll occasionally want to invoke these commands.
Finally, I unset a zsh(1) option to prevent it from invoking the Zsh Line Editor
(shell-mode replaces that facility).
if [ -n "$INSIDE_EMACS" ]
then
  export TERM=ansi
  export PAGER=cat
  export MANPAGER=cat
  grep --version 2>/dev/null | grep GNU > /dev/null && alias grep='command grep --color=auto'
  ls   --version 2>/dev/null | grep GNU > /dev/null && alias ls='command   ls   --color=auto'
  diff --version 2>/dev/null | grep GNU > /dev/null && alias diff='command diff --color=auto'
  case "$0" in
  *zsh) unsetopt ZLE ;;
  esac
fi
Terminal Emulation
You can solve both of my claimed shell-mode disadvantages
by using M-x term instead:
- you can run raw-mode and Curses applications because
termis a full-fledged terminal emulator, just likextermor any other terminal - you get the full completion capabilities of whatever shell you use — because
input is delivered a character at a time, instead of a line at a time (as with
shell-mode), when you hitTAByour shell responds normally.
So now you can happily run htop, mutt — even vim works perfectly (if you’re in
a sacrilegious mood).
Thanks for wasting my time with all that stuff about shell-mode then!
Well, I think the combination of shell-mode and native Emacs interfaces to
applications is superior to M-x term. But most of the concepts and commands
from shell-mode apply to term-mode as well, if you factor in the additional
complexities of term-mode.
Complexities?
Since term-mode delivers your input to the shell a character at a time, that
means that you can’t just type Emacs commands! If you fire up term-mode for the
first time, and think, “How does this mode work? I know, I’ll type
C-h m (describe-mode) as usual!”, it won’t work. The C-h is
immediately passed to your shell (where it almost certainly deletes the
character to the left of your cursor), and the m will then be inserted at the
prompt. If you type C-a and your cursor goes to the beginning of the line,
that’s not Emacs doing it: the C-a went directly to your shell and your shell
moved the cursor. You can’t type a M-x command because that gets passed to your
shell (zsh has its own M-x command, for example). Neither <up> nor C-p will
move back into the transcript. You get the idea. If you’re new to term-mode
you might have a lot of trouble figuring out how to “get back to Emacs”.373
Obviously a shell that isolates you from all the powerful synergistic
interactions of Emacs commands would be more of a liability than a
help — you wouldn’t be able to “use Emacs” until you quit the
term-mode shell! — so there’s a way to solve the problem.
Line Mode versus Char Mode
At any moment, the terminal emulator is one of two “sub-modes”374. It
starts up in Char Mode, the “raw” sub-mode, in which (almost) every character is
sent directly to your shell (this is indicated in the Mode Line where it says
“Term: char”), but you can switch to Line Mode to make it act like shell-mode:
almost all control characters are interpreted normally by Emacs and commands are
only sent to the shell when you hit RET. You can toggle back and forth between
these two “modes” at will:
C-c C-j(term-line-mode)- switch to Line Mode (mnemonic (for nerds): Control-j is ASCII “line feed”)
C-c C-k(term-char-mode)- switch to Char Mode (mnemonic:
K for Char, or “the key next to
C-j”)
I said above that in Char Mode, almost every character goes direct to the shell.
But obviously C-c is an exception, since you can use C-c C-j; there are several
other commands on the C-c prefix in Char Mode, including all the shell-mode
commands (so C-c C-c sends a SIGINT, etc). Additionally, C-x is an exception,
so you can change Windows and suchlike easily; it has a few additional
convenience bindings, like C-x M-x being bound to
execute-extended-command.
Disadvantages of the Terminal Emulator
The terminal emulator is a bit of a trade-off. If you spend a lot of time in
the shell running Curses programs, you’ll find the terminal emulator invaluable.
But the less you do in the shell and the more you do in an Emacs-native manner
(as this book is intended to encourage), the more fiddly you may find the need
to switch between Char Mode and Line Mode. Additionally, term-mode is not well
integrated with Tramp (see Remote Shells below), and the transcript commands
(C-c C-o, etc) don’t work as cleanly, because the shell can use escape sequences
in ways that can’t be perfectly predicted and coped with — the transcript can
end up looking strange (this doesn’t really interfere with working in the
terminal, it’s just wonky).
Myself, I basically don’t need any Curses applications (thanks to Emacs
alternatives), so I prefer M-x shell with it’s powerful transcript
and lack of term-mode fiddlyness.
Remote Shells
If you are editing a remote file via Tramp, any shell commands you execute,
whether by M-!, M-&, M-x shell, or M-x eshell (and also dired), will
transparently execute on the remote host. This is frankly almost miraculous
when you first try it, and I feel like I’m underselling this amazing feature by
saying so little about it. But what more can I say? It just works
automatically. As a simple demo, open a remote file (to a Unix host for this
demo) with Tramp and say M-! uname -n; it will display the remote hostname —
not the local hostname! See Tramp for details.
Eshell
Switching to Eshell marked a milestone for me: from then on I dropped all my crufty curses-based programs and switched to much more powerful Emacs alternatives. I now use Emacs everywhere to the point that it even is my window manager. Having a consistent environment well glued together really empowers you. — Pierre Neidhardt
Finally, I need to mention the exotic M-x eshell. M-x shell is
brilliantly integrated into Emacs via the combination of excellent subprocess
support and comint-mode, but taking those for granted, it’s a rather simple
thing: Emacs just sits between you and your shell. After hooking it up, the
shell, which is almost certainly a program written in C, does all the heavy
lifting of running programs, redirecting input and output, setting up pipelines,
etc.
That was too easy for John Wiegley; his eshell is a true, native Emacs shell
implemented in Elisp; it’s not an external program. Its command language is a
wild hybrid of Unix shell and Elisp, and has kind of amazing support for
redirecting command output directly to Emacs Buffers and the like. It’s
well-integrated with Tramp. Not only does it interpret your shell commands, but
it also lets you run Elisp commands and mix them with shell commands! This is a
really novel shell that has some very clever ideas, but as a result, it takes a
little getting used to. Many people who really give it a fair trial are very
devoted to it; doing that is on my TODO list.
References
Wiegley, John. 2020. Eshell. Cambridge, MA: Free Software Foundation. https://www.gnu.org/software/emacs/manual/eshell.html.
Read in Emacs with M-x info-display-manual RET eshell RET.
Browsing the Web
Probably most people spend more time in a web browser than any other application. While this book is intended to encourage you to move all of your computing life inside Emacs, I have to admit that the most unyielding application in this plan is the web browser.
Emacs has at least two viable web browsers (one built-in), but most of them don’t support Javascript, which means that not all web sites are fully functional. In particular, you can forget about doing any shopping in Emacs for now.375 But I do a large amount of my web browsing in Emacs. Many sites don’t require Javascript to function (and some sites look better without it). Emacs web browsing is great for tech blogs and news sites, and in fact being Javascript-free can be a distinct advantage: 1. you’ll almost never see an advertisement in an Emacs browser, and 2. browsing without Javascript is more secure (since many attacks from malicious web pages require it) and preserves more of your privacy.
Two different applications exemplify the two (current) approaches to writing an Emacs web browser:
- Emacs-w3m is a front-end to the external
w3mtext-mode browser. It’s somewhat complex to install but,w3mbeing written in C, is pretty fast. - EWW is a browser written in Emacs Lisp that’s built-in and ready to run. This is the browser I use (I used to use Emacs-w3m): it works great, is completely keyboard-controllable, and when you find a web page that requires Javascript to work, one keystroke pops it open in your preferred external browser: what have you got to lose?
EWW: Emacs Web Wowser

Figure 50: Browsing the Web with EWW
EWW was originally implemented by Gnus author Lars Magne Ingebrigtsen: hence the
silly name EWW: Emacs Web Wowser. An EWW Buffer, like that in Figure
50, is recognizably both an Emacs Buffer and a web page and many of your
intuitive actions and keystrokes will work as expected: TAB from link to link,
SPC to page through, and RET or a mouse-click to follow a link. While there’s
no Javascript support, EWW does handle cookies, submit forms, and display
images.
But many web browser features are handled in a more Emacs-ish manner.
In particular, browser tabs are Buffers. The default Buffer is *eww*. This is
a terrible name, and I think you would prefer that the Buffer be named after the
title of the web page. This is a new feature and so isn’t the default; I
highly recommend Customizing eww-auto-rename-buffer
immediately. (You can instead choose to have the Buffer named for the URL.)
When you click on a link in the web page, the new page re-uses the same Buffer; if you’ve Customized EWW to name the Buffer after the page title, the Buffer will automatically be renamed as you follow links.. You can open a link in a “new tab”—that is, a new Buffer—if you like.
If you’re using desktop-save-mode, all your EWW Buffers
will be saved when you exit, and restored when you next fire-up Emacs. By
default, the restoration of the Buffer contents is done lazily; this is because
fetching and rendering many Buffers full of HTML will slow down your startup.
So after restarting, when you switch to an EWW Buffer it will look empty. Just
type g (eww-reload) to restore your web page. If you’d
prefer to sacrifice startup speed to get all your EWW Buffers reloaded
automatically, Customize eww-restore-desktop.
Entry Points
The main entry point for EWW is M-x eww, which prompts for
a URL or search keywords. So you can invoke something like:
M-x eww RET https://www.gnu.org/software/emacs/ RET
or perhaps:
M-x eww RET gnu emacs web browsers RET
M-s M-w (eww-search-words) will do a web search for the
contents of the Active Region or else prompt you just like M-x eww.
The default search engine is the privacy-focused DuckDuckGo; you can Customize
eww-search-prefix to change that.
M-x eww-open-file is equivalent to giving M-x eww a file:// URL
(probably pointing to a file of HTML), but you don’t need to type the file://
part, and of course you’ll be able to use Completion for the filename.
The command M-x eww-list-bookmarks let’s you fire-up EWW on one of
your EWW bookmarks (see EWW Bookmarks below) and you can also use URLs in the
standard Emacs Bookmarks facility.
You can also invoke EWW from outside Emacs—from an external shell’s
command line, from scripts, or from the xdg-open(1) command. A
suitable invocation is:
emacs --no-desktop -f eww-browse URL
This of course fires up a fresh Emacs; you can also do this via
emacsclient(1) with a little more fiddling, which might be trickier
to script376:
emacsclient --eval '(eww "URL")'
There are many more implicit entry points to EWW via the Browse Url
subsystem. If you configure EWW as (one of) your default browsers,
then you can open web pages from Dired, Email messages,
M-x find-file-at-point, and many other places; see also
Goto Address Mode.
Using the Browser
What do you do with a web page once you’ve pulled it up? First and foremost,
you read it. You can scroll through the Buffer with the usual commands, and use
Incremental Search to search within the page. Like most Emacs applications,
EWW’s Major Mode inherits from special-mode and so supports its usual helpful
bindings for scrolling the Window. EWW has a wealth of its own key bindings;
see Table 52.
| Type | Key | Action |
|---|---|---|
| Page Display | F |
toggle Fonts |
M-C |
toggle Colors | |
M-I |
toggle Images | |
E |
correct character Encoding | |
D |
toggle paragraph Direction | |
R |
Reader mode | |
| Navigation | <tab> |
move Point to next link |
<backtab> |
move Point to previous link | |
RET |
follow the link at Point | |
C-u RET |
open this link in another browser | |
C-u C-u RET |
open this link in a new Buffer | |
G |
M-x eww |
|
d |
Download the object of this link | |
w |
copy URL of link to kill ring | |
i |
browse to the Image at Point | |
C-u i |
copy URL of Image to kill ring | |
& |
open this page in another browser | |
| “Tabs” | C-u M-x eww |
open a web page in a new Buffer |
M-RET |
open link at Point in a new Buffer | |
s |
switch to a different “tab” (with completion) | |
S |
list all EWW “tabs” | |
| History | l |
go back (Left) to previous page |
r |
undo l by going Right |
|
H |
list history of previous pages | |
| Site Navigation | n |
go to “Next” page |
p |
go to “Previous” page | |
u |
go to this page’s parent | |
t |
go to this site’s Top (home) page | |
| Bookmarks | b |
Bookmark this page |
B |
list EWW Bookmarks | |
M-n |
goto Next EWW bookmark | |
M-p |
goto Previous EWW bookmark | |
| Miscellaneous | g |
revert (reload) the web page |
q |
quit the browser window | |
w |
copy URL of this page to kill ring | |
v |
View HTML source of this page | |
C |
view Cookies | |
| Org Mode | C-c C-x C-w |
translate region to org mode |
C-c C-x M-w |
… the same |
Page Display
While you’re reading, you may want to change the way the display looks. You can
change the fonts from variable-pitch (proportional, the default) to fixed-pitch
with F (eww-toggle-fonts),377
M-C (eww-toggle-colors) let’s you choose between accepting the
web page’s preferred color scheme or not378, and you can toggle images on
and off with M-I (eww-toggle-images).379
Those of you who read languages other than English may occasionally need to
correct a bogus character-set encoding with
E (eww-set-character-encoding) or toggle the paragraph
direction with D (eww-toggle-paragraph-direction).
The page display command I use the most is R (eww-readable),
which implements the reader mode familiar from other web browsers. Just plain
EWW is already kind of gloriously like reader mode, but R is great for zapping
all the menus and other navigation from the top of the page. Just use
l (eww-back-url) to restore the full page.
Navigating Links
You can navigate from link to link with TAB (shr-next-link)
and S-TAB (shr-previous-link) (or any other motion or search
commands!) and of course RET (eww-follow-link) will follow
the link and open the new page in the same Buffer. With a single prefix
argument, RET will open the link in another web browser (presumably external to
Emacs), like & (below) does for the current page. With two prefix args (C-u C-u RET),
RET will open the link in a new Buffer, like M-RET below. G (eww) lets you
enter a new URL or search to be opened in this Buffer.
Instead of browsing the content of the link at Point,
d (eww-download) will download it to the
eww-download-directory, which you can Customize. If Point
isn’t on a link, it will download the current web page (as HTML).
When Point is on an image, + and - scale the image size; r will rotate the image
90° at a time; and i (shr-browse-image) will browse to that
image directly, from which page you could perhaps download it. With a prefix
argument, i copies the URL of the image to the Kill Ring.
Likewise, w (eww-copy-page-url) will copy the URL of the link
at Point to the Kill Ring, or, if Point is not on a link, the URL of the page
you’re looking at.
Sometimes, after following a link, you’ll find that EWW is not up to handling
that web page, typically because it depends heavily on Javascript. The
solution for these cases is
& (eww-browse-with-external-browser), which pops up the
current page in another web browser, probably outside of Emacs. But which
browser? It uses the Browse URL facility’s secondary browser, which you’ve
presumably configured (if necessary) to your liking; see below.
Managing “Tabs” (EWW Buffers)
If you invoke M-x eww (or G in an EWW Buffer) with a prefix
argument, i.e. C-u M-x eww, your web page will come up in a new Buffer,
preserving your other EWW Buffers. You can think of these Buffers as browser
“tabs”. When you’re following a
link, M-RET (eww-open-in-new-buffer) or C-u C-u RET will open
that link in a new Buffer.
Obviously you can “switch tabs” using any Buffer switching command, but from an
EWW buffer you can switch with s (eww-switch-to-buffer),
which has the advantage of offering up (via Completion) only your EWW Buffers,
and showing their URLs with their Buffer names.
S (eww-list-buffers) brings up a Buffer with a line for each
EWW Buffer, showing their page titles as well. Just hit RET on the line of the web
page you want to switch to. (You can also invoke
M-x eww-list-buffers from outside of EWW.) This is probably the
friendliest way to switch tabs.
Browser History
The left- and right-arrow buttons of the standard web browser are just the two EWW
commands l (eww-back-url) and
r (eww-forward-url): l goes left—back—to the web page that was
previously displayed in the current EWW Buffer, and r lets you undo that by
going right.
H (eww-list-histories) pops up a new Buffer with the history
of this Buffer’s previous pages: their titles and URLs, just like the S command
does for “tabs”.
Web Site Navigation
EWW has convenience functions for navigating the structure of a web site. When
a web site has next-page and previous-page links, whether represented as text or
graphical arrows or the like, you can use EWW’s n (eww-next-url) and
p (eww-previous-url) commands to follow those links. The
u (eww-up-url) command likewise follows a page’s “up” link
and t (eww-top-url) follows its “home” link. Needless to
say, these commands can’t be guaranteed to work with every site—they depend on
the web site author having clearly labeled those links in the site’s HTML
metadata.
EWW Bookmarks
You can bookmark the current web page with
b (eww-add-bookmark). This is an EWW-specific bookmark, not
a standard Emacs Bookmark, but you can also add the current web page to your
Emacs Bookmarks with the usual C-x r m (bookmark-set), or do
both: your choice. The B (eww-list-bookmarks) command pops
up a Buffer of all EWW-specific bookmarks that’s similar to the S and H Buffers. You can also
navigate sequentially through your EWW bookmarks with
M-n (eww-next-bookmark) and
M-p (eww-previous-bookmark), which I think is a weird idea:
is the sequence of your web browser bookmarks significant to you? To me these
feel almost like a way of jumping to a random bookmark, but YMMV.
Miscellaneous EWW Commands
EWW supports the common special-mode binding of g to Revert your Buffer, which in this case
means to reload the page, and the usual q to quit the window. w will copy the
URL of the current page to the Kill Ring, but only if Point is not on a link.
You can view the HTML source of the current page in an *eww-source* Buffer with
v (eww-view-source). There’s a very powerful function for
Org Mode users: C-c C-x C-w (org-eww-copy-for-org-mode) will
copy the text in the Active Region to the Kill Ring, translating all links to
Org syntax.
Finally, the command C (url-cookie-list) pops up a Buffer
displaying all the cookies that Emacs has received in this session; see HTTP
Cookies for details.
EWW From the Command Line
If you’d like to invoke EWW outside of Emacs from the shell command line, you
can use this trivial script (I name it ~/bin/eww):
#!/usr/bin/env sh
CREATE=
case "$1" in
-c) shift; CREATE=-c ;;
--) shift ;;
-*) exit 124 ;;
esac
exec emacsclient $CREATE --eval '(eww-browse-url "'"$*"'" (quote (4)))'
Now you can say things like:
$ eww https://www.gnu.org/software/emacs/
or:
$ eww gnu emacs web browsers
and it will open EWW in an existing Frame of your running Emacs, assuming you’re
running the Emacs Server; if you’d prefer it to open a new Frame, add the -c
option. If you don’t run the Server, just change emacsclient $CREATE to emacs
--no-desktop and it’ll start up a fresh Emacs for your (this will of course be
slower).
Browse URL
URLs can be found anywhere in Emacs. They might be in the text of some file you’re editing, or in the documentation of an Emacs command, or in an email. You might be about to type one in. The Browse URL subsystem’s job is to make it easy for you to browse these URLs. Browse URL also typically handles clickable links that are actually URLs rather than internal Emacs links. It predates EWW and so has extensive support for external web browsers (though it also supports EWW).
The fundamental Browse URL command is, appropriately enough,
M-x browse-url, which prompts you for a URL, with a default that
comes from the text at Point: so if Point is in or next to a URL, that will be
the default. You can edit it, or zap it and reenter a URL from scratch, or yank
a URL from the Kill Ring, as you like. When you hit RET, the URL will be opened
in your “preferred web browser”. But what is your preferred web browser?
With no Customization, Browse URL will try to choose a suitable one for you.
Strangely (in my opinion), as of this writing, it will never choose EWW! The
default is first guided by your operating system: if you’re running Microsoft
Windows, it will use the default Windows web browser380; if Mac OS, the
default Apple browser. If you’re running Unix, it will use the browser
specified the by the freedesktop.org XDG specification381, falling back to
a list of commonly-installed browsers like firefox(1), chromium(1), KDE,
chrome(1) and finally lynx(1) running in a terminal.
You should give Browse URL a test-run and see if you like the browser that’s chosen for you:
M-x browse-url RET https://www.gnu.org/software/emacs/ RET
If you’re not happy, you should Customize the variable
browse-url-browser-function and change it.
There’s also a notion of your secondary web browser choice: various commands
make it easy for you to occasionally open a URL in this other web browser—for
example, in EWW, by following a link at Point with C-u RET. Setting a
secondary browser especially makes sense if you choose EWW as your primary
browser. For example, I set my secondary browser to be firefox(1), which I use
for web sites that require Javascript. I recommend Customizing
browse-url-secondary-browser-function.
Now you’re ready to use the fleet of Browse URL commands. In addition to plain
old browse-url, you can use the following:
M-xbrowse-url-at-point- browse the URL at Point; like
browse-url, but doesn’t prompt. M-xbrowse-url-of-file- render the current Buffer, presumably of HTML, in your browser.
M-xbrowse-url-of-buffer- like
browse-url-of-file, but works when the Buffer isn’t visiting a file, or when the Buffer is narrowed. M-xbrowse-url-of-region- render, in your browser, the HTML in the Region
M-xbrowse-url-of-dired-file- in a Dired Buffer, open the file on this line in
your browser; this is bound to
Windired-mode.
Additionally, when looking at a URL, M-x find-file-at-point is
an entry point to Browse URL; see Find File at Point.
You can also explicitly invoke Browse URL to use a specific browser by calling one of the commands in Table 53.
M-x Command |
Browser |
|---|---|
browse-url-chrome |
chrome(1) |
browse-url-chromium |
chromium(1) |
browse-url-default-macosx-browser |
Mac OS open command |
browse-url-default-windows-browser |
Windows open command |
browse-url-elinks |
elinks(1) in a terminal |
browse-url-epiphany |
Gnome web browser |
browse-url-firefox |
firefox(1) |
browse-url-generic |
your custom browser |
browse-url-kde |
KDE web browser |
browse-url-text-xterm |
text-mode browser in an xterm(1) |
browse-url-text-emacs |
text-mode browser in an Emacs terminal |
browse-url-w3 |
old all-Elisp browser |
browse-url-xdg-open |
xdg-open(1) |
eww-browse-url |
EWW |
The browse-url-text-xterm command fires up any text-mode web browser, named by
browse-url-text-browser. The default value is lynx; IMHO
better choices are elinks(1) (which does a really nice layout) or w3m(1) (which
does images in the terminal).
The browse-url-generic command is what you can use to configure some other
exotic web browser (perhaps the Emacs-inspired Nyxt, or Opera). Just set
browse-url-generic-program to the name of your browser, and
optionally set browse-url-generic-args as needed. Most of
the other browser-specific commands in Table 53 have their own
browse-url-*-args variable as well, in case you want to add some options.
Browse URL not only handles http: (and https:) URL schemes, but also the mailto:
scheme; when presented with a mailto: URL it invokes your preferred mailer; see
Mail, News, and Feeds. You can teach it to handle other URL schemes by
Customizing browse-url-handlers; this variable is flexible
enough for you to define custom handling of specific web sites too, perhaps
sending Javascript-dependent shopping domains to your secondary browser
automatically.
Goto Address Mode
I mentioned that URLs can appear in almost any Buffer, and the Browse URL
commands will let you jump to them. The Minor Mode
goto-address-mode is a nice enhancement: it colorizes all
the URLs (and also email addresses) in your Buffer, making them more noticeable,
and when Point is at one of these locations,
C-c RET (goto-address-at-point) invokes
browse-url.
You can turn it on everywhere by invoking
global-goto-address-mode in your Init File, but I find that
a bit too sweeping; after all, many application Buffers, like EWW and Gnus, have
their own in-built facility. I turn it on in Shell Modes and, via
goto-address-prog-mode, in programming language Major
Modes, where it’s only activated in comments and strings.
;; goto-address-mode is handy in these modes
(dolist (hook '(shell-mode-hook eshell-mode-hook))
  (add-hook hook #'goto-address-mode))
(add-hook 'prog-mode-hook #'goto-address-prog-mode)
HTTP Cookies
All Emacs commands that fetch data from a web server use functions from
the url package, and handling of all HTTP cookies is done in these functions.
While cookies are obviously essential for sites requiring authentication, managing shopping carts, and the like, since such sites almost always require Javascript, they don’t work in EWW. For most other sites, cookies are unnecessary and probably only used to track you. I block all of them and this has never yet interfered with my use of any web site in EWW. You can block them with this Init File snippet:
(setq url-cookie-untrusted-urls '(".*")) ; cookies: generally a bad idea
If you feel less extreme about this than I do, you can Customize this variable to block only specific domains or URLs instead.
Note that if you don’t use EWW and configure Browse URL to invoke an external web browser, then cookies will of course be handled by that browser, and not by Emacs.
User Options
There are many User Options related to web browsing that you might want to
Customize. Do M-x customize-group for the eww, browse-url, and
url-cookie groups.
References
Free Software Foundation. 2020. EWW. Cambridge, MA: Free Software Foundation. https://www.gnu.org/software/emacs/manual/eww.html.
Read in Emacs with M-x info-display-manual RET eww RET.
The Calendar, Diary, and Clocks

Figure 51: Calendar for the Epoch
The calculation of dates and holidays is extremely complex, and Emacs has a
correspondingly powerful Calendar subsystem to handle this. You can pop up
a three-month calendar, centered on today, in a compact Window with
M-x calendar. Add a prefix argument and it will prompt you for a
year and month on which to center (instead of today). Figure 51
shows the Calendar window for the Unix Epoch382, which is 00:00:00 UTC on 1
January 1970. The highlighted dates are holidays.
The Emacs Calendar can display any month since January of the year 1 of the Common Era; the Calendar always displays the Gregorian calendar, even for a date at which the Gregorian calendar did not exist (i.e. before October 1582). However, the Calendar supports eleven additional calendar systems—Bahá’í, Chinese, Coptic, Ethiopic, French Revolutionary, Hebrew, Islamic, ISO, Julian, Mayan, and Persian—and can translate between them.
Besides displaying the calendar for any month, the Calendar subsystem can count days between arbitrary dates, display holidays and astronomical information, convert dates to and from the other calendar systems, generate printed calendars (in HTML, PDF, or LaTeX forms), and it also has a powerful Diary to keep track of your appointments. There’s also a timeclock facility for tracking your hours, but I think that’s better done in Org Mode.
Setting Up the Calendar
You should Customize the two variables calendar-latitude
and calendar-longitude to exploit some of the Calendar’s
more interesting features; these values are easy to get from a
gazetteer383, map or mapping software, or from Wikipedia in many cases.
The easiest way to express these values is as a Lisp vector, as in this example:384
(setq calendar-latitude  [43 02 north]) ; = 43°02'49"N
(setq calendar-longitude [76 08 west])  ; = 76°08'40"W
While you’re at it, you might set calendar-location-name to
a string naming your location; this is totally optional and merely makes some
displays look a little nicer.
(setq calendar-location-name "Syracuse, NY")
You can of course set these via M-x customize-variable instead.
I also recommend these Init File settings so that you’ll get colorized holidays and diary entries by default:
(setq calendar-mark-holidays-flag t        ; colorize holidays in the calendar
      calendar-mark-diary-entries-flag t)  ; also diary entries
Motion
Moving around in the Calendar is designed by analogy to the textual object
motion commands you’re already familiar with, from the smallest units (days =
characters) to the largest (years = pages). All these commands take numeric
arguments, so it’s easy to jump forward six months, say, with C-u 6 M-}. See
Table 54.
| Backward | Unit | Forward | Analog |
|---|---|---|---|
C-b, ← |
day | C-f, → |
(character) |
C-p |
week | C-n |
(line) |
M-{ |
month | M-} |
(paragraph) |
C-x [ |
year | C-x ] |
(page) |
| Beginning | Ending | ||
C-a |
week | C-e |
(line) |
M-a |
month | M-e |
(sentence) |
M-< |
year | M-> |
(buffer) |
You can jump directly to a specific date with the commands in Table 55.
| Command | Action |
|---|---|
g d |
go to specific date |
o |
center calendar on specific month |
g D |
go to specific day number in year |
g w |
go to specific week number in year |
. |
go to today |
> |
scroll one month forward |
< |
… backward |
C-v |
scroll three months forward |
M-v |
… backward |
Counting Days
You can count the number of days between any two dates in the Calendar. Just
move to one of the days, set the Mark, move to the other day385, and invoke
M-= (calendar-count-days-region).
Holidays
Emacs knows a lot of holidays, both secular United States holidays and major
religious holidays in the Bahá’í, Chinese, Christian, Islamic, and Jewish
traditions.386 Use M-x customize-group RET holidays to choose the ones
you’re interested in. When you’re in the Calendar, you can display them with
the commands in Table 56.
| Command | Action |
|---|---|
h |
display Holidays for date at point |
a |
display All holidays in view in another window |
x |
mark holidays in view |
u |
unmark … |
My recommended setting for calendar-mark-holidays-flag above marks (colorizes)
the holidays in the Calendar Window by default, so you won’t need the x command
unless you’ve unmarked them with u (for a clearer view perhaps).
M-x holidays pops up the same window as the a command in the
Calendar Window, but you can use it without first opening the Calendar;
M-x list-holidays prompts you for a range of years and generates a
Buffer listing all the known holidays in that time range.
The Emacs Ephemeris: Astronomical Information
The Calendar can compute the times of sunset and sunrise, the phases of the moon387, and the dates of upcoming eclipses.
| Command | Action |
|---|---|
S |
display time of Sunrise and Sunset |
M-x calendar-sunrise-sunset-month |
… for every day this month |
M-x sunrise-sunset |
… for today |
C-u M-x sunrise-sunset |
… for a given date |
C-u C-u M-x sunrise-sunset |
… and a given location |
M |
display Moon phases in calendar view |
M-x lunar-phases |
… the same |
C-u M-x lunar-phases |
… for a given month and year |
M-x lunar-phases includes upcoming eclipses in its listing; here’s
an example:
Friday, February 2, 2024: Last Quarter Moon 5:23pm (CST)
Friday, February 9, 2024: New Moon 5:01pm (CST)
Friday, February 16, 2024: First Quarter Moon 9:02am (CST)
Saturday, February 24, 2024: Full Moon 6:28am (CST)
Sunday, March 3, 2024: Last Quarter Moon 9:29am (CST)
Sunday, March 10, 2024: New Moon 4:03am (CDT)
Saturday, March 16, 2024: First Quarter Moon 11:12pm (CDT)
Monday, March 25, 2024: Full Moon 1:58am (CDT) ** Lunar Eclipse **
Monday, April 1, 2024: Last Quarter Moon 10:20pm (CDT)
Monday, April 8, 2024: New Moon 1:23pm (CDT) ** Solar Eclipse **
Monday, April 15, 2024: First Quarter Moon 2:14pm (CDT)
Tuesday, April 23, 2024: Full Moon 6:47pm (CDT) ** Lunar Eclipse possible **
To and From Other Calendar Systems
On the g keymap are commands to go to a date expressed in one of the
non-Gregorian calendar systems, and on the p keymap, to print (i.e. display) the
current date in another system.
| Goto | Calendar System | |
|---|---|---|
g a |
p a |
astronomical (Julian) day number |
g b |
p b |
Bahá’í |
g C |
p C |
Chinese |
g k |
p k |
Coptic |
g e |
p e |
Ethiopic |
g f |
p f |
French Revolutionary |
g h |
p h |
Hebrew |
g i |
p i |
Islamic |
g c |
p c |
ISO commercial calendar |
g w |
ISO commercial calendar week | |
g j |
p j |
Julian |
g m … |
p m |
Mayan |
g p |
p p |
Persian |
p o |
various other calendars |
Converting to the Mayan calendar is complex enough to require its own keymap of seven extra bindings; see “Mayan Calendar” in the Emacs manual.
The p o command displays the selected date in all the other calendar systems;
here’s the result for the Epoch:
Day 1 of 1970; 364 days remaining in the year
ISO date: Day 4 of week 1 of 1970
Julian date: December 19, 1969
Astronomical (Julian) day number (at noon UTC): 2440588.0
Fixed (RD) date: 719163
Hebrew date (before sunset): Teveth 23, 5730
Persian date: Dey 11, 1348
Islamic date (before sunset): Shawwal 22, 1389
Bahá’í date: S͟haraf 2, 126
Chinese date: Cycle 77, year 46 (Ji-You), month 11 (Bing-Zi), day 24 (Xin-Si)
Coptic date: Kiyahk 23, 1686
Ethiopic date: Takhsas 23, 1962
French Revolutionary date: Primidi 11 Nivôse an 178 de la Révolution, jour du Granit
Mayan date: Long count = 12.17.16.7.5; tzolkin = 13 Chicchan; haab = 3 Kankin
Printed Calendars
There are a variety of commands to generate “printed” calendars in HTML, LaTeX, and (indirectly via LaTeX), PDF. See the Manual for details.
The Diary
Emacs has a Diary facility that allows you to record appointments, reminders,
meetings, birthdays, and the like. They can be marked in the Calendar388
and the appointments for the day can be displayed in a pop-up Window via
M-x diary. Diary entries are entered in your diary file, defined by
diary-file, in a flexible format that allows for complex
dates and repeats. Here’s an example diary file:
4/15 TAX DAY
*/1  Submit Monthly Time Card
%%(diary-anniversary 10 20 1874) Charles Ives' Birthday: %d years old

Wednesday
  2:30pm-3:30pm Staff Meeting
  5:00pm-7:00pm Study Group
The easiest way to make Diary entries is from inside the Calendar via the commands in Table 59. See “Format of Diary File” in the Emacs manual for a description of the syntax used in manual edits.
| Command | Action |
|---|---|
d |
Display Diary entries for this date |
M-x diary |
… the same |
s |
Show the diary file |
m |
Mark all dates with diary entries |
u |
Unmark all calendar marks |
i d |
Insert a diary entry for this Date |
i w |
… for this day of the Week (e.g. any Thursday) |
i m |
… for this day of the Month (e.g. any 12th) |
i y |
… for this day of the Year |
It must be said that for many Emacs users, myself included, the Org Mode Agenda has largely replaced the functionality of the Diary. The Agenda can incorporate the Diary, so anything you record with the Diary will show up if you display the Agenda; this Init File snippet does the job:
(setq org-agenda-include-diary t) ; incorporate the diary into the agenda
If you use the Agenda and don’t already use the Diary, the main reason to use it occasionally is because the Diary’s ability to express complex recurring dates exceeds Org’s.
Appointments
Emacs can notify you of any Diary entries with an attached time of day through
the
Appointments subsystem.389 A
certain amount of time before the appointment occurs, a notification will pop up
in a new window, and the bell will ring. More notifications will pop up until
the appointment time has passed. You can customize the details via
M-x customize-group RET appt, but this Init File snippet will enable
the defaults:
(appt-activate +1)        ; appointment notifications, please
(require 'notifications)  ; also via desktop notifications
On most operating systems, this snippet will also generate OS notifications.390
You can add a nonce appointment as a sort of alarm without going to the trouble
of creating a Diary or Agenda appointment with M-x appt-add; it will
prompt you for the time, a description, and the number of minutes of lead time.
Any upcoming appointment notifications for the day can be canceled with
M-x appt-delete; you get to confirm the deletions one at a time, so
if you just answer “no” to all of them, this is also usable as a way of checking
which appointments are coming up. Note that these nonce appointments don’t
persist across Emacs sessions!
Customization
The Calendar is highly customizable; M-x customize-group RET calendar
offers you the option to change how everything is displayed, marked, and named,
and much more.
Holidays are of particular note. The default holidays are those common
throughout the United States, and only a small set of the (many) religious
holidays known to Emacs are included. M-x customize-group RET holidays
makes it easy to include or exclude any of these.
You can readily add your own holidays, perhaps local holidays, holidays for your workplace or university, birthdays of your friends or favorite celebrities. I think it’s easiest to do this in your Diary; second easiest is in your Init File.
The Calendar is capable of computing even the most complicated of holiday dates (like Passover and Easter), and you can use its powerful functions for your own dates. Here, for example, is an entry for the date of the US Presidential Election:
(add-to-list 'calendar-holidays
             '(holiday-sexp
               '(when (zerop (% year 4))
                  (calendar-gregorian-from-absolute
                   (1+ (calendar-dayname-on-or-before
                        1 (+ 6 (calendar-absolute-from-gregorian
                                (list 11 1 year)))))))
               "US Presidential Election"))
Clocks and Time
In addition to calendar features, Emacs has a variety of clocks for displaying the current time.
Mode Line Clock
You can display the current time in the Mode Line; see Optional Mode Line Features.
World Clock
M-x world-clock pops up a *wclock* Buffer displaying the current
time in various world time zones:
Seattle   Friday 05 August 12:14 PDT
New York  Friday 05 August 15:14 EDT
London    Friday 05 August 20:14 BST
Paris     Friday 05 August 21:14 CEST
Bangalore Saturday 06 August 00:44 IST
Tokyo     Saturday 06 August 04:14 JST
The times in this Buffer update continuously as long as the Buffer is displayed
in a Window. You can M-x customize-variable RET world-clock-list to
choose your own preferred time zones.
Time Stamps in Files
You can have Emacs update a time-stamp line every time you save a file. If you enable this feature, then when you save this file:
Meeting Notes
Time-stamp:

* Boring Topic
  Blah blah...
the Time-stamp: line will be updated to today’s date:
Time-stamp: 2022-10-13 17:25:09
If you edit and save the file again, the time-stamp will be updated. The magic string “Time-stamp:” and the format of the time and date are of course customizable. The facility can be enabled on a file-by-file basis.
It used to be common for programmers to have time-stamps in all their source
files, but in my opinion, this feature is pretty annoying now that we keep all
our files under version control, and I no longer use it. After all, your VCS
knows exactly when you last modified each file, and a
C-x v l (vc-print-log) will show you the time-stamp. Also,
most typesetters will allow you to readily include the publication date in
formatted versions of your documents.
But, if you think this feature sounds useful, see “Time Stamps” in the Emacs manual.
Timeclocks
Emacs also has several facilities for clocking your work hours and recording how
much time you spend on some task or project. Just invoke
M-x timeclock-in when you start work—it’ll prompt you for a project
name—and when you’re done, M-x timeclock-out, or
M-x timeclock-change to switch to working on a different project.
The timeclock log is stored in the file named in
timeclock-file in s simple format:
i 2022/10/13 17:38:27 test1
o 2022/10/13 17:39:31
i 2022/10/13 17:39:33 test2
o 2022/10/13 17:41:21 done
If you’re a programmer, you can whip up code to process that data easily enough, but Org Mode has a much more powerful timeclock facility that’s integrated with your Org Agenda and includes report generation, effort estimates, and data export to CSV for incorporation into external applications.
I keep sticking to Emacs because it has one huge ace up its sleeve that other editors simply cannot match. Emacs has a package that helps me organize my workflow, focus my note-taking and even keep a timeclock for how long I spend working on tasks. This package is called Org mode. — Christine Dodrill
References
Reingold, Edward M. and Nachum Dershowitz. 2018. Calendrical Calculations: The Ultimate Edition. Cambridge, UK: Cambridge University Press..
Hinman, Lee. 2017. Clocking Time with Org-mode. https://writequit.org/denver-emacs/presentations/2017-04-11-time-clocking-with-org.html.
Version Control
Version control is an essential component of software engineering and, I would say, of any sort of authoring, from articles and essays to novels and oversized books about Emacs. I’ll assume you’re already using version control; if not, I strongly encourage you to check out the Wikipedia article and get started.
Version control systems (VCS) are nowadays almost synonymous with Git, but there are in fact many other VCS’s to choose from. I prefer Mercurial (Hg) myself, and I also still use the ancient RCS in certain cases. But I have to use other VCS’s occasionally (Git especially), when I’m working with other people’s code.
Though there are two broad categories of VCS’s—the modern merge-based style, and the older lock-based—most VCS’s have analogous features. But wildly different user interfaces: keeping several of them straight is a daunting task.
Emacs to the rescue! The Emacs version control interface,
VC, tries valiantly (and quite
successfully) to provide a common abstraction over these varying systems so
that, regardless of the system in use for a given file or directory, you can use
the same commands to perform the most common operations. Most of the frequently
used commands work appropriately across all supported VCS’s, but some of them
aren’t consistently supported yet: you may need to occasionally pitch in with
the underlying commands via M-! (shell-command) or
M-x shell.
There are some slight differences in the way VC commands work with older lock-based systems like RCS; since few people use such VCS’s these days, I’ll describe only merge-based systems in detail. As always, the Manual has the complete story.
From here on, VC refers to Emacs’s VC commands, and VCS to the underlying version control system being used in any given case.
Supported Version Control Systems
Out of the box, Emacs VC supports nine version control systems; see Table 60. Other systems (for example, Darcs and Fossil) have support in the Package Manager.
| Abbreviation | Version Control System |
|---|---|
RCS |
GNU RCS |
CVS |
Concurrent Versions System |
SVN |
Apache Subversion |
SCCS |
Source Code Control System |
SRC |
SRC391 |
Bzr |
GNU Bazaar |
Git |
Git |
Hg |
Mercurial |
Mtn |
Monotone |
(Of course, you need to install the VCS’s themselves (any that you want to use) outside of Emacs via your operating system’s package manager.)
It must be mentioned that one of the modern killer apps for Emacs is Magit, a bespoke version control package for Git (only). People are fanatical about it, and while I prefer the simpler VC abstraction for the limited amount of work I need to do with Git, I’d be remiss not to mention it. Just install it from the Package Manager as usual. But from here on out, I’ll be discussing VC only, and everything will apply equally to any of the above VCS’s.
VC “Modes”
VC provides two main modes of interacting with the underlying VCS, which I’ll
call File Mode392 and Project Mode. File Mode applies when you issue VC commands
from a file-visiting Buffer, but also when you’re in a Dired Buffer (where it
applies to the file at Point). Project Mode applies when you’re in the
special vc-dir-mode Buffer created by
C-x v d (vc-dir), which is for interacting with the whole
repo at once. We’ll consider these two modes of working separately.
VC File Mode in One Command
The most frequent VCS actions are cleverly subsumed under one state-smart
command, C-x v v (vc-next-action). You can spend much of the
day issuing that one command repeatedly, and only occasionally delving into the
other VC commands.
C-x v v performs the appropriate next action on the file visited in the current
Buffer (or, if you’re in a Dired Buffer, the file at Point). The action depends
on the version control state of the file in this order:
| File State | C-x v v Action |
|---|---|
| No Repository! | Initialize the repo |
| Unregistered | Register the file |
| Unmodified | No action |
| Modified | Commit changes |
So suppose you’re working on a project in an existing VCS repository, and you
create a new file with C-x C-f (find-file) as usual. After
typing in some content, you hit C-x v v; since the file is new, it gets
registered with the repo—corresponding to the add command of most systems.
After some more editing, you issue another C-x v v—this time, VC commits your
changes (corresponding to the commit or check-in command). This pops up two new
Buffers in two new Windows: *log-edit-files*, which displays the names of the
files being committed (in the File Mode case, only one filename: that of the
file you’re editing) and *vc-log*. The latter will be the selected Window, and
you’re expected to type in a commit message or summary of your changes393.
Typically the first line of the commit message is a short pithy summary, and you
can use any number of lines following it to describe your changes in as much
detail as you like. When you’re done, just type the usual
C-c C-c (log-edit-done) and your changes are safely committed
to the repo; both of the Windows will vanish. If you’ve changed your mind, you
can abort the commit with C-c C-k (log-edit-kill-buffer),
which will also clean up the Windows.
That’s it! I can work for much of the day with just this one command.
More VC File Mode Commands
If the only thing you ever did with your VCS is add and commit files, you could dispense with the VCS entirely! The whole point is that you occasionally need to use other features of version control, primarily to save your butt when you screw up. The major categories of butt-saving include:
- comparing the current state of your file to a previous state (a.k.a. diffing)
- blaming somebody else for problems in your file394
- reverting that person’s changes so you can fix them
- getting an idea of the history of changes to the file (viewing the log)
- restoring a previous version of your file
- tagging revisions
- pushing and pulling from remote repos
- and the most complex, most annoying, and probably most important thing: working with branches
| Key | Category | Action |
|---|---|---|
C-x v v |
jack of all trades: DWIM | |
C-x v i |
Init | Initialize a repo or add a file |
C-x v = |
Diff | show diff of this file |
M-x vc-ediff |
… in Ediff | |
C-x v D |
… of all files in the project Directory | |
C-x v h |
… of just this region Here | |
C-x v l |
Log | show change Log of this file |
C-x v L |
… of all files in the project | |
M-x vc-log-search |
search the text of log entries | |
C-x v a |
update the ChangeLog file |
|
C-x v ~ |
View | show an older version in another buffer |
C-x v g |
assign blame for each line (annotate) | |
C-x v u |
Revert | Undo changes to this file |
C-x v x |
File | delete (X-out) this file via the VCS |
M-x vc-rename-file |
rename a file | |
C-x v G |
ignore this file Glob | |
C-x v I |
Remote | describe (log) Incoming changes |
C-x v + |
… pull (add) them in | |
C-x v O |
describe (log) Outgoing changes | |
C-x v P |
…. Push them out | |
C-x v r |
Branch | checkout (Retrieve) a given branch |
C-x v s |
tag this file | |
C-u C-x v s |
make current changeset a new branch | |
C-x v m |
merge in a given branch | |
C-x v M D |
show a diff of the common ancestor | |
C-x v M L |
show the log of the common ancestor |
Initializing a Repository
When you’re beginning an entire new project, you need to choose which VCS you’re
going to use and create a new repository. The first step is to create a new
project directory. Just create your first project file in a non-existent
directory with C-x C-f /new/directory/new-file; as usual, Emacs will open a
Buffer visiting new-file and ask if it should create the directory
/new/directory—say yes, of course. Now register the file with a simple C-x v
v (or if you’re feeling deliberate, C-x v i (vc-register),
which exists solely to register new files and repos). Emacs will respond in the
Minibuffer with:
/new/directory/new-file is not in a version controlled directory.
Use VC backend:
and will offer all the supported backends for Completion: Bzr, Git, Hg, RCS, SCCS, SRC, and SVN. Choose the one you want and you now have a new repo.
Diffing and Comparing
It’s easy to compare the current file to the most recent checked-in version:
just do C-x v = and you’ll get a colorized diff-mode
Buffer; see Diffing and Merging for details. C-x v D pops up a multi-file
Buffer with all the modified files in the project. You can also diff the Region
with C-x v h to avoid getting overwhelmed with detail.
The diff-mode Buffer features some 28-odd useful commands, but if you want
something fancier, M-x vc-ediff shows the comparison via the
super-powerful Ediff subsystem. I rarely do this395; diff-mode itself is
pretty powerful. Among the more useful commands are C-c C-c to jump from the
diff hunk at Point to its location in the file (visiting the file as needed),
and you can revert individual hunks in the file one-by-one; this is just a
diff-mode feature, so see Simple Diffing for details.
All of these commands compare the saved files in the working directory with the most recent checked-in versions. With a Prefix Arg, you can specify any previous version, identified however your VCS does it (revision numbers, hexadecimal idents, tag names). This can be more convenient to do from a VC log Buffer.
Examining the Logs
Analogously to VC diffing, C-x v l shows the VCS log for the current file, and
C-x v L does the same for all the files in the project (the changesets). There
are many handy commands to navigate and manipulate the log Buffer; be sure to do
C-h m (describe-mode). The one I use the most is =, which
generates a diff against the revision at Point.
M-x vc-log-search will search the text of log entries; this command is not
supported by all VCS’s.
Viewing Older Revisions
From a log Buffer you can pop up the complete text of the older version at Point
with f (log-view-find-revision). The text is popped up in a
new Buffer with a name in the form FILENAME~VERSION~.
Outside of the log Buffer, you can pop up a FILENAME~VERSION~ buffer with C-x v
~ (hence the mnemonic behind the key binding396), which prompts for a
version number, ident, or tag.
C-x v g annotates the file (or as I like to think of it, assigns blame). It
pops up a buffer that shows, for each line of the file, who last changed it, the
revision id, and the date when it was changed. Each line is colored via a heat-map
palette, with blue lines being the oldest and red the youngest. From any given
line you can get a complete diff or jump to the location in the file; see Figure
52.

Figure 52: Assigning Blame
Discarding Changes
If you decide that all the changes you’ve made to your file, through whatever
number of saves, were a bad idea, you can revert the file to the most recent
checked-in version with C-x v u. This is different from
M-x revert-buffer, which only reverts to the last saved version of
the file. C-x v u actually replaces the file on disk with the checked-in
version, and then reverts the Buffer from it.
Other File Operations
In addition to registering a new file, you can remove a file from version
control with C-x v x; this removes the file from the working directory and
informs the VCS of the fact that it’s no longer part of this changeset. Of
course your VCS will allow you to recover older versions of the file at any time
in the future.
It’s also important to be able to tell the VCS to ignore certain files and not
consider them as part of the repo; this is typically done for build artifacts,
backup files, and the like (otherwise, your VCS will constantly be suggesting
that you check these files in). Unlike most of the other commands, C-x v G
doesn’t operate on the current file, but rather always prompts you for a
filename or glob pattern, and informs the VCS to ignore it from now on. A
Prefix argument prompts for and removes a previously ignored pattern.
Tagging
You can tag the current checked-in version of your project with C-x v s. To tag
means to give a symbolic name to a changeset. You’ll be prompted for the name.
This command can also be used to create a new branch, as described next.
Branching and Merging
Modern VCS’s use branches to manage multiple independent lines of development
(your project might have a production branch, a development branch, and a bugfix
branch, say). Retrieving a branch means replacing the files in your working
directory with those of a different branch. You do this with C-x v r, which
prompts you for a branch label (what this is depends on your VCS; it can
typically be a version number or identifier, or a symbolic name).
You can’t retrieve any branches unless you’ve made some. You can do this with
C-u C-x v s, which will make the current changeset a new branch of development.
If you want to branch off from an earlier changeset, first switch to that changeset
with C-x v r
Eventually, two branches will need to be merged together (say, to apply the code
from a tested bugfix branch into the production branch). Merging is the most
complicated task a VCS can do, and VC’s C-x v m command just initiates the
process; you’ll have to handle overlap conflicts and the like manually,
undoubtedly with the help of the other VC commands we’ve discussed and the
various Emacs Diff commands. This includes C-x v M D, which shows a diff of the
common ancestor of the two branches being merged, and C-x v M L, which shows the
ancestor’s log.
Working With Remote Repositories
Modern distributed VCS’s (DVCS’s) have the potential to work with remote repos,
which may merely be in a different location in the file system but may also be
on a different host entirely. You can check whether or not there are remote
changes to pull with C-x v I; if there are, a log Buffer pops up displaying
them. C-x v O pops up a log of any outgoing changes.
If there are outgoing changes reported by C-x v O, C-x v P will push them to
the remote, and if C-x v I reports incoming changes, C-x v + will pull them.397
But where is the remote? Most DVCS’s record the current target for pushes and pulls, and this is what will be used. If a remote is not recorded, VC will prompt you for the command to use. A Prefix arg will always prompt for the command.
VC Project Mode
Most of the VC File Mode commands we’ve discussed apply to the file visited in
the current Buffer (or to the file at Point in a Dired Buffer). But sometimes
you want to perform VC actions on several or all of the files in your repository
at once. This is the job of C-x v d (vc-dir).
This command pops up a special *vc-dir* Buffer for the directory you specify.
By default, this is the Buffer’s default-directory.
Depending on your VCS, you may want to always work at the root directory of your
project; you can use C-x p v (project-vc-dir) instead to make
sure you always invoke vc-dir in the root directory of your project.
When popped up, the *vc-dir* Buffer lists all the interesting files in the
repo—it’s like the status command of your VCS—that is, modified files,
unknown files (which you probably want to either add to the repo or ignore), and
those with a recently changed status. In particular, files that are up-to-date
aren’t listed.
The Buffer has a header at the top that summarizes the state of the repo, and then lists the files in a two-column form that might look like this:
VC backend : Hg
Working dir: ~/txt/emacs-tutorial/
Parent     : 312:caa775acf936 tip
           :  VC: older revs, remotes
Branch     : default
Commit     : 2 modified, 2 unknown
Update     : (current)
Phases     : 5 draft

                         ./
    edited               TODO
    unregistered         cute-cat.jpg
    edited               emacs-tutorial.org
    unregistered         images/vc-blame.png
The first column shows the VC status and the second, the file name. You can see
that I’ve modified (“edited”) two files, and have two unknown (“unregistered”)
files. cute-cat.jpg is probably an image file I accidentally saved to this
directory; I’ll want to eventually move it elsewhere with Dired, or I could
delete it from here with the d command398. images/vc-blame.png, however,
is a new file that I want to add to this repo.
vc-dir-mode has all the key bindings from Special Mode, a
number of commands for marking files, and a bunch of shorter keystrokes that are
equivalent to the C-x v File Mode commands. You can use the C-x v File Mode key
bindings if you’re more used to them. Table 62 lists the key
commands (and their File Mode equivalents)399. Typically you mark multiple
files (like you do in Dired for example) to form a fileset, and then use a
command to operate on the entire set. Most of the commands apply to the entire
marked fileset, to the file at Point if no files are marked, or to all the files
in the Region if it is Active.
As you’d expect, the mark command is m and the unmark command is u; marking a
directory line (including ./) is equivalent to marking all the displayed files
in that directory. M marks all the files with the same status, and U unmarks
them; with a Prefix arg, these two commands apply to all displayed files.
| Key | A.K.A | Category | Action |
|---|---|---|---|
m |
Marks | Mark this file (or all in active region) | |
M |
Mark all files with this status | ||
u |
Unmark this file (or in active region) | ||
U |
Unmark all files with this status | ||
v |
C-x v v | Next | jack of all trades: DWIM |
RET, e, f |
Visit | Find file(s) at point | |
o |
… in Other window | ||
S |
Search | Searches this file(s) | |
M-s a C-s |
… isearch across them | ||
M-s a C-M-s |
… with a regexp | ||
Q |
Replace | Query replace this file(s) | |
i |
C-x v i |
Init | add a file(s) to repo |
= |
C-x v = |
Diff | show diff of this file(s) |
D |
C-x v D |
… of all files | |
l |
C-x v l |
Log | show change Log of this file(s) |
L |
C-x v L |
… of all files | |
G |
Ignore | ignore this file(s) | |
d |
C-x v x |
Delete | Delete this file |
I |
C-x v I |
Remote | describe (log) Incoming changes |
+ |
C-x v + |
… pull them in | |
O |
C-x v O |
describe (log) Outgoing changes | |
P |
C-x v P |
… push them out | |
B s |
C-x v r |
Branch | checkout (Retrieve) a given branch |
B c |
C-x v s |
tag this file(s) | |
C-u B c |
C-u C-x v s |
make Current changeset a new branch | |
B l |
show Log for this branch | ||
x |
hide up-to-date and ignored files | ||
C-c C-c |
kill the running VCS command |
VC Grepping
You can Isearch and Query Replace from the *vc-dir* with the search and replace
commands in Table 62, but you can also invoke the Grep facility of your VCS. VC
provides a command for Git ( M-x vc-git-grep), but other VCS’s don’t
have this yet. For Mercurial, I just do:
M-x grep RET hg grep -n REGEXP
All the grep-mode commands work, including Writable Grep.
You can probably do something similar for another VCS.
Diffing and Merging
If you’re a programmer or system administrator, you probably spend a lot of time comparing files, or as we call it, diffing. Even non-programmers would benefit from diffing, since anyone who creates and edits files ought to be using version control, and version control implies diffing.
The basic Unix tool for diffing is diff(1) and its variants; the
GNU implementations are the standard.
Diffing is very simple: you run diff(1) on two files and eyeball the
output. Emacs improves on this by providing excellent syntax highlighting and
colorization. But diffing very often implies the need to merge the differences
to create a new, combined, file, and merging is work. Emacs, in my opinion, has
the best merge tool: the Ediff subsystem. I probably do at least one merge
every day—sometimes several—and when I’m occasionally forced to use some
other merge tool400 I just want to crawl into a hole.
We’ll start by looking at the Emacs interface to diff(1), but if you need to get
some heavy diffing done right now, you should skip ahead to Ediff.
Simple Diffing
The simple Emacs front-end to diff(1) is M-x diff: it prompts for
two filenames, the new file and the old401, and runs diff(1) on them. It
pops up a Buffer named *Diff* with nicely colorized output.
There are three other main entry points to the Diff subsystem.
In a file-visiting Buffer, M-x diff-backup diffs the file with its
backup file—this is way of answering the question, “what changes have I made
since the last time I saved it?”—while M-x diff-buffer-with-file
diffs the (possibly as yet unsaved) Buffer with its file on disk (I only
discovered this command recently and it’s very handy). Finally,
M-x diff-buffers generates a diff of two Buffers, even if they
aren’t visiting files; this saves you from writing Buffers out to temporary
files, having to invent two file names and remember to clean them up afterwards.
Additionally, you can conveniently do a diff from Dired with
= (dired-diff), and from VC with
C-x v = (vc-diff) and
C-x v D (vc-root-diff); various other Modes and Packages make
it easy to jump into Diff as well.
Diff Mode
Let’s consider a file containing the text of Bertolt Brecht’s Der Pflaumenbaum:
Der Pflaumenbaum
Im Hofe steht ein Pflaumenbaum,
Der ist so klein, man glaubt es kaum.
Er hat ein Gitter drum,
So tritt ihn keiner um.
Der Kleine kann nicht größer wer’n,
Ja - größer wer’n, das möcht’ er gern!
’s ist keine Red davon:
Er hat zu wenig Sonn’.
Dem Pflaumenbaum, man glaubt ihm kaum,
Weil er nie eine Pflaume hat.
Doch er ist ein Pflaumenbaum:
Man kennt es an dem Blatt.
– Bertolt Brecht
I copied the file and changed the text according to (my understanding of) the
German orthography reform of 1996, and then I ran M-x diff on the two
files; Figure 53 is the result.

Figure 53: Der Pflaumenbaum Diff
Simple Diff Buffers are in diff-mode, which does a lot more
than just colorful highlighting. First let’s consider what a diff—also called
a patch— looks like.
A patch consists of a diff each for one or more pairs of files. Each file pair (here “file” for short) has a file header which is followed by the diff, which consists of a set of hunks.
In Figure 53 the file header is this part:
diff -u /home/keith/txt/emacs-tutorial/brecht1 /home/keith/txt/emacs-tutorial/brecht2
--- /home/keith/txt/emacs-tutorial/brecht1	2022-07-05 18:43:44.497204554 -0500
+++ /home/keith/txt/emacs-tutorial/brecht2	2022-07-05 18:43:44.497204554 -0500
File brecht2 is the newer of the two files. The header shows the exact diff(1)
command used and the files’ modification dates. The ––– and +++ characters
relate the files to the lines of the hunks.
A hunk is a group of consecutive lines that differ between the pair of files; the hunk always comes in the midst of a number of preceding and following lines that the files have in common; these common lines provide useful context.402
In Figure 53 there’s only one hunk, which starts with:
@@ -4,8 +4,8 @@
This means that the hunk consists of 8 lines starting at line 4 of the old file
(hence the –, as in the file header), and 8 lines starting at line 4 of the new file (the +).
In the hunk, lines beginning with – are only present in the old file, and lines
beginning with + are only present in the new file. Lines beginning with spaces
are lines of context common to both files.
From the Diff Buffer, you can actually act on the hunks—undo them in the new file one hunk at a time or apply them backwards to the old file. But most of these actions are easier to do via the very powerful Ediff subsystem.
Ediff
The biggest difference between the Ediff subsystem and the simple Diff commands
is that, instead of using a single Diff Buffer containing a patch as its
interface, Ediff presents multiple Buffers side-by-side, each containing a
colorized version of the old file or the new file. Figure 54 shows the
result of invoking M-x ediff RET brecht1 RET brecht2.

Figure 54: Der Pflaumenbaum Ediff
Ediff is much more intuitive. There’s no need to interpret the syntax of the
output of diff(1): the left window shows the file brecht1 and the right,
brecht2, nicely colorized. The reddish colors show the old hunks, and the
greenish the new.
There’s also a third window in this Frame, displaying a 1-line *Ediff
Control Panel* Buffer. When you start up Ediff, this will be the
selected Window; the Buffer is in ediff-mode and
is typically where you issue commands to operate on the two file
Buffers. If you type ? in this Buffer, it will expand to show an
explanatory menu of Ediff commands that are valid in this Buffer
(only). Each file Buffer will be in the Major Mode appropriate to the
file and you can in fact switch to either of the Buffers and edit
them.
When Ediffing two files it’s very common to want to copy bits of one file to the other. Suppose you’ve got the same file on two different machines; you may have made changes to both the remote file and the local copy, but not exactly the same changes: you’ve let the two files get out of sync! Ediff makes it easy, with a keystroke, to copy one diff from file A to file B, another from B to A, and you can jump between the two file Buffers and make any editing tweaks you like. This is a simple way of merging two files.
Personal Preferences
I should mention that Figure 54 isn’t what you’ll see out of the box if you
invoke M-x ediff. By default, the Control Panel will open in its
own dedicated Frame. I absolutely hate this, and it’s frankly unusable with a
tiling window manager like mine, so I configure it to open all Ediff windows in
the current Frame.
Also by default, the two file Windows are shown one above the other; I much prefer them side-by-side as in Figure 54: as you move from diff to diff, Ediff keeps them neatly aligned and it’s easier to visually compare them.
This Init File snippet imposes my preferences on you:
;; don't use a separate Frame for the control panel
(setq ediff-window-setup-function 'ediff-setup-windows-plain)
;; horizontal split is more readable
(setq ediff-split-window-function 'split-window-horizontally)
Ediff also radically changes your current Window Configuration; when I quit Ediff, I like to restore my windows to what they were before, with this code snippet:
;; restore window config upon quitting ediff
(defvar ue-ediff-window-config nil "Window config before ediffing.")
(add-hook 'ediff-before-setup-hook
          (lambda ()
            (setq ue-ediff-window-config (current-window-configuration))))
(dolist (hook '(ediff-suspend-hook ediff-quit-hook))
  (add-hook hook
            (lambda ()
              (set-window-configuration ue-ediff-window-config))))
Finally, Ediff will often newly Visit one or two files for the purpose of diffing, which clutters up your Emacs. I enable the Ediff Janitor, which will offer to cleanup these files’ Buffers for you when you quit.
;; offer to clean up files from ediff sessions
(add-hook 'ediff-cleanup-hook (lambda () (ediff-janitor t nil)))
Ediff Entry Points
Ediff has a dozen useful entry points, listed in Table 63.
| Command | Action | |
|---|---|---|
| Files | M-x ediff-files |
diff two files |
M-x ediff |
… the same | |
M-x ediff-files3 |
diff three files | |
M-x ediff3 |
… the same | |
M-x ediff-backup |
diff this file with its backup file | |
M-x ediff-current-file |
diff this buffer with its file on disk | |
| Buffers | M-x ediff-buffers |
diff two Buffers |
M-x ediff-buffers3 |
diff three Buffers | |
M-x ediff-regions-linewise |
diff two Regions in 1 or 2 Buffers | |
M-x ediff-regions-wordwise |
… but word-by-word | |
M-x ediff-revision |
diff this Buffer with an older revision | |
| Windows | M-x ediff-windows-linewise |
diff two Windows line-by-line |
M-x ediff-windows-wordwise |
… word-by-word |
You can diff files, Buffers, Windows, distinct Regions of Buffers and Windows, and directories (see below); you can also diff files and Buffers in terms of their Version Control revisions. Ediff can compare two files, or three. The common use case for a three-file comparison is when two files share a common ancestor. This occurs frequently when you have a new branch of a project under version control—say, a bugfix branch—and you need to compare the file where you’re fixing the bug with the original buggy version: both files will have a common ancestor in their parent revision, and adding this ancestor to the comparison allows Ediff to make very accurate guesses and predictions when you’re merging.
Ediff can compare the contents of Buffers, whether the Buffers are visiting files or not, and it can even compare two Regions, whether in the same Buffer or not. Doing this sort of thing in the shell usually requires creating (and cleaning up) temporary files; Ediff takes care of that for you.
Ediff can also compare Windows; this is sort of a shortcut for comparing Regions of Buffers, and it’s also an easy way of comparing two parts of the same Buffer: just split the Buffer into two Windows, and line up the parts you want to compare at the tops of the two Windows. When comparing Windows, you can compare wordwise (which is nice and detailed) or linewise (which is more like a normal diff).
Finally, Ediff can compare entire directories, and has powerful bookkeeping features to help you keep track of where you are in the comparison; see below.
The Expanded *Ediff Control Panel*
    Move around      |      Toggle features      |        Manipulate
=====================|===========================|=============================
p,DEL -previous diff |     | -vert/horiz split   |a/b -copy A/B's region to B/A
n,SPC -next diff     |     h -highlighting       | rx -restore buf X's old diff
    j -jump to diff  |     @ -auto-refinement    |  * -refine current region
   gx -goto X's point|    ## -ignore whitespace  |  ! -update diff regions
  C-l -recenter      |    #c -ignore case        |
  v/V -scroll up/dn  | #f/#h -focus/hide regions | wx -save buf X
  </> -scroll lt/rt  |     X -read-only in buf X | wd -save diff output
    ~ -swap variants |     m -wide display       |
=====================|===========================|=============================
    R -show registry |     = -compare regions    |  M   -show session group
    D -diff output   |     E -browse Ediff manual|  G   -send bug report
    i -status info   |     ? -help off           |  z/q -suspend/quit
-------------------------------------------------------------------------------
For help on a specific command:  Click Button 2 over it; or
                                 Put the cursor over it and type RET.
Whatever your Ediff entry point, everything is controlled from the *Ediff
Control Panel*. Do as the one-line Panel Window suggests and hit ? to
expand it. Wherever the Panel refers to “X”, it means for you to type the
letter A, B, or C to specify one of the Buffers being compared.
Most of the “Move around” commands are obvious: you step back and forth through
the files, diff by diff, or jump to a diff by its number (shown in the Control
Panel’s Mode Line. You can scroll the file Windows pairwise, or bring the
current diff back to the center. The ~ (ediff-swap-buffers)
command swaps the two files in the two Windows, so you can have the old file on
the left (where I expect it) or on the right.
The commands in the “Toggle features” section change the appearance of the files
or of the Windows. The | (ediff-toggle-split) command
toggles the Windows between side-by-side (the default with my Init File) or
one-over-the-other, and m (ediff-toggle-wide-display)
full-screens the Ediff Frame. h (ediff-toggle-hilit) and
@ (ediff-toggle-autorefine) cycle through a variety of
different ways to display the highlighting and refinement of the different words
in the diffs. # # (ediff-toggle-skip-similar) and
# c (ediff-toggle-ignore-case) toggle between ignoring
whitespace or case differences. The
# f (ediff-toggle-regexp-match) lets you focus on only the
diffs that match a Regular Expression (temporarily hiding the diffs that don’t),
and # h is the inverse and hides the matches. The letters A, B, and C toggle
the read-only status of the corresponding file Buffers.
The “Manipulate” section has the crucial commands for choosing and copying
individual diffs. Lowercase a and b copy the current diff to the other file.
So in Figure 54 typing a would cause file A’s diff number 1—with the
umlauts—to replace file B’s orthographic reform version. Upon changing your
mind, you could then restore file B’s diff with the command r b. Conversely,
typing b would replace file A’s umlauts with B’s umlaut-free version.
At any point, you can edit either file A or file B, so after copying a diff from
the other file, you can tweak it. Invoking
* (ediff-make-or-kill-fine-diffs) (from the Control Panel
Buffer) will recompute the refinement colors of the current diff after
an edit, if necessary,
and ! (ediff-update-diffs) will recompute all the diffs in
both files, just as if you had quit and re-invoked your Ediff command.
Sometimes a single diff can be quite large and you only want to copy bits of it
from one file to the other; in this case the a or b commands would require you
to do a bunch of manual editing after the copy. When this happens, the
= (ediff-inferior-compare-regions) command can help. It
invokes a new, recursive, Ediff session on just the text of the current diff,
within which you can copy the individual smaller differences using a and b
commands. When you’re done, quit this recursive Ediff with q, and you’re back
in the parent Ediff, ready to continue.
Merging

Figure 55: Der Pflaumenbaum Ediff Merge
Your version control system will frequently need you to manually merge two conflicting files (typically from two branches); so will file synchronizers, like Syncthing and Unison403 and some operating system package managers404. The family of Ediff Merge commands is the way to perform these tasks.
In Figure 55, I’ve invoked:
M-x ediff-merge RET brecht1 RET brecht2
It looks like the M-x ediff command of Figure 54 but with an
extra window, called C, which is the result of the merge. In this example,
Ediff has no way of guessing whether you’d prefer variant A or variant B so it
shows you both possibilities in Buffer C. If you prefer one or the other, just
use the a or b commands. With M-x ediff, those commands update
either the A or B buffer, but with M-x ediff-merge. they update the
C Buffer.
In the simplest case, you can just step through all the diffs between the two
files, choosing one from A or one from B in each case. When you’re done, you
quit with q (ediff-quit) and then you can switch to the C
Buffer—your merge—and save it to a file.
Note that if you use neither the a nor the b command for a given diff, the
result of the merge will be the literal text you see in Buffer C, in our example:
<<<<<<< variant A
Der Kleine kann nicht größer wer'n,
Ja - größer wer'n, das möcht' er gern!
>>>>>>> variant B
Der Kleine kann nicht groesser wer'n,
Ja - groesser wer'n, das moecht' er gern!
======= end
with the <<<< and >>>> characters and all the rest. You can jump into Buffer C
to delete any of these bits, or mix and match the two variants however you like
(perhaps you want to keep the “größer”’s but use the “moecht” with them).
When you finish the merge with q (ediff-quit), Buffer C,
actually called *ediff-merge*, is the result of your merge: you generally want
to save it to a file with C-x C-w (write-file).
If you expand the *Ediff Control Panel* you’ll see that there are a few extra
commands to help with merging.
Ediff Merge Entry Points
There are several entry points to the Merge subsystem; most are analogous to the
Ediff entry points. But take special note of the -with-ancestors variants.
When the two files you’re merging are related to a common ancestor (typical
with version control system merges), you can use these variants and Ediff will
be able make educated guesses about which variant, A or B, to prefer.
| Command | Action |
|---|---|
M-x ediff-merge |
merge two files |
M-x ediff-merge-files |
… the same |
M-x ediff-merge-files-with-ancestor |
… taking an ancestor into account |
M-x ediff-merge-with-ancestor |
… the same |
M-x ediff-merge-revisions |
merge this file with an older revision |
M-x ediff-merge-revisions-with-ancestor |
… taking an ancestor into account |
M-x ediff-merge-buffers |
merge two buffers |
M-x ediff-merge-buffers-with-ancestor |
… taking an ancestor into account |
Integrating Ediff into External Programs
Version Control Systems and such often have a configuration file in which you can
specify your merge tool. You can set this to be Emacs running ediff-merge or,
better, ediff-merge-files-with-ancestor. Here are two examples of how I do
this.
First, for my version control system, Mercurial, I have this stanza in my config file:
[merge-tools]
emacs.executable = emacs
emacs.args = --no-desktop --eval '(ediff-merge-files-with-ancestor "$local" "$other" "$base" nil "$output")'
The magic strings $local, $other, $base, and $output are replaced by Mercurial
with appropriate file names when it invokes Emacs. See Starting Emacs! for
information about --eval.
I use Unison as one of my file synchronizers, and this line in its preferences file does the job:
merge = Name * -> emacs --no-desktop --eval '(ediff-merge-files "CURRENT1" "CURRENT2" nil "NEW")'
Here the magic filenames are CURRENT1, CURRENT2, and NEW. Note that Unison
doesn’t provide an ancestor file when it invokes the merge tool, so I use a
different Emacs function.
Also note that I invoke emacs here, with --no-desktop, rather than
emacsclient. I used to use emacsclient for a quicker startup but I found it to
be too confusing in the already confusing context of file merging—I prefer a
totally clean, empty Emacs! You could invoke emacs with -q instead, which will
skip loading your Init File and get a very fast startup, as long as you can cope
with an uncustomized Emacs. (My Emacs is so heavily customized that I can
barely remember how to use an Emacs invoked with -q, but YMMV.)
Comparing and Merging Directories
You can also Ediff two directories, comparing all pairs of files that have the
same basename. You could of course just manually run
M-x ediff-files on every pair of files yourself, but it would be
easy to miss a pair, or forget where you left off after a break. The Ediff
Directories subsystem does all the bookkeeping for you.
When you fire up M-x ediff-directories, you’ll be asked if you want
to narrow the files to be considered via a Regular Expression; just hit RET if
you want to consider all possible files.
You’ll be presented with a Buffer called *Ediff Session Group Panel* which lists
all the pairs of corresponding files; each pair is called a session because
you’ll (potentially) be doing a complete diff or merge on it. ? expands a helpful menu
of Session Group commands (see Table 65).
| Command | Category | Action |
|---|---|---|
D |
Prep | show differences among directories |
= = |
for each session, show which files are identical | |
= h |
like ==, but also marks sessions for hiding | |
h |
Hiding | mark session for hiding (toggle) |
x |
hide marked sessions | |
C-u x |
unhide marked sessions | |
u h |
unmark all sessions marked for hiding | |
= h |
like ==, but also marks sessions for hiding | |
RET |
Session | start Ediff session at Point |
v |
… the same | |
q |
quit this session group | |
m |
Marking | mark session for a non-hiding operation (toggle) |
u m |
unmark all sessions marked for operation | |
= m |
like == ==, but also marks sessions for operation | |
P |
collect custom diffs of all marked sessions |
You generally want to start by preparing your Session Group.
D (ediff-show-dir-diffs) pops up a new Buffer that shows you
the remaining files in the two directories that don’t have corresponding
names. You might want to copy any one of them to the other directory, which you
can do with a simple C command in this Buffer.
We now want to hide, i.e. exclude from diffing, as many files as possible.
You should run = h (ediff-meta-mark-equal-files), which will
do a quick comparison of the pairs of files in all the sessions, and mark, for
hiding, the ones that are identical (why waste time running Ediff on these
pairs?).
You should now mark for hiding any non-identical pairs that you’re just not
interested in. A good example would be a version control subdirectory (like a
.git or .hg directory). Just navigate to these pairs and hit
h (ediff-mark-for-hiding-at-pos).
Now hide all those pairs with x (ediff-hide-marked-sessions),
and you’re ready to start Ediffing. Just navigate to each pair in turn and hit
RET to fire up a normal Ediff session. When you’re done (having quit the diff
session with q), you’ll be taken back
to the Session Group and that Session will be marked as finished.
You can also mark pairs with the Mark commands and then run
P (ediff-collect-custom-diffs) to get a simple Diff Buffer
giving you an overview of the differences amongst all the marked files. This is
also a handy way of generating a patch.
If your selected pairs include any directories, they will be diffed recursively, creating their own Session Groups.
The bookkeeping done by the Session Groups is invaluable for managing an
otherwise tedious and annoying task. You can easily take a break from diffing
and rejoin your sessions again later; just run
M-x ediff-show-registry. The Ediff Registry shows you all Ediff
sessions you have running. Sadly however, Ediff sessions aren’t preserved if
you quit your Emacs (not even if you’re using Desktop Mode).
There are several other entry points, which determine which Ediff command is used on each pair of files.
| Command | Action |
|---|---|
M-x ediff-directories |
diff common files in two directories |
M-x ediff-directories3 |
diff common files in three directories |
M-x ediff-directory-revisions |
… only files under version control |
M-x ediff-merge-directories |
merge common files in two directories |
M-x ediff-merge-directories-with-ancestor |
… using ancestors from a third directory |
M-x ediff-merge-directory-revisions |
merge common files in two directories |
M-x ediff-merge-directory-revisions-with-ancestor |
… with ancestors |
Patching
In addition to merging, there’s also patching. Suppose Amy and Bridget each
have a copy of the file foo. Amy makes some changes to foo that Bridget wants,
and instead of giving Bridget the changed file, Amy gives Bridget a diff405 of
Amy’s old foo against her new foo. In this context, the diff output is called a
patch, and Bridget wants to apply the patch to her own foo in order to
transform it into Amy’s new version.
This may sound crazy—why doesn’t Amy just give Bridget the new foo? But this
actually does happen fairly frequently, especially when Amy and Bridget are
programmers working on a program together, or system administrators dealing with
a security patch that needs to be quickly applied. Bridget may have made her
own changes to foo which she wants to keep; applying Amy’s patch preserves
Bridget’s changes while applying Amy’s (unless there are line by line conflicts).
A single patch often contains diffs of several files and all should be applied
at once. Applying patches used to be a lot of work until Larry Wall wrote
patch(1). Ediff has a helpful interface to patch(1).
Either of M-x ediff-patch-file or M-x ediff-patch-buffer
will run patch(1) and then pop up an Ediff showing you the changes that have
been applied406. You can approve the changes or make any necessary tweaks.
Emacs also makes it easy to generate a patch for one file. You can do it from
Dired: just mark the pair of files you want to be in the patch and say
! (dired-do-shell-command) with the command diff -u * and
then save the *Shell Command Output* Buffer to a file (or email it directly from
Emacs). The easiest way to generate a patch containing multiple files is from
the ediff-directories Session Group Buffer.
Emerge
Emacs has another, older, subsystem for merging files called
Emerge. All the Emerge commands begin
with emerge-; don’t confuse the two. Personally I think the Ediff Merge
subsystem is far superior, and I haven’t used Emerge in years, but it is a
powerful system in its own right. YMMV.
Simple Window Comparison
You can also do a simple comparison of two windows with
M-x compare-windows. Arrange your Frame so it’s only displaying the
two Windows you want to compare. In each Window, set Point at the beginning of
the part of the text you want to compare (perhaps just do
M-< (beginning-of-buffer) in each). Now invoke
compare-windows.
Point in each Window will be moved to the first spot in each Window where the
two Buffers differ. Reinvoking compare-windows jumps to the next difference407. In
between invocations you can make any changes you like in either Window.
With a prefix argument, compare-windows will ignore differences in whitespace.
In writing this description I discovered that this apparently simple command is
really quite complex and powerful; see M-x customize-group
compare-windows.
References
- Free Software Foundation. 2021. Comparing and Merging Files. Cambridge, MA: Free Software Foundation. https://www.gnu.org/software/diffutils/manual/diffutils.html.
Read in Emacs with
M-x info-display-manual RET diffutils RET.
- Free Software Foundation. 2020. Ediff. Cambridge, MA: Free Software Foundation. https://www.gnu.org/software/emacs/manual/ediff.html.
Read in Emacs with
M-x info-display-manual RET ediff RET.
Playing Music
Another application domain for Emacs is as a music player. This mostly means playing from a collection of audio files (mp3s, flacs, oggs). Nowadays most people use commercial streaming services (Spotify, Bandcamp, YouTube, Amazon, etc) to play music and may well own neither any audio files nor even physical CDs or vinyl; while there are a few Emacs interfaces to such services, the very idea goes against the grain of the Emacs predilection for free and open file formats and protocols. If you own your own data, no corporate entity can take it from you, start charging you (more) money or inflicting more ads, or just vanish in a corporate bankruptcy.
Audio data is complex and multifarious, and I know of no Emacs packages that manipulate the data directly in Elisp.408 That means that Emacs music players are generally interfaces to external programs that you’ll need to install via your operating system’s package manager.
EMMS: Emacs Multimedia System
My preferred music player is EMMS, the Emacs Multimedia System. It has a 5,300-line Info manual, will work with almost any audio players you happen to have installed, and is perhaps the most Emacs-native of all the music players I’ve tried: that is, it’s well-integrated with other Emacs systems, lets you manage its buffers and windows however you like (rather than requiring a bespoke multi-paned layout), is massively customizable, and everything about it is plain text.
First you need to use your operating system’s package manager to install at
least one audio player. If you don’t already have a preference, I recommend
just installing mplayer, since it plays some 200-odd audio formats. (But see
below for MPD.)
Next, you need to install EMMS itself via the Emacs package manager. Just give this command once:
M-x package-install RET emms RET
(See The Package Manager for more information, including updating your packages.)
Now you need to configure EMMS in your Init File. You can read the disquisition in the manual, but here’s a configuration I used before switching to MPD:
(autoload 'emms "emms" nil t nil)
(autoload 'emms "emms-browser" nil t nil)
(with-eval-after-load 'emms
  (require 'emms-setup)
  (emms-all)
  (setq emms-player-list '(emms-player-mplayer))
  (setq emms-source-file-default-directory (file-name-as-directory "~/mp3s"))
  (define-key emms-browser-mode-map (kbd "SPC") #'emms-browser-toggle-subitems-recursively)
  (when (memq system-type '(gnu gnu/linux gnu/kfreebsd))
    ;; use GNU find for extra speed when possible
    (setq emms-source-file-gnu-find "find"
          emms-source-file-directory-tree-function 'emms-source-file-directory-tree-find)))
You’ll need to change ~/mp3s to the directory where you keep your audio files
(EMMS will work with multiple directories; this is just the default.)
Now restart your Emacs409, and say M-x emms-add-directory-tree;
either hit return to add your default music directory (defined above), or pick
any other directory of music files (whether under your default directory, or
elsewhere). This populates the default playlist with all the files in that
directory (recursively). If you’ve chosen a directory with, say, thousands of
audio files, it may take a while to populate the playlist (and especially to
convert simple filenames to Artist–Title format), but it runs in the background
so you can start using EMMS right away, and the data will be cached, so the next
time you start up EMMS, it will all be loaded quickly.
Now say M-x emms and in the *EMMS Playlist* buffer just move Point
to the song you want to play and hit RET. Of course you can just use
C-s (isearch-forward) or M-x occur or whatever
you like to find your way around, until you get comfortable with the EMMS
searching and browsing commands.
Be sure to check out the manual to learn the basic commands, how to work with multiple playlists, how to use the browser, display album covers and lyrics, mark tracks in playlists for bulk operations, use the tag editor to fix metadata, set bookmarks, play streaming audio and internet radio, and much more.
Music Player Daemon (MPD)
One of the most popular music players for Unix nerds is Music Player Daemon (MPD). I’m a big fan of MPD, but its disadvantage is that it’s somewhat complex to set up and configure. It implements a client-server interface: the server knows about your music files and your audio hardware, and any number of clients (CLI, TUI, GUI, and Emacs) exist that can talk to the server to control it (play this track, stop playing, randomly play all my Math Rock tracks…). This design means that there are many MPD clients, and that the server and client can be on different machines (so, you can use an MPD client on your phone to control the server on the Raspberry Pi that’s connected to your home stereo).
If you’re already using MPD, EMMS can use it instead of the above mplayer setup
and I would recommend that; see below for a possible configuration.
Emacs also has several other MPD clients; one is built-in: M-x mpc.

Figure 56: M-x mpc
I don’t like its interface: it’s completely undocumented and it pops up an
arrangement of five windows that I just find confusing. You can instead install
ampc from the Package Manager410 and run
M-x ampc — you’ll get an extremely similar bunch of windows (six
this time) but ampc actually has documentation (do C-h P ampc, which you can do
before installing it) and I find it less confusing. There are at least three
more MPD clients in the MELPA package repository (mpdel, elmpd, and mpdmacs)
that I haven’t investigated.411
Here’s the EMMS configuration I use with MPD:
(autoload 'emms "emms" nil t nil)
(autoload 'emms "emms-browser" nil t nil)
(with-eval-after-load 'emms
  (require 'emms-setup)
  (require 'emms-player-mpd)
  (emms-all)
  (add-to-list 'emms-info-functions 'emms-info-mpd)
  (setq emms-player-list '(emms-player-mpd))
  (setq emms-player-mpd-music-directory "~/mp3s")
  (emms-cache-set-from-mpd-all)
  (ignore-errors
    (call-process "mpc" nil nil nil "consume" "off")))
References
Free Software Foundation. 2020. Emms Manual. Cambridge, MA: Free Software Foundation..
Read in Emacs with M-x info-display-manual RET emms RET.
Mail and News
One of the big application domains for Emacs is as a Mail User Agent (MUA), or what we loosely call a mailer. Rather than using the usual web-based interface to Gmail, Outook, or the like; a traditional GUI mailer like Thunderbird; or a command-line client like Mutt; you can leverage all the things Emacs does for you by reading your mail in Emacs.
A decade or two ago, reading mail in Emacs was more common; now, when Email is a commodity run by multinational megacorporations like Google, Apple, and Microsoft, Emacs mail definitely isn’t for everybody. That said, you’ll have to pry my Emacs mailer out of my cold, dead hands.
Even if you don’t want to commit to using Emacs as your MUA, the Emacs mailers can still be useful. I have a friend who uses Gmail as his MUA but hit the maximum space limit. Rather than pay for more space, he exported (and then deleted) all his old mail (Google uses Mbox format for this) and now happily uses Notmuch in Emacs to search and read his decade’s worth of archival mail.412 Also, internet mailing lists often make their archives available as downloadable Mbox files and Emacs makes a great browser for these.
Sending Mail
Being able to compose and send mail directly from Emacs is useful even if you don’t use Emacs to read your mail, and it’s easy to set up. If you’re doing all your computing in the Lisp Machine, it’s very annoying to have to paste a bunch of text into a web browser (or worse, compose your text directly in a browser), and probably see it get mangled into HTML in the bargain.
Configuring SMTP
There are a lot of ways to send email but the most common nowadays is remote SMTP. If you use Gmail, Apple, Microsoft, or the like for your email, you can use their SMTP server to send mail from Emacs. You’ll need to know:
- your SMTP server name, something like
smtp.gmail.comorsmtp.office365.com - your user name
- your password
Some providers may have additional settings you need to specify (at this writing, these three are sufficient for Gmail). You may also need to tweak settings in your provider’s web interface (e.g., Gmail requires you to enable mail access for “less secure apps”; be sure you understand the ramifications of this413).
You don’t have to configure these via Customize or in your Init File; when you
send your first email, you’ll be prompted for them, and Emacs will remember your
responses. However, you might want to use M-x customize-option to
configure these two User Options ahead of time: it will save you some future
typing:
user-mail-address- your email address (to be filled-in to the emails you
send) in the form
user@example.com user-full-name- your name, in the form
Joe Blow
Composing Email
Before you can send an email, you need to compose it. The basic command to pop
up a mail composition Buffer is C-x m (compose-mail); it has
as variants C-x 4 m (compose-mail-other-window) and
C-x 5 m (compose-mail-other-frame). The Buffer is called
*unsent mail*, will be in message-mode, and will be
initialized with some text similar to this (you’re Joe in this scenario):
To:
Subject:
From: Joe Blow <joe@example.com>
--text follows this line--
As you’d expect, this is in every way a normal Buffer with some appropriate key
bindings and colorization due to message-mode. (The From: line may look strange
if you haven’t yet configured your email address and name, as above (you can
always just edit the From: line manually).
Now just fill out your message: add an email address to the To: line (I’d
recommend your own email address for this first test message, so you can tell if
it worked), add a subject to the Subject: line, correct the email address in the
From: line if necessary, and type the body of your message after --text follows
this line-- (don’t mess up that line, it’s significant). The word “test” is
sufficient as the body for this test message.
In order to send the email, you need to have network connectivity at that moment: in other words, your wifi needs to be up (if your computer doesn’t have a wired Ethernet connection).
Now send the message with C-c C-c (message-send-and-exit).
This first time (and this time only) Emacs will have some questions for you —
probably only two:
Send mail via (default mail client):Enter
smtphere.Outgoing SMTP mail server:Type your mail provider’s SMTP hostname here.
While this is happening, Emacs is actually negotiating with your provider’s SMTP server; if the provider asks Emacs for more information, Emacs will pass those questions on to you (it will certainly ask for your user name and password here).
When you enter your password, Emacs will ask if you want to save it for later
use. If you say yes, it will be saved in the file ~/.authinfo in plain text,
meaning anyone with access to this file on your computer can read it to see your
password. In my opinion you should set up this file to be encrypted, and it’s
easiest to do this ahead of time; see Authentication, Encrypted Files, and
EasyPG Assistant for more information.
If there are questions that you don’t understand or don’t know the answer to,
just use C-g (keyboard-quit) to abort the sending, and read
“Mail Sending” in the Emacs manual.
Reading Mail
The next step after sending mail is to read your mail. Emacs has half a dozen mailers to choose from, but only three are built-in, and of the three, only Gnus directly supports remote mail. Gnus is my favorite mailer and I highly recommend it, though it’s not for the faint of heart.
If you are used to traditional mail readers, but have decided to switch to reading mail with Gnus, you may find yourself experiencing something of a culture shock. — Lars Magne Ingebrigtsen, Gnus author
Properly speaking, Gnus is a newsreader. In this context, “news” means Usenet and its protocol, NNTP. Usenet (1980) is what preceded Internet Web Forums (and AOL, and most BBS’s), and was of tremendous cultural importance414. Imagine if instead of having to go to a different web site for every forum, they all came together (thanks to the open protocol NNTP) as newsgroups readable in your choice of many special newsreader programs. In addition, the newsreader would keep of track of which postings you’ve read in each newsgroup. No more plowing through dozens of messages you’ve already read to find the newest ones; no more reading in reverse order. Wow.
Since you read all these newsgroups in one program, they all had exactly the same interface (wow), and if you didn’t like that interface, you could choose a different newsreader, or write your own.
The first Emacs newsreader that I used was Gnews by Matthew P. “Weemba” Wiener (definitely before 1988). At some point I switched to Masanobu Umeda’s GNUS (1988-1992), which Lars Magne Ingebrigtsen rewrote under the slightly differently-spelled name Gnus in 1994.
Gnus was definitely the best newsreader I had ever used, inside or outside of Emacs. And since any single post (“news message”) in a newsgroup was almost exactly like an email, Lars made it possible to just treat all your actual email as news. Your mail folders would be treated as newsgroups. Sending an email would be like posting to a newsgroup. Now you have the same interface to both news and mail, and since Gnus is the most crazily powerful and extensible news reader of all time, it makes an amazing mailer. It’s possible that I’ve been using Gnus as my main mailer since about 1996 (with various breaks to experiment with other Emacs mailers, none of which were up to the challenge).
Gnus ships as part of Emacs and is a very large and complex system. It has a 32,761-line manual, which is very entertaining (makes great bedtime reading!), well-written, and covers everything you need to know. Figuring it all out will be something of a project… But fortune favors the bold!
Other Emacs Mailers
There are half a dozen other mailers to choose from; most of them are third-party packages but three are built-in. All of these mailers, listed here from oldest to newest, are completely usable if they meet your requirements. My recommendations below are strictly personal preference. But first, some terminology.
- Remote Mail
- This is the normal way people read mail nowadays. Some service provider, like Gmail or Outlook, receives and hosts your mail for you, which you read “remotely”. That is, your MUA (say, the Gmail app on your phone) fetches each email over the network each time you click to read it: you don’t actually have copies of all your mail. The protocol that enables remote mail is called IMAP.
- Local Mail
- This means that your mail is delivered directly to your
computer, the messages are stored on your local disk, and your MUA never makes
a network connection (except to send). This is the way email originally worked when people
logged into servers from terminals. It assumes your computer is always on
because mail can arrive at any moment (and if your computer is down, the mail
will bounce), and so usually only servers with system
administrators do this (not personal desktops or laptops). But there’s a
hybrid approach: you can use a Mail Retrieval Agent (MRA) to fetch your mail
from a remote provider (like Gmail)
to your computer’s disk, as if it had been delivered there directly;
examples of MRAs include
msmtp,movemail,isync,mpop,fetchmail, andofflineimap.
The Mailers
Some of these mailers don’t do the IMAP protocol; using them may require a certain amount of comfort with installing and running external software (like one of the MRA’s above), and without IMAP, setting up an ecosystem where you can read your mail both in Emacs and also on your phone can be something of a challenge, depending on how particular you are.
- Rmail
- The oldest Emacs mailer (1985; it actually predates GNU Emacs and was present in ITS TECO Emacs in 1975); built-in; still supported and updated; only local mail is supported. Rmail is pretty basic, but if you configure your MRA to split your mail into reasonably-sized folders, that may be sufficient for your needs. Even if you don’t commit to Rmail as your MUA, it makes an excellent browser for random Mbox files you may have laying around (like those you can download from mailing list archives).
- MH-E
- A front-end to
nmh, the “modern” replacement for the Rand Mail Handler (MH), a historic (1979) command-line MUA. MH-E is a mature program last updated in 2016. The Emacs package is built-in, but depends onnmhbeing installed. Local mail only. Not recommended. - VM
- A mature program last updated in 2010; neither built-in nor available in the package manager; needs to be manually installed. Both local and remote mail are supported. Not recommended.
- Mew
- A very nice MUA with a lovely Mime composition facility; probably my second-favorite Emacs mailer, though I haven’t used it for many years. Both local and remote mail are supported. Available in the package manager from MELPA.
- Wanderlust
- A capable MUA; both local and remote mail are supported. But it’s not in the package manager and is typically installed outside of Emacs via the OS package manager (available to my knowledge on Arch Linux and FreeBSD at least); depends on three other Elisp packages that are also not available in the package manager. I find that this means that Wanderlust easily goes out-of-sync with Emacs updates and for this reason I don’t recommend it.
- Notmuch
- A very unusual, elegant, and minimalist mailer based on
search, with tagging replacing folders; available in the package manager from
MELPA. The downsides are that Notmuch depends on a standalone command-line
application (called
notmuch) which indexes, searches, and manages the tags, and that it does local mail only. - Mu4e
- Similar in design to
notmuch, but based on themumail indexing program. Local mail only. Same caveats as Notmuch. (I haven’t ever used this mailer, but it’s well-liked.)
Browsing Mbox Files
Even if you aren’t using Rmail as your mailer, rmail-mode
makes an excellent Major Mode for viewing Mbox files, if you happen to have any.
You can make this your default with this Init File snippet:
(add-to-list 'auto-mode-alist '("\\.mbox\\'" . rmail-mode))
References
- [DeVault, Drew]. [n.d.]. Use plaintext email: Why is plaintext better than HTML? https://useplaintext.email/#why-plaintext.
- Ingebrigtsen, Lars Magne. 2020. The Gnus Newsreader. Cambridge, MA: Free Software Foundation. https://www.gnu.org/software/emacs/manual/gnus.html.
Read in Emacs with
M-x info-display-manual RET gnus RET. - GnusTutorial in the EmacsWiki
Kaludercic, Philip. June 2, 2020. Rmail is a Usable Emacs Mail Client..
See also the chapter Reading Mail with Rmail in the Emacs manual.
- Reid, Brian, Stephen Gildea, Jim Larus and Bill Wohler. 2016. The MH-E Manual. Cambridge, MA: Free Software Foundation. https://www.gnu.org/software/emacs/manual/mh-e.html.
Read in Emacs with
M-x info-display-manual RET mh-e RET.
Web and News Feeds (Syndication)
News web sites and blogs update on a regular basis, adding new headlines, stories, or posts periodically. It can be overwhelming to have to check many such sites on a daily basis; besides the sheer amount of time required to visit them, new items you might be interested in can be deeply buried and easily missed. Somebody should do something about this!
Somebody did! Many such sites use web syndication to publish a feed of the new items on their site (such feeds are often loosely called “RSS feeds”). Using a tool called a news aggregator or feed reader, you can subscribe to these feeds and see all the updates, from possibly hundreds of sites, in one central sorted list of headlines. Click on a headline to see a summary (sometimes the complete content) of the web site’s update or jump directly to it in your web browser. You can typically sort the headlines in various ways, categorize the web sites, and more.
To browse a personal collection of feeds, you need a feed reader. The most popular feed readers historically have probably been web sites that offer aggregation as a service, with all the drawbacks this entails. Some require payment in the form of a monthly subscription; many are ad-supported; and like any service, it may disappear at any moment.415 (Google Reader was one of the most popular such feed readers, but Google yanked the plug after half-a-dozen years, leaving their customers in the lurch.)
You can avoid all this by running your own feed reading software, and of course Emacs is ready with several.
Your job, with any feed reader, is to add the URLs of the feeds you’re interested in, and the reader does the rest, groveling all your feeds for updates whenever you start it up.
![]()
Sites that syndicate their content usually indicate this with a link, often buried at the bottom of the home page, that says something like “RSS feed” or “Atom feed”416, or perhaps just the standard web feed icon. Sometimes it can take some hunting to find a feed link; it might be buried in an About or Contact page.
Newsticker

Figure 57: Newsticker Feed Reader
The main built-in Emacs feed reader is Newsticker. Just run
M-x newsticker-show-news and it will pop up the three panel view
seen in Figure 57. By default, it comes populated with just the
EmacsWiki news feed; here I’ve added Gnus author Lars Ingebrigtsen’s blog feed
and have popped up one of his posts. Lars’s feed includes the complete contents
of each of his blog posts, so I actually never need to visit his web site! But
many other feeds just have a bare-bones summary417; in this case typing
v (newsticker-treeview-browse-url) will pull up the web page
corresponding to the feed entry via Browse URL. If you were using Newsticker
you would probably have dozens of entries under “Feeds”. As usual,
C-h P (describe-package), M-x customize-group,
and C-h m (describe-mode) from any of the Newsticker Buffers
will explain all.
Other Feed Readers
You can also use Gnus, the Emacs mailer, to read web feeds, and that’s great because of the automatic deep integration with all of Gnus’s amazing capabilities, but I have to admit there’s a fatal flaw: Gnus has to fetch all your feeds synchronously, which means the more feeds you add, the slower it is to update them. Somebody needs to write an asynchronous back-end. So unless you’re both already using Gnus for your mail (and hence completely comfortable with it) and only want to browse a small number of feeds (say, a dozen), I can’t recommend it.
I switched from reading feeds in Gnus to the third-party elfeed package from
Christopher Wellons. It’s very fast; I’m using it for over 70 feeds at the
moment and it updates them in a few seconds. It caches every feed entry you’ve
ever looked at, so you can go back to anything at any time (even if the feed
entry has disappeared from the original web site)418; I’ve been using it
for several years and it’s only using 54M of disk space to preserve all those
years of data. There are several third-party add-ons available, such as one
for playing videos from Youtube RSS feeds.
UNFINISHED Podcasts
UNFINISHED Slideshow Presentations
Slideshow presentations (aka “powerpoints”) are a way of life (or maybe a necessary evil?) for academics and business types. In this application, Emacs can replace WYSIWYG GUI programs like LibreOffice’s Impress, Apple’s Keynote, or Microsoft’s PowerPoint. Almost all of the packages for slideshows are based on Org Mode. There are two different approaches:
- to have Emacs generate a presentation that will be shown via an external program, or
- to show a presentation directly via Emacs, typically on a laptop with an HDMI connection to a big monitor.
I’m not wild about the second option, because of the unpredictable problems—resolution issues, or even just cabling issues—that you can bump up against when hooking up your laptop to some unknown screen in some strange venue.
However, it does have a minimalist, retro appeal. The idea is to hook up your laptop to the screen, pull up your presentation, which is an Org Mode document, and switch to a special Mode that’s designed to display each of your headlines in slideshow form: full-screened, in a large font, and with single-keystroke commands to advance from headline to headline: that is, from slide to slide. Since Org can display colorized source code blocks, inline images, and the like, this looks much like a sort of texty Powerpoint presentation.
There are several third-party packages to do this, such as org-present,
zpresent, org-tree-slide, epresent, and more; check them out in the Package
Manager.
But I prefer to have Emacs generate (compile, or typeset) a presentation ahead of time. There are two different approaches to this approach:
- generate a presentation to be shown in a web browser, or
- generate a presentation that’s essentially a specialized PDF.
The web browser approach produces very professional-looking, sexy slideshows by
compiling your Org document to HTML backed by a Javascript library that renders
a slideshow in the browser, with typically very dynamic transitions, rotations,
fades and dissolves, and the like. As a techno-stick-in-the-mud, I find this
kind of presentation to be too glitzy and distracting. In addition, the setup
looks potentially fiddly to me, requiring multiple Javascript and CSS files to
be installed or at least linked-to in the generated HTML. But if you like the
sound of it, there are several third-party packages you can investigate, like
ox-ioslide, ox-reveal, org-re-reveal, ox-spectacle, and
ox-html5slide.
Beamer
This leaves us with my favorite approach: export an Org document to Beamer. Beamer is a LaTeX class that produces a PDF that displays, in any PDF viewer, as a slideshow. A Beamer PDF is a single file requiring no links to external Javascript or CSS files (and not even any network connection). Since any PDF viewer will display it, you can drop the file into web space and pull it up in any web browser, but you can also carry a copy on a USB flash drive in case there are Internet connectivity problems at your venue. And you could also display it from your laptop in your laptop’s web browser or a standalone PDF viewer—which include Emacs itself. I like knowing I have all that flexibility when I’m busy panicking about my presentation.
UNFINISHED EUDC: Emacs Unified Directory Client (LDAP)
References
Free Software Foundation. 2022. Emacs Unified Directory Client. Cambridge, MA: Free Software Foundation..
Read in Emacs with M-x info-display-manual RET eudc RET.
UNFINISHED FTP (File Transfer Protocol)
UNFINISHED Accessing SQL Databases
Editing Processes with proced
Every Unix user needs a system monitor or process viewer to monitor running operating system processes—what process is using most of my CPU? my memory?—and interact with them (e.g., to pause or kill them).
Combinations of command-line programs like ps(1), kill(1), pkill(1), and
pgrep(1) can handle these tasks, but most people prefer a dynamic tool like
top(1) or the popular htop(1). The native Emacs equivalent is
M-x proced, the “process editor”.
This is not to be confused with the *Process List* Buffer generated by
M-x list-processes, which is specialized for interacting with
asynchronous processes spawned by your Emacs. Some of these are external system
processes that you can also see via proced, but list-processes knows how Emacs
sub-processes are connected to your Emacs via Process Buffers, and also includes
Emacs network connections in its purview. See Managing Asynchronous Processes.
But back to proced. When you fire it up, you’ll see a *Proced* Buffer that will
look something like the below (for clarity I’ve elided some overlong argument lists,
dozens of self-similar Firefox sub-processes,419 and other boring processes).
| User | PID | %CPU | %MEM | Start | Time | Args |
|---|---|---|---|---|---|---|
| keith | 111343 | 1.3 | 7.2 | Feb 1 | 03:40:30 | /usr/lib/firefox/firefox |
| keith | 890703 | 1.1 | 4.2 | Feb 8 | 01:56:21 | /usr/lib/firefox/firefox -contentproc |
| keith | 1038 | 0.8 | 13.0 | Jan 31 | 02:21:56 | emacs |
| keith | 1262 | 0.5 | 0.5 | Jan 31 | 01:30:04 | xmobar |
| keith | 885 | 0.1 | 0.2 | Jan 31 | 10:02 | /usr/bin/mpd –systemd |
| keith | 1043 | 0.0 | 0.1 | Jan 31 | 05:44 | herbstluftwm –locked |
| keith | 1027 | 0.0 | 0.0 | Jan 31 | 04:01 | xautolock -locker xtrlock |
| keith | 1454647 | 0.0 | 0.1 | 14:35 | 00:00 | dunst |
| keith | 1019 | 0.0 | 0.0 | Jan 31 | 00:43 | unclutter |
| keith | 2138 | 0.0 | 0.0 | Jan 31 | 00:30 | /usr/bin/gpg-agent –supervised |
| keith | 909 | 0.0 | 0.2 | Jan 31 | 00:21 | /usr/bin/pulseaudio |
| keith | 1739 | 0.0 | 0.1 | Jan 31 | 00:02 | /usr/bin/aspell -a -m -d en_US |
| keith | 7791 | 0.0 | 0.1 | Jan 31 | 00:01 | /usr/bin/dirmngr –supervised |
| keith | 878 | 0.0 | 0.1 | Jan 31 | 00:00 | /usr/lib/systemd/systemd –user |
| keith | 905 | 0.0 | 0.0 | Jan 31 | 00:00 | ssh-agent |
| keith | 1062639 | 0.0 | 0.1 | Feb 9 | 00:00 | /bin/zsh -i |
| keith | 239379 | 0.0 | 0.1 | Feb 2 | 00:00 | ssh ocaml |
| keith | 1346 | 0.0 | 0.0 | Jan 31 | 00:00 | /usr/bin/alsactl monitor default |
| keith | 447137 | 0.0 | 0.0 | Feb 4 | 00:00 | emacsclient -c |
By default, the Proced Buffer shows all system processes owned by you, the user
who’s running Emacs, but you can change that with a keystroke to see all processes.
By default, the list is sorted on the %CPU column; since proced uses
tabulated-list-mode, you can sort on any column. The
process list is updated every 5 seconds, and there are several predefined
formats featuring more attributes (columns), up to 31 on my Linux system.
Surely you’d prefer to see this information in color. I recommend this for your Init File:
(setopt proced-enable-color-flag t) ; colorful proced
Besides observing processes, proced’s raison d’être is signaling (or renicing)
processes; the approach will be familiar from Dired and the like: you mark the
processes you want to signal, and then do so, choosing the signal to send with
k (proced-send-signal).
I’ve grouped the *Proced* commands into four major categories: commands that
change the display, commands that change the sort, commands to mark and unmark
processes for actions, and the actions themselves.
| Category | Key | * | Action |
|---|---|---|---|
| Display | f |
Filter processes according to SCHEME | |
F |
change buffer Format (verbosity / columns) | ||
o |
* | Omit this process | |
T |
toggle Tree view | ||
g |
refresh process list (revert) | ||
RET |
refine process list according to this process | ||
| Sort | s S |
choose a column to sort on | |
s c |
sort by CPU percentage | ||
s m |
sort by Memory percentage | ||
s p |
sort by PID (process ID) | ||
s s |
sort by Start time | ||
s t |
sort by total run Time | ||
s u |
sort by process owner (User) | ||
| Marks | m, d |
Mark this process | |
M |
Mark all processes | ||
C |
mark the Children of this process | ||
P |
mark the Parent of this process | ||
u |
Unmark this process, moving forward | ||
DEL |
Unmark this process, moving backward | ||
U |
Unmark all processes | ||
t |
Toggle marks | ||
C-/ |
Undo mark changes | ||
| Kill / Renice | k, x |
* | Kill (signal) this process |
r |
* | Renice this process | |
| Quit | q |
Quit (hide) the *Proced* buffer |
Commands marked with an asterisk (*) follow the Dired model to determine which
processes the action applies to:
- the next \(N\) lines if a numeric argument is given, else
- the marked processes, or finally
- the process on the current line (where Point is).
Commands That Change the Display of Processes
The list of process is normally a flat list sorted on some column (see below)
but you can also toggle a tree view with
T that groups by parent-child
relationship. You can omit uninteresting processes from the Buffer with
o (proced-omit-processes), and force a refresh of the list by
reverting the Buffer with g (revert-buffer); a forced refresh
(as opposed to the automatic refresh that happens (by default) every 5 seconds) will discard
any refinement or omissions. You can toggle whether or not this automatic
refresh happens with M-x proced-toggle-auto-update.
Filtering the *Proced* Buffer
The f (proced-filter-interactive) command prompts you for a
filter scheme; see Table 69. (The default is user.) This
determines how many rows you see.
| Name | Meaning |
|---|---|
user |
all processes owned by the Emacs user |
user-running |
… which are currently running |
all |
all system processes |
all-running |
… which are currently runnning |
emacs |
all processes descended from this Emacs |
Formatting the *Proced* Buffer
The F (proced-format-interactive) command prompts you for a
format scheme, one of short, medium, long, and verbose. (The default is short.)
This determines how many and which columns are present.
You can add your own format scheme or tweak any of the existing ones with
M-x customize-variable RET proced-format-alist.
Marking Processes
Marking and unmarking processes is done as per Dired, primarily with
m (proced-mark) and u (proced-unmark).
Unusual marking commands include C (proced-mark-children) to
mark all the children of the process on the current line; for example, I could
easily omit all 20 of my Firefox container processes by moving to the parent
process, hitting C to mark its children, and then using
o (proced-omit-processes) to omit them from the Buffer. If
instead I want to focus only on the Firefox containers, then after C I could
toggle the marks with t (proced-toggle-marks), and then use o
to omit all the non-Firefox processes.
Killing and Renicing
Unix defines a set of 20-odd signals that can be sent to processes, typically to
terminate or pause them. Sending a signal is colloquially known as killing, and
the k (proced-send-signal) command prompts you for the signal
you want to send to the process on the current line, or the marked processes.
Processes also have a priority, known as niceness – the nicer the process, the
lower its priority, and therefore the slower it runs and the less it impacts the
performance of your system (how nice!). Changing the niceness of a process is known as
renicing, and you can do it with the r (proced-renice) command.
UNFINISHED Unix Manual Pages
UNFINISHED Calc
Interactive Tutorial
Embedded Mode
Unit Conversion
calc knows many different units: meters and inches and feet; liters and fluid
ounces; days, weeks, and years and hours, minutes, and seconds; miles per hour;
and furlongs, footlamberts, and muon rest masses, among about 150 more (say u v
when in calc-mode).
References
Gillespie, Dave. 2020. The GNU Emacs Calculator. Cambridge, MA: Free Software Foundation. https://www.gnu.org/software/emacs/manual/calc.html.
Read in Emacs with M-x info-display-manual RET calc RET.
There’s an Emacs Calc Reference Card.
Passwords and Password Managers
Despite the ubiquity of mobile phones and new biometric methods of identification, people still need new passwords all the time. This leads to two kinds of tools: password generators (because people suck at making up good passwords), and password managers (because people suck at remembering good passwords).
A password manager stores your many passwords and passphrases420 in an encrypted form, which means that you really only need to remember one very strong password to unlock (decrypt) the password manager. This allows you to use unmemorable passwords for all your web logins—especially if your password manager will usually enter (type in) the passwords for you.
The passphrase for your password manager needs to be strong, and you need to be able to remember it! Believe it or not, the best advice for how to choose a good passphrase is in this xkcd comic.

Password Strength
However, since it’s 15 years old now, you probably want to use more than four words: I’d recommend five or six421.
Theoretically, all you need for a password manager is one file (probably an Org Mode file so you can use an outline structure with tags) that you encrypt with EasyPG Assistant, though this won’t automatically enter passwords into websites for you.
This Unix command implements the xkcd password algorithm; Unix users can run
this command repeatedly in M-x shell until they get a passphrase they
like:
echo $(grep -v "'" /usr/share/dict/words | shuf -n 6 | tr A-Z a-z)
It’s important to include the spaces in your passphrase (though you can replace them with some other punctuation character if you like).
Emacs has both fancier password generators and password managers, but none are
built-in. I haven’t used any of these third-party packages myself; you can
read about them via C-h P (describe-package).
Password Generators
password-generator- “password generator for humans”
dw- Diceware passphrase generation commands
totp- generate Time-based One-time Passwords (TOTP), like Google Authenticator
The Diceware home page is an excellent source of information about passwords and security.
Password Managers
The espy package implements the “encrypted Org Mode file” password manager I
described with some simple helper functions around it. The rest of the
third-party password managers are front-ends to pass(1), “the standard Unix
password manager”. I use pass(1) myself, though it works fine for me with
just Dired as my Emacs interface.
pass- major mode for
password-store passmm- a minor mode for pass (Password Store)
password-store- password store (pass) support
password-store-otp- password store (pass) OTP extension support
EasyPG Assistant
Emacs transparently edits encrypted files via the external program GNU Privacy Guard (GnuPG)422, and the Emacs interface to GnuPG is called EasyPG Assistant, or EPA for short423.
Perhaps you don’t need to encrypt your files in general, but if you need to
frequently enter passwords in Emacs, perhaps for remote file editing via Tramp,
editing files via sudo(8), or authenticating yourself to various network
services (like your Emacs Email client), then you might want to store your
passwords in a file so that you don’t have to re-type them constantly, and in my
opinion such a file needs to be encrypted424. I’ll send you to the
Authentication chapter for how to store your passwords, but that chapter will
have to send you back here for how to encrypt them!
GnuPG is all about public-key cryptography425. Public-key encryption is a complex topic, and GnuPG is an extremely complex program: I can’t cover it adequately here. See The GNU Privacy Handbook for complete details. But if you’re already set up to use public-key, Emacs can make using it easier.
If not, GnuPG also handles old-fashioned symmetric-key cryptography as well, which is much easier to understand and doesn’t require complex setup, and while public-key is much more powerful, and easier to use once set up, symmetric-key is perfectly adequate for encrypting files that you don’t need to share with others.
Symmetric-key cryptography simply means that you use a password to encrypt some text, and the same password is also used to decrypt the text: probably that’s exactly what you expected when you saw the word “cryptography”!
On Passwords
For symmetric-key encryption, you’ll need to make up one or more passwords or passphrases. It’s okay, IMHO, to use the same passphrase for several (or all) of your personal symmetrically-encrypted files426, but it is definitely more secure to use a distinct passphrase for each: however, this is a hassle and requires you to use a password manager.427 (Using public-key encryption obviates the need for a password manager, at least for your files.) See Passwords and Password Managers for hints on password generation.
Symmetric-Key Operations
If you haven’t set up public-key encryption, you can still use GnuPG to encrypt files.
Creating A Symmetrically-Encrypted File
To create a brand new symmetrically encrypted file, simply visit a file with a
.gpg extension tacked onto any other extension you might want, e.g. C-x C-f
foo.org.gpg. When you save this new file, a window will pop up listing the
contents of your GnuPG public-key ring, but the list will be empty if you haven’t
configured public-key encryption, and the entirety of the buffer will look
like this:
Select recipients for encryption.
If no one is selected, symmetric encryption will be performed.
- ‘m’ to mark a key on the line
- ‘u’ to unmark a key on the line
[Cancel][OK]
Without a public-key ring, there are no recipients to select, but that’s alright.
Just click the [OK] button and Emacs will use symmetric encryption for this
file. You’ll be prompted for an encryption passphrase (be sure to remember it;
you won’t be able to decrypt the file without it!).
Symmetrically-Encrypting an Existing File
If you want to encrypt a file that already exists, use
M-x epa-encrypt-file; it will prompt you for a filename and proceed
as above. When you’re done, you’ll have an additional file: a new encrypted
version of the original which has a .gpg extension. You should visit this file
to make sure you can decrypt it, and assuming you can, you should delete the
original unencrypted file with M-x delete-file or via Dired’s
D (dired-do-delete) command. It’s probably best to use Dired
so you can check for backup or auto-save files; you’ll want to delete them too
in order to avoid exposing your now-encrypted data.
Public-Key Operations
If you already have a public-key key pair set up with GnuPG, you can use EPA to do additional operations. See The Least to Know About Public Key Cryptography if you want to set it up.
Encrypting and Decrypting Files
Encrypting a file with public-key is mechanically the same as with symmetric-key; the only difference is that your public-key ring will be populated with at least your own public key, and possibly more, so the Buffer that pops up when you initiate encryption will look something like this428:
Select recipients for encryption.
If no one is selected, symmetric encryption will be performed.
- ‘m’ to mark a key on the line
- ‘u’ to unmark a key on the line
[Cancel][OK]

u 5DA89C7DECA0D55A Keith Waclena <keith at lib.uchicago.edu>
e 57D15AB98548EF3A The University of Chicago Network Security Center <security@uchicago.edu>
- 15D68804CA6CDFB2 FreeBSD Security Officer <security-officer@FreeBSD.org>
- F8B506E4A1694E46 The SANS Institute <sans@sans.org>
e 064973AC4C4A706E NetBSD Security Officer <security-officer@NetBSD.org>
- 9E98BF3210A792AD Bacula Distribution Verification Key (www.bacula.org)
If you mark one or more of the keys in the Buffer, public-key encryption will be used.
But which key? If you want to encrypt a file so that only you can decrypt it, simply mark your own key. If you want to encrypt it so that only one other person can decrypt, you need to have their public key in your key ring and mark it. Thanks to public-key encryption, there’s no need to somehow transmit the password used to decrypt this file to the recipient: they just decrypt it with their own private key. Not even you, the sender, can decrypt this file.
How do you get someone else’s key in your ring? You need to import it. See Importing and Exporting Public Keys.
In addition to solving the password distribution problem, public-key also lets you encrypt a file for several recipients at once. Just mark the key for each recipient who should be able to decrypt the file, including your own key if you like.
Encrypting and Decrypting Regions
An encrypted file just looks like random binary data. But you can also encrypt just one or more portions of the file’s contents, in which case it will look something like this:429
Here's the secret information!
-----BEGIN PGP MESSAGE-----

hQEOA2k9uqIsdvCNEAP/RJfBlafF4KeqNVl3LIZHgt+6E4Inve7Vz7pNmyCfXqSA
uGotx0xJxAqhdcZSrooVMZL+oP3JsEKZPeJZkoX/oGCYg4c55Y+LSmRr76tIrqmO
vDU5qhPZz4H9PvP0hve1KyfIRjTQB7/8ZJiry/4KVlf16kDiNWVsMn5rdFlyJ98D
/ROfebRZ6zOnuC3T51chrwVjsB6xKr8sKO5pJXUXQGC7vjexRB25opsdiuNlDb64
YcodunCMy1m5jYZbatA41RVV+Qh0luTkH6JxIeSugwzHApsS+Vq3VbWgoH6pi9BQ
VnFwKqc4lCFHk8XXnSuVA1x69OFCf3uZDDUhhfBcOCYX0kABsSqaGQArxX67W+cO
M5YHvHQQoNCcbFDDzPSiQjE2AG30tU46n4th55VHujgpugniX8OteSxouX703NgU
YAOk
=k5Ze
-----END PGP MESSAGE-----
Act quickly!
This format is called “armored output” because it’s safer to move it around
(e.g. via email) than binary data (which can get corrupted). You can decrypt
such data with M-x epa-decrypt-armor-in-region. Since the encrypted
data is easily recognizable, you don’t have to set the Region precisely around
it—you could just use C-x h (mark-whole-buffer) and
epa-decrypt-armor-in-region would decrypt any and all such encrypted bits in the
Buffer. The command will ask whether to replace the armored content with the
decrypted data, or to display it in a temporary Buffer.
You can create an armored encrypted Region in a Buffer with
M-x epa-encrypt-region.
Normally, there’s no need to decrypt an unarmored Region, because no one would
insert the binary data into the middle of a file: unarmored data is always
stored as the complete contents of a file. And since Emacs by default decrypts
encrypted files automatically when you visit them, there’s very little call for
M-x epa-decrypt-region. But there it is, just in case.
Signing and Verifying
Besides encrypting and decrypting data, public-key cryptography can also be used to sign data. To sign data means to attach an incorruptible digital signature that verifies that you and only you sent a given email, or signed a given contract, or packaged a piece of software. You can sign an entire file, or just portions (Regions) of it.
Here’s what a signed Region looks like; there’s no way for me to disavow this statement:
-----BEGIN PGP SIGNED MESSAGE-----
Hash: SHA1

I hereby agree to use Emacs for the rest of my life.
-----BEGIN PGP SIGNATURE-----

iF0EARECAB0WIQS2KmSeImk7rnKCEDldqJx97KDVWgUCZHZSaAAKCRBdqJx97KDV
WtbbAKCLvZMwnQSJYX63njph890ws/TTbgCfcwtPU4EQ9ofOzh4C8Wx5HlqoUzc=
=lXKR
-----END PGP SIGNATURE-----
I created it by setting the Region around the declaration and invoking
M-x epa-sign-region. You can verify such signed text with
M-x epa-verify-region, which in this case will pop up a Buffer like
this430:
Good signature from 5DA89C7DECA0D55A Keith Waclena <keith at lib.uchicago.edu>
But if someone changes the text of the declaration, verification will fail:
Bad signature from 5DA89C7DECA0D55A Keith Waclena <keith at lib.uchicago.edu>
You can sign an entire file without Visiting it with M-x epa-sign-file.
Public-Key Ring Management
The command M-x epa-list-keys displays your GnuPG public-key ring in
a *Keys* Buffer that will look something like this:
The letters at the start of a line have these meanings.
e  expired key.  n  never trust.  m  trust marginally.  u  trust ultimately.
f  trust fully (keys you have signed, usually).
q  trust status questionable.  -  trust status unspecified.
 See GPG documentation for more explanation.

  u 5DA89C7DECA0D55A Keith Waclena <keith at lib.uchicago.edu>
  e 57D15AB98548EF3A The University of Chicago Network Security Center <security@uchicago.edu>
  - 15D68804CA6CDFB2 FreeBSD Security Officer <security-officer@FreeBSD.org>
  - F8B506E4A1694E46 The SANS Institute <sans@sans.org>
  e 064973AC4C4A706E NetBSD Security Officer <security-officer@NetBSD.org>
  - 9E98BF3210A792AD Bacula Distribution Verification Key (www.bacula.org)
Each line has a public-key identifier, a person’s (or corporate entity’s) name,
and usually an email address. Some lines have flags that indicate the key’s
trust level, and you’ll notice I have a couple expired keys that I should update
or delete. You can hit RET on any of these keys to get more complete
information (in particular, full key fingerprints).
Table 70 lists the key management commands available in this Buffer. In addition to the usual Special Mode commands, you can mark one or several keys and then give a command that will use them. (If no key is marked, the key at Point will be used.)
| Key | Type | File? | Command |
|---|---|---|---|
m |
Marking | Mark this key | |
u |
Unmark this key | ||
d |
Encrypt / Decrypt | yes | M-x epa-decrypt-file |
e |
yes | M-x epa-encrypt-file |
|
i |
Import / Export | yes | M-x epa-import-keys |
o |
export this or marked keys | ||
s |
Sign / Verify | yes | M-x epa-sign-file |
v |
yes | M-x epa-verify-file |
|
r |
Delete | Remove (delete) this key |
There’s a corresponding, less-used, command to list your private-Key ring,
M-x epa-list-secret-keys.
The five “File?” commands in Table 70 can be used outside of the *Keys*
Buffer via M-x; they will prompt you for a file to operate on and pop up the *Keys*
Buffer if needed.
Importing and Exporting Public Keys
Where do you get other people’s public keys so that you can send them encrypted
data? Many people make their keys available on their web site; you can just
download the key as a file and then use M-x epa-import-keys.
You can also import someone’s key from a key server, if the user has uploaded
it to one. Just say M-x epa-search-keys and enter the user’s name
or email address. You can then mark the correct key and import it.
If you want to upload your public key to a key server, you can mark it in the
*Keys* Buffer and type o (epa-export-keys).
There’s a bit of a chicken / egg problem here: how do you know that the key on the person’s web site is really their key? If someone else has gained control of their web site, they could have replaced the key with a different one! Such concerns are very real for journalists, dissidents, and whistle-blowers. Ideally you would get a copy of each person’s public key face-to-face with an exchange of flash drives, or from their phone via Near-field communication (NFC) or the like. But usually it’s good enough to compare the key on their web site with its fingerprint, as published in a separate medium, like their email signature, business card, or via a key server. See The GNU Privacy Handbook under “Web of Trust” for more information.
Caching Passwords Via the GPG-AGENT
When you run gpg(1) for the first time in a login session (or when Emacs first
runs it for you), it fires up an additional program in the background called
gpg-agent(1). This program caches your passwords for a period of time431
so that, if you visit an encrypted file several times in quick succession, you
won’t have to re-enter your password every single time.
gpg-agent’s password prompt will probably come from an OS GUI popup window rather
than from Emacs itself. If you’d rather have Emacs prompt you in the
Minibuffer, Customize epg-pinentry-mode and set its value
to loopback. You’ll also need to add this entry to your GnuPG config file:
allow-loopback-entry
Encryption Commands in Dired
Performing GnuPG operations on whole files is often most easily done in Dired via the commands in Table 71; as usual they observe the Dired marks or numeric arguments.
| Key | Command |
|---|---|
: d |
Decrypt this file |
: e |
Encrypt this file |
: s |
Sign this file |
: v |
Verify this file |
In most Emacs mail user agents (MUAs), it’s very easy to encrypt, sign, decrypt, and verify email messages and attachments. I haven’t made a study of this in all the MUAs, but it’s certainly true in the one I use, Gnus. Decrypting and verifying will just happen automatically, and encrypting and signing are a keystroke away.
References
- Free Software Foundation. 2022. EasyPG Assistant User’s Manual. Cambridge, MA: Free Software Foundation. https://www.gnu.org/software/emacs/manual/epa.html.
Read in Emacs with
M-x info-display-manual RET epa RET.
- Ashley, Mike. 1999. The GNU Privacy Handbook. Cambridge, MA: Free Software Foundation. https://www.gnupg.org/documentation/guides.html.
- Free Software Foundation. 2017. The GNU Privacy Guard Manual. Cambridge, MA: Free Software Foundation..
Read in Emacs with
M-x info-display-manual RET gnupg RET.
The Email Self-Defense web site has a very good introduction to GnuPG.
UNFINISHED Emacs Speaks Statistics: Data Analysis
UNFINISHED Maps
UNFINISHED Emacs as Window Manager
Games and Amusements
Emacs comes with 24 built-in games and amusements, and there are at least 46 more in the Package Manager. If any of the games I mention aren’t available in your Emacs, just search them in the Package Manager. I’ve divided them into several categories.
Actual Games
By this I mean games with a computer opponent that you play against, or classic
computer games in which you try to get a better score than the last time. The
only true built-in games with a computer opponent are M-x gomoku,
which plays Gomoku or Five-in-a-Row, M-x chess, and
M-x gnugo which is a front-end to the GNU Go engine (which you’ll have
to install via your OS package manager).
chess has a very weak game engine implemented in Emacs Lisp so you can play it
right away, but if you install any of several strong chess engines via your OS
package manager, like gnuchess or stockfish, M-x chess will detect it and you
can play against a much stronger opponent. The default chessboard is a simple
ASCII representation, but you can install optional graphics for a more
traditional look; see the documentation. M-x chess-ics lets you
play against human opponents elsewhere on the Internet via an Internet Chess
Server.
In the computer-game category we have M-x dunnet, a text adventure
in the mold of the classic Advent a.k.a. Colossal Cave Adventure432.
Dunnet is almost unique among all Emacs programs of any kind in that it can be
run in batch mode, from a terminal outside of Emacs!433 We also have
tetris, snake, and pong—just M-x any of them. You can also install
Pac-Man from the Package Manager under the name pacmacs.
Puzzles
There are a number of puzzles or solitaires. One of the best is Boruch Baum’s
crossword puzzle. It downloads free puzzles from various sources (e.g. The
Washington Post) which you can attempt to solve (hints are available). The user
interface for this puzzle is really well done, but if your puzzle grid isn’t
perfectly square, I suggest abandoning your game, adding this to your Init File
and restarting (the issue revolves around your default font and how good its
Unicode coverage is):
(setq crossword-empty-position-char "#")
M-x blackbox plays Eric Solomon’s famous Black Box game (as a “game”
it’s really a competitive solitaire). M-x solitaire plays Peg
Solitaire, M-x bubbles is an implementation of Same Game, and
M-x 5x5 is a puzzle with several different automatic solvers which
you can watch (which may put this in the category of Display Hacks). Finally
M-x mpuz is a multiplication puzzle.
Cryptography
There are several commands related to traditional cryptography434. Emacs
supports ROT13, the traditional Caesar cipher of Usenet, still occasionally used
as it was then to obfuscate punch lines. M-x rot13-region and
friends will encode or decode ROT13, since it’s its own inverse.
Two conspiracy theorists walk into a bar. Lbh pna’g gryy zr gung jnf whfg n pbvapvqrapr…
Then there’s the very impressive M-x decipher-mode, which provides
assistance in decrypting monoalphabetic substitution ciphers.
Insert your ciphertext in a new Buffer and invoke M-x decipher,
which will set the Buffer up and invoke the Mode. Special commands will list
letter and digram frequencies, show adjacency lists, and the like.
Of course Emacs can handle Morse code:435 just set the Region around this
message and invoke M-x unmorse-region; encode your own messages with
M-x morse-region.
.--/..../.-/- ..../.-/-/.... --./---/-.. .--/.-./---/..-/--./..../-
Display Hacks
There are a number of amusements that fall into the category of display hacks
(i.e. fun things to stare at). M-x hanoi implements the Towers of
Hanoi puzzle, well-known to programmers for its simple recursive solution.
Infinitely more interesting is M-x life, an implementation of
Conway’s famous cellular automaton. One of
17 starting patterns is
randomly chosen. It’s not hard to add your own, but check out the Life Lexicon
for everything you could possibly want to know about patterns, and
additional Elisp code.
Emacs also has its own screensaver. Just say M-x zone and your
Emacs will zone-out randomly. It’s hard to describe, but either something
disturbing but very subtle will happen, or something very disturbing and
extremely in-your-face will. Regardless of how messed up your precious text
looks, I assure you that nothing is really happening. Give any Emacs command at
all, and the zoning will stop and all apparent destruction will vanish.
Definitely one of the best things in Emacs.
Jokes / Wackiness
Finally we have a motley assortment of oddities. I mentioned at the very
beginning that Emacs comes with a Rogerian therapist; you might need one after
watching M-x zone. Just invoke M-x doctor if you feel
the need to talk things out; it’s an Elisp implementation of Weizenbaum’s famous
ELIZA program from the MIT AI Lab in 1966: more of an early Natural Language
Processing project than a psychology one, ELIZA was the first chatbot.
Unix systems have had a fortune cookie program since 1979, which prints a
random quip, quotation, or joke every time it’s run. M-x fortune
does the same thing for Emacs436.

Real Programmers
In honor of several XKCD comics on the topic of Emacs, we have the otherwise
inexplicable M-x butterfly (you’ll have to bind it to C-x M-c
M-butterfly yourself).
References
Poundstone, William. 1985. The Recursive Universe: Cosmic Complexity and the Limits of Scientific Knowledge. Chicago: Contemporary Books..
EMACS FOR…
UNFINISHED Emacs for Writers
Writing should be all about the words. But word processors like Microsoft Word, Google Docs, or Apple’s Pages force you to think about formatting as you compose. — Ashton Wiersdorf
Emacs is heavily used for authoring printed documents (memos, journal articles, books like this one), and online documents like PDFs and HTML pages (and entire web sites). You’ll remember that “the one thing Emacs isn’t” is a WYSIWYG word processor such as Microsoft Word or Google Docs: instead, Emacs authors use a markup language of some kind that’s “typeset” by an external program: the most popular must surely be LaTeX, and nowadays the flexible Org Mode must be a close second. See Typesetting and Publishing below for these.
The rest of this chapter describes facilities and subsystems that can assist across many different authoring modes.
Text Mode
text-mode is one of the oldest of all the Emacs
major modes. It’s rarely used these days; most people use Org Mode
instead, or else a text-formatting markup language like LaTeX.
text-mode is for editing plain, unspecialized, natural language prose,
i.e. blank-line separated paragraphs consisting of sentences.
If you prefer your paragraphs to be recognized by leading indentation
of the first line, so that you don’t need blank lines between them,
you should use M-x paragraph-indent-text-mode instead of
text-mode. There’s an equivalent Minor Mode,
paragraph-indent-minor-mode that you can use in
other texty Major Modes (like, say, message-mode
for emails).
If you really want to use it, there’s not much to say
about text-mode. You can Customize the paragraphs group with
M-x customize-group to fine-tune the details of how paragraphs and
sentences are handled, but that’s about all I can think of.
Outline Mode
Emacs has had the Major Mode
outline-mode since the very
beginning. It uses a very simple markup to structure text into an outline, and
provides three main features:
- folding text i.e. hiding and revealing branches of the outline to make it easier to see the document structure, and to focus on one part at a time
- colorful syntax highlighting that makes it easier to spot the headlines (headings)
- commands to navigate by headlines, and to easily move headlines—and everything underneath them recursively—around: promote and demote them, and rearrange siblings amongst themselves.
However, outline-mode has for some time been eclipsed by its compatible but much
more powerful sibling, Org Mode. While Org is enormous and daunting in its
power, at the level of simple outlining, it’s actually easier to learn and use
than outline-mode; I can’t see any reason for anyone not to skip directly to Org
Mode. Org is great for writers, especially given its built-in abilities to
export directly to beautifully typeset documents in the form of PDFs, HTML, and
more.
Wrapping Lines and Filling Paragraphs
The Minor Mode auto-fill-mode breaks lines between words
for you automatically as you’re typing, whenever the length of the line exceeds
the value of the Buffer Local variable fill-column. To
break the line means to insert a newline; when auto-fill-mode is on, this
happens whenever you type a space and the line is about to get too long. When
enabled, you’ll see the lighter “Fill” in the mode line.
The default value of fill-column is 70 characters. You can change that default
via Customize, or in your Init File with setq-default, or
via a File-Local Variable. You can also change it locally in the current Buffer
with M-x set-variable, but the easiest way is to use
C-x f (set-fill-column).
auto-fill-mode is by default adaptive, which means it tries to propagate a
common prefix to all the lines of your current paragraph. Whitespace indentation is
always propagated, so you start a paragraph with two spaces, for example, all
subsequent auto-filled lines will be similarly indented. You can also set an
explicit fill-prefix with C-x . (set-fill-prefix). Many
programming languages, like Python, start comment lines with #. So if you want
to write a big block comment in python-mode, start the
first line, position Point after the # (and any spacing after it you want to
include), and hit C-x ., which takes all the characters from the beginning of the
line up to Point as the prefix. Now all subsequent auto-filled lines will be
commented automatically. (Note that many Major Modes for programming
languages will have their own way of automating the entry of block comments, so
you won’t typically have to do this. But you might want something similar in
plain text.)
I guess if you prefer to hit RET explicitly rather than letting Emacs fill your
lines for you, then you might appreciate a visual indication of the fill column:
turn on the Minor Mode display-fill-column-indicator-mode;
it will draw a vertical line down your Window at the fill column.
When you’re typesetting via some markup language, the program processing your
text probably doesn’t care about the lengths of your lines or the regularity of
your paragraphs—it’s going to wrap your lines and fill your paragraphs for you
in the typeset output. But many people are happier editing text whose lines
don’t have erratic lengths and whose paragraphs are filled at about the same
margin. I enable auto-fill-mode in text-mode-hook like so:
(add-hook 'text-mode-hook 'auto-fill-mode)
Since Org Mode, the Mode I use for all my publications (and all my notes),
inherits from text-mode, I get auto-fill in Org Mode too.
Filling Paragraphs
auto-fill-mode only fills one line at a time, as you’re typing it; it doesn’t
re-fill your paragraph after you’ve deleted a bunch of text from the middle of
it, rendering the paragraph all ragged. Most people re-fill paragraphs
explicitly, as needed, with M-q (fill-paragraph), which
completely re-fills the current paragraph with a ragged-right, or all the
paragraphs in the Active Region. With a Prefix argument, M-q will fill and
right-justify. M-q respects the fill column and the fill prefix as well.
I said auto-fill-mode doesn’t re-fill your paragraphs as you edit them the way a
word processor does, but the Minor Mode refill-mode does. I actually
never even heard of this one until just now.
The command M-x fill-region-as-paragraph will convert multiple
paragraphs into one, by deleting paragraph separators and then refilling the
whole region.
All these filling commands support a lot of customization; see
“Filling” in the Emacs manual for details, and the Customization group fill.
Breakable and Non-breakable Spaces
Occasionally you’ll find a spot between two words where you really don’t want
M-q to break the line. In this case, if you use the Unicode character NO-BREAK
SPACE instead of an ordinary space; M-q won’t break the line there. You can
insert one with C-x 8 SPC; see Inserting the Occasional Funny Character for
details.
Spell Check
Unless you’re an ex-spelling bee champion, you’ll want to have
spellcheck enabled for your text Modes. The built-in spell-checking
tools are Ispell and
flyspell-mode. Ispell is a collection of
commands that communicate with the old Unix ispell(1) program (which
can be traced back to 1971); while I use a few of its commands occasionally,
its interface is somewhat old-fashioned and a little tedious to use.
Instead I use Flyspell, which provides a more nimble interface to
ispell(1).
Spellcheck is handled by an external program, which you’ll need to
have installed, either the venerable ispell(1) or one of its
compatible descendents, aspell(1), hunspell(1), or enchant(1). Check
to see if you’re ready to go by running
M-x ispell-check-version; if all is well, it will print a
message like:
@(#) International Ispell Version 3.1.20 (but really Aspell 0.60.8.1)
If you get an error, you’ll have to have your OS package manager install one of these programs.
But which program? You should prefer either aspell(1) or hunspell(1)
over ispell(1), because they support UTF-8 and dictionaries for
multiple languages without the extra configuration ispell(1) requires;
they both provide more accurate corrections too. In fact, if
ispell(1) is what’s detected by ispell-check-version, I would
recommend installing one of the other ones anyway (Emacs will prefer
either of them even if ispell(1) is installed). I use aspell(1)
myself, because when I last used hunspell(1) it didn’t deal with
contractions very well, and I’ve never tried enchant(1). If you want
to make sure Emacs uses your choice of spellchecker, Customize
ispell-program-name.
Now let’s get spellchecking. You probably want spellcheck in all
Major Modes derived from text-mode, so do
M-x customize-variable text-mode-hook and enable Flyspell;
now it’ll work in Org Mode and most everyplace else where you’re
writing. If you’re a programmer, you might also Customize
prog-mode-hook and enable
flyspell-prog-mode, which will then do
spellchecking in your programming language Modes, but only within
comments and string literals. Of course you can also toggle it on and
off manually in any Buffer with M-x flyspell-mode.
Flyspell Mode
| Key | Action |
|---|---|
C-. |
correct the current word |
C-c $ |
… via a popup menu |
C-; |
correct the previous misspelled word |
C-, |
move to the next misspelled word |
M-$ |
add a new word to your personal dictionary |
Flyspell is very easy to use. When enabled, it highlights suspected
misspellings, as you type, with wavy red underlines. If you immediately notice
the misspelling and want to correct it, type
C-. (flyspell-auto-correct-word),437 and it will replace
the misspelling with the first of several possible corrections. If that’s not
the one you wanted, hit C-. again to change to the next one. You can very
quickly whip through half-a-dozen with C-.; if you overshoot in haste, just
Undo. All the suggestions are shown, in the order they’ll be offered, in the
Echo Area. C-c $ (flyspell-correct-word) does the same
correcting via a popup-menu at Point. (Watch out; in Org Mode, C-c $ is bound
to org-archive-subtree; use
M-x flyspell-correct-word instead.)
Of course it’s possible none of the suggested corrections are what you
want; if you want a correction that’s not listed, just do it manually
with a quick M-DEL (backward-kill-word) and type in
the correct word.
C-; (flyspell-auto-correct-previous-word) is the
long-distance version of C-.: it corrects the nearest misspelled word
before Point, even if it’s many words back. When you’re typing at
speed, you’ll often have typed several words before the red squiggles
catch your eye; C-; let’s you correct that word without moving Point.
Like C-., hit C-; repeatedly to cycle through the corrections.
I find C-; can be a little bit dangerous; if you hit it by accident and aren’t
paying attention, you can find out (sometimes much later) that you accidentally
corrected a valid word to what is now the incorrect word (this correction might
not even be visible within your current window). I don’t disable this
command—it’s too useful—but you might keep it in mind.438
If the word you typed is correct but not known to Flyspell, you have two
choices: just leave it there and ignore the red squiggles forever, or teach
Flyspell439 this new word. M-$ (ispell-word) followed
by i will add the word preceding or containing Point to your personal dictionary
(see below). If the word just happens to be capitalized—first word in a
sentence, say—you probably want to add the lowercase version of the word to
your dictionary for greater utility; use M-$ u (to “uncase” it) instead. Of
course, if the capitalized form is the only correct spelling—proper noun,
say—then that’s what you should add.
You can move through your misspellings ahead of Point (or, with a
Prefix Arg, prior to Point) with
C-, (flyspell-goto-next-error).440
One thing to keep in mind is that Flyspell only marks misspellings as
you type them. So, if you Visit a file that has misspellings, and
immediately hit C-, to jump to the first error, Flyspell will just say
“no more misspelled words” (because you haven’t typed any misspelled
words yet). If you want to spellcheck the whole Buffer, you need to
run M-x flyspell-buffer first; then all your misspellings
will be squiggled-up and you can step through them all with C-, to fix
them. You can instead use M-x flyspell-region to check a
smaller portion of the buffer. But see below.
Flyspell binds C-M-i to
flyspell-auto-correct-word, which it also binds
to C-.. This makes me very unhappy; I think C-. is much easier to
type, and C-M-i is a common binding in many Major Modes, so Flyspell
ends up stealing whatever command is on C-M-i. I disable that in my
Init File like so:
(with-eval-after-load 'flyspell (define-key flyspell-mode-map (kbd "<M-tab>") nil) (define-key flyspell-mode-map (kbd "C-M-i") nil))
Ispell Commands
While Flyspell does most of what I need, there are a couple of Ispell commands that I also use occasionally.
M-x ispell-buffer and M-x ispell-region are
useful for mass-spellchecking a Buffer. Ispell has been in Emacs for
a very long time and has a somewhat old-fashioned user interface. In
particular, it’s more modal than most Emacs interfaces, rather like
a Query Replace: once you start, the intention is for you to finish
spellchecking in one go (though it supports Recursive Edit and you can
also easily quit and start over where you left off).

Figure 58: Ispell in Action
The spellcheck starts with the first misspelling in the Buffer (or
Region), and pops up a window offering possible corrections, each
numbered (I’ll call these numbers replacement codes). Typing one of
the numbers makes that correction and Ispell proceeds to the next
misspelling. If there are more than ten suggestions, letters and
punctuation will also be used to identify them. You hit SPC to accept
the supposed misspelling as correct.
This is simple enough, and even though you might have to eyeball a
dozen or more suggestions to identify the right replacement code, it’s
quicker than cycling through Flyspell’s C-. a dozen times for
each word.
But it’s the additional keystrokes that are available that really make Ispell faster at spellchecking an entire Buffer. Table 73 lists the options; here word means the possible misspelling in the Buffer, and suggestion means one of the numbered candidates.
| Key | Type | Action |
|---|---|---|
0..9 |
Correct | replace the word with the suggestion labeled 0..9 etc |
r |
Replace word with a typed-in replacement and recheck | |
R |
Replace word with a typed-in replacement and query-replace in buffer |
|
l |
Look up a typed-in replacement in dictionary with wildcards | |
SPC |
Accept | accept word this time |
i |
accept word and Insert it in your personal dictionary | |
u |
same but Un-case word first (insert lowercase version) | |
a |
Accept word as correct for the rest of this Ispell session | |
A |
Accept word as correct but only for this buffer / file | |
x |
Stop | eXit spellcheck, restoring Point |
X |
eXit spellcheck, leaves point here, restart later from here | |
q |
Quit spellcheck and kill ispell(1) process |
|
C-r |
enter Recursive edit | |
C-l |
Display | redraw screen |
? |
show help for these commands |
When you’re actually correcting a misspelling, the main alternative to
typing a replacement code is r, which lets you type in an ad hoc
correction. After you type it, Ispell will recheck your new word to
make sure it’s what you intended. You can also use R to change all
occurrences of the word in the Buffer to your typed-in replacement.
You can abort this Ispell session with X; if you then restart with
another M-x ispell-buffer, Ispell will pick up where you
left off.
When instead you’re refusing all suggestions because the word is
correct, you can use SPC to accept it just this once—if the word
recurs later in the Buffer, Ispell will ask about it again. But more
often you’ll want to accept it for the remainder of the spellcheck and
have Ispell skip over all the recurrences; this is the a command.
Perhaps even more often than that, you’ll want to use the i command
and insert the word into your personal dictionary so that it’s considered a
valid word from now in, in all future Ispell sessions. The u command
is like i, but un-cases the word (i.e. lowercases it) when it adds it
your dictionary.
Third-Party Spellcheckers
There are more recent third-party spellcheck packages available, which
are mostly about speed. Flyspell works well for me; the way I use it,
it’s perfectly responsive, even for the 200,000-word file that makes
up this book. But I admit I never use M-x flyspell-buffer
to spellcheck my whole book in one go—that is indeed pretty
slow on this book—I just rely on Flyspell to report spelling errors as I type
and it works fine that way. If you need something faster, check out
the third-party packages jinx, jit-spell, and spell-fu via
C-h P (describe-package).
There are also twenty-odd additional packages that implement different interfaces, completion front-ends, and the like for various of these spellcheckers.
Dictionaries and Thesauri
A dictionary and a thesaurus must be two of the most important tools for any writer. There’s no shortage of dictionary web sites out there, but some of them require you to create an account (which usually means more spam for you), some deliver ads, many are cobbled together from unspecified sources, and I’m sure there are already awful dictionaries generated by AI. Regardless, we’d prefer to have a dictionary that’s nicely integrated into Emacs.
The built-in Emacs Dictionary searches multiple dictionaries at a time and quickly pops up definitions with pronunciation, parts of speech, brief etymologies, representative quotes, and usage hints.
One of the dictionaries is the 1913 edition of Webster’s Revised Unabridged Dictionary. While this is obviously not the most up-to-date dictionary, it is highly regarded as one of the best dictionaries of American English ever published; see Somers for a discussion. Other dictionaries searched include the more up-to-date Princeton WordNet, the Jargon File, several specialized dictionaries, and a variety of foreign language translating dictionaries.
The main entry point to the dictionary is M-x dictionary-search; I
use this all day long, so I highly recommend defining your own key binding for
it. This command prompts you for a word; the default is the word at Point.
Here’s what you’ll see for the word “treatise”:
2 definitions found
From The Collaborative International Dictionary of English v.0.48 [gcide]:
Treatise \Trea"tise\, n. [OE. tretis, OF. treitis, traitis, well
made. See Treat.]
1. A written composition on a particular subject, in which
its principles are discussed or explained; a tract.
–Chaucer.
[1913 Webster]
He published a treatise in which he maintained that
a marriage between a member of the Church of England
and a dissenter was a nullity. –Macaulay.
[1913 Webster]
Note: A treatise implies more form and method than an essay,
but may fall short of the fullness and completeness of
a systematic exposition.
[1913 Webster]
2. Story; discourse. [R.] –Shak.
[1913 Webster]
From WordNet (r) 3.0 (2006) [wn]:
treatise
n 1: a formal exposition
Try searching for “window”, “buffer”, “megabucks”, “oxygen”, “syracuse”, “suriname”, and “imho” to see examples with results from the specialized dictionaries.
One of the dictionaries is the Moby Thesaurus441, but see below for more on that.
The dictionaries are all hosted at dict.org, so the Emacs Dictionary only works
when you have internet connectivity. All the dictionaries are freely available
for download, so you can in fact run your own dictionary server on your laptop
or local network, but I think very few people bother with this (I don’t do
this). By default, the dictionary will assume you’re running your own server; I
recommend this Customization for your Init File to avoid an initial warning.
(setq dictionary-server "dict.org") ; we don't run our own server
The Dictionary Buffer
The result of your search comes up in a Dictionary Buffer, which has a header with six clickable buttons:
[Back] [Search definition] [Matching words] [Quit]
[Select dictionary] [Select match strategy]
There is also a set of key bindings.
| key | Equivalent Button | Action |
|---|---|---|
s |
[Search definition] |
Search for a new word |
d |
display Definition for the word at point | |
l |
[Back] |
go back (Left) in lookup history |
m |
[Matching words] |
list all words Matching pattern. |
D |
[Select dictionary] |
select the default Dictionary |
M |
[Select match strategy] |
select the default Matching Strategy |
n, TAB |
move to the Next link | |
p, S-TAB |
move to the Previous link | |
RET |
follow link at point | |
q |
[Quit] |
close the dictionary buffer |
h |
display this help information |
Matching Words
In addition to looking up word definitions, you can also look up words
themselves with M-x dictionary-match-words. In its default mode,
this can be useful for looking up a word that you don’t know how to spell, since
it returns a list “similar” words442 But in the Dictionary Buffer, you can
change strategies with the [Select match strategy] button; if you choose “Match
prefixes” for example, then searching for “ambi” will list 72 matches, including
Ambidextrous, Ambient, Ambiguous, and Ambitious.
The Available Dictionaries
There are 15 basic dictionaries (see Table 75) you can choose from
with the [Select dictionary] button; the default is to search all of them, but
if you choose a specific one, your choice will persist as long as you do
searches in this Dictionary Buffer.
| gcide | The Collaborative International Dictionary of English v.0.48 (include’s Webster’s 1913) |
| wn | WordNet (r) 3.0 (2006) |
| moby-thesaurus | Moby Thesaurus II by Grady Ward, 1.0 |
| elements | The [chemical] Elements (07Nov00) |
| vera | V.E.R.A. – Virtual Entity of Relevant Acronyms (February 2016) |
| jargon | The Jargon File (version 4.4.7, 29 Dec 2003) |
| foldoc | The Free On-line Dictionary of Computing (30 December 2018) |
| easton | Easton’s 1897 Bible Dictionary |
| hitchcock | Hitchcock’s Bible Names Dictionary (late 1800’s) |
| bouvier | Bouvier’s Law Dictionary, Revised 6th Ed (1856) |
| devil | Ambrose Bierce’s The Devil’s Dictionary (1881-1906) |
| world02 | CIA World Factbook 2002 |
| gaz2k-counties | U.S. Gazetteer Counties (2000) |
| gaz2k-places | U.S. Gazetteer Places (2000) |
| gaz2k-zips | U.S. Gazetteer Zip Code Tabulation Areas (2000) |
Translation Dictionaries
There are also 148 dictionaries that will translate between various pairs of languages like French, Bulgarian, Kurdish, Slovak, Swedish, Lateinisch, Modern Greek, Italian, Latin, and Swahili, for example. Just select the proper dictionary, perhaps English-German, and search “dictionary” to get “Lexikon”, “Verzeichnis”, amd “Wörterbuch”.
Thesauri
Thesaurus \The*sau"rus\, n.; pl. Thesauri. [L. See Treasure.]
A treasury or storehouse; hence, a repository, especially of
knowledge; – often applied to a comprehensive work, like a
dictionary or cyclopedia.
[1913 Webster]
As mentioned above, the Dictionary includes the Moby Thesaurus, a substantial project with 30,000 headwords and more than 2.5 million synonyms and related terms. Each of your (default) Dictionary searches will include results from this thesaurus. For example, a search for “radiating” results in:
20 Moby Thesaurus words for “radiating”:
approaching, asymptotic, centripetal, centrolineal, concurrent,
confluent, confocal, connivent, converging, focal, meeting,
mutually approaching, radial, radiate, radiated, radiative, rayed,
tangent, tangential, uniting
While I find this pretty useful, the problem with this resource is that it’s
just a pile of undistinguished words. In fact I chose “radiating” because lots of
words result in an overwhelming hundreds of synonyms! My preferred thesaurus is
the third party package mw-thesaurus, which, for “radiating” for example,
clearly distinguishes between the senses “to extend outwards from or as if from
a central point”, “to emit rays of light”, and “to throw or give off”, and
classifies the results as Synonyms, Related words, Near antonyms, and Antonyms.
More Third-Party Options
There are several other third-party dictionary and thesaurus packages available. Some candidates (not tried by me) include:
- define-word
- display the definition of word at point
- le-thesaurus
- Query thesaurus.com for synonyms of a given word
- lexic
- A major mode to find out more about words
- powerthesaurus
- Powerthesaurus integration
- synonymous
- A thesaurus at your fingertips
- wordnut
- Major mode interface to WordNet
- wordreference
- Interface for wordreference.com
References
- Raymond, Eric S. and Guy L. Steele. 1996. The New Hacker’s Dictionary, 3rd edition. Cambridge, MA: MIT Press. http://www.catb.org/~esr/jargon/.
- Somers, James. 2014 May 18. You’re Probably Using the Wrong Dictionary. https://jsomers.net/blog/dictionary.
- Steele, Guy L., Jr., Richard M. Stallman, Mark R. Crispin, Raphael A. Finkel, Donald R. Woods and Geoffrey S. Goodfellow. 1983. The Hacker’s Dictionary: A Guide to the World of Computer Wizards. New York: Harper & Row. http://www.catb.org/~esr/jargon/.
UNFINISHED Presentation Slide Shows
UNFINISHED Generating Web Pages and Web Sites

UNFINISHED Footnote Minor Mode
UNFINISHED Managing Bibliographic Citations
UNFINISHED Typing Tutors
UNFINISHED Emacs for Programmers
UNFINISHED Change Logs
“Change Log” in the Emacs manual.
UNFINISHED On-the-Fly Syntax Checking
UNFINISHED Debugger Support
THE BACK OF THE BOOK
Appendices
Varieties of Emacs: A History

David A. Moon
“Emacs”443 is actually the name of a family of text editors that are either descended from or inspired by one another. The original Emacs was written at the MIT AI Lab in 1976 by famous Lisp hackers Dave Moon and Guy L. Steele Jr. It was implemented in the famously cryptic444 command language of the command-line text editor TECO to provide it (TECO, that is) with a collection of useful macros and an enhanced visual mode. This Emacs ran on a DEC PDP-6 under the Incompatible Timesharing System (ITS), and would be completely recognizable to a modern Emacs user.
")
Guy L. Steele (gls)
For an editor to deserve the name “emacs” the main requirement is that it be fully extensible with a real programming language, just like the original TECO Emacs. For GNU Emacs, this language is Lisp. Other Emacsen have used Lisp and Scheme, a dialect of Trac called Mint, interpreted C-like languages, etc.
TECO, and thus the original Emacs, was implemented in PDP-6 assembly language, and so wasn’t readily portable to other computer architectures (except perhaps the related PDP-10). But seemingly everyone who’d ever used Emacs insisted on having it, so many completely new reimplementations were created. The first new version, by Dan Weinreb, was also the first Emacs implemented in Lisp, for the MIT Lisp Machine. This was EINE, which stood for “EINE Is Not Emacs” (which was probably the second recursive acronym).
In 1978, Bernie Greenberg implemented Multics Emacs for the Honeywell 6180 running the Multics operating system; this Emacs was implemented in Maclisp. At the same time a new version for the Lisp Machine was released, the wonderfully-named ZWEI (“ZWEI Was EINE, Initially”). From this point on, there was a specially-built Emacs or Emacs-alike of some sort for many other machines and operating systems (e.g., SunOS, VMS, MS-DOS, CP/M, etc).
The software portability enabled by the Unix operating system and the C programming language, and the gradual dominance of Unix, finally somewhat tamped down the fecund growth of this Emacs ecosystem.
The first Emacs for Unix was Gosling Emacs (a.k.a. Gosmacs), implemented by James Gosling in 1981. It was written in portable C, but its extension language, Mocklisp, was only superficially similar to Lisp and couldn’t be considered a serious programming language.
Gosmacs was initially freely redistributable, but went commercial in 1983 as Unipress Emacs.
")
Richard M. Stallman (rms)
GNU Emacs, released in 1985, was written (also in C) by Richard Stallman, arch hacker and Chief GNUisance, an early contributor to and maintainer of the original TECO Emacs. He started with the freely-redistributable code of Gosmacs, but replaced Mocklisp with a true Lisp interpreter (implemented in C), changing virtually all the Gosmacs code in doing so. Unipress complained about the remainder of the original Gosmacs code in the freely-redistributable GNU Emacs, and within a few months, Stallman had replaced it all with his own original code.
As microcomputers encroached on the province of time-shared mainframes and
minicomputers in the 1980s, microcomputer Emacsen began to appear. Due to
memory limitations, most of these were not the real thing and had sub-standard, if
any, extension languages. Still, they were way better than edlin. Notable
examples, among many others, include MINCE445 (1981), which ran on 8-bit Z80’s
running CP/M; JOVE (1983); MicroEmacs (1985); mg (1986); and probably the
closest of them all to a true Emacs, Russ Nelson’s Freemacs (1986), a 21K MS-DOS
executable with a real extension language, MINT (“MINT Is Not TRAC”). Freemacs was
written in a combination of 304,470 bytes of 8086 assembly language and a
whopping 294,976 bytes of MINT.
These early Emacsen were all non-graphical text-mode applications. In 1989, work was begun at the University of Illinois on a graphical-mode fork of GNU Emacs for the X Window System, called Epoch. Lucid, Inc. needed more than Epoch provided and started their own fork, originally called Lucid Emacs but better known as XEmacs. The graphical features were intended to be merged into GNU Emacs, but there was disagreement on the implementation issues, and the XEmacs fork became more of a schism: XEmacs was permanently divorced from GNU Emacs; the two projects coexisted (and shared code) for close to twenty years. XEmacs development ceased in 2009.
Nowadays, most other Emacsen are variants or forks of GNU Emacs, like the GNU version for Microsoft Windows, or Aquamacs, a version for Mac OS that uses the native Cocoa API. Today, GNU Emacs effectively is Emacs.
Historical Firsts & Innovations
GNU Emacs may well be the longest-lived (41 years old) free software computer program (excluding operating systems) still in active development. It’s an important part of the history of computing, not least because of the many innovations that debuted in Emacs, many of which have gone on to be standard features that are now expected to be present in any editor or IDE.
There’s a hobby called retrocomputing where enthusiasts resurrect, preserve, and use ancient computer hardware and software. As of this writing, Gen Z’ers in droves are supposedly trading in their smart phones for old-school flip phones.446
Emacs is possibly unique in providing the fun of retrocomputing in a completely modern, up-to-date, actively evolving, and completely usable system.
Here’s a partial timeline of Emacs firsts. It can be hard to pin down the facts on some of these; any mistakes are entirely my own.
- 1976
- ITS Emacs created.
- 1976 real-time display (full-screen) editor
- “In the early to mid-1970s, [Richard] Stallman would make some key enhancements to TECO that allowed it to become a fully interactive, WYSIWYG-style onscreen editor.” — Dan Murphy, The Beginnings of TECO
- 1976 docstrings
- The concept of actually attaching the documentation of a function to the function itself was invented in ITS Emacs and enabled the online help system.
- 1976 hypertext
- Emacs’s Info was one of the first freely available hypertext systems, predating the World Wide Web by about fourteen years.
- 1976 file manager
- Dired was one of the earliest file managers, and probably the first to be built-in to an editor.
- 1978 incremental search
- Invented in ITS Emacs.
- 1985
- GNU Emacs released.
- 1985 completion
- GNU Emacs was probably the first editor with completion,
and possibly the first non-shell (completion was invented in the TENEX “shell”
in 1969, and then adopted in
tcsh(1)in 1981). - 1985 undo
- The first editor with unlimited undo and redo.
- 1985 IDE
- Arguably the first all-software, multi-programming-language IDE.
- 1989 transparent remote file editing
- Via the
ange-ftppackage, now subsumed by Tramp. - 1992 file local variables
- Stems from Elisp’s unusual variety of scopes.
- 1992 Incremental Narrowing Framework
- I believe Icomplete was the first INF.
Emacs vs. The Unix Philosophy
Emacs has often been criticized by Unix purists as being diametrically opposed to the Unix Philosophy. Unix is supposed to consist of many small, simple commands that each do one thing well, whose power comes from their composabilty via shell pipelines, while Emacs is the ultimate monolithic application: one enormous program that tries to do everything itself.
This is seen as a violation of a key precept of the Philosophy:
Make each program do one thing well. To do a new job, build afresh rather than complicate old programs by adding new “features”. — Doug McIlroy, “UNIX Time-Sharing System”
I would like to suggest that Emacs is actually a better manifestation of the Unix Philosophy. The ideal Unix system consists of many small programs written mainly in C, run by the Unix kernel; Emacs consists of many functions written mainly in Elisp, any of which will be even smaller than the smallest Unix programs, run by the Lisp kernel.
Ideal Unix programs are composable via pipes: the output of one program can be the input to another. Emacs Lisp functions are inherently composable.
Unix programmers are exhorted to “write programs to handle text streams, because that is a universal interface.” Flat text streams are just a stream of bytes with at best a minimal two-dimensional structure of lines of characters; any additional structure has to be imposed on that. But there’s no standard for any extra structure, and so every program comes up with something different (colon-separated fields? CSV? XML? JSON?). Even in 1978 McIlroy felt the need to warn the programmer not to “clutter output with extraneous information” and “avoid stringently columnar or binary input formats” in an attempt to mitigate the problem.
Calling an Emacs function is of course much lighter-weight than forking and exec’ing even the smallest compiled C program, and all the programs in a pipeline need to parse, unparse (for output) and re-parse each other’s flat text data over and over. In contrast, Elisp functions all support the same recursive tree-structured data format (S-expressions), which doesn’t need to be copied or parsed in between the “pipelines” of functions.
Emacs consistently excels at meeting other precepts of the Philosophy:
- “Don’t insist on interactive input” (McIlroy). Elisp interactive commands can always be composed with non-interactive functions.
- “Design and build software, even operating systems, to be tried early, ideally within weeks. Don’t hesitate to throw away the clumsy parts and rebuild them” (McIlroy). The Emacs user is continually modifying their system as they work.
- “Use tools in preference to unskilled help to lighten a programming task, even if you have to detour to build the tools” (McIlroy). Nothing could be more of an Emacs cliché than devoting time to building and enhancing tools!
- “Self-supporting system: all Unix software is maintained under Unix” (Thompson & Ritchie). Emacs is developed and maintained inside of Emacs, including documentation, debuggers, and packaging.
- “Make it easy to write, test, and run programs” (Thompson & Ritchie). Any Elisp function that throws an error can pop you directly into the ever-present built-in debugger; the profiler and compiler are at your fingertips; the entire state of Emacs at the moment of the error is introspectable; and you can fix the bug and continue your work without so much as restarting.
- “Write abstract programs that generate code instead of writing code by hand” (Raymond). Lisp programming at its most advanced is all about writing Lisp code to generate Lisp code (via macros); see Graham and Hoyte.
- “Write flexible and open programs” (Raymond). Elisp programs are customizable via the Customize Facility, and their behavior can be changed by Buffer Local Variables, dynamic binding, and function advice (see “Advising Functions” in the Elisp manual).
A key innovation of Unix was the interactive shell that allowed users to glue programs together interactively, and to easily make new programs out of shell scripts. Emacs is a shell for Elisp functions, without the disadvantages of shell scripts—the difficulties of quoting and the dangers of rescanning commands, weak error handling, poor data structures, poor portability, and inefficient execution due to a lack of compilation.
References
- Graham, Paul. 1994. On Lisp: Advanced Techniques for Common Lisp. Englewood Cliffs, NJ: Prentice Hall. http://www.paulgraham.com/onlisptext.html.
- Hoyte, Doug. 2008. Let Over Lambda: 50 Years of Lisp. https://letoverlambda.com/.
- McIlroy, M.D., E.N. Pinson and B.A. Tague. July-August 1978. “UNIX Time-Sharing System: Forward.” Bell System Technical Journal 57, no. 6: 1899-1904. https://archive.org/details/bstj57-6-1899/page/n1/mode/2up.
- Raymond, Eric S,. 2004. The Art of Unix Programming. Boston: Addison-Wesley..
The Great Sentence-Ending Controversy
“Typing two spaces after a period is totally, completely, utterly, and inarguably wrong,” Farhad Manjoo wrote in Slate in 2011. “You can have my double space when you pry it from my cold, dead hands,” Megan McArdle wrote in the Atlantic the same year. — Avi Selk
The Emacs default of ending sentences with two spaces comes from the era of typewriters: in the monospace font of the typewriter, two spaces made sentence endings easier to see and to distinguish from abbreviations, and so improved readability. In the early days of computing, anything you looked at on a terminal screen or printed from a computer would come out in a monospace font, too.
Nowadays, most of the computer-generated text that we read is digitally typeset and formatted with proportional fonts for a web browser or a PDF viewer. When you generate text like this from Emacs (say, via Org Mode), it doesn’t matter at all how many spaces you put after your periods, or even between words: the typesetting process will arrange for an appropriate amount of spacing. So spaces after sentences only affect paragraph filling (also not usually a concern when you’re typesetting) and sentence motion.
If you’re in the habit of using two spaces, like Megan and I, the Emacs sentence
commands are ready for you. If you’re a one-spacer like Farhad, you can set
sentence-end-double-space to nil in your Init File:
(setq sentence-end-double-space nil)
but note that the sentence commands will then have to assume abbreviations (e.g. “e.g.”) end your sentences, making the commands less useful. Which is why I use two spaces.
If you’re a two-spacer, you will find yourself facing a lot of one-spaced
sentences as you edit other people’s files, emails, and the like. In this
situation, M-x repunctuate-sentences is a lifesaver: it will convert
these sentences to the more useful two-space format.
Install Emacs on ChromeOS
Chrome OS now runs Linux in a VM, and the Emacs you install there is the real thing (though not the latest version). Once you’ve installed and fired it up, Emacs can be run from the launch bar like any other ChromeOS app.
Installing Emacs on a (post-2018) Chromebook is easy but there are a few steps.
Go to Settings and in the Device tab, click on “Linux (Beta)”, then “Turn on”.
Click “Install” in the pop-up dialog (the defaults are probably fine).
If after installation completes, a Linux terminal window does not appear, click on the new Unix Prompt (“>_”) icon in the launch bar (or, if that’s missing, fire up the Terminal app from the launcher) and wait for the VM to start up.
At the shell prompt in the VM window, run:
sudo apt update sudo apt upgrade sudo apt install emacs25
Now run Emacs from the shell prompt:
emacs
With Emacs running, you should see a new icon for it in the launch
bar (a script “E”); Alt-click on the icon and select “pin” from the menu.
Just to make sure everything’s working, exit Emacs (click the
“X” in the window’s title bar (or use C-x C-c (save-buffers-kill-terminal)).
You can minimize the Linux shell window.
Click the icon to start up a new Emacs. You can start Emacs like this in the future; it will start up the Linux VM if necessary (which makes the first start-up after a reboot pretty slow).
If you have Linux skills, you can fiddle with the package manager to get a more up-to-date version of Emacs.
The biggest problem is not with the Emacs per se; it’s that the VM’s file system and the Chrome OS file system are mostly separate. If Chrome is your only machine, no problem (you can backup your data manually via Settings / Linux (Beta)).
But if your Chromebook is just one of several machines, and you want
to clone your config from another OS, you’ll have to jump through some
hoops, either loading it from a web URL, or via Tramp from a host on
the network, or synchronize it via rsync(1), unison(1), or the like.
Syncing at the file system level is also possible with syncthing(1),
sshfs(1), or any of many other tools. The same thing goes for your
data.
UNFINISHED Install Emacs in the Windows System for Linux (WSL)
The Famous Canards
Many people will argue that you shouldn’t use Emacs.
One of the oldest arguments is that Emacs is too big; an old saw goes:
EMACS: Eight Megabytes And Constantly Swapping447
but this dates from days of old when 8M was a lot of memory. Nowadays, that’s about the size of one pop song in digital form. A modern Emacs takes 26M (52M graphical) of memory; that’s a mere 3% of the space my web browser is using at this moment, and in Client / Server usage, this is the only instance of Emacs that will be running on your 8G laptop.
Another argument is that Emacs takes too long to start up. On my 13-year-old laptop, it starts up in 0.1 seconds (0.5 graphical), which I think is plenty fast enough. If you heavily customize your Emacs and don’t take care to make your customizations lazy, you can indeed achieve much slower startup times (perhaps on the order of several seconds — with my 1,120-line Init File it takes 2.4 seconds to start). Since I run the Emacs server, I only pay this cost once, just after I’ve rebooted; then I can connect to the server, from various terminals and shells, with the Emacs client in less than 0.01 seconds. See Client / Server.
Using the Desktop to persist your buffers across sessions can also slow down
your startup time; if this is a problem, Customize
desktop-restore-eager in order to make the restoration of
your Buffers happen lazily.
The Troublesome Meta Key
The Meta key is a modifier key which works exactly like a Control key or a Shift key in that it generates no character by itself, but rather modifies another key struck while it’s being held down.
What key is the Meta key? On “standard” keyboards, it will be either the Alt key or the Windows key. On Apple keyboards, it will be either the Option key or the Command key. You’ll just have to try them and see!
Fire up Emacs with emacs -Q --no-splash. Type a word, and then type Alt-b using
the Alt key. If your cursor moves backwards to the beginning of the word you
just typed, Alt is your Meta! If not, try Windows-b using the Windows key; this
should work, and indicates that Windows is your Meta. Likewise for Command and
Option on a Mac keyboard.
If neither of those work, then probably some other program is stealing the Meta key; for example, your X window manager might be using it for its own purposes, in which case Emacs may never see you type it. When this happens, you either have to change Emacs’s notion of the meta key, or change the window manager’s notion of its key.
You can also change which key Emacs uses as Meta for any reason (either necessity or if another key just feels better to you). Whichever key turns out to be your Meta, the other key is known as the Super key. If your Meta is Alt (Command), your Super is probably the Windows key (Option key). On Unix systems running X11, the Super key is usually used to control your window manager, leaving Meta for Emacs (unless you choose to swap them).
For more help solving Meta key problems, see the Emacs Wiki.448
The ESC Prefix
There’s one other prefix command that’s both very important and completely
redundant: the ESC prefix. This is the key labeled “esc” on your keyboard; that
key lets you type the ASCII Escape (which is a control character: actually it’s
exactly the same character sent by C-[, so you can type that if you prefer).
As described above, not all keyboards provide a suitable Meta key, or it may be
reserved or stolen by your desktop or the operating system. If this applies to
you, all is not lost. You just use the ESC key instead. M-a becomes ESC a;
C-M-f becomes ESC C-f (remember the equivalence of C-M-f and M-C-f and this will
make sense).449
There’s only one trick: ESC is actually an ASCII character, not a shift-like
modifier key. If you type Alt, say, without then typing another key
simultaneously, nothing happens: Emacs doesn’t see that you hit Alt. No key
code is sent to Emacs at all. But when you hit ESC, you’ve immediately sent the
ASCII Escape character to Emacs. It’s just like hitting Z or *. This means that
you don’t try to hold down ESC at the same time as the other key: use it as a
prefix character and type it separately and distinctly.
A true Meta is a wonderful thing for Emacs (it makes typing much faster), but I
used ESC for years. (When Emacs was born in 1976, hardly any keyboard had any
modifier key besides Control and Shift, and everybody used ESC.)
The Least to Know About Public Key Cryptography
Symmetric Encryption
Most encryption techniques use a password or passphrase450 to encrypt a file that contains a secret. The same password both encrypts and decrypts the file: hence the term symmetric encryption.
You have to remember this password if you want to decrypt the file. As long as you’re the only person who has to decrypt the file, this isn’t too much of a problem, but what if you need to share the file with someone else? Since it’s encrypted, you can securely send them the file, say via email, but they can’t decrypt it unless you give them the password. But how do you securely send them the password? If you encrypt the password, you have just dug yourself a deeper hole. The only real solution is to arrange a face-to-face meeting, and if you can do that, you might as well just give them the unencrypted secret file while you’re at it! This is called the key-management problem.
Public-Key Encryption
The real solution to the problem is Public-Key Encryption, a.k.a. asymmetric cryptography: you use one password to encrypt the file, and a second, different password to decrypt it.
Everyone has a pair of related passwords, or keys. One is your private key that you zealously keep secret. The other is your public key which you share with the entire world: publish it on your web page or social media profile; print it on your business cards; include it in the signature of every email you send; and upload it to a network of key-servers which anyone can query.
Now when you want to send a secret file to someone, you encrypt the file with their public key (which you find on their website). Because of the mathematical relationship between each person’s public and private key, only the private key can decrypt a secret encrypted with the corresponding public key! So anybody can encrypt a message to person A with A’a public key, but only A can decrypt those messages, with A’s own private key. The key management problem is solved!
How do you encrypt a file that only you yourself should see? Simple: just encrypt it with your own public key, and only your own private key (which only you know) can decrypt it.
What if you were to “encrypt” a file with your private key? Then only your public key can decrypt it—but that means anybody can decrypt it, since your public key is, well, public!
Far from being a disaster, this is actually a bonus: while everyone can decrypt this file, only you could have encrypted it with your private key, so this is a digital signature: a secure way of signing a document, like a contract. Once you’ve signed it, you can’t later deny that you’d done so.
With GnuPG you can both securely encrypt files, and securely sign them, or both.
Setting Up Public Key Encryption
Once you’ve installed GnuPG, you can create your public/private key pair by running this command in the shell:
gpg --quick-generate-key EMAIL
where EMAIL is your email address, in the form test@example.com.
The private-key part of your key pair is just a huge random number451, and that number is stored in a file. You’ll be asked for a passphrase, which is used to encrypt your private key:452; see On Passwords for recommendations.
In order for GnuPG to compute enough random data to generate your key pair, you should wiggle your mouse, or type any text you like in some other window, or start playing a video453. When the command finishes, you’ll see something like:
public and secret key created and signed.
pub rsa3072 2023-05-28 [SC] [expires: 2025-05-27]
5A6256007A1E27CBF51B27D451B2DCA5731D91DE
uid test@example.com
sub rsa3072 2023-05-28 [E]
The big hexadecimal number, here 5A6256007A1E27CBF51B27D451B2DCA5731D91DE, is
your fingerprint. You can think of it as the id of your public key454, and
you can share it with anyone. Your actual public key is a really huge number
that will be well over 1,000 hex digits in length. I put my fingerprint in my
email signature and on my business cards, and my entire huge public key on my
web site.
There are many more concepts you’ll need to understand in order to use public-key cryptography effectively. See The GNU Privacy Handbook for the explanation.
An Initial Init File
Throughout this book I’ve given a number of recommended snippets for a minimal Init File designed for a beginning Emacs user following along with the text. All these snippets are gathered together in this appendix. You can download them as a usable Init File here:
https://www2.lib.uchicago.edu/keith/emacs/init.el
Remember that this Init File is designed in accordance with my notion that you should learn Emacs with as few changes from the defaults as possible. This is definitely not the Init File that I use (mine is 16 times as large)! If you start with this one, you’ll slowly change it to suit your needs and preferences and, eventually, will no longer recognize it!
Ask Emacs where to install this file with C-h v user-emacs-directory; this will
give you the path to a correct directory; make sure that directory exists, and
install the Init File in it, named “init.el”. On Unix systems, you can use
~/.emacs.d/init.el, but under other OS’s you should check. See
“Init File” in the Emacs manual if there’s any confusion.
If you already have your own Init File, you don’t have to replace it. Instead,
download the book’s Init File to your user-emacs-directory, renaming the file to, say,
use-gnu-emacs.el, and now you can simply add this line to your existing Init File to
include my recommendations:
(with-demoted-errors "%S" (load-file (concat user-emacs-directory "use-gnu-emacs.el")))
If you add this line at the beginning of your existing Init File, the rest of your Init File will trump any conflicting settings; vice-versa if you add this line at the end.
The Init File
;; -*- Mode: Emacs-Lisp; lexical-binding:t; coding: utf-8 -*- ;; Recommended minimal starting Emacs Init File ;; extracted from the book: ;; /Use GNU Emacs: The Plain Text Computing Environment/ ;; by Keith Waclena ;; https://www.lib.uchicago.edu/keith/emacs/ ;; (require 'package) (when (< emacs-major-version 24) ;; For important compatibility libraries like cl-lib (add-to-list 'package-archives '("gnu" . "https://elpa.gnu.org/packages/"))) (when (version< emacs-version "26.3") ;; older emacsen < 26.3 may need this (setq gnutls-algorithm-priority "NORMAL:-VERS-TLS1.3")) (with-eval-after-load 'package (dolist (arc '(("melpa-stable" . "https://stable.melpa.org/packages/") ("melpa" . "https://melpa.org/packages/"))) (add-to-list 'package-archives arc t)) (setq package-archive-priorities '(("gnu" . 10) ("nongnu" . 9) ("melpa-stable" . 8) ("melpa" . 7)))) ;; thanks to an anonymous EmacsWiki coder (defun undo-yank (arg) "Undo the yank you just did. Really, adjust just-yanked text like \\[yank-pop] does, but in the opposite direction." (interactive "p") (yank-pop (- arg))) (keymap-global-set "C-M-y" 'undo-yank) (setq enable-recursive-minibuffers t) (with-eval-after-load 'chistory (setq list-command-history-max 120) (define-key command-history-map (kbd "<return>") 'command-history-repeat)) (setq completion-styles '(partial-completion substring flex)) (unless (package-installed-p 'vertico) (with-demoted-errors "%s" (unless package-archive-contents (package-refresh-contents)) (package-install 'vertico))) (with-demoted-errors "%s" (vertico-mode +1)) (unless (package-installed-p 'marginalia) (with-demoted-errors "%s" (unless package-archive-contents (package-refresh-contents)) (package-install 'marginalia))) (with-demoted-errors "%s" (marginalia-mode +1)) (setopt minibuffer-visible-completions t) (unless (package-installed-p 'windmove) (with-demoted-errors "%s" (unless package-archive-contents (package-refresh-contents)) (package-install 'windmove))) ;; <S-{left,right,up,down}> switches windows (with-demoted-errors "%s" (windmove-default-keybindings)) (winner-mode +1) ; undo window config changes ;; add more felicitous bindings (define-key winner-mode-map [(control c) (control left)] 'winner-undo) (define-key winner-mode-map [(control c) (control right)] 'winner-redo) (keymap-global-set "C-{" 'shrink-window-horizontally) (keymap-global-set "C-}" 'enlarge-window-horizontally) (keymap-global-set "C-^" 'enlarge-window) (keymap-global-set "C-<" 'scroll-left) (keymap-global-set "C->" 'scroll-right) (undelete-frame-mode +1) ; bring back deleted frames (setq large-file-warning-threshold (* 100 1024 1024)) ; 100MB (unless (version<= "29.1" emacs-version) ; no longer necessary! (when (version<= "27.1" emacs-version) ; only available recently... (global-so-long-mode +1))) ; speed up long lines (setq view-read-only t) (add-hook 'doc-view-mode-hook 'auto-revert-mode) (add-hook 'pdf-view-mode-hook 'auto-revert-mode) (add-hook 'dired-load-hook (lambda () (require 'dired-x))) (setq dired-dwim-target t) ; suggest other visible dired buffer (unless (package-installed-p 'wgrep) (with-demoted-errors "%s" (unless package-archive-contents (package-refresh-contents)) (package-install 'wgrep))) (add-hook 'kill-emacs-query-functions 'custom-prompt-customize-unsaved-options) (desktop-save-mode +1) ; restore files from previous session (save-place-mode +1) ; come back to where we were in that file (keymap-global-set "C-+" 'text-scale-adjust) ; embiggen font (setq-default indent-tabs-mode nil) ; don't insert tabs (setq async-shell-command-buffer 'new-buffer) ;multiple async commands ok! (setq async-shell-command-display-buffer nil) ;don't pop up the buffer (setq comint-buffer-maximum-size 65336) ; must be able to cat War and Peace! (add-hook 'comint-output-filter-functions 'comint-truncate-buffer) ;; goto-address-mode is handy in these modes (dolist (hook '(shell-mode-hook eshell-mode-hook)) (add-hook hook #'goto-address-mode)) (add-hook 'prog-mode-hook #'goto-address-prog-mode) (setq calendar-mark-holidays-flag t ; colorize holidays in the calendar calendar-mark-diary-entries-flag t) ; also diary entries (setq org-agenda-include-diary t) ; incorporate the diary into the agenda (appt-activate +1) ; appointment notifications, please (require 'notifications) ; also via desktop notifications ;; don't use a separate Frame for the control panel (setq ediff-window-setup-function 'ediff-setup-windows-plain) ;; horizontal split is more readable (setq ediff-split-window-function 'split-window-horizontally) ;; restore window config upon quitting ediff (defvar ue-ediff-window-config nil "Window config before ediffing.") (add-hook 'ediff-before-setup-hook (lambda () (setq ue-ediff-window-config (current-window-configuration)))) (dolist (hook '(ediff-suspend-hook ediff-quit-hook)) (add-hook hook (lambda () (set-window-configuration ue-ediff-window-config)))) (setopt proced-enable-color-flag t) ; colorful proced (setq dictionary-server "dict.org") ; we don't run our own server
Bibliography
Abelson, Harold, Lytha Ayth, Julie Sussman, Gerald Jay Sussman and Neil Van Dyke. 1996. Structure and Interpretation of Computer Programs, Second Edition. Cambridge, MA: MIT Press. https://www.neilvandyke.org/sicp-texi/
The famous Wizard Book, converted to Texinfo by Lytha Ayth and Neil Van Dyke. Install this and you can read the book in Emacs with hyperlinks, indexing, full-text search Emacs-style, easy-to-evaluate Scheme code, and last but not least, ASCII diagrams.
Ashley, Mike. 1999. The GNU Privacy Handbook. Cambridge, MA: Free Software Foundation. https://www.gnupg.org/documentation/guides.html
A tutorial introduction to GNU Privacy Guard (a.k.a. GnuPG or GPG). Emacs can use GnuPG to work transparently with encrypted files.
Auerbach, David. May 9, 2014. “The Oldest Rivalry in Computing.” Slate. https://slate.com/technology/2014/05/oldest-software-rivalry-emacs-and-vi-two-text-editors-used-by-programmers.html
An excellent overview of the perennial Editor Wars and the bitter Emacs / Vi rivalry.
Ballantyne, Tony. 2018. My Emacs Writing Setup. https://github.com/ballantony/emacs-writing/blob/main/EmacsWritingTips.org
Good companion to Wood’s Guide to Emacs for Writers, this one by a novelist, with lots of Org Mode tips.
Barski, Conrad and James A. Webb. [n.d.]. Casting SPELs in Lisp—Emacs Lisp Edition: A Comic Book. https://www.lisperati.com/casting-spels-emacs/html/casting-spels-emacs-1.html
The book that evolved into the Common Lisp book, Land of Lisp.
Batsov, Bozhidar. 2011. Why Emacs? https://batsov.com/articles/2011/11/19/why-emacs/
A nice testimonial from the author of the Emacs Prelude starter kit.
Borkowski, Marcin. 2021. Hacking Your Way Around in Emacs. https://leanpub.com/hacking-your-way-emacs/
An intermediate Elisp text, suitable as a follow-up to Chassell.
Borkowski, Marcin. 2018. “TEXing in Emacs.” TUGboat 39, no. 1. https://www.tug.org/TUGboat/tb39-1/tb121borkowski-emacs.pdf
An introduction to Emacs for TeX and LaTeX users, including Org Mode and a little Elisp programming.
Cameron, Debra, Eric S. Raymond, Marc Loy, James Elliott and Bill Rosenblatt. 2004. Learning GNU Emacs, 3rd Edition. Sebastopol, CA: O’Reilly Media. https://www.oreilly.com/library/view/learning-gnu-emacs/0596006489/
Very out-of-date, but not uselessly so; covers Emacs version 21.3. A typical O’Reilly manual.
Chassell, Robert J. 2020. An Introduction to Programming in Emacs Lisp. Cambridge, MA: Free Software Foundation. https://www.gnu.org/software/emacs/manual/eintr.html
Read in Emacs with
M-x info-display-manual RET eintr RET.A tutorial introduction to Elisp “written as an elementary introduction for people who are not programmers”. Designed to be read in Info, where you can evaluate and run all the code examples.
Chua, Sacha. 2014. How to Learn Emacs Keyboard Shortcuts (A Visual Tutorial for Newbies). https://sachachua.com/blog/2013/09/how-to-learn-emacs-keyboard-shortcuts-a-visual-tutorial-for-newbies/
A sketch-guide explaining the mysteries of Emacs key bindings.
Chua, Sacha. 2016. How to Learn Emacs: A Hand-drawn One-pager for Beginners. https://sachachua.com/blog/2013/05/how-to-learn-emacs-a-hand-drawn-one-pager-for-beginners/
A sketch-guide to the very basics.
- Finseth, Craig A. 1991. The Craft of Text Editing, or, A Cookbook for an Emacs. Berlin: Springer-Verlag. http://www.finseth.com/craft/
Free Software Foundation. 2021. Comparing and Merging Files. Cambridge, MA: Free Software Foundation. https://www.gnu.org/software/diffutils/manual/diffutils.html
Read in Emacs with
M-x info-display-manual RET diffutils RET.Complete documentation for the GNU diff, diff3, cmp, and sdiff programs.
Free Software Foundation. 2022. Emacs auth-source. Cambridge, MA: Free Software Foundation. https://www.gnu.org/software/emacs/manual/auth.html
Read in Emacs with
M-x info-display-manual RET auth RET.Centralized management of authentication information (usernames, hosts, passwords) via any of several backends; used by most Emacs applications that need to connect to external services (Tramp, Gnus, GnuPG, etc).
Free Software Foundation. 2022. Message. Cambridge, MA: Free Software Foundation.
Read in Emacs with
M-x info-display-manual RET message RET.Documents the Emacs email message composition mode, used to compose emails (or, if you go back in time, news postings).
Free Software Foundation. 2022. Emacs Unified Directory Client. Cambridge, MA: Free Software Foundation.
Read in Emacs with
M-x info-display-manual RET eudc RET.Documents the Emacs Unified Directory Client, an interface to directory services (LDAP) and contacts (BBDB, macOS Contacts).
Free Software Foundation. 2022. TRAMP User Manual. Cambridge, MA: Free Software Foundation.
Read in Emacs with
M-x info-display-manual RET tramp RET.Documents the remote file editing capabilities of Emacs.
Free Software Foundation. 2022. EasyPG Assistant User’s Manual. Cambridge, MA: Free Software Foundation. https://www.gnu.org/software/emacs/manual/epa.html
Read in Emacs with
M-x info-display-manual RET epa RET.How to use EPA to encrypt, decrypt, and sign files in Emacs.
Free Software Foundation. 2017. The GNU Privacy Guard Manual. Cambridge, MA: Free Software Foundation.
Read in Emacs with
M-x info-display-manual RET gnupg RET.The complete documentation for GnuPG.
Free Software Foundation. 2020. Emms Manual. Cambridge, MA: Free Software Foundation.
Read in Emacs with
M-x info-display-manual RET emms RET.Documentation for the Emacs Multimedia System (in short, music player), EMMS.
Free Software Foundation. 2020. EWW. Cambridge, MA: Free Software Foundation. https://www.gnu.org/software/emacs/manual/eww.html
Read in Emacs with
M-x info-display-manual RET eww RET.Documentation for the Emacs web browser, EWW.
Free Software Foundation. 2020. Ediff. Cambridge, MA: Free Software Foundation. https://www.gnu.org/software/emacs/manual/ediff.html
Read in Emacs with
M-x info-display-manual RET ediff RET.Complete documentation for the powerful Ediff family of diffing and merging tools.
Free Software Foundation. 2020. Interactive Do. Cambridge, MA: Free Software Foundation. https://www.gnu.org/software/emacs/manual/ido.html
Read in Emacs with
M-x info-display-manual RET ido RET.Documents the Ido completion framework.
Free Software Foundation. 2020. Autotyping. Cambridge, MA: Free Software Foundation. https://www.gnu.org/software/emacs/manual/autotype.html
Read in Emacs with
M-x info-display-manual RET autotype RET.One of the often overlooked Emacs manuals, documenting convenient features for text that you enter frequently in Emacs, such as expanded text templates (via Skeletons), file boilerplate, copyright statements, timestamps, URLs, and the like.
Free Software Foundation. 2020. GNU Emacs Reference Card. Cambridge, MA: Free Software Foundation. https://www.gnu.org/software/emacs/refcards/index.html
A classic-style, one-page, double-sided, tri-fold reference card for your vest pocket (slip behind your pocket protector); available in eight languages. The digital version is up-to-date, but the printed (on card stock) version is currently stuck at v25. (At the level of detail covered in card form, it can be pretty out-of-date and still be perfectly fine.) At the URL there are also refcards for Calc, Dired, Gnus, Org, and more.
Free Software Foundation. 2020. The Org Manual. Cambridge, MA: Free Software Foundation. https://www.gnu.org/software/emacs/manual/org.html
Read in Emacs with
M-x info-display-manual RET org RET.The authoritative reference on Org Mode.
Friedl, Jeffrey E. F. 2002. Mastering Regular Expressions. Sebastopol, CA: O’Reilly.
The standard book-length work on using regular expressions.
Gillespie, Dave. 2020. The GNU Emacs Calculator. Cambridge, MA: Free Software Foundation. https://www.gnu.org/software/emacs/manual/calc.html
Read in Emacs with
M-x info-display-manual RET calc RET.Extensive documentation for the powerful Emacs calculator and computer algebra system.
Glickstein, Bob. 1997. Writing GNU Emacs Extensions. Sebastopol, CA: O’Reilly Media.
Probably describes Emacs version 19, so very out of date, but may still be useful. Covers Emacs customization in the init file, and implementing things like major and minor modes.
- Graham, Paul. 1994. On Lisp: Advanced Techniques for Common Lisp. Englewood Cliffs, NJ: Prentice Hall. http://www.paulgraham.com/onlisptext.html
Guerry, Bastien. 2013. Learn Emacs Lisp in 15 minutes. https://learnxinyminutes.com/docs/elisp/
Describes Emacs version 24.3, but almost certainly compatible with the latest version.
Hinman, Lee. 2017. Clocking Time with Org-mode. https://writequit.org/denver-emacs/presentations/2017-04-11-time-clocking-with-org.html
An overview of and tutorial for Org Mode’s timeclock facility.
- Hoyte, Doug. 2008. Let Over Lambda: 50 Years of Lisp. https://letoverlambda.com/
Ingebrigtsen, Lars Magne. 2020. The Gnus Newsreader. Cambridge, MA: Free Software Foundation. https://www.gnu.org/software/emacs/manual/gnus.html
Read in Emacs with
M-x info-display-manual RET gnus RET.Complete documentation for the Gnus newsreader and Mail User Agent. Includes a comprehensive discussion of how to program the Gnus API in Elisp. Lars’s writing style is inimitable and the huge manual is unexpectedly hilarious.
Kaludercic, Philip. June 2, 2020. Rmail is a Usable Emacs Mail Client.
A good overview of the Rmail Mail User Agent.
- Knuth, Donald E. 1984. “Literate Programming.” The Computer Journal 27, no. 2: 97–111. http://www.literateprogramming.com/knuthweb.pdf
Krawitz, Robert, Richard M. Stallman, Dan LaLiberte, Bil Lewis and Chris Welty. 2019. GNU Emacs Lisp Reference Manual. Cambridge, MA: Free Software Foundation. https://www.gnu.org/software/emacs/manual/elisp.html
Read in Emacs with
M-x info-display-manual RET elisp RET.The bible of Emacs Lisp; complete Elisp details for writing config files and extensions, and general purpose programming.
Kremer, Sebastian and Free Software Foundation. 2022. Dired Extra. Cambridge, MA: Free Software Foundation.
Read in Emacs with
M-x info-display-manual RET dired-x RET.Documents additional features for Dired.
Levy, Steven. 1984. Hackers: Heroes of the Computer Revolution. Garden City, NY: Anchor Press / Doubleday.
History of the hackers of the MIT AI Lab who built the Lisp Machines and Emacs, the personal computer hackers who built Basic and the Apple computer, and the hackers behind early computer gaming. The Epilogue, “The Last of the True Hackers” tells the story of Richard Stallman’s epic battle against the renegades who would bring down the AI Lab’s Lisp Machine.
- McIlroy, M.D., E.N. Pinson and B.A. Tague. July-August 1978. “UNIX Time-Sharing System: Forward.” Bell System Technical Journal 57, no. 6: 1899-1904. https://archive.org/details/bstj57-6-1899/page/n1/mode/2up
Mendler, Daniel. [2021]. vertico.el—VERTical Interactive COmpletion. https://github.com/minad/vertico/blob/main/README.org
A very modern, minimal, and extensible incremental narrowing completion framework for the Minibuffer. Available from GNU ELPA.
Monnier, Stefan and Michael Sperber. 2020. “Evolution of Emacs Lisp.” Proceedings of the ACM on Programming Languages 4, HOPL Article 74. doi:10.1145/3386324
Detailed technical article on the history of the Emacs Lisp programming language, with particular attention paid to its unique features.
Murphy, Dan. 2009. “The Beginnings of TECO.” IEEE Annals of the History of Computing 31, no. 4: 110–115. http://tenex.opost.com/anhc-31-4-anec.pdf
History of the TECO text editor, both Emacs’s direct predecessor and its first implementation language. A fascinating must-read!
Pereira, Murilo. January 3, 2021. How to Open a File in Emacs. https://www.murilopereira.com/how-to-open-a-file-in-emacs/
A thoughtful consideration of the state of Emacs, its core values, and possible futures. Begins with a tour-de-force demonstration of Emacs the Lisp Machine via a debugging problem.
Petersen, Mickey. n.d. Mastering Emacs. https://www.masteringemacs.org/
I haven’t seen this commercial e-book, but based on the articles on Petersen’s blog, it looks superb. Petersen seems to always have a new version of the book ready whenever a new version of Emacs is released.
Post, Ed. July 1983. “Real Programmers Don’t Use Pascal.” Datamation. https://www.ee.ryerson.ca/~elf/hack/realmen.html
Hilarious send-up of programming stereotypes, circa the early days of Emacs.
Poundstone, William. 1985. The Recursive Universe: Cosmic Complexity and the Limits of Scientific Knowledge. Chicago: Contemporary Books.
The best published examination of Conway’s cellular automaton, Life. Poundstone considers computers, algorithms, complexity, and shows how to build a computer out of a “game” with four trivial rules. Great stuff.
Raman, T.V. 2024 July 31. Emacspeak: A Speech Odyssey. https://emacspeak.blogspot.com/2024/07/emacspeak-speech-odyssey.html
The 30-year update of Raman’s “Emacspeak At Twenty” article.
Raman, T.V. 2014 September 12. Emacspeak At Twenty: Looking Back, Looking Forward. https://emacspeak.sourceforge.net/turning-twenty.html
Raman tells the story of how he created the amazing Emacspeak, an eyes-free speech-subsystem that enables Emacs to do the job of screen reader software. (He had the first version up and running in 4 hours of Elisp hacking.)
Raymond, Eric S,. 2004. The Art of Unix Programming. Boston: Addison-Wesley.
Book-length treatment of the Unix Philosophy and the Open Source movement.
Raymond, Eric S. and Guy L. Steele. 1996. The New Hacker’s Dictionary, 3rd edition. Cambridge, MA: MIT Press. http://www.catb.org/~esr/jargon/
Raymond’s controversial update of the The Hacker’s Dictionary to include more recent entries from the world of Usenet, Unix, microcomputers, and the nascent World Wide Web.
Reid, Brian, Stephen Gildea, Jim Larus and Bill Wohler. 2016. The MH-E Manual. Cambridge, MA: Free Software Foundation. https://www.gnu.org/software/emacs/manual/mh-e.html
Read in Emacs with
M-x info-display-manual RET mh-e RET.Complete documentation for the MH-E Mail User Agent.
Reingold, Edward M. and Nachum Dershowitz. 2018. Calendrical Calculations: The Ultimate Edition. Cambridge, UK: Cambridge University Press.
The basic reference on algorithms for calculations on dates and calendars, this book originates in Emacs Lisp code written by mathematician Reingold for the Emacs Calendar subsystem.
Ritchie, Dennis. February 12, 2004. An incomplete history of the QED Text Editor. Murray Hill, NJ: Bell Labs. https://www.bell-labs.com/usr/dmr/www/qed.html
Interesting history of the many versions of the QED text editor in which Ken Thompson first implemented regular expressions.
Schulte, Eric, Thomas Dye, Dan Davison and Carsten Dominik. 2012. “A Multi-Language Computing Environment for Literate Programming and Reproducible Research.” Journal of Statistical Software 46, no. 3: 1–24. doi:10.18637/jss.v046.i03 https://doi.org/10.18637/jss.v046.i03
Good overview of using Org Mode for scientific research, covering publication, statistical analysis, and embedded data and source code for reproducible research,
- Selk, Avi. May 4, 2018. “One space between each sentence, they said. Science just proved them wrong.” The Washington Post. https://www.washingtonpost.com/news/speaking-of-science/wp/2018/05/04/one-space-between-each-sentence-they-said-science-just-proved-them-wrong-2/
Somers, James. 2014 May 18. You’re Probably Using the Wrong Dictionary. https://jsomers.net/blog/dictionary
A paen to Webster’s Revised Unabridged Dictionary, 1913 edition.
Stallman, Richard M. 28 Oct 2002. My Lisp Experiences and the Development of GNU Emacs. San Francisco: International Lisp Conference. https://www.gnu.org/gnu/rms-lisp.html
Stallman’s personal history with Lisp and how it fits into the Emacs story.
Stallman, Richard M. 1981. EMACS: The Extensible, Customizable, Self-Documenting Display Editor. https://www.gnu.org/software/emacs/emacs-paper.html
An extremely interesting article on the design of Emacs. Predates GNU Emacs; covers the original TECO Emacs and Lisp Machines Emacs.
Stallman, Richard M. 2020. GNU Emacs Manual. Cambridge, MA: Free Software Foundation. https://www.gnu.org/software/emacs/manual/emacs.html
Read in Emacs with
M-x info-display-manual RET emacs RET.The authoritative user’s reference; also a fine introduction. The complete text is available in Emacs via Info; type
C-h rto read it.
Steele, Guy L., Jr., Richard M. Stallman, Mark R. Crispin, Raphael A. Finkel, Donald R. Woods and Geoffrey S. Goodfellow. 1983. The Hacker’s Dictionary: A Guide to the World of Computer Wizards. New York: Harper & Row. http://www.catb.org/~esr/jargon/
The first published book version of the famous Jargon File, the glossary of the lingo of the hackers of the Arpanet era, including MIT’s TECO and Emacs hackers. An amazing, hilarious, and important historical document. See also Raymond’s New Hacker’s Dictionary; the URL points to his online version.
- Stephenson, Neal. 1999. In the Beginning … Was the Command Line. New York: Avon Books. https://web.archive.org/web/20180218045352/http://www.cryptonomicon.com/beginning.html
- Thompson, Silvanus P. 1911. Calculus Made Easy: Being a Very-simplest Introduction to Those Beautiful Methods of Reckoning Which Are Generally Called By the Terrifying Names of the Differential Calculus and the Integral Calculus. London: Macmillan.
Wiegley, John. 2020. Eshell. Cambridge, MA: Free Software Foundation. https://www.gnu.org/software/emacs/manual/eshell.html
Read in Emacs with
M-x info-display-manual RET eshell RET.The authoritative reference on Eshell.
Wood, Randall. 2011. The Woodnotes Guide to Emacs for Writers. http://therandymon.com/woodnotes/emacs-for-writers/emacs-for-writers.html
Probably describes Emacs version 23.2. A tutorial specifically for non-programmers, emphasizing topics like “Foreign Languages and Foreign Characters,” “Occasional Diacriticals,” “Writing in a Foreign Alphabet,” “Inserting Special Characters ,” “Word wrap,” “Reformatting Hard Wrapped Documents,” “Cleaning Up Spacing”.
Zawinski, Jamie. 2000. Tabs Versus Spaces: An Eternal Holy War. https://www.jwz.org/doc/tabs-vs-spaces.html
The authoritative explanation of the debate.
[DeVault, Drew]. [n.d.]. Use plaintext email: Why is plaintext better than HTML? https://useplaintext.email/#why-plaintext
A reasoned analysis of why you might want to read your email in Emacs.
[Krehel, Oleh]. n.d. Ivy User Manual. https://oremacs.com/swiper/
Read in Emacs with
M-x info-display-manual RET ivy RET.Documentation for the Ivy incremental narrowing completion framework for the Minibuffer. Available from GNU ELPA.
Colophon
The version number of this book is 30.2.29; the first two components are the major and minor components of the version number of the Emacs which was used to publish the book, and the third component is the patch-level of the book.
This book is written in and published from GNU Emacs. The text consists of 23,161 lines of Org Mode markup, which, with some helpers, generates all three published versions of the book:
- the PDF version is compiled by Emacs from Org to LaTeX and then typeset with the tufte-latex classes (inspired by the beautiful typography of Edward Tufte);
- the HTML version (which uses Fabrice Niessen’s ReadTheOrg) is compiled by Emacs from Org;
- and the EPUB ebook versions are compiled by Emacs from Org via TEXINFO and the GNU
texi2any(1)command; the Kobo EPUB is generated by Patrick Gaskin’skepubify(1).
Org Mode’s multi-language metaprogramming facility, Babel, is used heavily to automate indexing, hypertext links to the web version of the Emacs manuals, and the many bits of statistical information in the book. The original 1997 version of this book (written in HTML preprocessed by the GNU m4 macro processor) was soon plagued by broken web links and obsolete claims about Emacs; with Babel, all these things are computed automatically every time the document is updated, so the useful lifetime of this new edition should be considerably lengthened.
There are 1,843 lines of Babel code in 7 languages (emacs-lisp, gnuplot, shell, dot, ditaa, python, org), supported by 1,047 more lines of custom Emacs Lisp code.
Everywhere in this book that you see very precise numbers (e.g., “1,843 lines of Babel code”, “427,921 lines of hypertext reference manuals”), those numbers are probably computed by Babel code during publication. (Nice round numbers (e.g. “30,000 lines of Magit source code”) are probably looked up or hand-estimated.)
Graphviz and Ditaa were used for some of the diagrams.
The bibliographic data is maintained in Refer format and the bibliography is
generated by code in my refer-mode package.
Version control is handled by Mercurial via Emacs’s VC (“Version Control” in the Emacs manual).
The publication process is orchestrated by GNU Make and M-x compile.
The RSS feed is generated by Bastien Guerry’s ox-rss.
Previews of the HTML version are made easy by Christopher Wellons’s 100% Elisp
simple-httpd web server.
It takes about three minutes to regenerate any of the versions of this 600-odd page book after an edit.
Photo and Illustration Credits
| Author | License | Description |
|---|---|---|
| Fernandes, Luis | GPL | GNU Emacs Logo |
| Haldir | Public Domain | Emacs + AUCTeX |
| Man with one red shoe | CC BY-SA 3.0 | Photo of Richard M. Stallman |
| Munroe, Randall | CC BY-NC 2.5 | xkcd Password Strength |
| Munroe, Randall | CC BY-NC 2.6 | xkcd Real Programmers |
| Nzeemin | CC BY-SA 3.0 | Ukrainian keyboard |
| Ruban, George | CC BY-SA 4.0 | Photo of Guy L. Steele |
| Vi-alt13ri | CC BY-SA 4.0 | Photo of David A. Moon |
| Licenses | URL |
|---|---|
| CC BY-NC 2.5 | https://creativecommons.org/licenses/by-nc/2.5/ |
| CC BY-SA 4.0 | https://creativecommons.org/licenses/by-sa/4.0/ |
| CC BY-SA 3.0 | https://creativecommons.org/licenses/by-sa/3.0/ |
| GPL | http://www.gnu.org/licenses/gpl.html |
Acknowledgments
I’d like to thank Dave Moon and Guy Steele for inventing Emacs, Richard Stallman for maintaining it and then creating GNU Emacs, Lars Ingebrigtsen for Gnus, Carsten Dominik for Org, and all the dedicated maintainers of and contributors to GNU Emacs.
Closer to home, I’d like to thank Matt Teichman and Elisabeth Long for encouraging me to write this book, David Talmage for EPUB motivation (and kringles), and especially Ann Lindsey for being my Emacs games beta tester and for everything else.
About the Author
Keith Waclena used the TECO programming language for his first paid programming job on a DECsystem-10 at Syracuse University in 1979, and discovered the original TECO Emacs shortly thereafter. Amazed and besotted, he tried to use only Emacs or at worst Emacs-like editors from that point on, continuing to use TECO Emacs on DECSYSTEM-20’s at the University of Chicago, MINCE on a Z80 running ZCPR3, Freemacs on a borrowed 286 running MS-DOS, Gosling and Unipress Emacs on a Sun 3/60 and NeXT cube, and finally GNU Emacs (with temporary excursions into Epoch and XEmacs) on every computer since (whether under SunOS, BSD, System V, Solaris, NetBSD, FreeBSD, Mac OS X, MS Windows, ChromeOS, or Linux). He’s been using Emacs daily for 47 years, and even after writing this book, feels like he’s only scratched the surface.
He is currently a programmer at the University of Chicago Library, coding mostly in OCaml for work purposes but mostly in Emacs Lisp for personal projects.
Footnotes:
The PDF and EPUB versions of this book contain all the links that the HTML version does, so if your reader doesn’t make links obvious by default, you may want to enable that feature.
Some Windows programmers may find a lot of Unix stuff to skip.
And support for many non-Unicode coding systems and languages, including Chinese-BIG5, Chinese-CNS, Chinese-GB, Cyrillic-Alternativnyj, Cyrillic-ISO, Cyrillic-KOI8, Devanagari, English, Ethiopic, Greek, Hebrew, Japanese, Korean, Lao, Latin-1, Latin-2, Latin-3, Latin-4, Latin-5, Thai, Tibetan, and Vietnamese. ISO-2022 is supported, so you can combine different coding systems in the same file.
As of 2026; the original Emacs, GNU Emacs’s predecessor, dates back almost 10 years earlier, to 1976; while GNU Emacs was a complete reimplementation, the two programs are conceptually identical.
Whether Git, Mercurial, Fossil, GNU Arch, Bazaar, CVS, Monotone, RCS, SCCS/CSSC, or Subversion.
This document is written in Org; the HTML, PDF, and EPUB versions are generated from the Org source code.
How many times have you had to take a screenshot of an error message from a GUI application because the text wasn’t copyable?
In particular, C-h, the very important Help character, will probably be
taken as Backspace and will delete characters; the function keys may or may not
work for you (if they do, you can use F1 for Help); and possibly nothing will
work as a Meta key (you can use the Escape key instead).
If you like dark themes (what we used to call “reverse video”), as in
all the screen shots in this book, you can add the -rv option; later you can
make that your default, or choose one of many other dark themes.
Or “visit”, in Emacs lingo…
The splash screen has some helpful hints and clickable links (in underlined cyan); you can click them with the mouse, or navigate through them with the Tab key and use Return (Enter) to execute them.
Try that with vim…
If you like vim’s modal command framework, Emacs has an extremely
powerful vim emulation called Evil.
Prelude is probably the least intrusive of these.
Though if the “old-fashioned defaults” seem unbearable to you, trying a starter kit is better than giving up!
Before I declared Init File Bankruptcy in 2018, my 70K init file comprised 1,874 lines of Emacs Lisp, so I think it’s safe to say I’m not against customization. (My new init file is about half as big.)
See Mailing Lists.
I’ve included my own current Init File, my pre-Bankuptcy Init File, and the starter Init File I recommend in this book.
You could say this is true of any program, but the Emacs user is always aware of this, while the non-Emacs user doesn’t usually think about it at all.
At startup, a fresh Emacs has 1,988 key bindings available.
When I say “clickable” in this document, I don’t specifically mean “with the mouse” (though you can do that if you like); rather I mean positioning your cursor at some location and “activating” it (typically by hitting Return). Emacs is full of clickable text locations that provide links to other locations and various other actions.
But I’m trying to get with the program: it’s worth it.
The Super key is the “other modifier” on your keyboard. It’s usually right next to your Meta key. See The Troublesome Meta Key.
While these differences have a historical basis, today they really come down to Apple versus everybody else. These differences are utterly beyond Emacs’s control.
These are basically the characters on the keys of your keyboard: letters, digits, and punctuation. See What Is Text?.
There’s also C-A (a.k.a. Shift+Control+a or S-C-a) which is a distinct
keystroke (when running in graphical mode), but to keep things simple the
uppercase control characters are by default equated to the corresponding
lowercase control characters. The same is true of the upper-case
metacharacters, etc.
What key is the Meta key? On standard keyboards, it will be either the Alt key or the Windows key. On Apple keyboards, it will be either the Option key or the Command key. See The Troublesome Meta Key.
Really more than 256, since Emacs (in graphical mode) can bind to keys like Insert, Print Screen, the function keys…
C-g is the ASCII Bell or Alert character, originally meant to make a
teletype beep, so it sort of makes sense as the interrupter (especially since
Emacs beeps when you type it).
Technically, the Minibuffer.
Completion is actually much more sophisticated than this; see Completion for details.
Rob Pike’s text editor Acme, from the Plan 9 operating system, is almost unusable without a 3-button mouse, since it relies so heavily on mouse chords.
My personal configuration completely disables all mouse bindings when I’m using a laptop, because it’s far too common for me to generate mouse events accidentally when the heel of my palm brushes against the touchpad, which drives me crazy.
Under X on a Unix machine, this actually yanks the primary selection.
Emacs is also happy to edit non-text (binary) files, like images and executable files, and has special modes for this.
But not before: if you visit a new, non-existent file, insert text into it, but then kill the buffer (after reassuring Emacs that you want to discard your edits), the file will not have been created,
Emacs does save-some-buffers implicitly when you exit, as well.
Though you can have Emacs or your window manager resize the entire Frame.
This seems wrong — up is down, down is up: have we gone through the looking glass? — but it’s just because the words describing scrolling are inherently ambiguous.
C-u C-x = will report a lot of interesting info.
Though a few commands will make a distinction between an active and an inactive region, to add utility.
IBM codified this as its Common User Access (CUA) standard; in Mac OS, you use Command+ instead of Control+.
You need a third-party application from the App Store to embiggen the Mac OS clipboard. As of Windows 10, Microsoft users now have a clipboard history; it’s not enabled by default: when enabled, the clipboard history supports up to 25 items.
You would probably just retype “foo” — but imagine larger chunks of text here: whole lines or paragraphs.
There’s also the command M-x append-to-buffer, which works
exactly the same way, except it doesn’t add a newline, so all your chunks will
be mashed together.
And, on Unix machines, the more complex X Selections mechanism.
Except in certain special modes.
M-x customize-group RET paragraphs.
Because now we tend to print formatted documents (e.g., PDFs) rather than plain text files.
S-expression stands for “symbolic expression”.
By default, the last 16 locations; you can change this value by Customizing
mark-ring-max.
You may notice the message “Mark set” or “Mark saved where search started” in the Echo Area when this “convenience Mark” is set automatically.
Put (global-display-line-numbers-mode) in your init file.
Or a function.
Like me until very recently, he said, shame-facedly.
I’m simplifying here: Emacs Lisp has more types than these, and also makes some subtle distinctions that I’m glossing over.
These are pure symbols, not variables, simply because they only need to exist as names and don’t actually hold values.
There’s a way to change the default value too, but only via Elisp.
I can’t imagine why you would want to change this variable, but let’s ignore that.
The word “globally” means the variable is not buffer-local; if it were, it would say “(buffer-local)” instead.
These weird names are enshrined in the depths of Lisp history.
N.B.: in non-graphical mode, it’s impossible for a program to distinguish C-h
from <backspace>, so you’ll need to use either <f1> or ESC x help for help in this case.
A Face is a font with associated styles, such as color and slant; see Faces and Fonts.
Note that this does not include the thousands of third-party packages available in community repositories; see The Package Manager for that.
For now, let’s just say that keymaps hold key bindings, that there’s a global one, one for the major mode, and one for each minor mode in action at any moment, and they’re searched in order from most precise to most general; this is how Emacs customizes keystrokes to do mode-specific things.
“Emacsen” is the official plural of “Emacs”; see also The Jargon File.
Texinfo is a front-end to the TeX typesetting system, specifically designed for software manuals, and can generate PDFs, HTML (single-page or multi-page), and more, in addition to its default of generating Info manuals for Emacs.
It’s actually Chapter 1: Getting Started of the Info manual.
A node could be any number of screens long.
Of course, it’s really a graph; see Hyperlinks below.
Info calls inter-node links cross references.
If you’re not particular about low-level layout details, you can use Texinfo for any kind of book. For an example, see Abelson et al. in the Bibliography.
Technically, and as the command name indicates, this is how many lines are in the current page of the current buffer; see Editing with Textual Objects for information about pages.
N is determined by message-log-max,
1,000 by default.
“Lossage” is an old computer jargon term meaning “the result of a bug or malfunction” (The Jargon File).
Also, one of the best things about Emacs is that it is almost 100% modeless, in the sense of “modal dialog”.
Why would you need to search or spell-check within a one-line response to a question? Well, nobody specifically thought that it would be important to be able to do so: it’s just that the Minibuffer is a buffer like any other, so of course it works!
Well, I’m embarrassed to say I only figured this out recently!
This might occasionally require a superficial knowledge of Elisp syntax, such as quoting.
N is determined by list-command-history-max,
32 by default.
Though Emacs has third-party libraries for that, if you like.
There are many others in the Package Manager; I prefer Selectrum myself.
Or set the Region around this snippet and say M-x eval-region.
It’s published on the EmacsWiki; I wrote a 67-line Makefile to automate downloading and upgrading it.
American Standard Code for Information Interchange.
The funny 2- and 3-letter names in the table are the historic 1967 abbreviations for the official Teletype names of the non-printing characters.
There are many! One Unix utility handles 2,038 different character sets!
Data that doesn’t consist primarily of printing characters is generally called binary data and comes in innumerable formats; one example would be an image format like GIF. Emacs is happy to work with binary data too, but it’s not really its main thing.
As is whitespace in general; see Visualizing Whitespace.
The magic of 80 characters or columns was a holdover from the days of the punched card, which in turn led to computer terminals with screens that measured 80 columns wide.
There’s also the rogue control character, DEL (ASCII 127 decimal), at
the end of the ASCII table. Sorry about that!
As from starting up Emacs with the -rv or --reverse-video option, or
having chosen a dark theme.
I’m sorry to report that these are Octal (i.e. base-8) digits; you’ll just have to trust me that there was a good historical reason for this choice.
On a Unix system, try C-x C-r /bin/date.
I’m using the term data structure loosely here, from the perspective of the Emacs user, not the programmer; really, most of these features of buffers are composed of sets of buffer-local variables.
The “other” window is the window that
C-x o (other-window) would switch to; see Switching Windows.
You can customize which buffers are displayed in the Tab Line, perhaps, say, limiting them to a certain Major Mode.
Of course, Emacs lets you change this default! See
save-some-buffers-default-predicate.
Or you can invoke M-x shell with a prefix argument and it
will prompt for the new name.
You could also say C-h v default-directory.
One usually doesn’t want a buffer like this changing on the fly while
you might be trying to do something in it; it’s at least distracting and might
lead to mistakes. Nonetheless, EIPNIF: you can have this if you want it by saying
M-x auto-revert-mode.
Actually, Emacs will return that memory to the operating system, so even other processes benefit.
During the pandemic of 2020, I used the Emacs on my desktop at work
from home, via emacsclient over ssh, and when I finally rebooted my desktop, that
Emacs had been up for 204 days, 2 hours, 48 minutes, and 55 seconds (according
to M-x emacs-uptime).
Just different enough to be annoying!
Though the key bindings are annoyingly dissimilar; I’ve long intended to sit down and make Ibuffer’s bindings as close to Dired’s as possible…
Dating from 1992 or earlier.
Actually, the next step is to see if the file has a magic number.
(This is the way the Unix file(1) command identifies files.) There are currently
no magic numbers defined in Emacs by default; you can add your own to
magic-mode-alist. But see the related Magic Fallback.
Typically, changing spaces to tabs or vice versa.
Or a Minor Mode; the principles are the same.
Perhaps you want to play a special sound every time you enable a given mode… Who knows what you might want to do!
To be preferred over the older, built-in, Flymake.
Technically called a “lighter”.
Note the solid block cursor of the selected window versus the hollow cursors of the the others in Figure 15.
Well, you can back up by giving C-x o a negative prefix argument as with
C-u - C-x o…
This feature is off by default; Customize
fit-window-to-buffer-horizontally to turn it on.
You can fine-tune these positions by tweaking the variable
recenter-positions.
With Emacs, there’s always a “conversely”…
Even though it’s been around since 1993…
In a non-graphical terminal, which can’t display fringes, a backslash character (\) is used.
I’m also an old Unix programmer-type, and most of the files I work with have short lines.
The Mode Line is actually optional (EIPNIF) —you can turn it off by setting
mode-line-format to nil: but it’s so useful and
has so little cost in screen real estate that I don’t see why you would.
The first line here is an example of a Mode Line; in the second I’m labeling the various components for the sake of discussion.
Only if you receive your mail locally; see Mail, News, and Feeds.
The Menu Bar, Tool Bar, and Vertical Scroll Bar are turned on by default, but you can turn them off.
The rules are slightly different if you’re running the Emacs Server.
For Unix users running X Windows, you can also open new Frames on other X displays or servers; see “Multiple Displays” in the Emacs manual.
I find these to be excruciatingly slow if you run the Emacs Client over a network connection to a remote machine (and anyway, Emacs Completion is far superior to any GUI dialog box).
You’ll recall that C-x 4 is the keymap for commands that do things in
other Windows, and C-x 5 is for other Frames.
I suppose you could instead disable
auto-save-mode, but I mean, just make the directory
already.
The easier-to-type ffap is defined as an alias for find-file-at-point.
Apparently I have 1,059 of them in this book at the moment (almost all URLs).
A typical minified Javascript file on my system is only 3M in size — not any kind of problem for my Emacs — but contains lines as long as 657,440 bytes.
I’ve even known people in this situation to exit Emacs, answer “no” to the “Save file?” question, and then restart!
Actually, if you’re not using Version Control, you can use your Backup
file to recover an older version; the best way is via M-x ediff-backup.
Though it may sneak in a single backup file if you modify the new file before you add the file to the repo; you can delete this backup file once the file is checked-in and version control is managing it.
Even in a version-controlled or temp directory.
If you visit a symlink to a file you’re already editing, Emacs will figure this out.
I hope you didn’t use Vim in a terminal to make a quick change to that file…
Remember, save early and often!
Remember, that other user is you!
If Emacs isn’t familiar with your favorite compression tool, you can
customize the variable jka-compr-compression-info-list.
You’ll need to install GnuPG from your operating system’s package manager.
In this tar-mode buffer, that’s
tar-extract; it’ll be an analogous function for another
type of archive.
There is a 3rd-party Emacs package available in Melpa-Stable called PDF Tools that provides enhanced handling of PDFs; see below.
MuPDF does a better job on PDFs than GhostScript, so its a good idea to install it even if you already have GhostScript installed.
nov is a 3rd-party Emacs package available from the Melpa-Stable
repository.
In an EPUB’s nov-mode, the command for this is a (nov-reopen-as-archive).
doc-view-mode renders all the pages at once into temporary files (though it
pops up the first page as soon it’s ready).
In alphabetical order.
The Dired Buffer will be opened automatically in the background if you don’t already have one.
If it’s an animated GIF.
Or as Emacs calls it, coding system.
Which is what makes the addresses along the top and the left of the hex dump display so useful.
On Microsoft Windows, where ls(1) doesn’t normally exist, Emacs
emulates it in Elisp.
But see Writable Dired, below.
If that tar archive already exists, it is updated so that its contents match the current state of the subdirectory.
This double confirmation of mass deletes really appeals to my paranoid nature.
By default, LaTeX detritus; you can customize
dired-garbage-files-regexp and add your own detritus.
You can override this by giving a command a numeric argument of 1,
which will force it to operate on the current line (actually any numeric
argument overrides the marks and operates on the given number of files at
Point).
This is assuming that the new files are visible in some Dired buffer. You won’t see any marks if you can’t see the new files.
Or, if they happen to be contiguous in this directory, we can put
Point on the first and say 2 % R.
But then you really need to be familiar with regexps to be an Emacs (or Unix) user.
You can also commit your changes by toggling back to read-only with C-x C-q.
Or just kill the Dired Buffer.
Actually, in an abundance of caution, it will be flagged for deletion
with a D, and you can x it after exiting Wdired.
In another abundance of caution, this feature is off by default. You
can enable it with M-x customize-variable RET wdired-allow-to-change-permissions RET.
A couple of handfuls, those are…
For your first try, make sure there are no Dired marks in either directory.
The -l option is mandatory.
But only if the * is surrounded by whitespace.
Note that this is not the usual shell interpretation of its ? wildcard!
Though Dired’s % C command is perhaps an easier or more natural way to do that.
You don’t have to carefully mark only image files, so the quickest way
to see thumbnails for everything in the directory is to mark all the files with a
simple U t ( dired-toggle-marks).
Note that locate(1) only works if your system is regularly updating its
database; this is outside of Emacs’s purview.
These are the colors I see in my reverse-video color scheme; they may be different for you.
To search in the reverse direction.
Which is just what you normally do to insert a non-printing character in any Buffer; see Quoted Insert.
Emacs calls this case-folding.
Emacs calls this character folding.
“Typically” and “usually” because of course Emacs allows you to declare
that _ is part of a word in any given buffer or Major Mode.
Though not always with highlighting as sophisticated as Emacs’s.
This is also bound to the less felicitous M-g n.
The usual Emacs “finish up” or “I’m done” key binding.
E.g, C-u - M-%.
The non-mnemonic SPC, DEL, and RET keybindings are what we old-timers
are used to.
As for Isearch, any other Emacs command will also end the
query-replace, without replacing, and be immediately executed.
It may seem odd to you that the numbering doesn’t start at one, but programmers tend to start counting from zero.
You could also do this task with a Keyboard Macro, but a Query Replace will be simpler, and will also always run faster.
If the scope of your grep is large, it might take minutes to finish.
That’s a backtick, not an apostrophe.
Though you can always change that!
That is, files compressed by the gzip(1) program.
Note that Dired’s A command doesn’t actually use the Grep facility, but
rather the related Xref facility.
You won’t get line numbers without the -n option, and note that by
default, no FILENAME is output unless more than one file is named on the command
line; you can toss in /dev/null to achieve this state; the GNU implementations
support a -H option that assures the presence of the FILENAME.
A string is what programmers call a sequence of characters; foo is a 3-character string, a sequence of characters is a longer string.
As far as I know, Thompson invented the common basis of the modern syntax of Regular Expressions.
Except for newline: dot doesn’t match newline.
Really, from Buffer to Buffer.
We’ve all been there…
However, the third-party package undohist will persist the undo history
of all your file-visiting Buffers across sessions.
Myself, I have never hit these limits. At least, I’ve never noticed it!
And why you shouldn’t take notes in non-file-visiting Buffers; see Ubiquitous Capture.
Other tools for mass edits include Rectangles and the third-party Multiple Cursors package.
Possibly the Minibuffer…
Interestingly, I used a Macro to generate this list of steps from the recorded Macro definition!
I learned C-x ( and C-x ) decades ago and didn’t really know
anything about <F3> and <F4> until I started researching this chapter…
Well, you can set kmacro-ring-max to be as big as
you like; the default is only
8, which has always been plenty
for me.
I know, “next” gets “previous”? Is the snake eating its tail or is the tail being eaten by the snake? Everything is relative.
The C-k has to be entered immediately after a C-x C-k C-v or else it’s
just a normal C-k (probably kill-line!).
Of course, you can always reach out to Elisp within a Macro via
M-: (eval-expression) and the like.
Practically speaking, if you really just want to number lines, the
easiest way is with C-x r N (rectangle-number-lines); see Rectangles.
If you call it outside of definition mode, it will set the default format for all subsequent Macro definitions.
Or a handy shortcut, if you’re feeling generous.
Elisp has two built-in debuggers.
I was certainly surprised when I discovered this in writing this chapter!
You have to have named it first…
The Verlaines: “Anniversary” (Some Disenchanted Evening, 1989)
Presented, somewhat annoyingly IMHO, in a “cleaned up” form, with hyphens replaced by spaces and all components capitalized.
Either with the mouse or by moving Point to the button and hitting RET.
You can’t just make up a name; it needs to be a correctly spelled official color name for your OS, like say PapayaWhip.
Mmmm… salmon…
“ELPA” stands for Emacs Lisp Package Archive.
It’s also extremely easy to set up a personal repository.
Welcome to computer programming!
This is somewhat outside the control of Emacs, depending on your operating system and how the program running as a subprocess was written.
After all, batteries occasionally run down while your computer is asleep.
Your OS window manager is in charge of exactly where each restored Frame ends up on your screen; Emacs can only suggest locations for them.
I suppose that happens…
The message tells you the PID so that you can check this.
Always good practice: I do this all the time.
Admittedly this may take a little familiarity with Elisp and the debugger.
Such system-wide customizations probably don’t exist on single-user machines.
This feature dates back to at least 1998.
Actually, my favorite Czech composer is Erwin Schulhoff.
There’s also the older auto-complete framework, which has
44
backends, but auto-complete is old and buggy, and I can’t recommend it.
In a non-transient Buffer.
You can store a filename as a string with C-x r s but that counts as
text to be inserted later, not as a filename to be visited.
How do you type that bullet character? See International Character Set Support.
Or its Bookmark name, if you’ve already bookmarked this file with a name that’s distinct from the filename.
I’ve never used this feature; I think it would be more useful with a better user interface in the Bookmarks menu.
I guess I just explained it there, didn’t I?
But see below for saving your Abbrevs across sessions.
The Active Region isn’t supported, I suspect because the Abbrev commands long predate it.
Like, when you’re writing about “sk” being an abbreviation for Székelykáposzta, for example…
: The “GNU” stands for “GNU’s not Unix!”.
A Face can also override the font’s Width, Height, Weight, or Slant.
The success font visible in Figure 42 is just the
default font in bold with a bright green foreground color.
I use with-demoted-errors so my Init File will still work even if I haven’t
installed my preferred font (which is not actually Helvetica).
Strictly speaking, a Theme can customize Variables as well as Faces.
Remember, a symbol is like a word, but customized in programming language Major Modes to match the language’s notion of a variable or function name. In ordinary text, you can use this command to highlight words.
Especially with a proportional font, in my opinion.
I’m looking at you, Python…
Season 3, Episode 6: “Bachmanity Insanity”.
Formfeeds are excluded by these commands to preserve their usefulness in separating files into pages.
And many more formats…
I say typically because this is very malleable command whose exact behavior depends on the Major Mode and the values of various User Options.
Actually, the value of tab-width is used.
Including full programmable spreadsheet capabilities, for example.
Unicode has four or five more encodings, depending on how you count them.
These mnemonics come from those used in the TeX typesetting system.
For me, non-English…
Coding systems also come into play at the interface of Emacs and another process, Emacs and a filename, or Emacs and a terminal; see “International” in the Emacs manual.
Thanks, history…
Including Linux and the BSDs.
Though not so recently that you will never encounter a file with lines encoded “the wrong way”…
Previously we used the ange-ftp package for this; it
still exists, but the much more powerful Tramp package has handled
remote editing since 1998.
As an ssh’ing Unix user…
rsh, rcp, telnet, and nc (netclient).
Of course you’re now wondering, “how large is ’large‘?”. Unfortunately it depends on the speed of your local computer, your network connection, and your remote computer, so only personal experience will tell.
Instead of using Emacs as your mailer…
I would hope…
You can’t use C-x # because, since you gave no filename, emacsclient
isn’t waiting for you to finish.
N.B. if you have images or PDFs in the remote Emacs, they’ll work fine too.
Which is always running its own local Emacs with its own Server.
It’s possible but unconventional to run multiple servers on the same machine. See “Emacs Server” in the Emacs manual.
You can force a shutdown with M-x server-force-delete if
you really want to.
If you live in Emacs the way I recommend, this can happen even if you don’t run the Server.
Such as rich markup, hyperlinks, attachments. tagging, TODOs, agendas, etc…
This book is an Org Mode document.
And you can always export Org to Markdown if you need to talk to outsiders.
Like “This chapter is about folding text.”
A lot more in the case of, for example, the spreadsheet…
Just like I’ve done with this book.
If you read your Email in Emacs…
Though you can if you want, thanks to plain text.
You can also turn on automatic recalculation if you like.
Many languages require functions to be defined before they’re used, so a purely top-down presentation means reading the program backwards.
I make 1,589 Org source block function calls in this book; I don’t want to say “yes” that many times every time I export it.
Or installed as interpretive script files.
And even Org Mode itself, for some recursive twistiness.
GitHub only supports the most basic Org markup features, however.
Whether or not it’s visiting a file.
If it doesn’t, you need a different book…
I.e. non-PostScript printers, even ancient dot matrix printers or line printers. Though I’ve also encountered PostScript printers that are too snooty to print plain text and insist that it be converted to PostScript first.
In my workplace, our printers are actually networked photocopiers that speak PostScript.
FYI, you don’t want to name your alias print, which is the name of an
important low-level Lisp function…
That’s why you use them instead of Unix, right?
Your system may use an entirely different command; if you can print from the command line, you can configure Emacs to use it.
AKA “command-line optons”…
And used to execute other kinds of code, like Java applets and Flash.
That is, a function that returns true or false.
As you ideally would for every phone app you install…
Or, move it so it is the first member of the list.
By which I mean, the file format can’t cope with that.
I’m afraid I fell into this category until recently…
This is a bit of a simplification…
Applying when a comment takes up a whole line.
If you want to set them to on, you’d use the value t, which is the
conventional value for “true” or “on”—but actually, in Elisp, any non-nil value counts as
true.
I just made that up…
Technically, three events…
Non-Lispers think LISP stands for “Lots of Irritating Superfluous Parentheses”. Yawn.
Though you’ve already seen hundreds of function names with hyphens in
this book: all the M-x commands are functions, of course.
Actually, all functions can be invoked by the user, e.g. via
M-: (eval-expression), which lets you invoke arbitrary Elisp
expressions from the Minibuffer.
There are 2,305,843,009,213,693,951 possible positive integers in Elisp. (Okay, more, actually…)
Or 50-odd, if you’ve loaded the optional packages that I have.
No expressions at all are also valid, but can only implement a function that does nothing: what programmers call a no-op.
Invented by the Polish logician Jan Łukasiewicz in the 1920s.
This will usually be 1, which we could have written instead of
(point-min) — unless the buffer is narrowed: (point-min) takes narrowing
into account, and so is the correct code.
How does she do it?
Via your preferred Emacs IRC client, of course.
You can use TAB completion on both the command name and any filename
arguments.
You can have the time of day (and the system load average) displayed in
the Mode Line by putting (display-time) in your init file.
(setq shell-file-name (executable-find "bash"))
It’s probably nicer to use M-x delete-file instead, which
has some extra features. (It’s tricky to come up with good examples of external
command usage because for most common possibilities, Emacs provides a better
native way to do it!)
I.e. terminates with a non-zero exit status.
There’s a better way; see below.
By default, less than \(1/4\) of the height of the current frame; this is
max-mini-window-height.
(setq shell-command-dont-erase-buffer t)
Of course, Emacs can directly count the words for you with
M-x count-words-region (also on M-=); I said it was hard to think up
examples that you need to do with external commands!
But again, you’d really do this with C-x C-u (upcase-region)…
And frankly, I have no idea how this issue translates to Microsoft Windows.
For those familiar with Unix system calls, a program that opens the terminal in cooked mode and flushes properly may work, but raw mode programs probably won’t work at all.
But guess what? Emacs has a terminal emulator. Several. See below.
Emacs can display PDFs itself, but I’ll admit that an external PDF viewer might occasionally be a better choice.
Alternatively, you can use M-! but append an
ampersand & to the command — the same thing you’d do in the shell; there’s no
difference between these two approaches: M-& just appends the ampersand for
you.
This assumes these commands have those exact names and behave the way
they do in a “normal” shell, e.g. bash. If this isn’t the case for your shell, you can
fix it with some customizations.
Which also doesn’t really suit me! Tough problem.
Actually, there are third-party packages that allow this.
man(1) needs extra convincing; hence the setting of MANPAGER.
Almost as tricky as figuring out how to exit vim!
Not real Emacs “Modes”; the sub-modes are just clever manipulations of
the term-mode major mode.
Another way Emacs saves you money?
emacsclient doesn’t support the same -f option. But hey,
what are you doing outside of Emacs anyway?
I always want fixed-pitch fonts here and have Customized
shr-use-fonts.
I disable all web page color choices by Customizing shr-use-colors.
Surprise! I like images. But a quick M-I can be very handy to vanish
those pointless stock-photo web header images.
I.e., whatever xdg-open(1) would run.
The official birthday of the Unix operating system.
N.B. we only use degrees and minutes, don’t specify seconds.
Feel free to change the display if your second date isn’t visible.
The Package Manager has packages defining holidays for an additional 21 countries or religions.
Crucial information for any programmer…
And will be with my recommended setup.
The Org Agenda uses the same notification system.
Unix users should make sure D-Bus is enabled.
I’ve never heard of this one! Apparently a front-end to RCS?
Neither an Emacs Major Mode nor Minor Mode here…
Emacs allows this message to be empty, if your VCS (and boss) doesn’t object.
My personal favorite…
Though I use Ediff daily in other contexts.
Admittedly, many of the C-x v bindings are not very mnemonic…
You’re not required to do the log command before doing a push or pull.
But who wants to delete a cute cat picture?
There are more that I haven’t listed; use C-h m.
Usually the hated vimdiff(1)…
If you don’t know which file is newer, it doesn’t matter which you name first.
Technically, this is the Unidiff format generated by running diff(1)
with the -u; in my opinion, this is by far the best format.
I use both of these.
Like Arch Linux’s pacdiff(8).
I.e., the output of diff(1).
It effectively diffs the .orig file patch creates against the newly
patched file.
I actually find that very surprising…
Or instead, set the region around the entire with-eval-after-load sexp
and say M-x eval-region.
Just say M-x package-install RET ampc RET; you only have to do this once.
And I’ve written two of my own (which I no longer use)!
Status report: he now uses Gnus as his MUA, but still uses Notmuch for his archives.
Emacs is as secure an app as your web browser; the “less secure apps” setting is about installing other apps from your phone’s app store that might want to access your email. So just pay attention to app permissions if you enable “less secure apps”.
Usenet is still around, in a sort of underground way, and Lars generously built a free service that uses the NNTP protocal to allow you to read thousands of mailing lists without the bother of actually subscribing to them.
See https://killedbygoogle.com/ for examples.
RSS and Atom are the two main syndication data formats.
And some lazy sites don’t even have a summary, just a headline…
The complete opposite of having something like Google Reader yanked out from under you.
Which are actually using the vast majority of my memory.
A passphrase is just a long, multi-word, version of a password.
Passwords can be cracked faster every year… stupid computers…
You’ll need to install GnuPG via your operating system’s package manager.
The name of the program is GnuPG but the installed command is usually gpg(1).
Though Emacs doesn’t insist on this; EIPNIF.
One of the most important mathematical breakthroughs of the 20th century, IMHO.
With public-key encryption you’re effectively using the same passphrase for all your files, too.
Which presumably you’re already using for all your web accounts.
For the sake of avoiding spam I’ve elided the 100-odd keys for non-corporate individuals from my key ring.
Confusingly, “PGP” was the name of the free software that preceded GnuPG (a.k.a GPG).
Assuming you have my public key in your key ring.
Configurable outside of Emacs in GnuPG’s config file.
Just invoke: emacs --batch -f dunnet; why you would do this instead of
play it inside Emacs is beyond me.
Non-digital; for the real thing, see EasyPG Assistant.
Can’t your editor?
It’s not a front-end to fortune(6) but rather accesses the fortune data
files directly.
That’s control-period…
Actually Ispell, which is what Flyspell is talking to.
That’s control-comma…
Try looking up “moby”…
Using the same Levenshtein-distance algorithm that a spell checker uses.
“Editing MACroS”
But Turing-complete.
“MINCE Is Not Complete Emacs”.
Albeit probably less as a hobby and more because of the stress induced by social media.
There are many more: “Eventually Munches All Computer Storage”, “Emacs Makes A Computer Slow”, “Escape-Meta-Alt-Control-Shift”, etc, but also “Emacs Makes All Computing Simple”.
You really don’t want to use Emacs without a Meta key, so see The Troublesome Meta Key for how to fix this.
Which is just a longer, and hence stronger, password.
Albeit one with particular properties.
Symmetrically!
I am not pranking you.
It’s a cryptographically secure hash.